Let me guess: You’re wondering how much space you actually need for a functional living room, right?
Here’s the real-world breakdown based on who lives there:
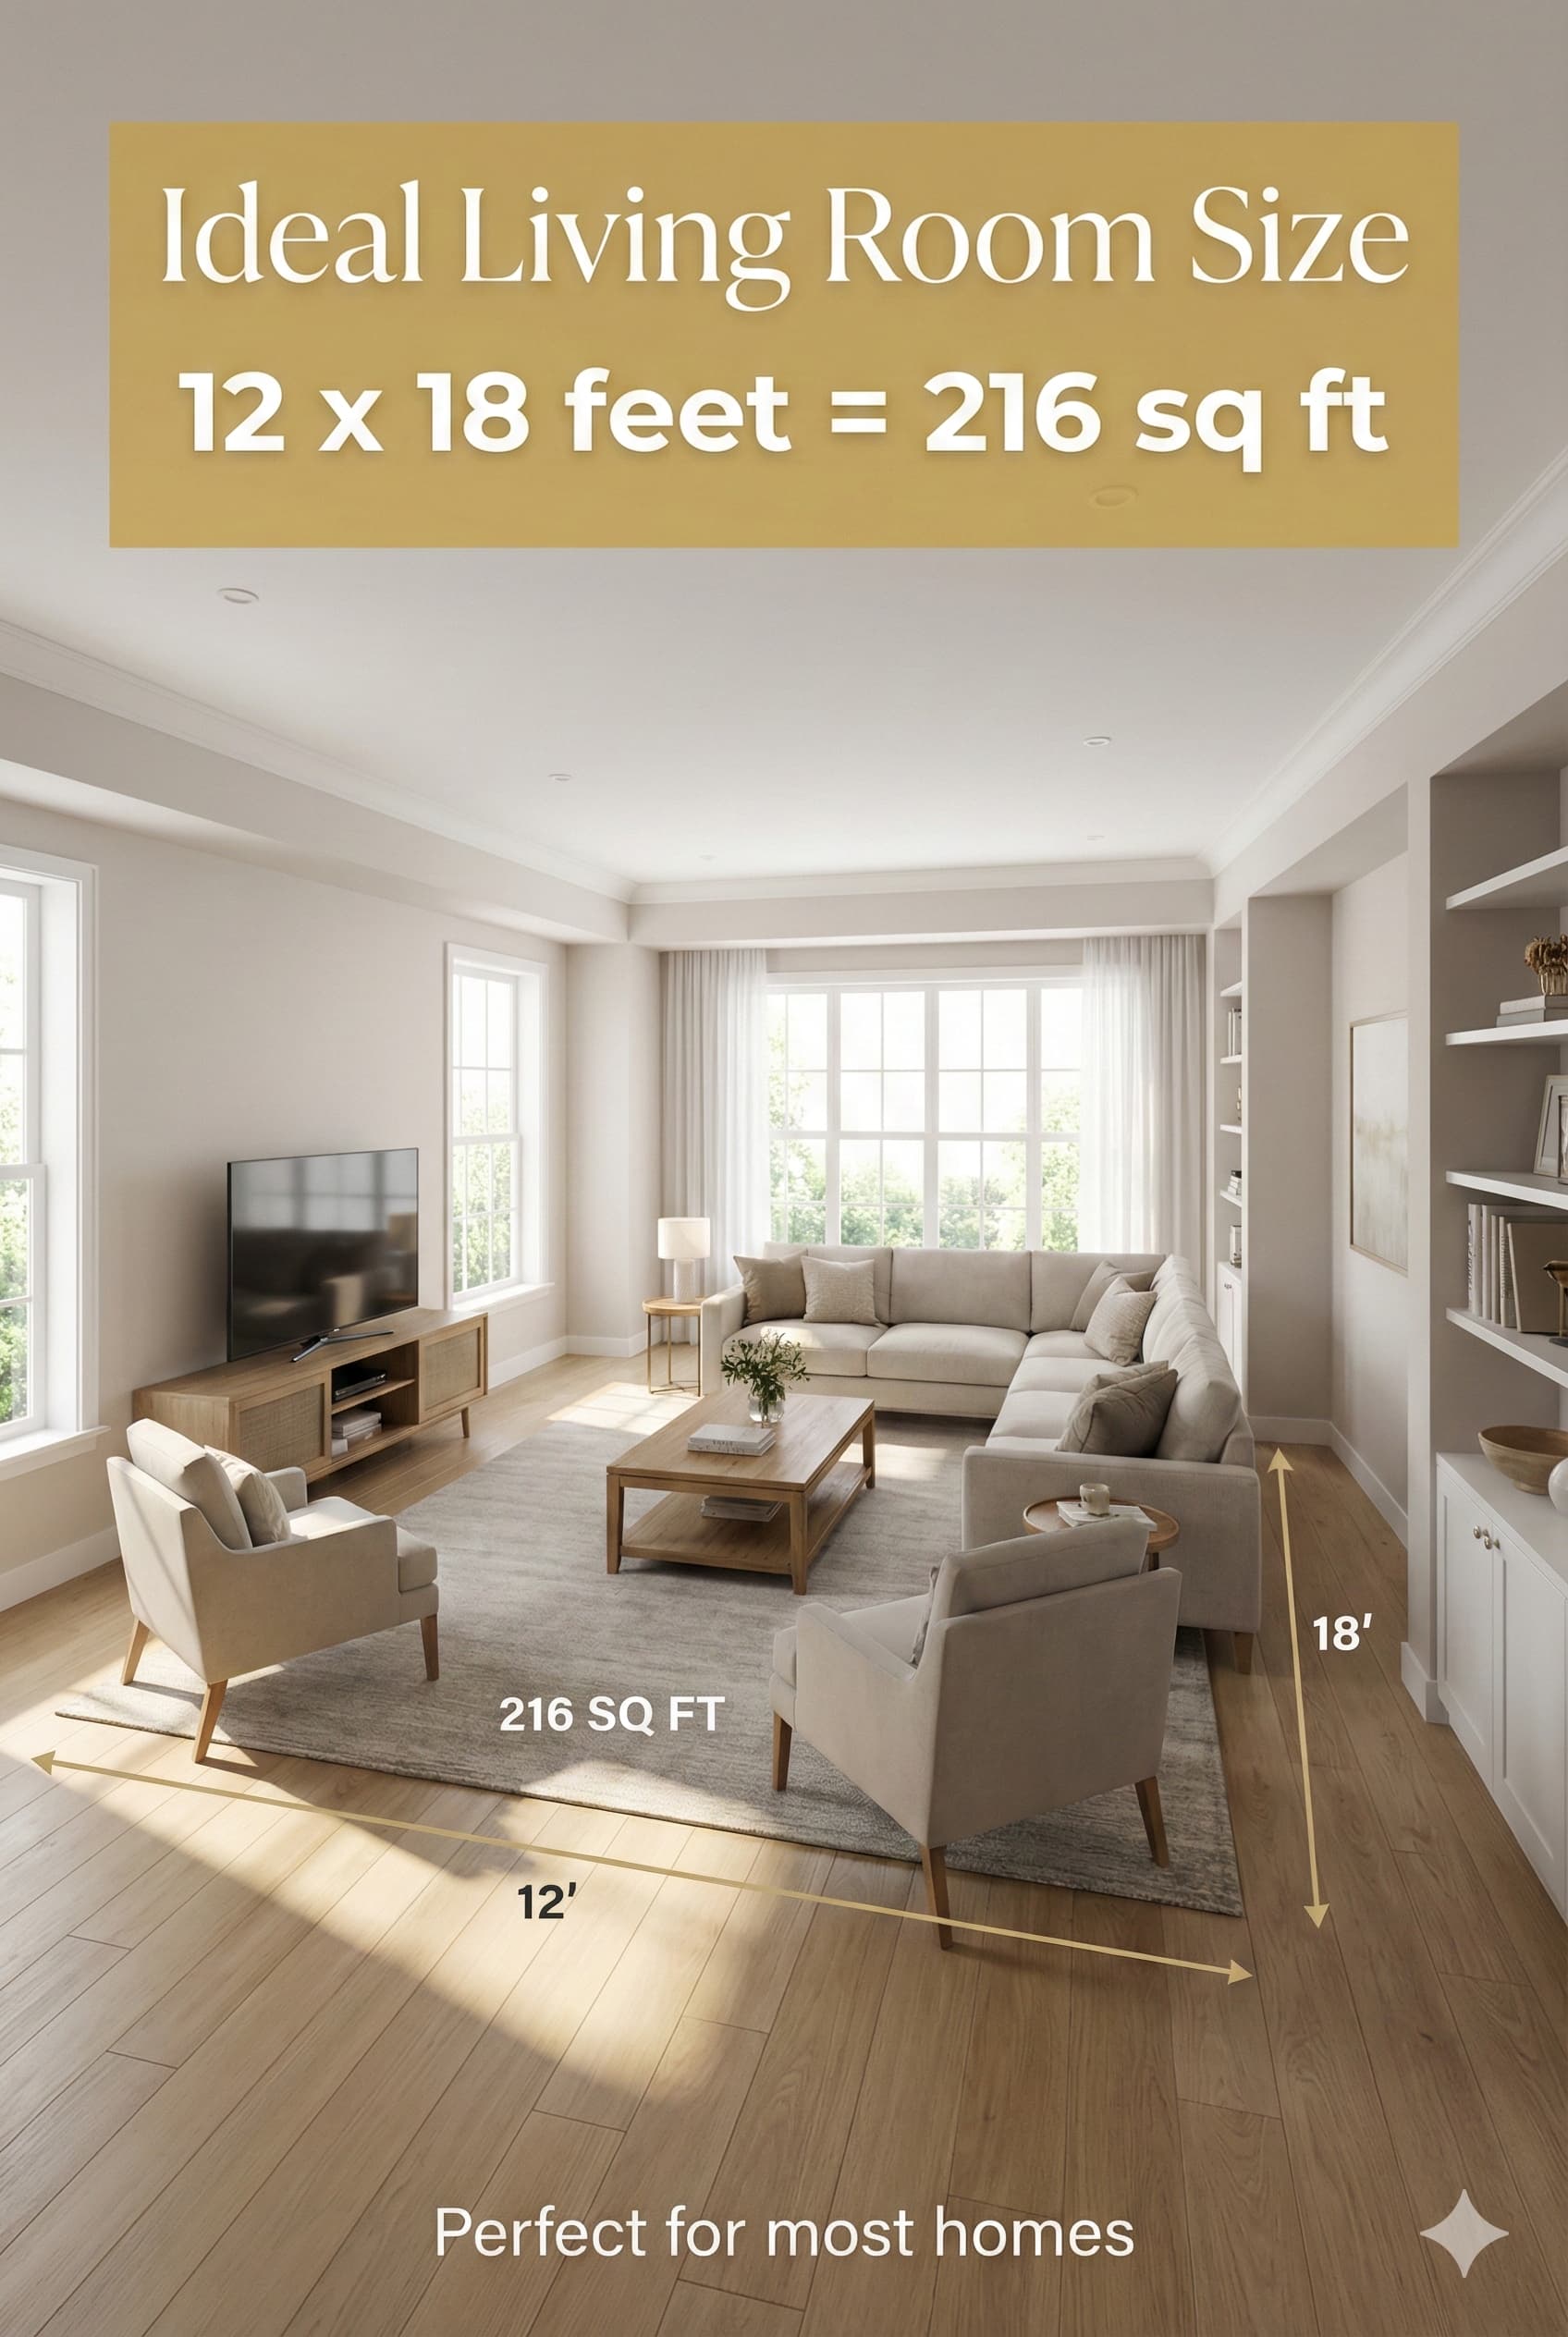
If you live alone: 150-200 square feet works perfectly. That’s roughly 12×15 feet, enough for a sofa, coffee table, TV stand, and your favorite reading chair without feeling cramped.
If you’re a couple or small family: You’ll be happier with 250-350 square feet. This gives you room for more seating (because visitors happen), a proper coffee table setup, and maybe that console table you’ve been eyeing.
If you’ve got multiple generations or love hosting: Go for 350-450 square feet. This lets you create different zones, conversation area over here, TV watching over there, maybe a reading nook by the window.
But here’s what matters more than square footage: How you actually use the space.
Think about your typical evening. Are you sprawled on the couch watching Netflix? Reading while your partner works on their laptop? Playing board games with kids? Each activity needs specific furniture, lighting, and space arrangements. And yes, your living room can handle multiple activities, you just need to plan for them.
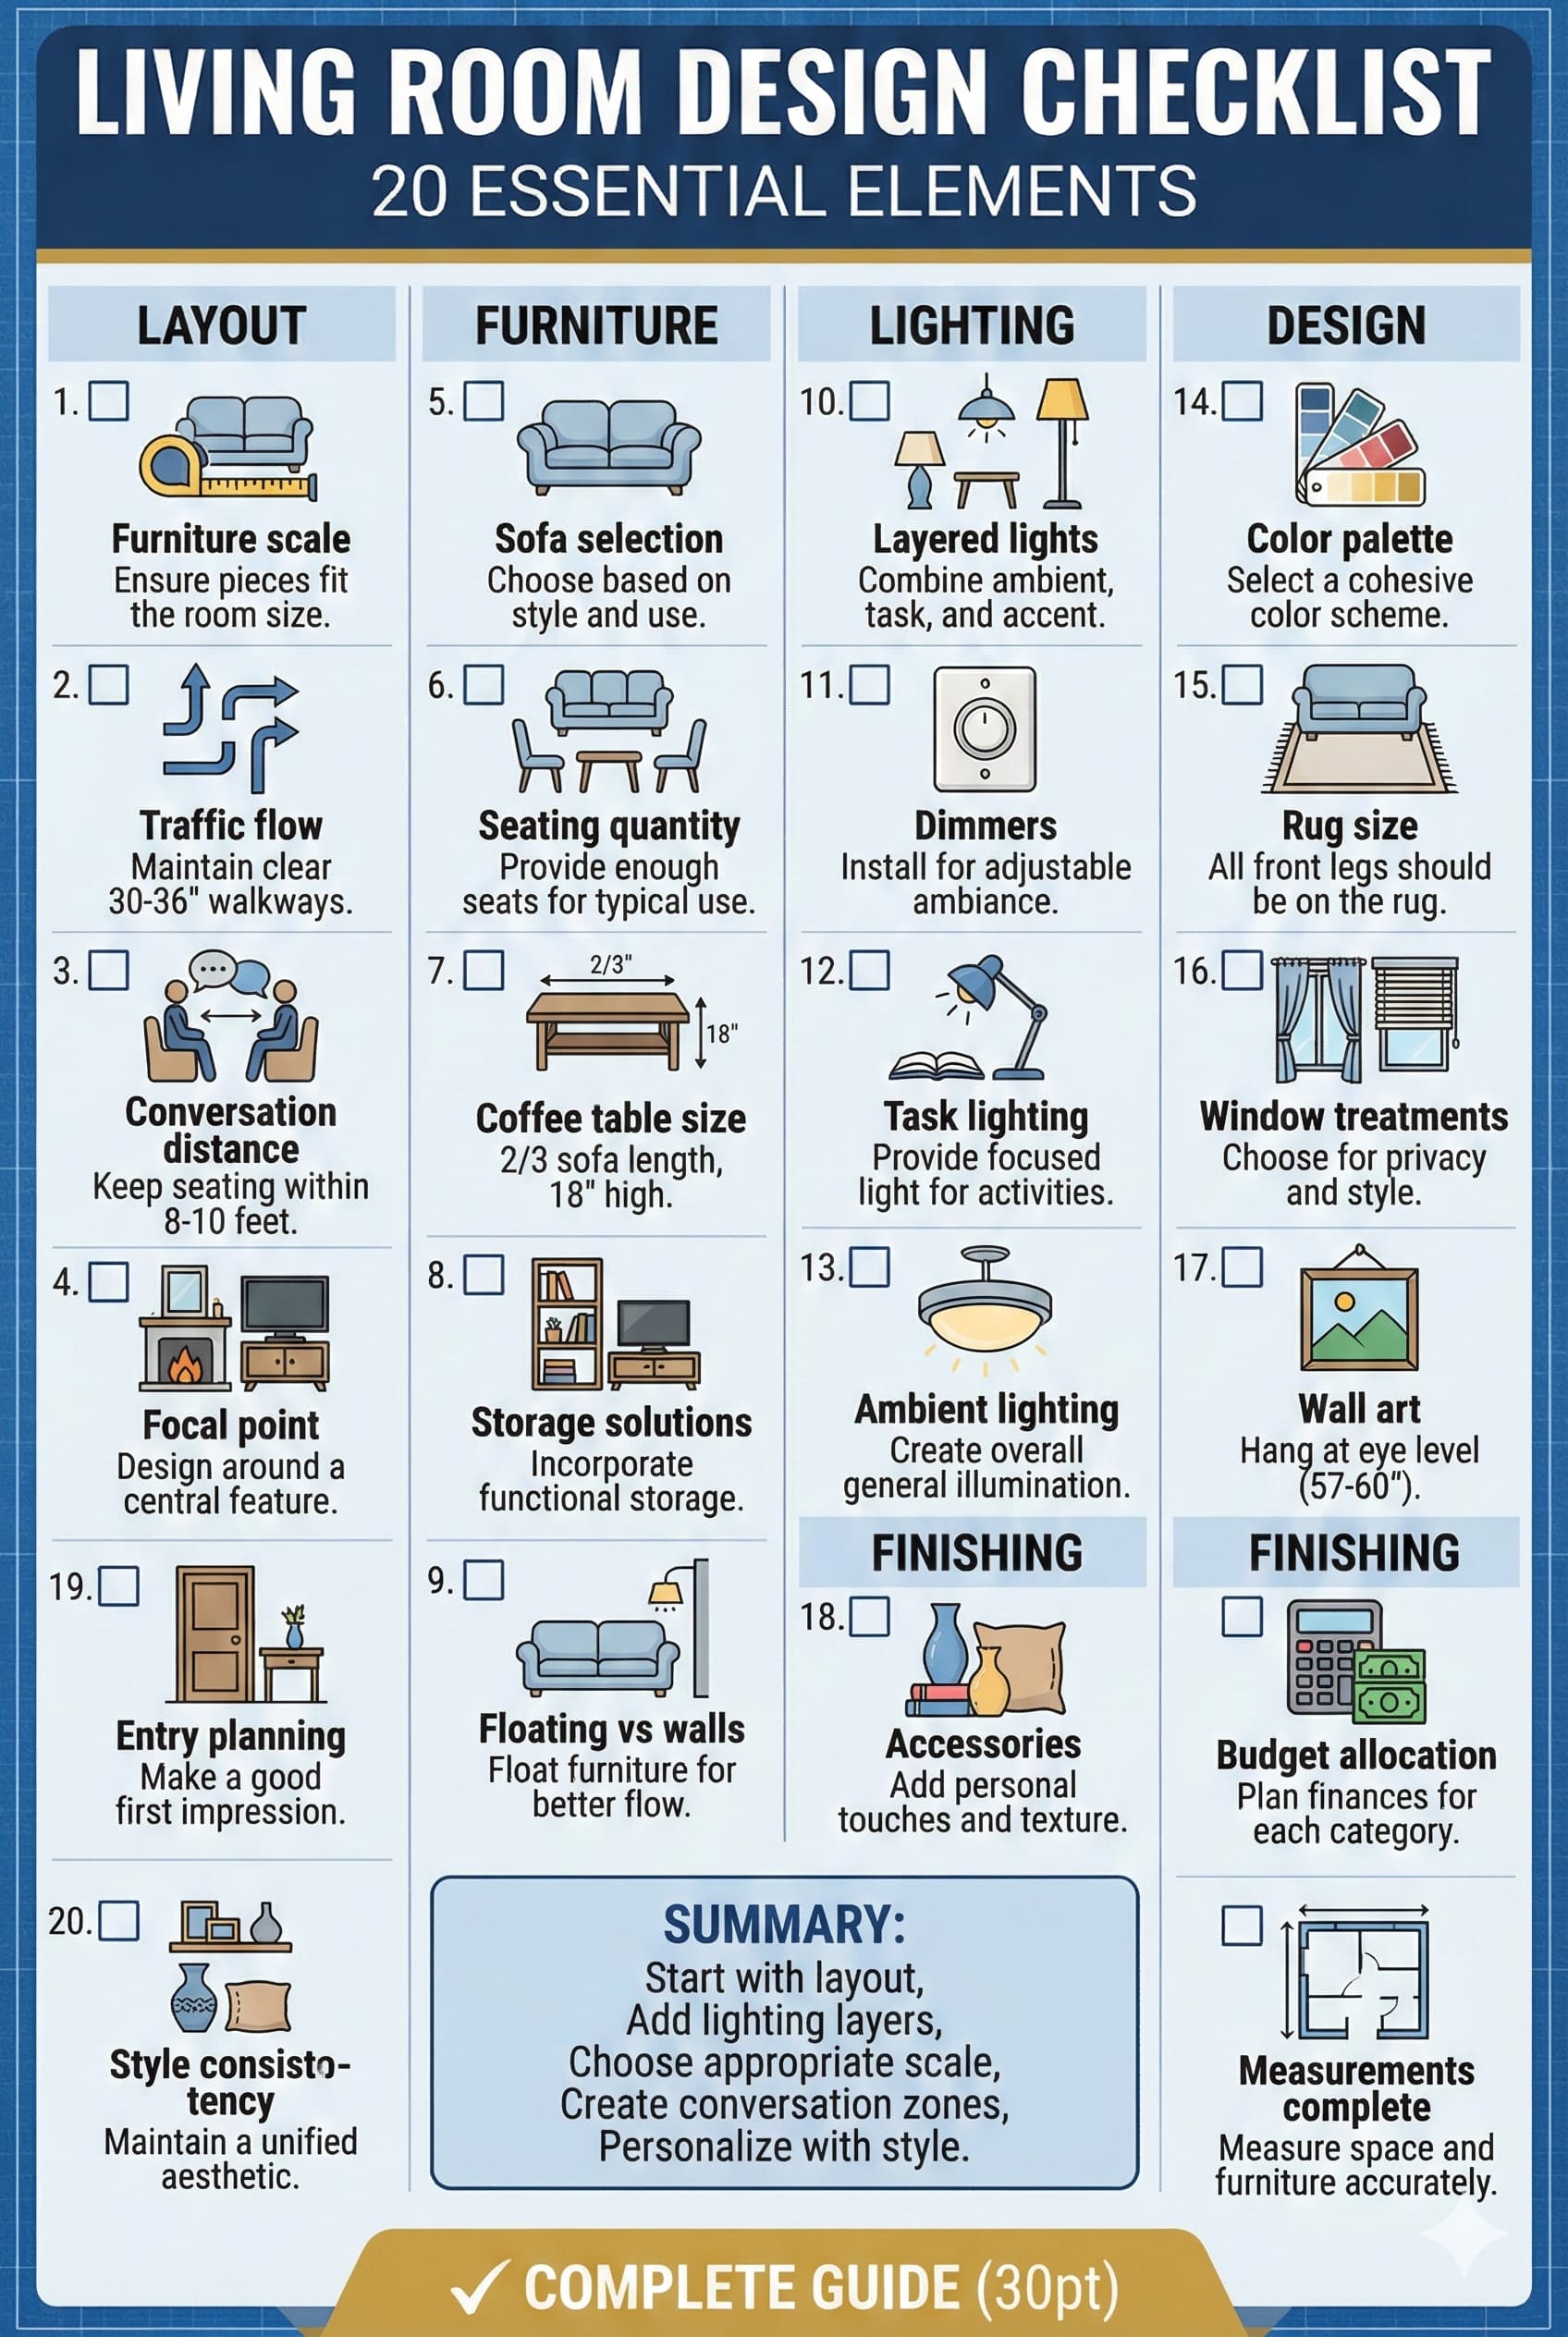
According to professional design standards Functional requirement assessment identifies specific activities occurring in living room spaces including primary functions (conversation, entertainment viewing, reading) and secondary functions (homework, crafts, exercise, gaming). Each activity category requires dedicated spatial allocation, appropriate lighting levels measured in foot-candles, and supporting furniture configurations. Living room furniture arrangement must fit identified activity requirements without spatial conflicts between functional zones.
| Small Living Room | 150-200 sq ft | 4-6 pieces | 3-4 people |
| Compact Living Room | 200-250 sq ft | 6-8 pieces | 4-6 people |
| Medium Living Room | 250-350 sq ft | 8-10 pieces | 6-8 people |
| Large Living Room | 350-450 sq ft | 10-14 pieces | 8-10 people |
| Extra Large Living Room | 450+ sq ft | 14+ pieces | 10+ people |
Living room design styles selection depends on architectural context, existing architectural details, and household aesthetic preferences. Contemporary residential construction typically features open floor plans connecting living rooms to adjacent kitchen and dining areas, necessitating cohesive design approaches across connected spaces. Traditional home design often includes defined living room boundaries with door openings and distinct ceiling treatments requiring contained design schemes.
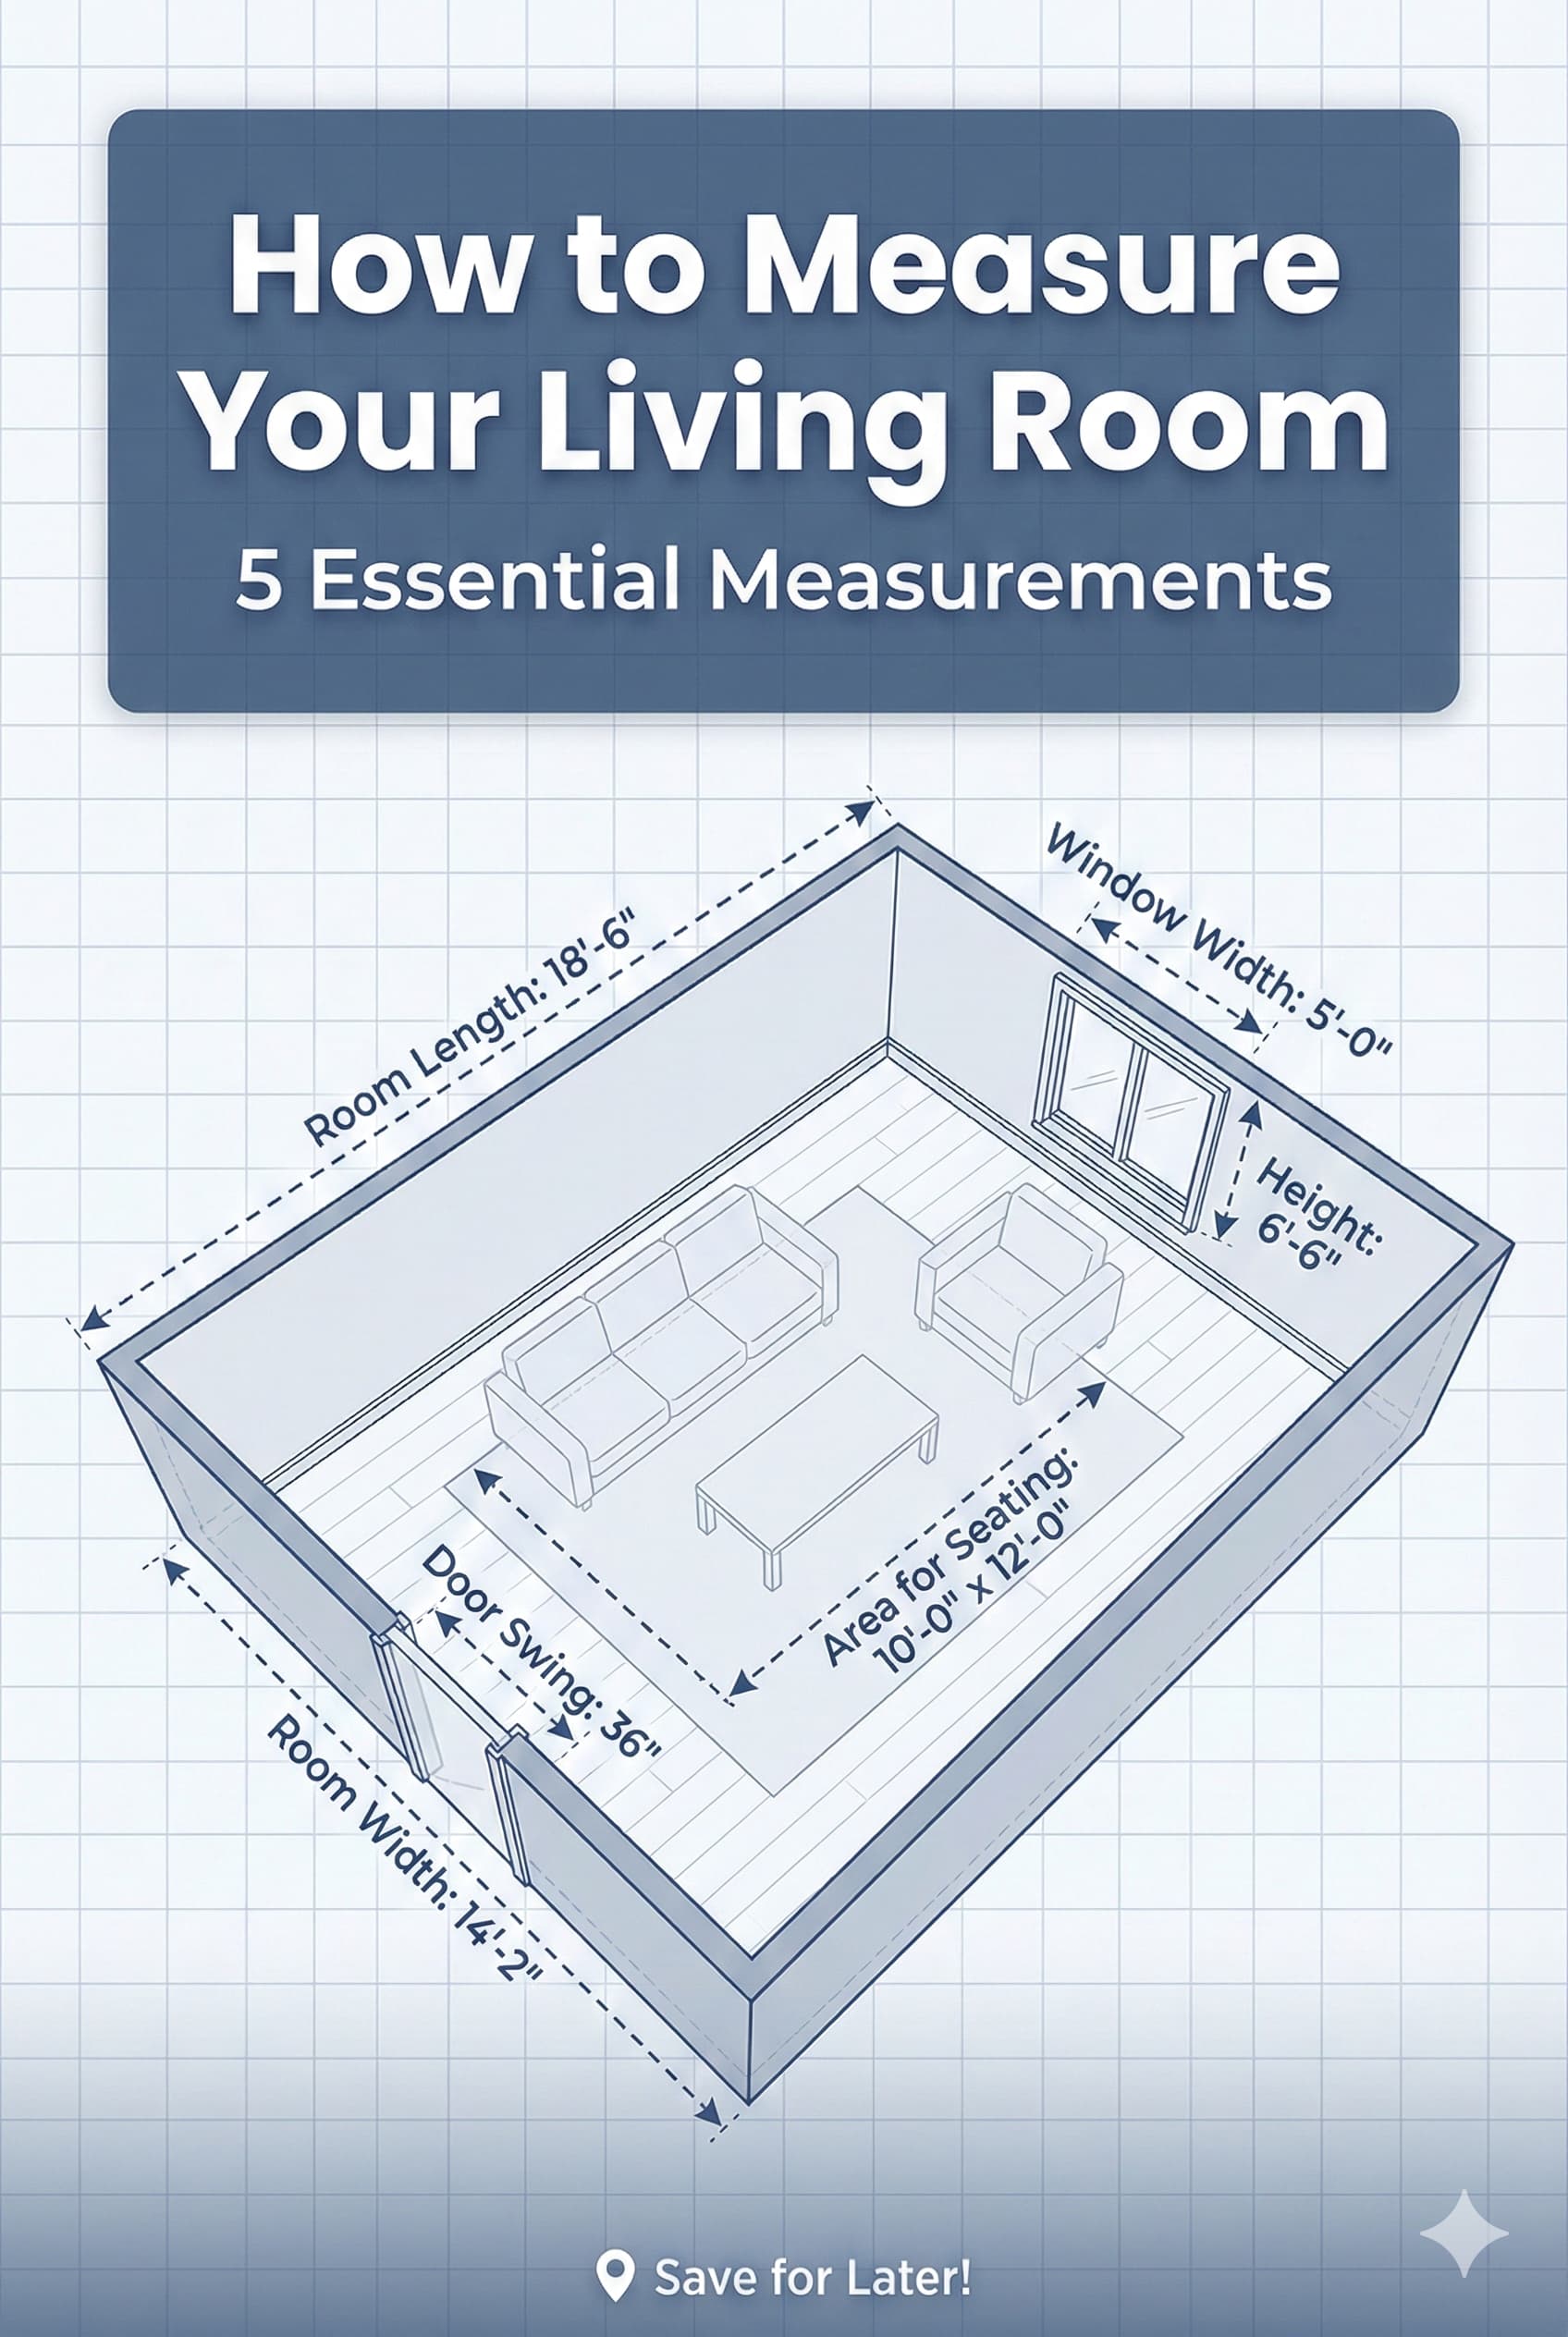
Living room measurement protocols begin with documenting room dimensions using digital laser measuring devices or traditional measuring tapes. Record length and width measurements at multiple points across rooms, as construction variations create dimensional inconsistencies averaging 0.5-2 inches in residential structures. Measure ceiling heights at room corners and center points, documenting variations from standard 8-foot or 9-foot ceiling heights.
Document architectural features including window locations with sill heights, door swing directions with clearance requirements, electrical outlet positions, light switch locations, cable/internet connection points, and HVAC register positions. Window measurements require both rough opening dimensions and actual glass dimensions, as treatment installation depends on frame configurations. Door measurements must include frame width, swing radius, and required clearance space preventing furniture obstruction.
Professional space planning follows industry design standards for optimal room functionality.
| 24 inches | 36 inches | 42-48 inches | Primary walkways | |
| Secondary Path | 18 inches | 24 inches | 30 inches | Furniture access |
| Furniture Clearance | 12 inches | 18 inches | 24 inches | All sides |
| TV Viewing Distance | 1.5x screen diagonal | 2x screen diagonal | 2.5x screen diagonal | 55-65 inch screens |
| Coffee Table to Sofa | 14 inches | 16-18 inches | 18-20 inches | Legroom space |
| Sofa to Wall | 3 inches | 6 inches | 12 inches | Visual breathing room |
Living room floor plans require scaled drawings representing spatial relationships accurately. Professional designers utilize 1/4 inch scale (1/4 inch equals 1 foot) for residential space planning, allowing standard 8.5×11 inch paper to fit rooms up to 34×44 feet. Digital floor planning applications provide alternative approaches using drag-and-drop furniture templates scaled to room dimensions automatically.
Assess existing living room conditions including flooring condition and material, wall surface condition requiring repair or preparation, ceiling condition and height, natural light availability through window quantity and orientation, and artificial lighting adequacy. Environmental factors including HVAC vent positions affecting furniture placement, electrical outlet distribution requiring supplementary circuits, and architectural constraints like structural columns or irregular room shapes impact design planning significantly.
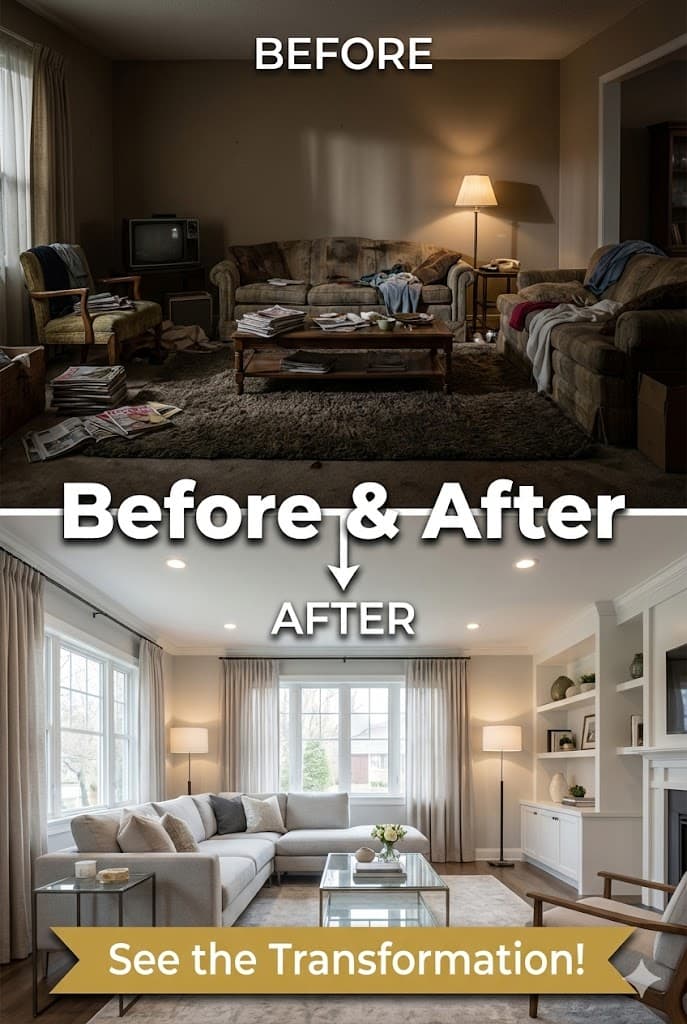
Living room design projects typically require 4-12 weeks from initial planning through completion depending on scope extent, material lead times, and contractor availability. Planning and design development phases consume 1-2 weeks, procurement and ordering require 2-4 weeks, and put in placeation spans 1-6 weeks based on renovation extent. Living room makeover projects addressing cosmetic updates complete faster than comprehensive renovations requiring electrical upgrades, flooring replacement, or built-in installation.
Phase one involves space assessment, measurement documentation, functional requirement identification, and preliminary concept development. This planning stage establishes project scope, identifies budget parameters, and creates foundational understanding of spatial constraints and opportunities. Living room layout ideas generation during planning explores multiple furniture arrangement options before committing to specific configurations requiring furniture purchases.
⚠ PAIN POINT: I start multiple living room projects but never finish them completely
✓ SOLUTION: Create detailed project timeline with specific completion dates for each phase: Week 1-2 Planning/Measurement, Week 3-4 Procurement/Ordering, Week 5-6 Installation/Implementation, Week 7-8 Styling/Finishing. Schedule deliverables and establish accountability checkpoints preventing project abandonment.
Phase two encompasses furniture selection, finish material specification, lighting fixture selection, window treatment design, and accessory planning. This development stage requires researching product options, comparing specifications and prices, reviewing samples, and finalizing selections before ordering. Living room furniture lead times vary from immediate availability for in-stock items to 12-16 weeks for custom upholstery, requiring advance planning preventing project delays.
Phase three put in places designed solutions through furniture delivery and placement, finish installation, lighting fixture mounting, window treatment installation, and accessory arrangement. Professional installation typically proceeds in sequence: flooring first, then window treatments, followed by lighting fixtures, then furniture delivery, concluding with styling and accessories. Contemporary living room projects often require paint application, wall repair, or architectural modification occurring before finish installation begins.
Phased put in placeation allows budget distribution across multiple timeframes rather than requiring complete funding upfront. Priority phase addresses foundational elements including flooring, major furniture pieces, and lighting infrastructure. Subsequent phases add layering elements including window treatments, accent furniture, artwork, and decorative accessories. Modern living room design projects benefit from phased approaches allowing style evolution and preference refinement over time.

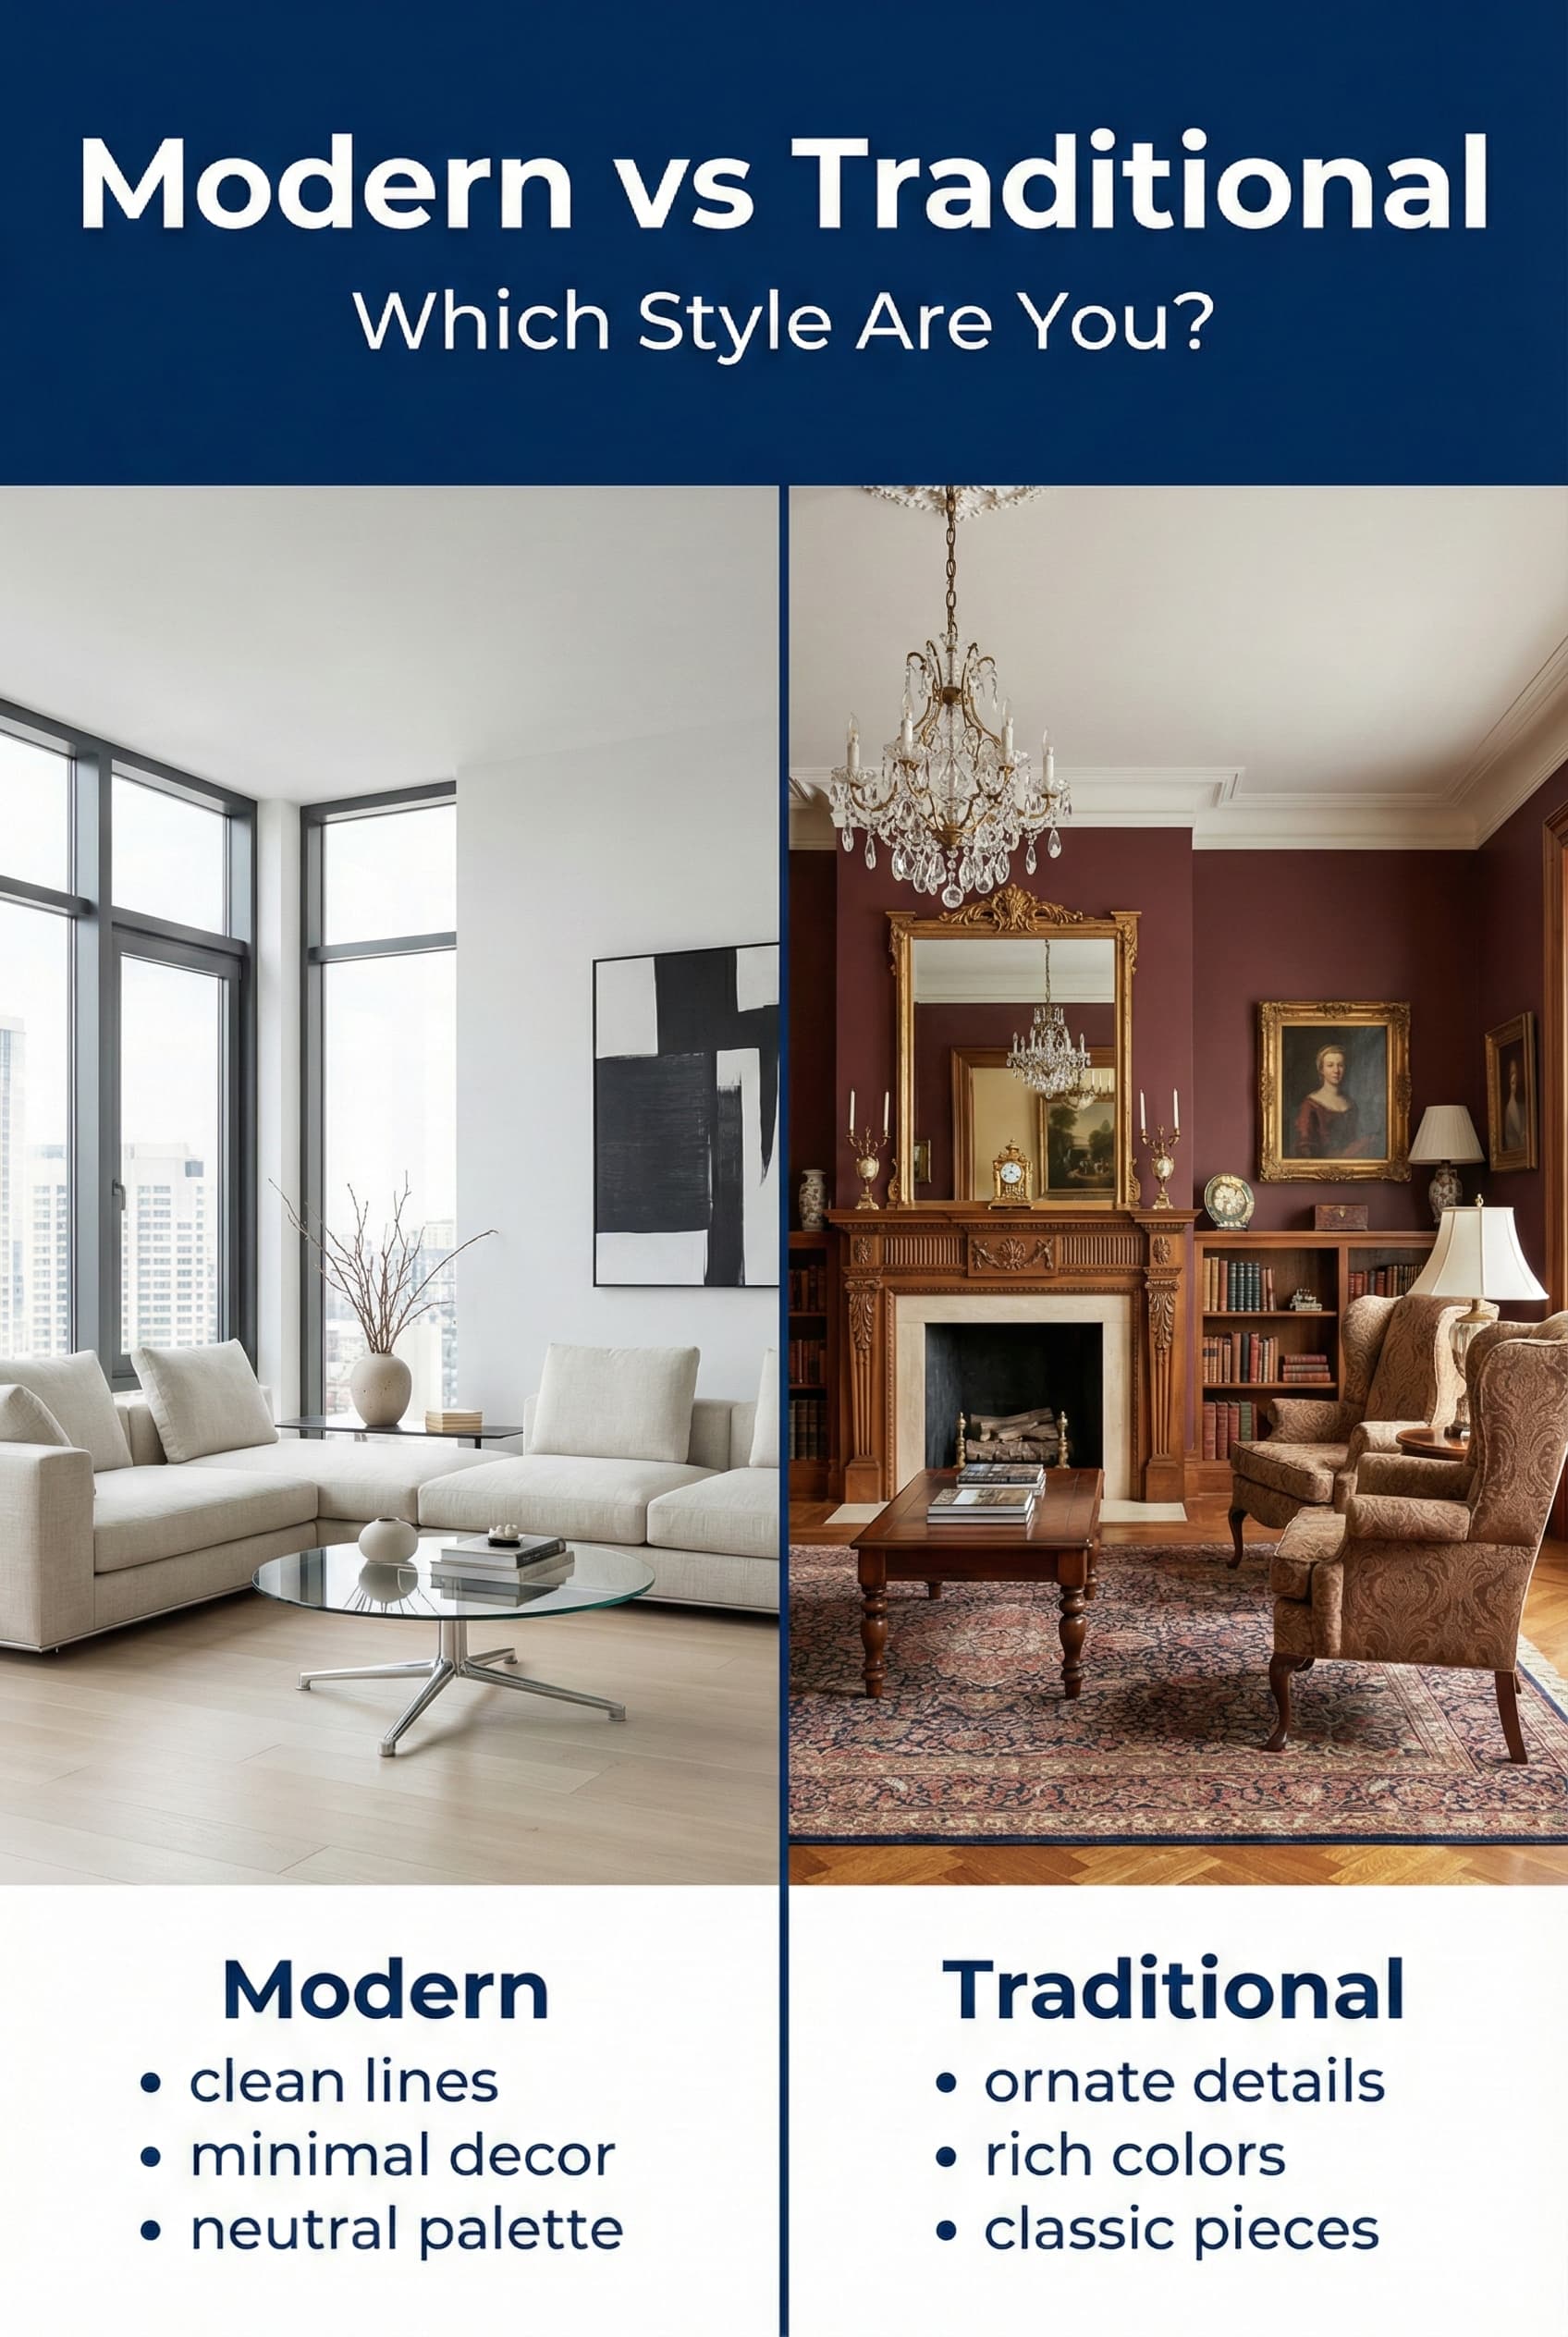
Modern living room design originated in early 20th century Europe through Bauhaus movement and International Style architecture. This aesthetic philosophy emphasizes function over ornamentation, geometric forms, industrial materials including steel and glass, and spatial openness through minimal partitioning. Modern furniture features clean lines, low profiles, exposed legs, and absence of decorative carving or applied ornamentation.
Color palettes in modern living rooms favor neutrals including whites, grays, blacks, and natural wood tones with limited accent color application. Window treatments remain minimal using simple panels or cellular shades rather than elaborate drapery treatments. Flooring typically consists of hardwood, polished concrete, or large format tile rather than carpet. Lighting fixtures display geometric profiles fabricated from metal, glass, or molded plastic in architectural forms.
Sofa Seat Height | 17-19 inches | 15-17 inches | Leather, linen, wool |
Sofa Arm Height | 24-26 inches | 22-24 inches | Exposed wood, metal |
Coffee Table Height | 16-18 inches | 14-16 inches | Wood, glass, metal |
Media Console Height | 20-24 inches | 18-22 inches | Wood veneer, lacquer |
Side Table Height | 22-26 inches | 20-24 inches | Metal, wood, stone |
Modern living room layouts emphasize spatial flow and visual connection between adjacent areas. Furniture arrangements avoid blocking sightlines or creating visual barriers. Storage solutions integrate into wall systems or employ closed cabinetry hiding visual clutter. Decorative accessories remain minimal with selective display of high-quality objects rather than collected groupings. Modern design prioritizes edited aesthetic restraint over abundance.
Technology integration appears seamless in modern living spaces with concealed wiring, flush-mounted screens, and integrated audio systems. Furniture selection fits modern media components through appropriate sizing and cable management provisions. Climate control remains unobtrusive through minimalist vent grilles and thermostat designs. Contemporary modern interpretations relax pure modernist austerity while maintaining foundational principles of simplicity and functionality.
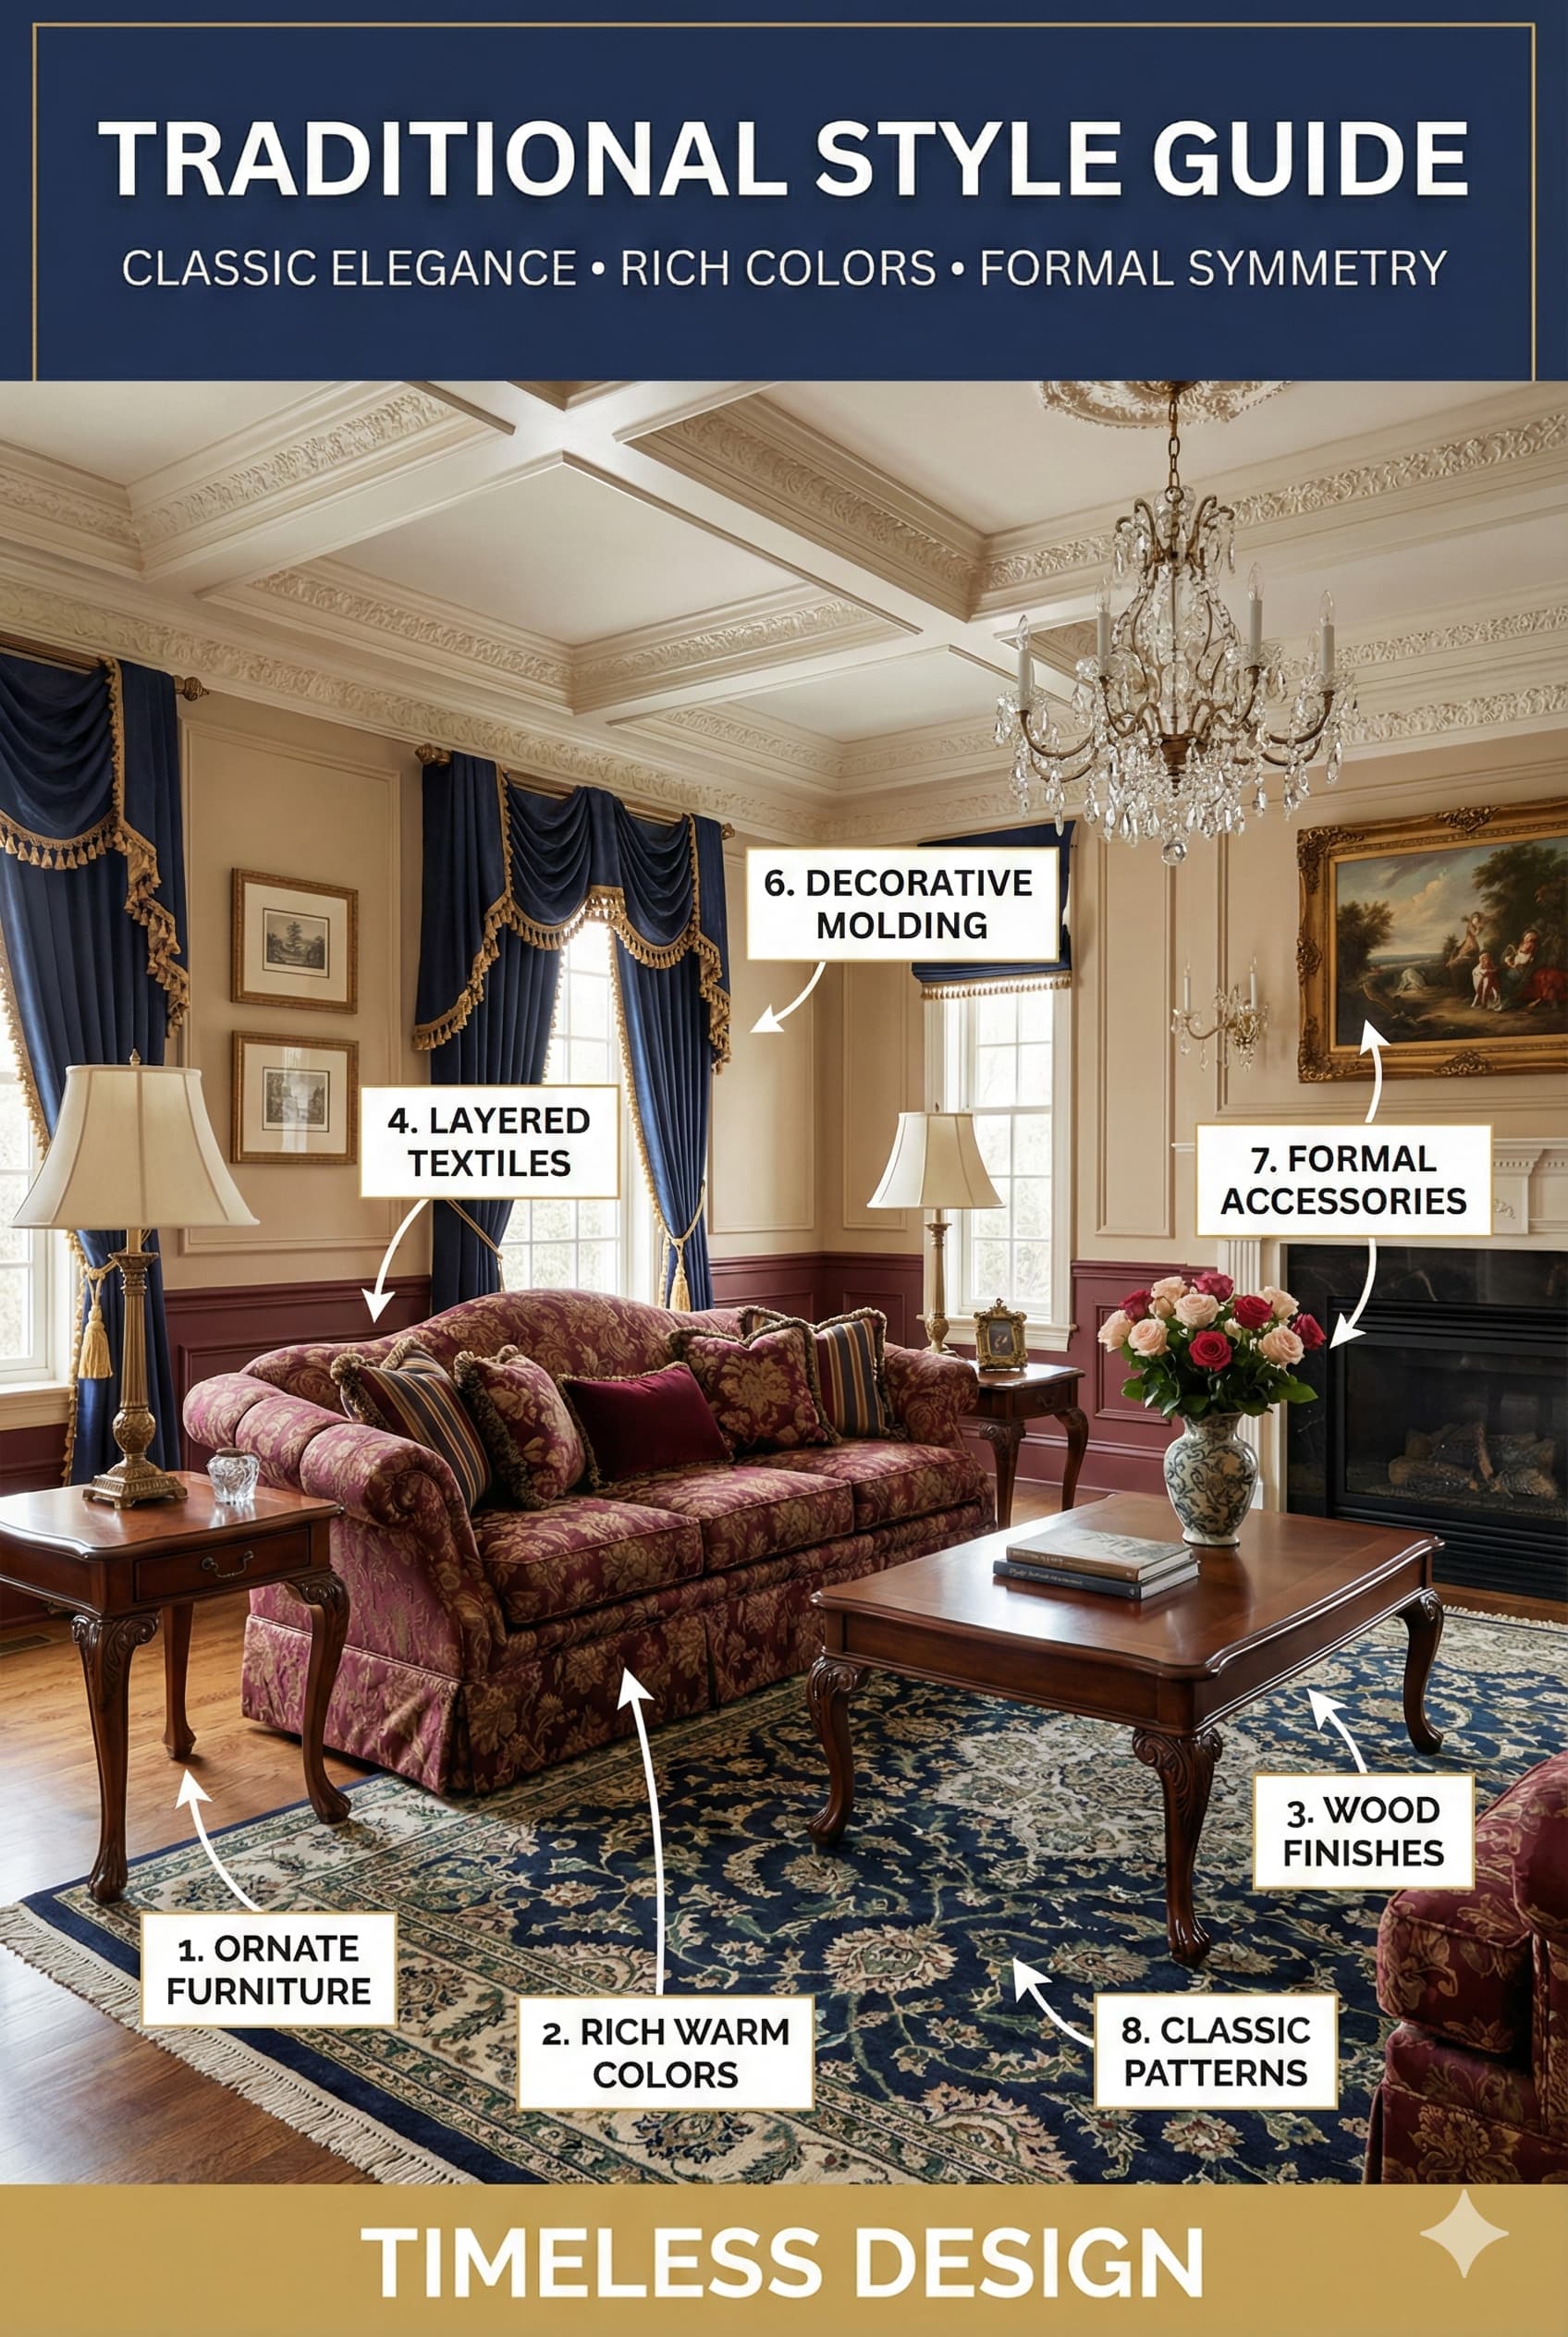
Traditional living room design references European decorative arts from 18th and 19th centuries including English Georgian, French Provincial, and American Federal periods. These historical styles emphasize formal furniture arrangements, rich wood finishes with detailed carving, upholstered pieces with rolled arms and skirts, and layered window treatments. Traditional style projects established permanence and refined elegance through quality materials and detailed craftsmanship.
Furniture in traditional living rooms features curved profiles, detailed woodwork, turned legs, and formal upholstery. Sofas display rolled arms, back cushioning with button tufting, and upholstered skirts concealing legs. Wood pieces showcase decorative moldings, applied carvings, and rich stained finishes in cherry, mahogany, or walnut. Traditional furniture construction emphasizes joinery quality and expected multi-generational durability.
Camelback Sofa | 84-96 inches wide | Curved back, rolled arms | Exposed wood frame |
Wingback Chair | 32-36 inches wide | High back, side wings | Turned wood legs |
Butler’s Coffee Table | 48-54 inches long | Lower shelf, carved details | Cherry, mahogany stain |
Secretary Desk | 36-42 inches wide | Drop-front writing surface | Traditional wood stain |
Breakfront Cabinet | 72-84 inches wide | Glass-front upper section | Hand-rubbed finish |
Traditional living room color palettes favor rich saturated tones including burgundy, forest green, navy blue, and golden yellow combined with cream or ivory backgrounds. Wall treatments may include chair rails with contrasting colors above and below, picture frame moldings, or formal wallpaper patterns. Window treatments feature elaborate multi-layer constructions with decorative valances, side panels, and functional sheers. Traditional design embraces visual richness and layered complexity.
Lighting in traditional living rooms includes formal chandeliers as focal points, coordinated table lamp pairs on matching end tables, and wall sconces flanking fireplaces or artwork. Fixture finishes typically showcase brass, bronze, or antique metal treatments with fabric shades. Area rugs display traditional patterns including Persian, Oriental, or formal medallion designs in wool or wool-blend constructions. Traditional style prioritizes formality and established aesthetic conventions over contemporary innovations.
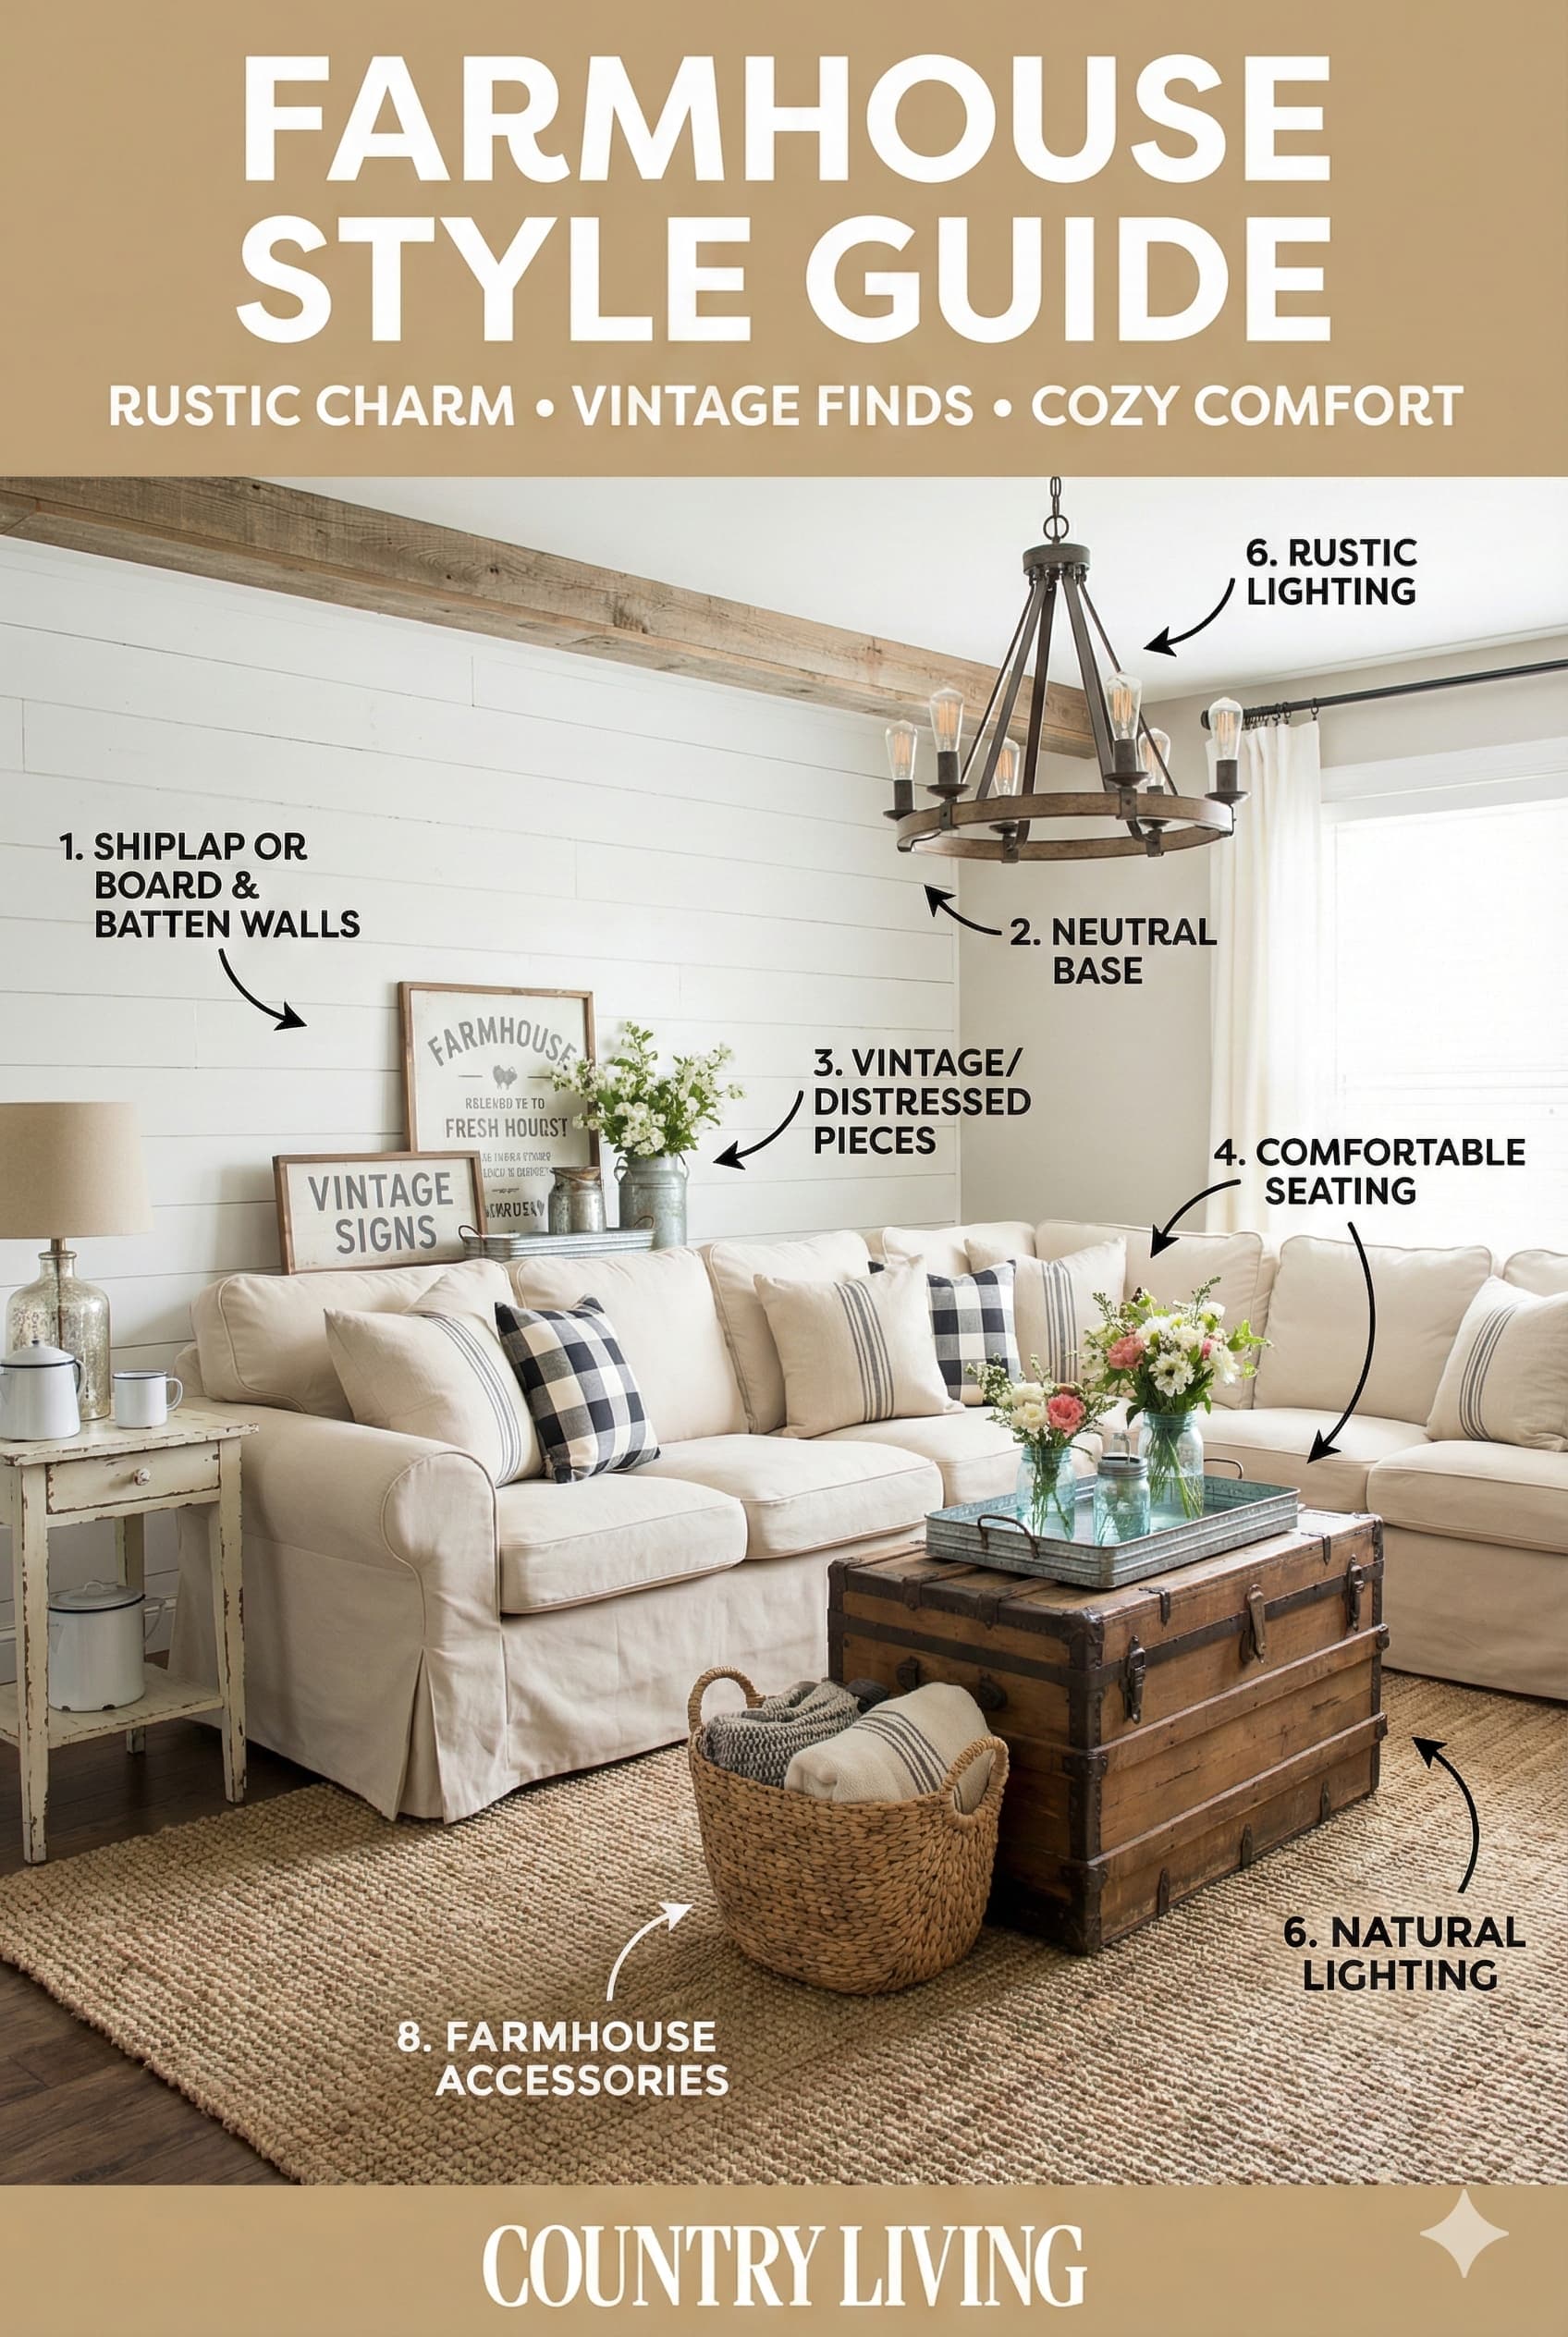
Farmhouse living room style emerged from American agricultural architecture with practical functional priorities and resource-conscious material selections. Contemporary farmhouse interpretations modernize rustic elements into refined comfortable spaces balancing nostalgic references with current lifestyle requirements. Farmhouse design emphasizes natural materials, neutral color palettes, vintage-inspired furnishings, and casual comfort over formal perfection.
Farmhouse living room furniture features simple profiles, natural wood finishes, slipcovered upholstery, and functional storage integration. Sofas and chairs display clean lines without excessive ornamentation, often dressed in washable slipcovers in neutral linen or cotton. Coffee tables and side tables showcase reclaimed or distressed wood finishes emphasizing material authenticity over pristine perfection. Farmhouse style celebrates imperfection and patina as desirable characteristics.
Color palettes in farmhouse living rooms center on whites, creams, warm grays, and natural wood tones with accent colors drawn from nature including soft blues, muted greens, and rust tones. Walls commonly feature shiplap paneling, board and batten treatments, or simple painted surfaces in neutral tones. Ceilings may expose wood beams or structural elements adding architectural interest. Modern farmhouse interpretations maintain neutral foundations while incorporating contemporary elements including metal fixtures and updated lighting.
⚠ PAIN POINT: Farmhouse style looks great in photos but feels cluttered in my actual space
✓ SOLUTION: Limit decorative accessories to 3-5 meaningful pieces per surface. Maintain significant empty wall space (40-50 percent) rather than covering every surface. Select larger-scale accessories rather than numerous small items. Rotate seasonal decorations rather than displaying everything simultaneously. Edit ruthlessly maintaining “less is more” discipline.
Textiles in farmhouse living rooms include natural fibers (linen, cotton, wool) in simple patterns or solid colors. Throw pillows feature ticking stripes, buffalo check, simple florals, or solid linens. Area rugs showcase simple patterns, vintage reproductions, or natural fiber constructions in jute or sisal. Window treatments remain simple using panel curtains in natural linen or cotton rather than elaborate layered treatments. Farmhouse design embraces unaffected simplicity and functional comfort.
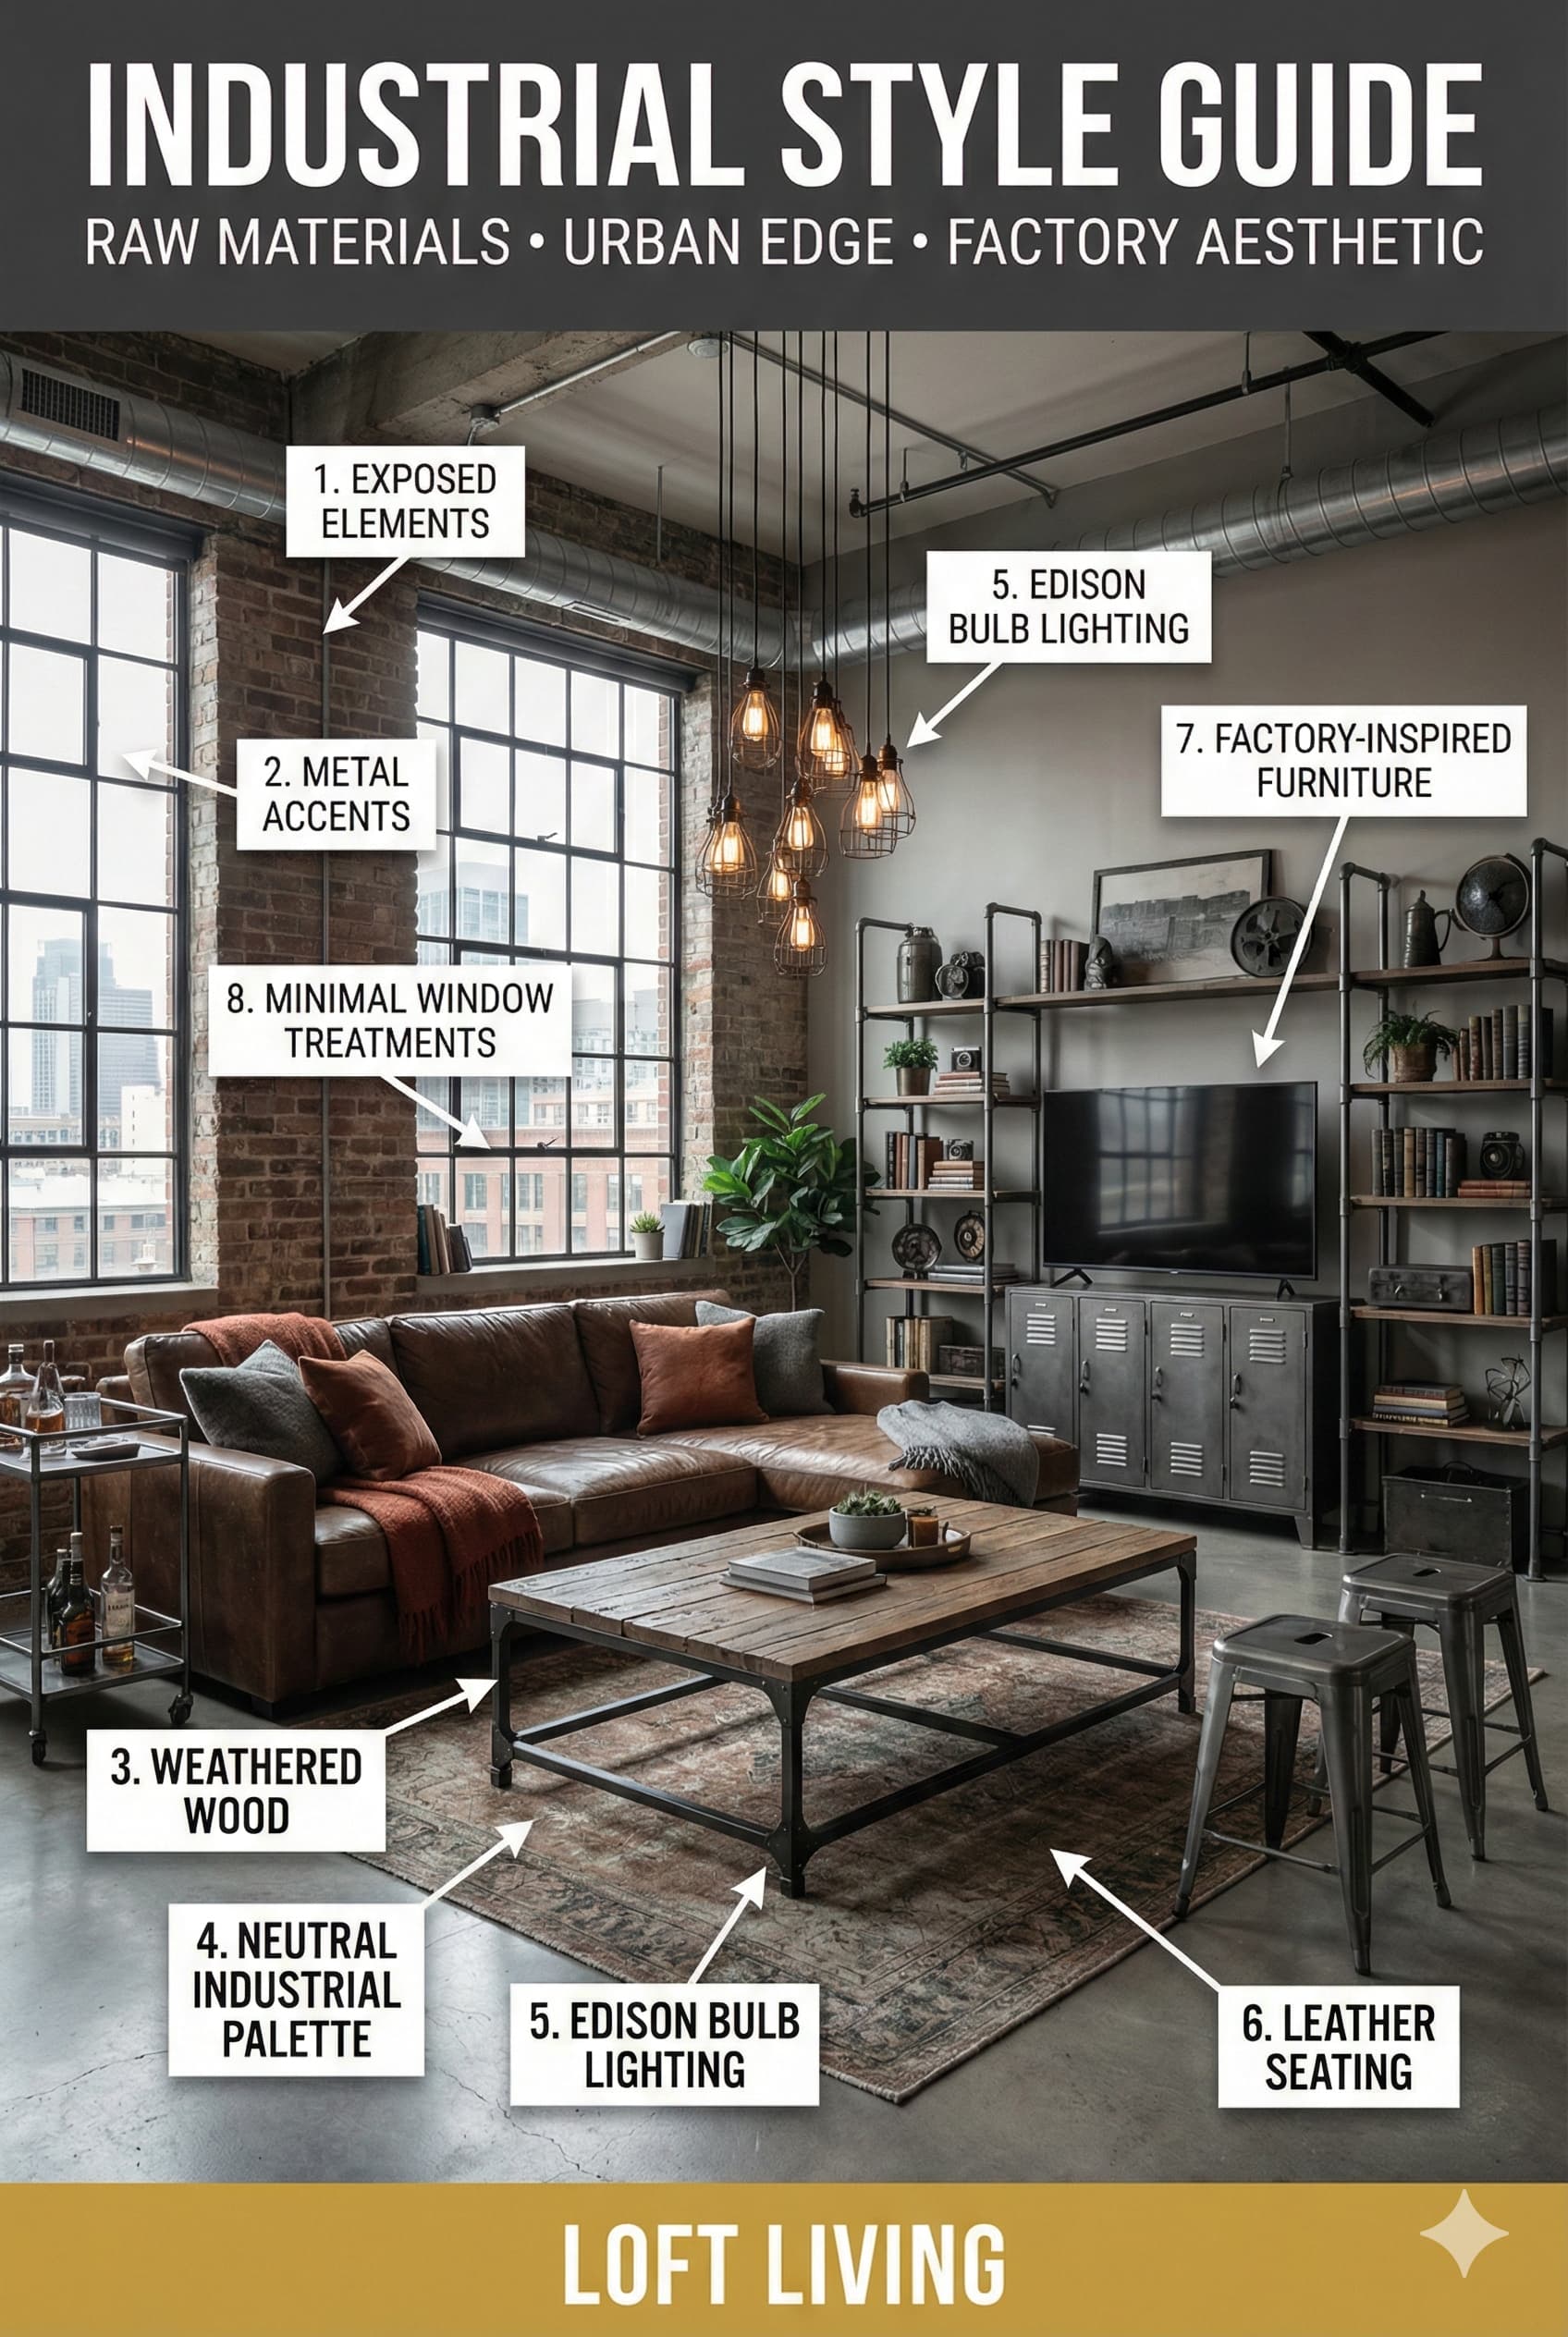
Industrial living room design draws inspiration from converted warehouse and factory spaces, celebrating exposed structural elements, raw materials, and utilitarian objects as aesthetic features. This urban aesthetic showcases brick walls, concrete surfaces, metal fixtures, and open ductwork as intentional design elements. Industrial style originated in loft conversions where structural elements remained exposed due to space constraints and budget limitations, subsequently becoming intentional aesthetic choices.
Furniture in industrial living rooms combines metal frameworks with leather, wood, or canvas upholstery. Seating pieces feature exposed metal legs, leather upholstery in rich brown or black tones, and substantial proportions suggesting durability. Tables showcase mixed materials including metal bases with reclaimed wood tops or concrete surfaces. Storage solutions employ open metal shelving, vintage factory carts, and repurposed industrial objects. Industrial furniture emphasizes honest material expression and functional utility
Leather Sofa | 84-96 inches wide | Metal frame + leather | Distressed brown, black |
Metal Coffee Table | 48-60 inches long | Steel + wood/concrete | Raw steel, powder coat |
Pipe Shelving Unit | 72-96 inches wide | Iron pipe + wood planks | Black pipe, natural wood |
Factory Cart Table | 36-48 inches wide | Steel frame + wood top | Industrial gray, rust |
Wire Basket Storage | Various sizes | Wire mesh + metal frame | Galvanized, black metal |
Industrial living room color palettes favor neutral foundations including gray, black, white, and natural wood tones with limited accent color. Walls may display exposed brick, concrete, or painted surfaces in deep gray or charcoal. Flooring typically consists of concrete, stained concrete, or wide plank hardwood. Ceilings expose structural elements, ductwork, electrical conduit, and beam framing as aesthetic features. Industrial design celebrates raw unfinished surfaces as intentional aesthetic statements.
Lighting in industrial living spaces features Edison bulbs, metal shade pendants, vintage inspired fixtures, and exposed bulb installations. Fixtures display metal finishes including black, bronze, brushed nickel, or raw steel. Floor lamps showcase adjustable arms, photographer-style tripods, or vintage factory lamp reproductions. Industrial style lighting celebrates functional forms over decorative embellishment. Windows remain minimally treated using simple panels, metal blinds, or remaining completely bare in appropriate contexts.
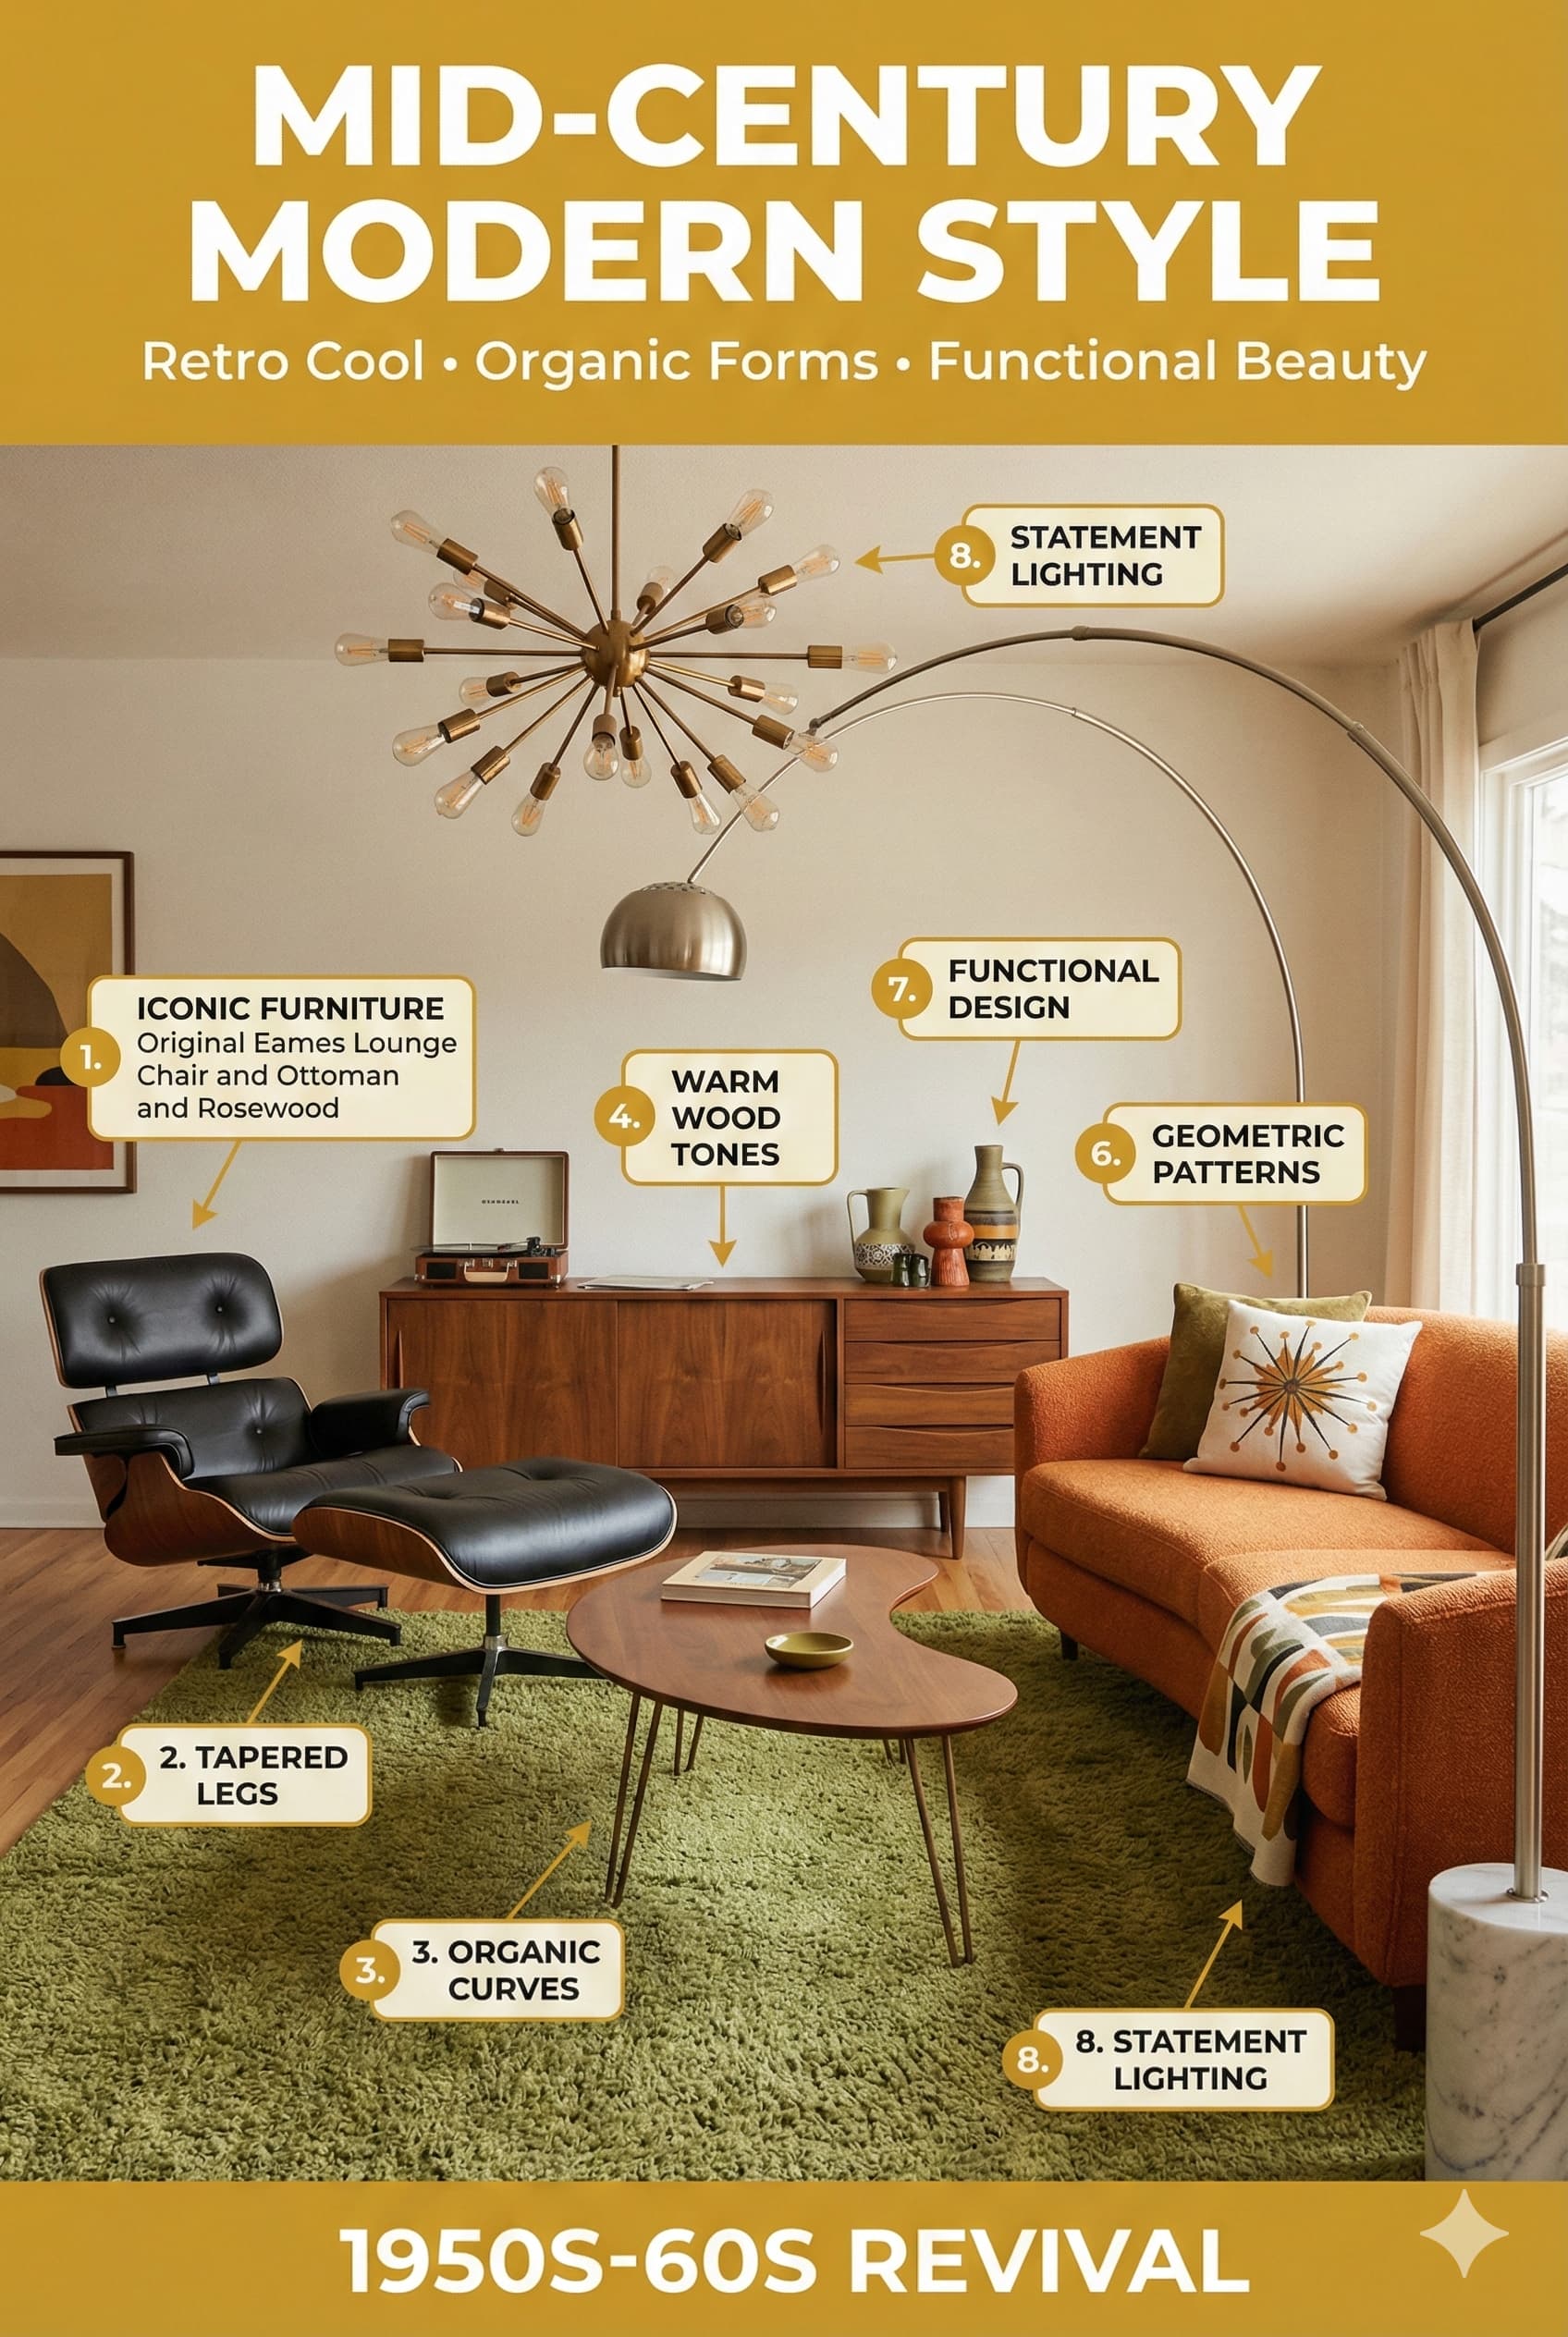
Mid-century modern living room design references 1950s-1960s furniture design and architecture emphasizing organic forms, functional simplicity, and connection between indoor and outdoor spaces. This aesthetic features iconic furniture pieces by designers including Eames, Saarinen, and Noguchi combined with architectural elements including large windows, open floor plans, and minimal ornamentation. Mid-century style experienced major revival beginning in early 2000s, driving contemporary furniture reproductions and vintage market appreciation.
Furniture in mid-century modern living rooms displays characteristic tapered wood legs, organic curved forms, molded plywood construction, and geometric upholstery patterns. Sofas and chairs feature low profiles, exposed wood frames, and streamlined forms without excessive padding. Tables showcase sculptural wood forms, bent plywood, or molded plastic. Storage pieces include credenzas, sideboards, and modular wall units with sliding doors and geometric drawer fronts. Mid-century furniture combines functional efficiency with artistic expression.
Color applications in mid-century modern living rooms include neutral foundations (white, gray, walnut wood tones) accented with bold hues including orange, turquoise, mustard yellow, and avocado green. Wall treatments remain simple using painted surfaces occasionally featuring accent colors or geometric patterns. Flooring consists of hardwood, terrazzo, or cork. Windows feature simple treatments including panel curtains or remaining bare emphasizing view connections. Mid-century design celebrates color boldness within overall compositional restraint.
⚠ PAIN POINT: Mid-century furniture looks great but feels uncomfortable for actual daily use
✓ SOLUTION: Select reproduction pieces with updated cushioning and ergonomic improvements over original designs. Add throw pillows for lower back support. Choose deeper seat depths (22-24 inches) rather than period-correct shallow seats (18-20 inches). Test furniture extensively before purchasing, prioritizing comfort over aesthetic purity. Supplement statement mid-century pieces with more comfortable contemporary seating for primary use.
Accessories in mid-century modern living rooms include period-appropriate objects like sunburst clocks, ceramic vessels, teak accessories, and abstract artwork. Lighting features globe pendants, arc floor lamps, sculptural table lamps, and architectural fixtures. Plants appear prominently in ceramic planters or plant stands adding organic elements. Mid-century style balances restraint with carefully selected statement pieces creating visual interest without clutter.
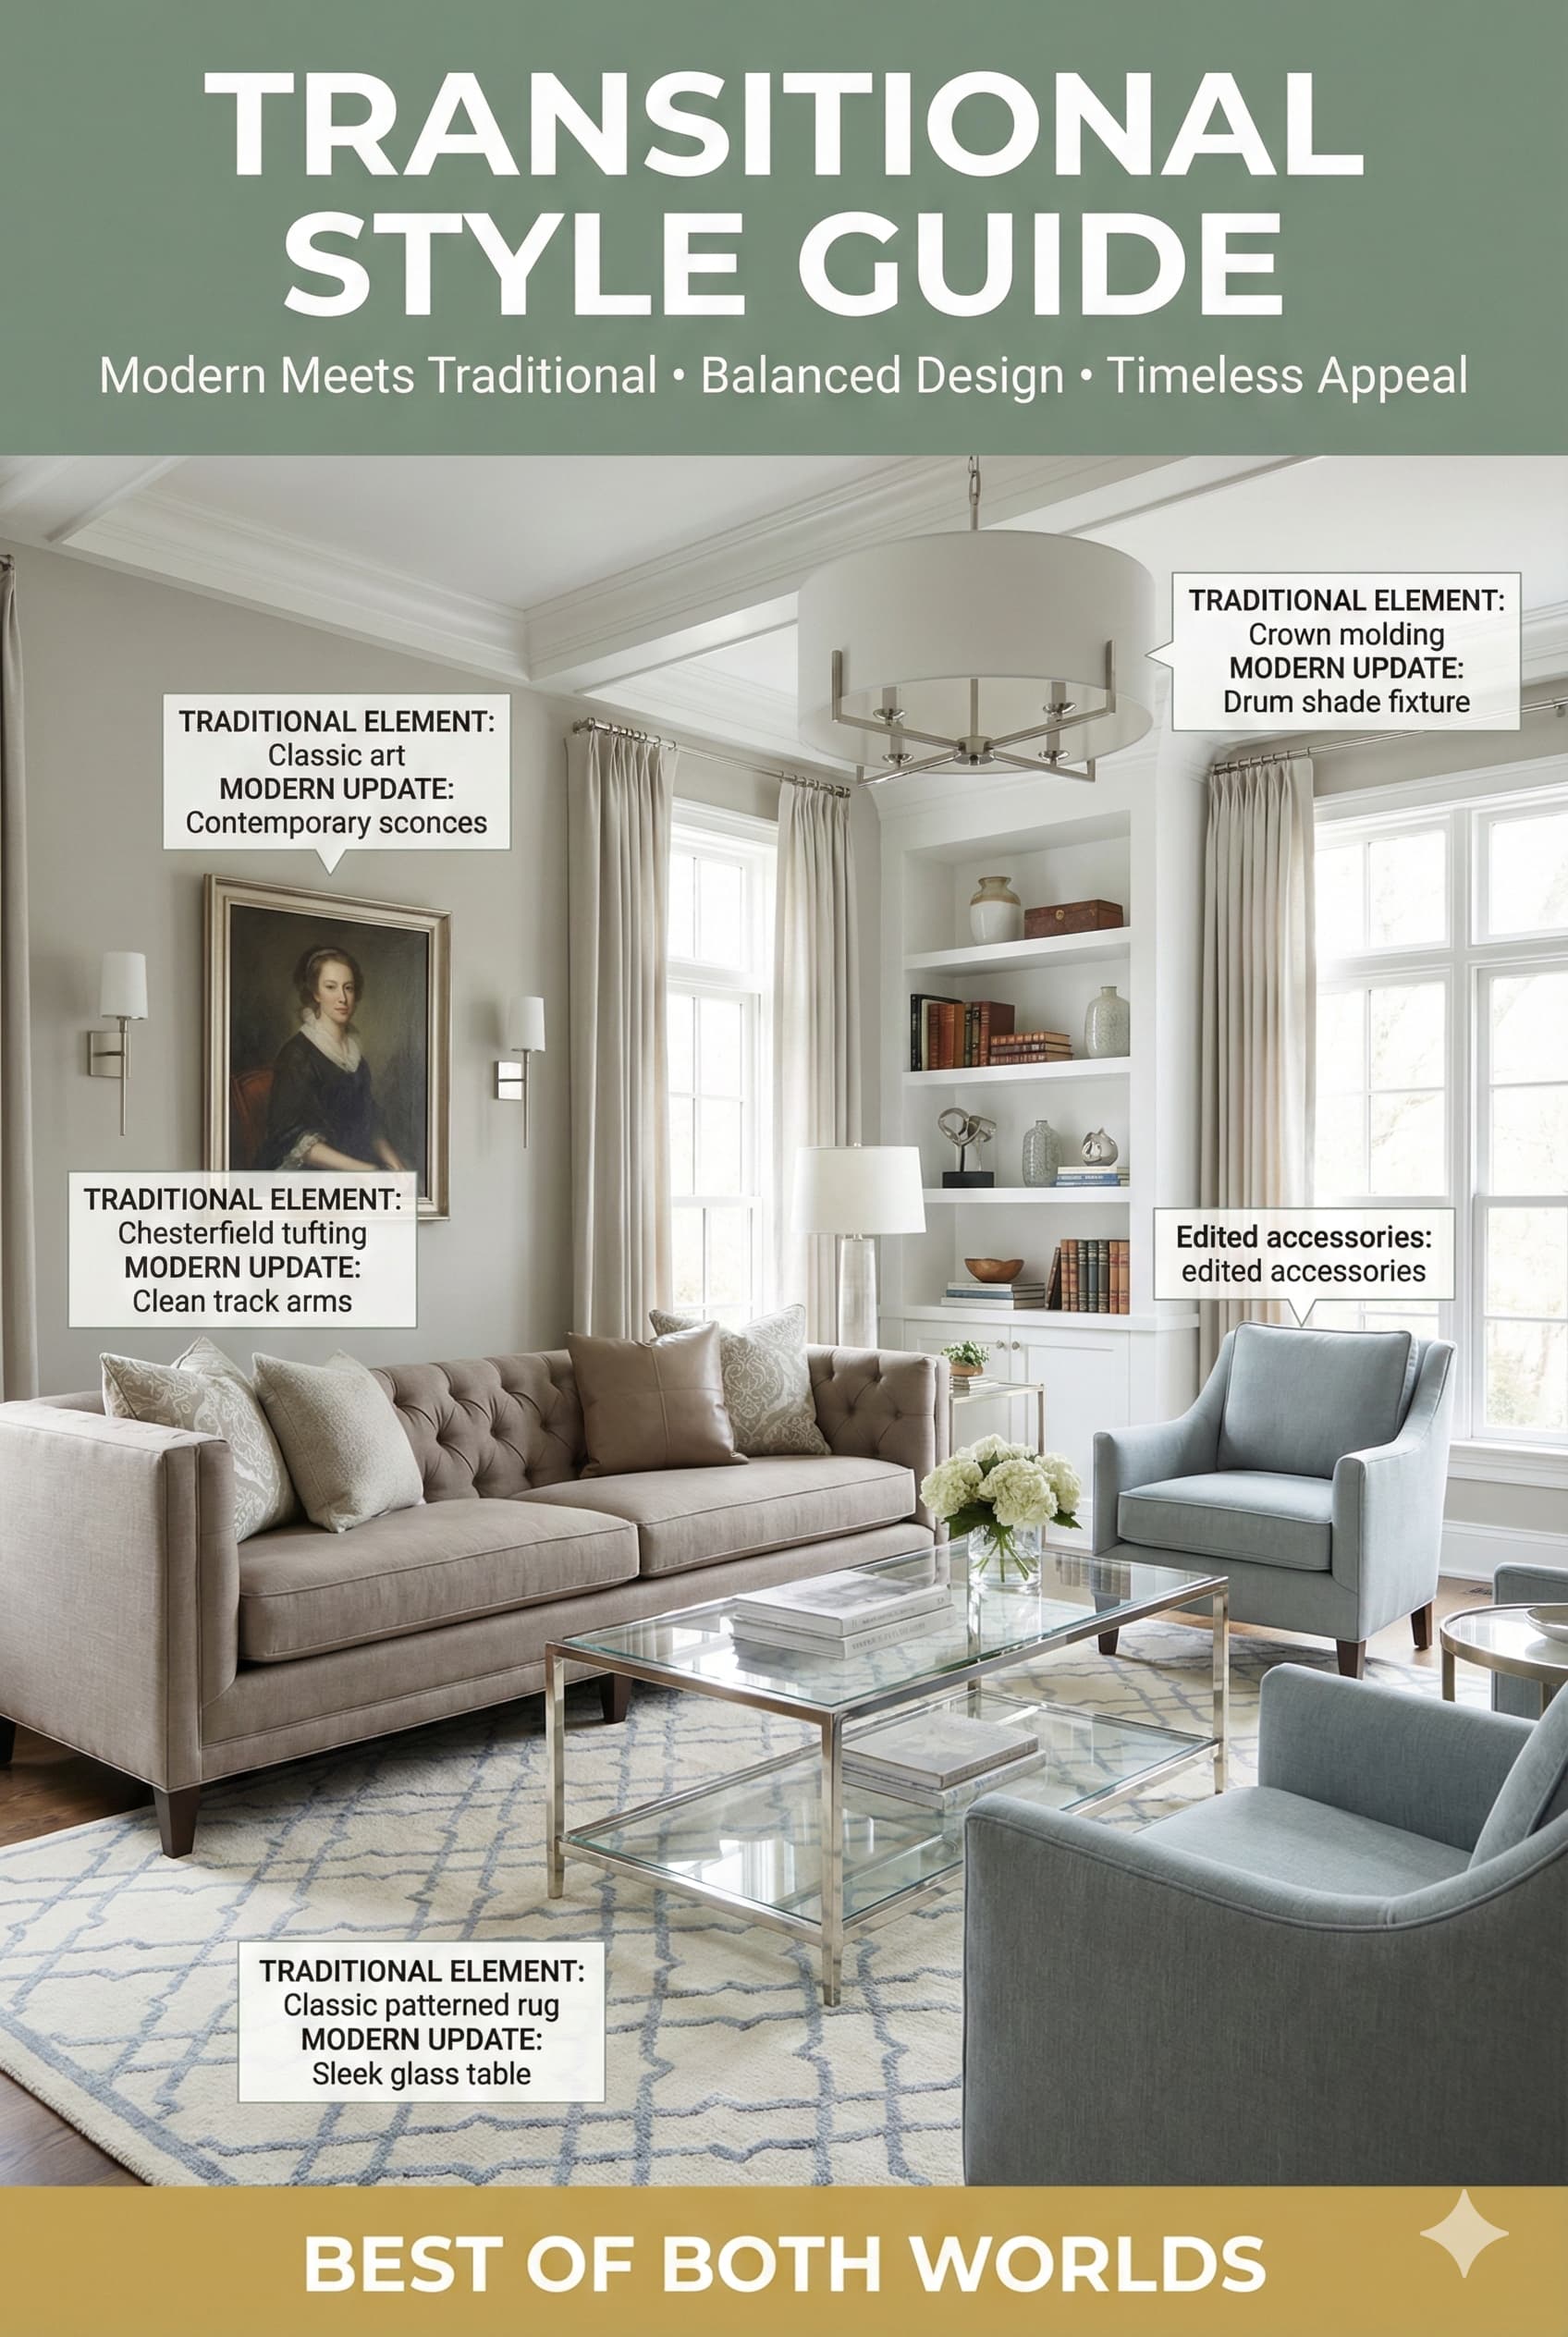
Transitional living room design blends traditional comfort and formality with contemporary simplicity and updated aesthetics. This hybrid approach maintains traditional concepts including symmetrical furniture arrangements, rich upholstered pieces, and quality wood furniture while adopting contemporary elements including cleaner profiles, neutral palettes, and simplified details. Transitional style represents the most popular design approach in American residential interiors, appealing to broad demographic ranges through accessible familiar aesthetics.
Furniture in transitional living rooms features simplified traditional profiles without excessive ornamentation. Sofas display subtle curves rather than pronounced rolls, track arms or simple rolled arms rather than elaborate shapes, and exposed wood legs rather than upholstered skirts. Wood pieces showcase simple lines with minimal carving, neutral or natural wood finishes rather than dark traditional stains, and contemporary hardware. Transitional furniture maintains substantial scale and comfortable proportions from traditional design while adopting cleaner contemporary forms.
Track Arm Sofa | 84-90 inches wide | Traditional scale + modern profile | Linen, velvet, leather |
Tufted Ottoman | 36-48 inches square | Traditional detail + contemporary form | Performance fabric, leather |
Wood Console Table | 60-72 inches wide | Traditional function + clean lines | Walnut, oak, painted finish |
Upholstered Chair | 30-34 inches wide | Traditional comfort + modern legs | Neutral fabrics, leather |
Mixed Material Coffee Table | 48-54 inches long | Traditional + contemporary materials | Wood + metal, glass + wood |
Transitional living room color palettes favor neutral foundations including warm whites, warm grays, greiges, and taupe with limited accent color introduction. Walls typically feature single neutral colors without contrast treatments. Flooring consists of medium wood tones or gray-toned woods rather than traditional dark stains or contemporary bleached finishes. Window treatments include simple panels, woven wood shades, or clean roman shades rather than elaborate traditional draperies or bare contemporary windows. Transitional design achieves comfortable familiarity without dated traditionalism or stark contemporary coldness.
Lighting in transitional living spaces combines traditional forms with contemporary finishes and simplified details. Chandeliers feature updated silhouettes in mixed metals or contemporary finishes. Table lamps display traditional urn forms in updated materials or simplified profiles. Floor lamps bridge traditional function with contemporary aesthetics. Transitional style successfully appeals to those seeking updated spaces maintaining comfortable familiarity.
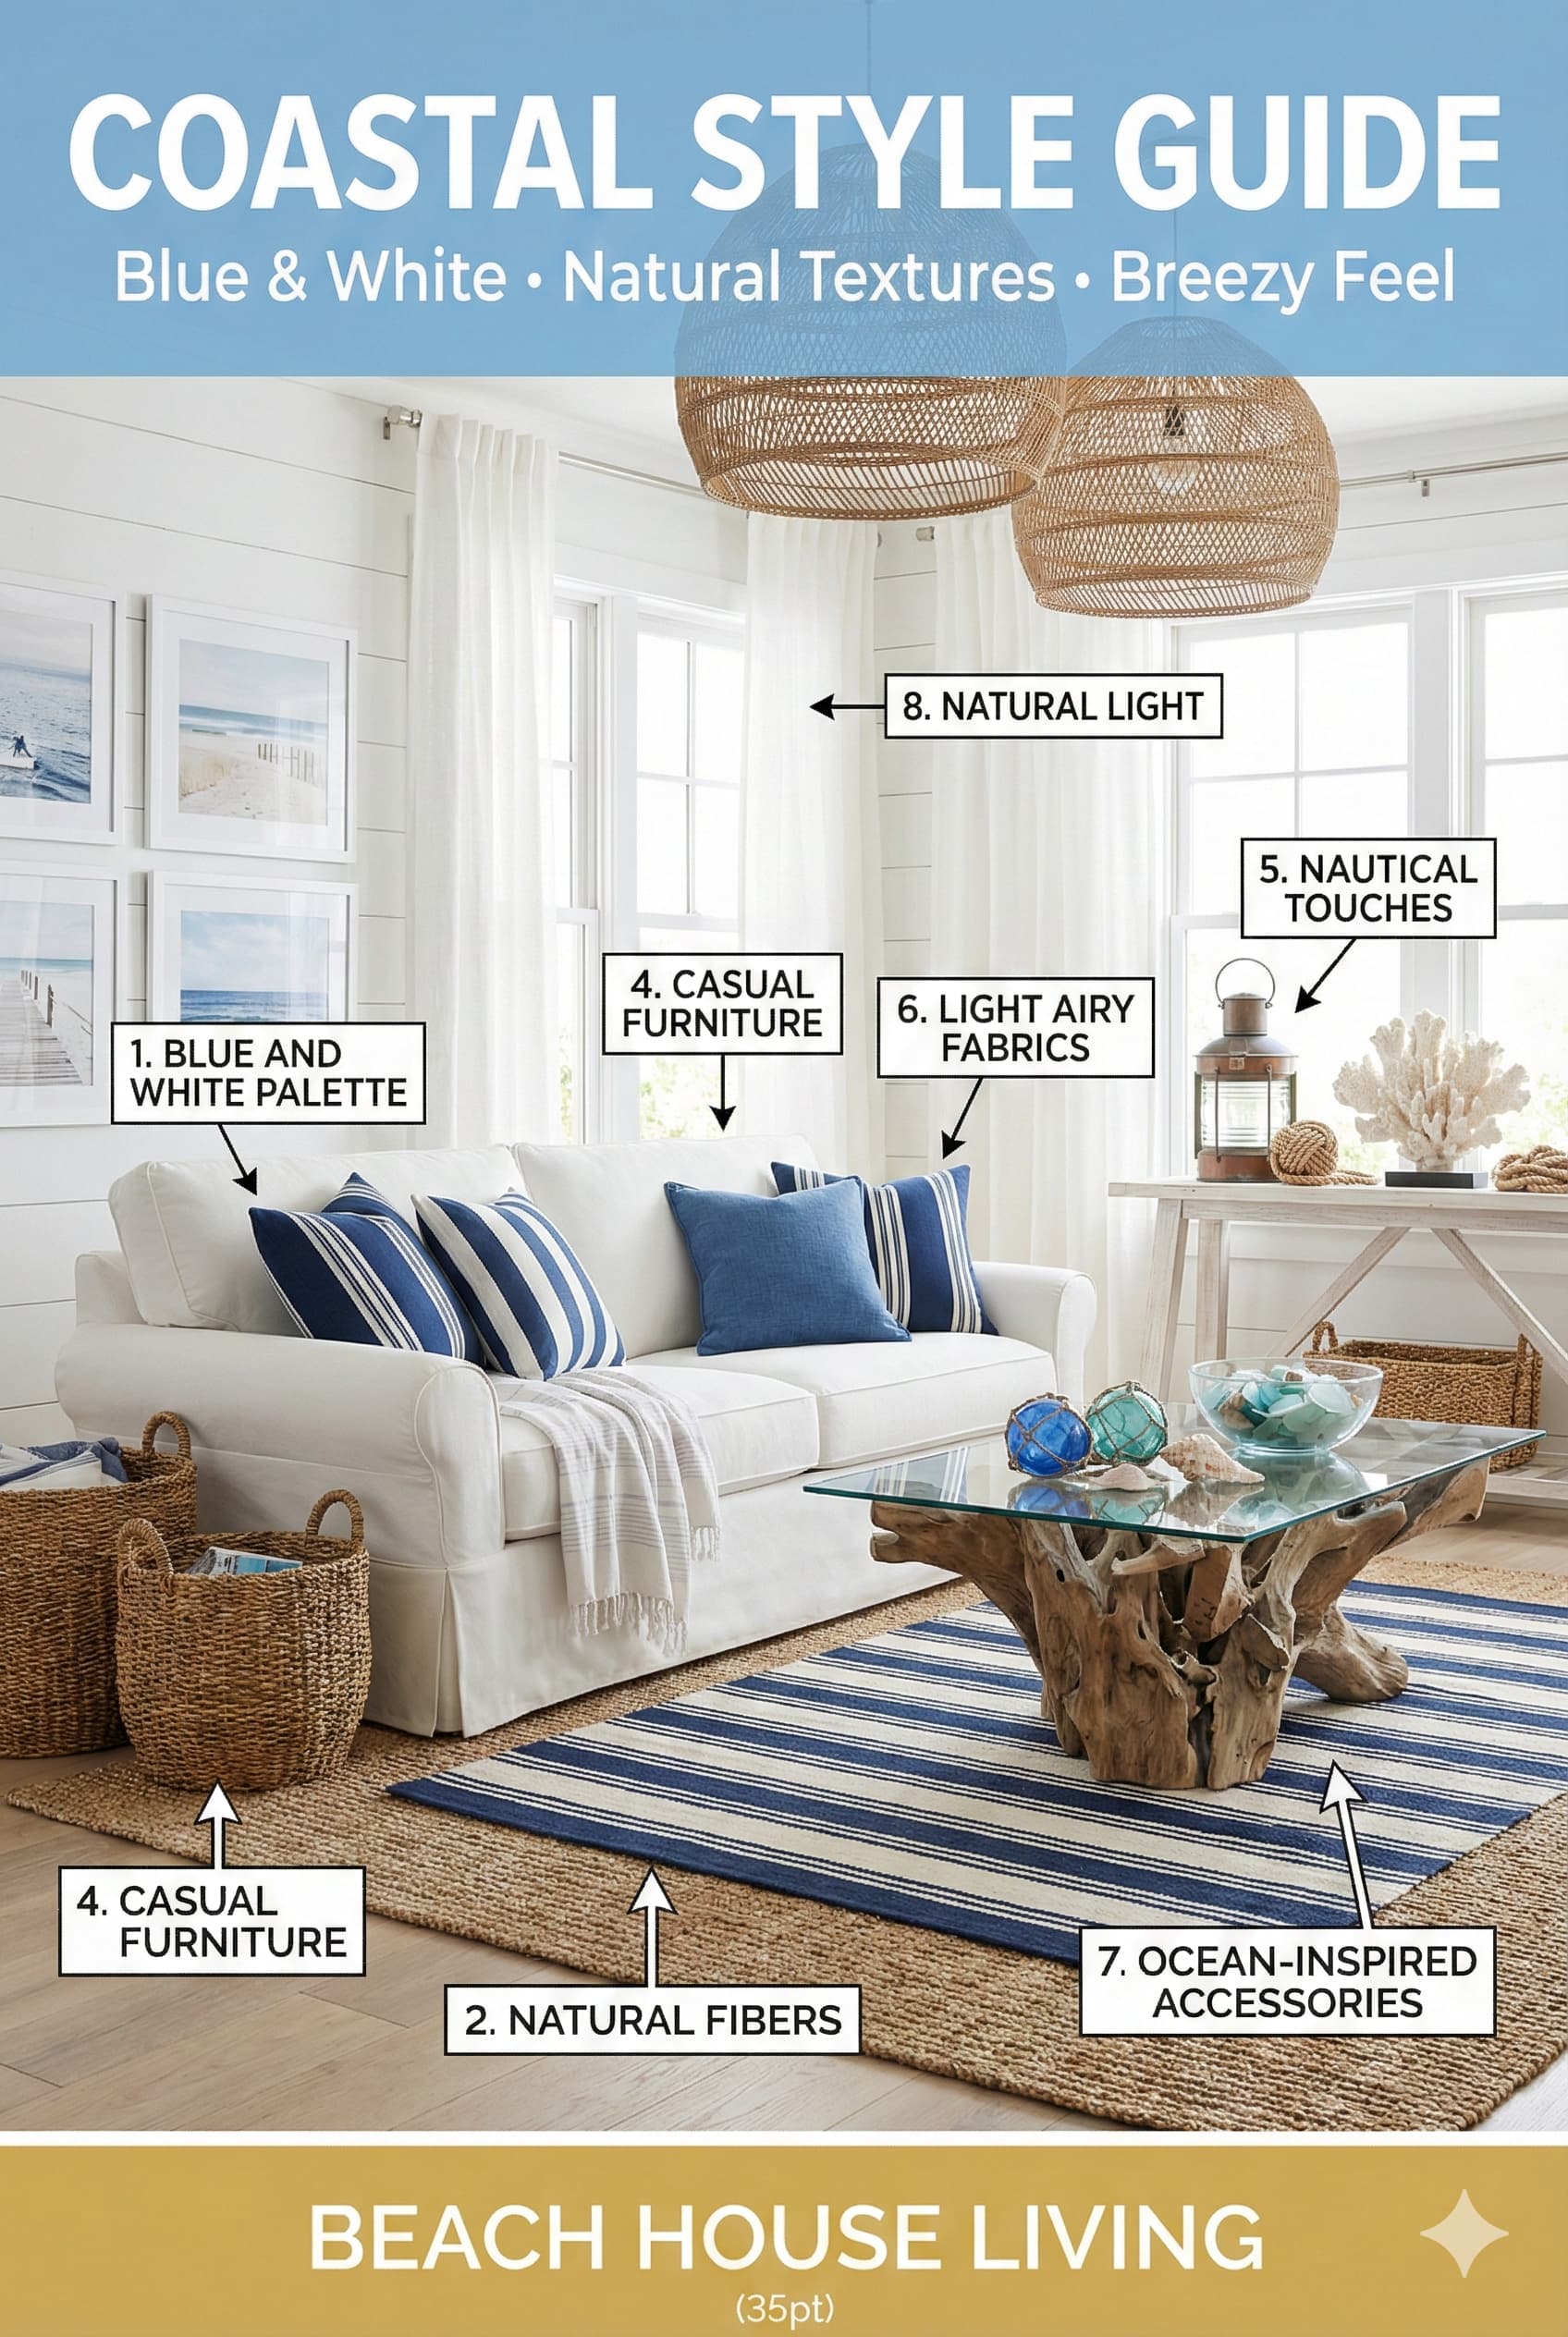
Coastal living room design creates relaxed comfortable spaces referencing beach environments through light color palettes, natural textures, and casual furniture. This aesthetic emphasizes airy openness, natural light, and connection to outdoor environments. Coastal style varies from formal traditional coastal (Hamptons, Cape Cod) to casual beach house (California, Florida) to nautical themed (New England maritime), sharing common elements including light palettes and relaxed atmospheres.
Furniture in coastal living rooms features light wood finishes, painted white or soft colored pieces, woven natural materials, and slipcovered upholstery. Sofas and chairs display simple profiles in white or neutral fabrics, often with washable slipcovers. Wood furniture showcases white painted, driftwood gray, or natural light wood finishes. Woven pieces including rattan, wicker, seagrass, and rope add textural interest. Coastal furniture prioritizes casual comfort and durable materials withstanding sandy feet and wet swimwear.
Color palettes in coastal living rooms center on whites, soft blues, sandy beiges, soft greens, and gray blues. Walls typically feature crisp white or soft warm white creating bright backgrounds. Accent colors reference ocean, sky, and sand including navy blue, turquoise, seafoam green, and coral. Flooring consists of light wood, white-washed wood, or natural fiber area rugs over hard surfaces. Windows remain lightly treated using white curtains, woven wood shades, or remaining bare maximizing natural light and views. Coastal design celebrates brightness, airiness, and effortless casual elegance.
⚠ PAIN POINT: Coastal style looks overly thematic and tacky with too many beach decorations
✓ SOLUTION: Limit overt beach themed items (shells, starfish, anchor motifs) to 1-2 subtle accessories. Focus on evoking coastal feeling through color palette, natural textures, and light airy space rather than literal beach objects. Use high-quality natural materials (linen, jute, rattan) creating sophisticated coastal aesthetic. Maintain predominantly neutral palette with limited blue accent introduction avoiding thematic overload.
Textiles in coastal living rooms emphasize natural fibers including linen, cotton, jute, and sisal. Throw pillows feature simple stripes, solid colors, or subtle patterns rather than overt nautical themes. Area rugs showcase natural jute, sisal, or simple patterns in blue and white. Upholstery fabrics include durable performance textiles, slipcover-appropriate cottons and linens, and stain-resistant options practical for beach house living. Coastal style maintains casual livable aesthetic prioritizing durability and easy maintenance over formal perfection.

Living room layout planning establishes functional spatial organization supporting intended activities while maintaining clear circulation paths and visual balance. Furniture arrangement follows proven principles including conversation distance optimization, traffic flow preservation, and focal point establishment. Residential interior planning research shows systematic layout development yields significantly higher functionality and user satisfaction compared to intuitive furniture placement approaches.
Living room furniture placement begins with identifying room focal points including architectural features (fireplaces, large windows with views), entertainment elements (televisions, projection screens), or created focal points (artwork, built-in cabinetry). Primary seating arrangements orient toward established focal points while maintaining appropriate viewing or conversation distances. Secondary seating areas in larger living rooms may establish independent focal points supporting multiple simultaneous activities.
Spatial planning in small living rooms requires precise furniture sizing and strategic multi-functional furniture selections. Each furniture piece must justify spatial allocation through functional contribution. Oversized furniture in undersized spaces creates cramped uncomfortable environments while undersized furniture in appropriate spaces appears disproportionate and fails to adequately support activities. Living room design success depends substantially on appropriate furniture scaling matching spatial dimensions.
⚠ PAIN POINT: My living room layout never feels quite right – furniture seems awkwardly placed
✓ SOLUTION: Create scaled floor plan using graph paper (1/4 inch scale) or digital planning application. Cut scaled furniture templates matching owned or planned pieces. Test multiple arrangement options before moving actual furniture. Verify all clearance minimums (24-inch walkways, 18-inch furniture access, 14-18 inch coffee table to sofa spacing) meet requirements. Photograph arrangements from multiple angles evaluating spatial balance and traffic flow.
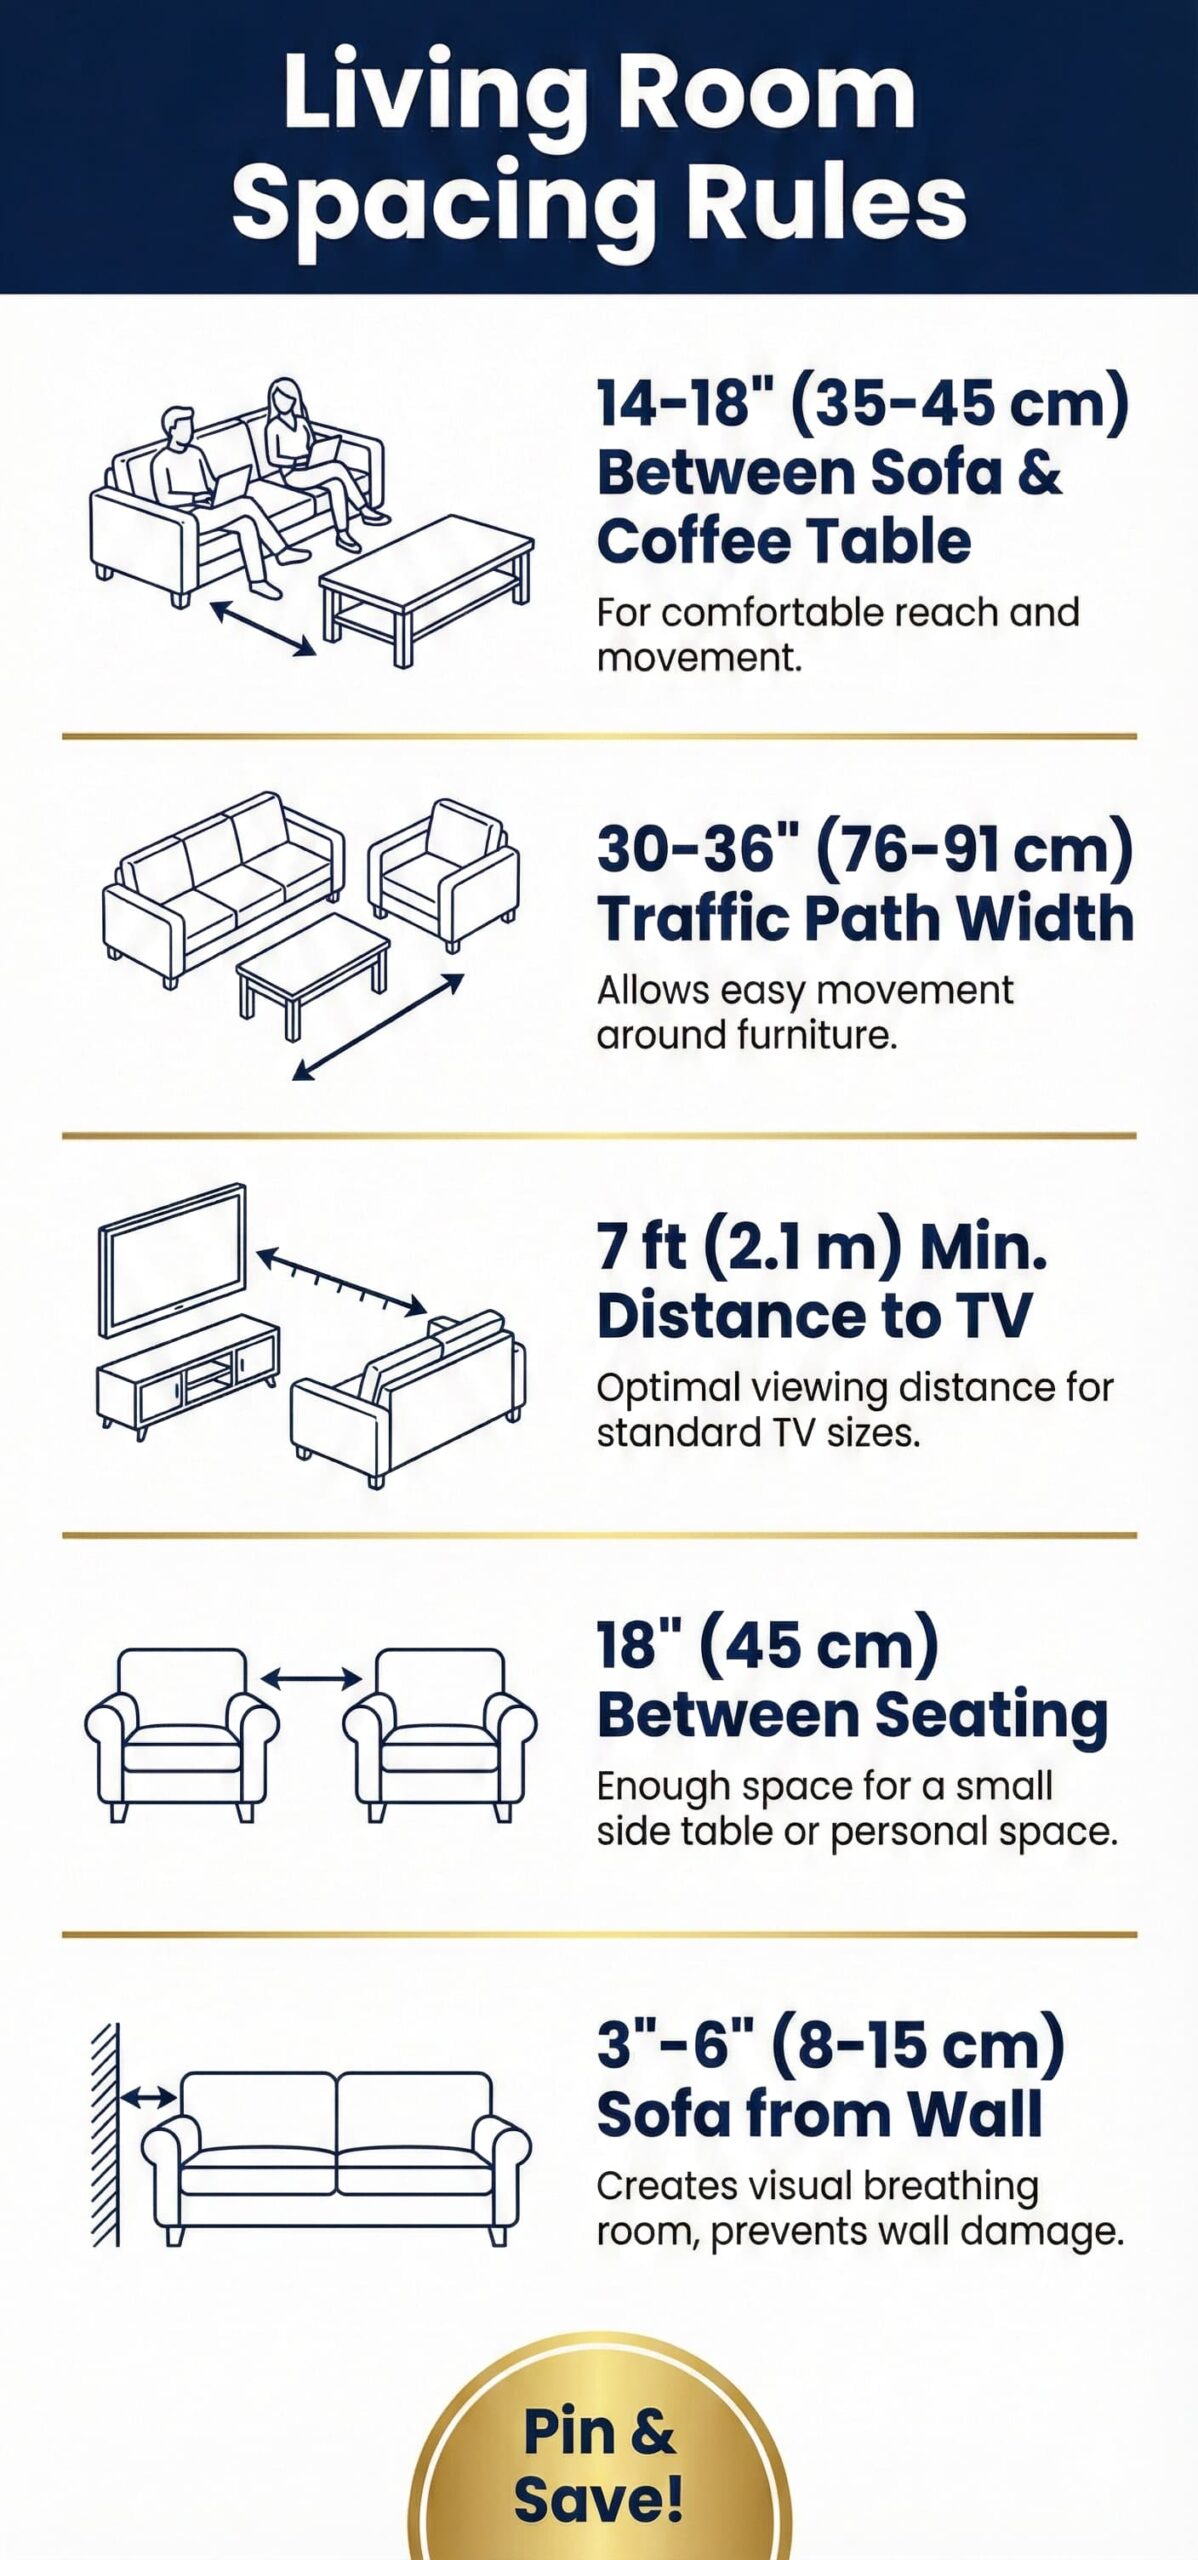
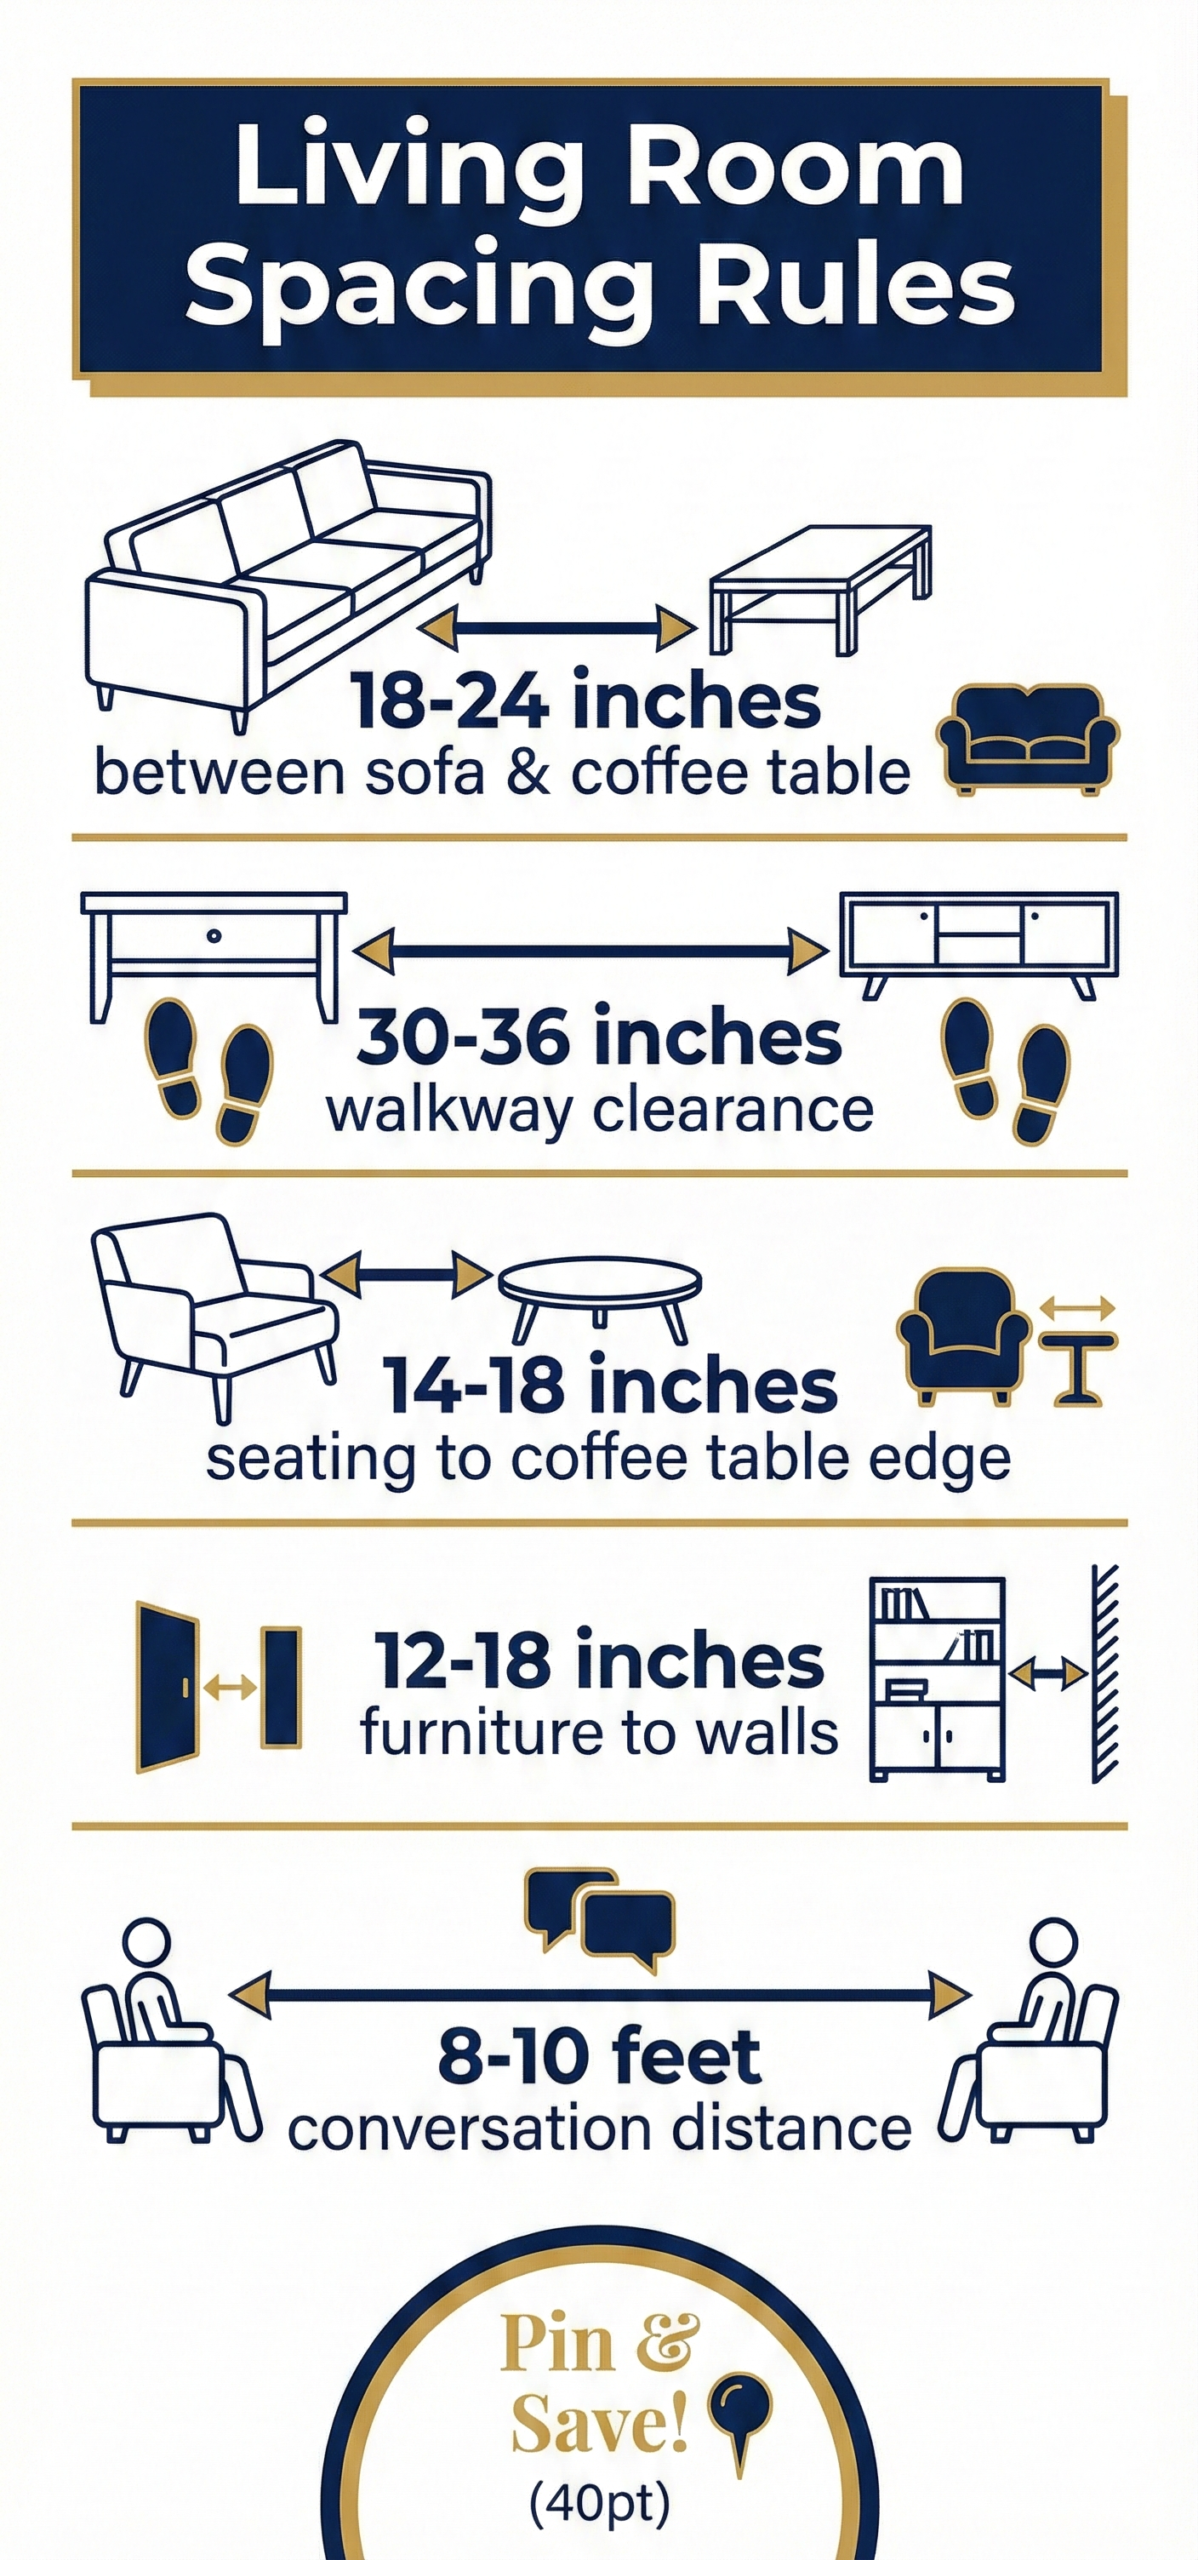
Living room measurement standards specify minimum clearances between furniture pieces, required traffic pathway widths, and recommended spatial relationships supporting functional room use. Primary traffic paths through living rooms require minimum 36-inch width allowing two people to pass comfortably and accommodating mobility device passage per accessibility guidelines. Secondary paths accessing furniture pieces require minimum 24-inch width, though 30-36 inches provides more comfortable access.
Furniture clearance measurements specify minimum space surrounding pieces allowing functional use. Sofas and chairs require minimum 18-inch clearance on sides and rear allowing users to walk around pieces and access seating. Front clearance depends on coffee table presence – minimum 14 inches between sofa front and coffee table edge provides legroom, while 16-18 inches fits larger adults more comfortably. Optimal spacing measures 18-20 inches balancing accessibility with conversation distance.
Main Traffic Path | 30 inches | 36 inches | 42 inches | 48 inches |
Secondary Path | 18 inches | 24 inches | 30 inches | 36 inches |
Furniture to Wall | 3 inches | 6 inches | 12 inches | 18-24 inches |
Sofa to Coffee Table | 14 inches | 16 inches | 18 inches | 20 inches |
Seating to Seating (conversation) | 48 inches | 60 inches | 72 inches | 84-96 inches |
TV to Seating (55-inch screen) | 6.8 feet | 7.5 feet | 9.2 feet | 11.5 feet |
Seating to Fireplace | 6 feet | 8 feet | 10 feet | 12 feet |
Television viewing distance calculations depend on screen size and resolution. For 4K Ultra HD televisions, recommended minimum distance equals 1.5 times screen diagonal measurement, while comfortable viewing distance measures 2-2.5 times diagonal. A 65-inch television requires minimum 8.1-foot viewing distance with optimal viewing at 10.8-13.5 feet. Traditional HD televisions required greater viewing distances (2.5-3 times diagonal), but higher resolution displays fit closer comfortable viewing.
Conversation area dimensions specify optimal seating distances supporting comfortable dialogue without shouting or uncomfortably close proximity. Research in environmental psychology establishes 4-8 feet as optimal social conversation distance for American cultural contexts. Seating arrangements placing primary conversation partners 6-8 feet apart function optimally for living room social activities. Distances exceeding 10 feet inhibit comfortable conversation requiring voice projection.

Furniture arrangement principles guide effective living room layout development regardless of room size or shape. Establish room focal point first, identifying architectural features, views, or entertainment elements attracting visual attention. Orient primary seating toward focal point creating logical spatial organization. Balance furniture distribution avoiding heavy concentration on one side creating visual and functional imbalance. Maintain clear traffic paths connecting room entries to adjacent spaces without furniture obstruction.
Conversation area configuration requires seating arrangement facilitating face-to-face interaction at appropriate distances. L-shaped arrangements using sofa plus perpendicular loveseat or chairs create intimate conversation zones for 4-5 people. U-shaped arrangements adding opposing sofa or loveseat fit 6-8 people supporting larger gatherings. Furniture angled slightly inward (5-10 degrees) enhances conversation comfort compared to strictly perpendicular arrangements.
Furniture scale relative to room proportions significantly impacts spatial perception and functionality. Oversized sectional sofas in small living rooms overwhelm spaces creating cramped uncomfortable environments. Undersized furniture in large living rooms appears lost within space failing to create appropriate visual weight or functional accommodation. Furniture height impacts sight line preservation – lower profile pieces (seat backs under 32 inches) maintain visual openness while taller pieces (seat backs 36-40 inches) create enclosure and privacy.
⚠ PAIN POINT: I bought furniture that looked perfect in the showroom but feels wrong in my actual living room
✓ SOLUTION: Measure existing room dimensions and create scaled floor plan before shopping. Research furniture dimensions from retailer websites before visiting showrooms. Bring room dimensions, photos, and scaled floor plan when furniture shopping. Use painter’s tape on actual floor marking furniture footprints testing size appropriateness. Verify all pieces fit through doorways and hallways – measure narrowest passage point requiring navigation during delivery.
Symmetrical arrangements create formal balanced compositions appropriate for traditional design aesthetics. Matching furniture pairs (two identical chairs flanking fireplace, matching table lamps on coordinating end tables) establish visual equilibrium. Asymmetrical arrangements achieve balance through varied furniture pieces of similar visual weight creating dynamic contemporary compositions. Asymmetry requires careful consideration ensuring one side doesn’t appear sparse while opposite side appears cluttered.
Floating furniture arrangements pull pieces away from walls creating more intimate spatial definitions and sophisticated contemporary aesthetic. This approach functions best in medium to large living rooms (300+ square feet) with adequate space for furniture + clearances + walkways behind furniture. Small living rooms typically require perimeter furniture placement maximizing functional floor area. Exceptions include small spaces where strategic floating pieces create functional zones separating activity areas in open floor plans.
Traffic flow patterns through living rooms require clear unobstructed pathways connecting entry points to adjacent spaces and functional zones within rooms. Primary circulation paths measure minimum 36 inches wide accommodating wheelchairs, walkers, and two people passing simultaneously per accessibility standards. Secondary paths accessing furniture or peripheral zones require minimum 24-inch width, though 30 inches provides more comfortable passage preventing constant furniture contact.
Furniture placement must preserve traffic flow rather than forcing circuitous navigation around obstacles. Direct paths from main entries through living rooms to adjacent spaces (kitchens, hallways, stairs) take priority over furniture arrangement preferences. When circulation necessarily passes through seating areas, ensure pathways behind sofas measure at least 36 inches wide allowing comfortable passage without disrupting seated occupants.
Main Entry to Adjacent Space | 36 inches | 42 inches | 48 inches | Primary circulation |
Furniture Access Path | 24 inches | 30 inches | 36 inches | Reaching seating |
Behind Sofa Passage | 36 inches | 42 inches | 48 inches | Through-traffic areas |
Around Coffee Table | 24 inches | 30 inches | 36 inches | Navigating conversation area |
Doorway Opening | 32 inches clear | 36 inches | 42 inches | Standard residential |
Corner navigation requires adequate clearance preventing tight turns forcing sideways passage. Right-angle turns in traffic paths benefit from minimum 48-inch clearance allowing natural stride continuation without gait modification. Furniture placement creating narrow passages combined with 90-degree turns creates particular access challenges for wheelchair users, individuals using mobility aids, or anyone carrying objects through spaces.
Dead-end paths should maintain 60-inch diameter turning space allowing wheelchair users to reverse direction per accessibility guidelines. Living room layouts creating alcoves or nooks must provide adequate space for entry, use, and exit without backing out. Open floor plans connecting living rooms to adjacent spaces require particular traffic flow attention as multiple circulation patterns intersect within shared areas.
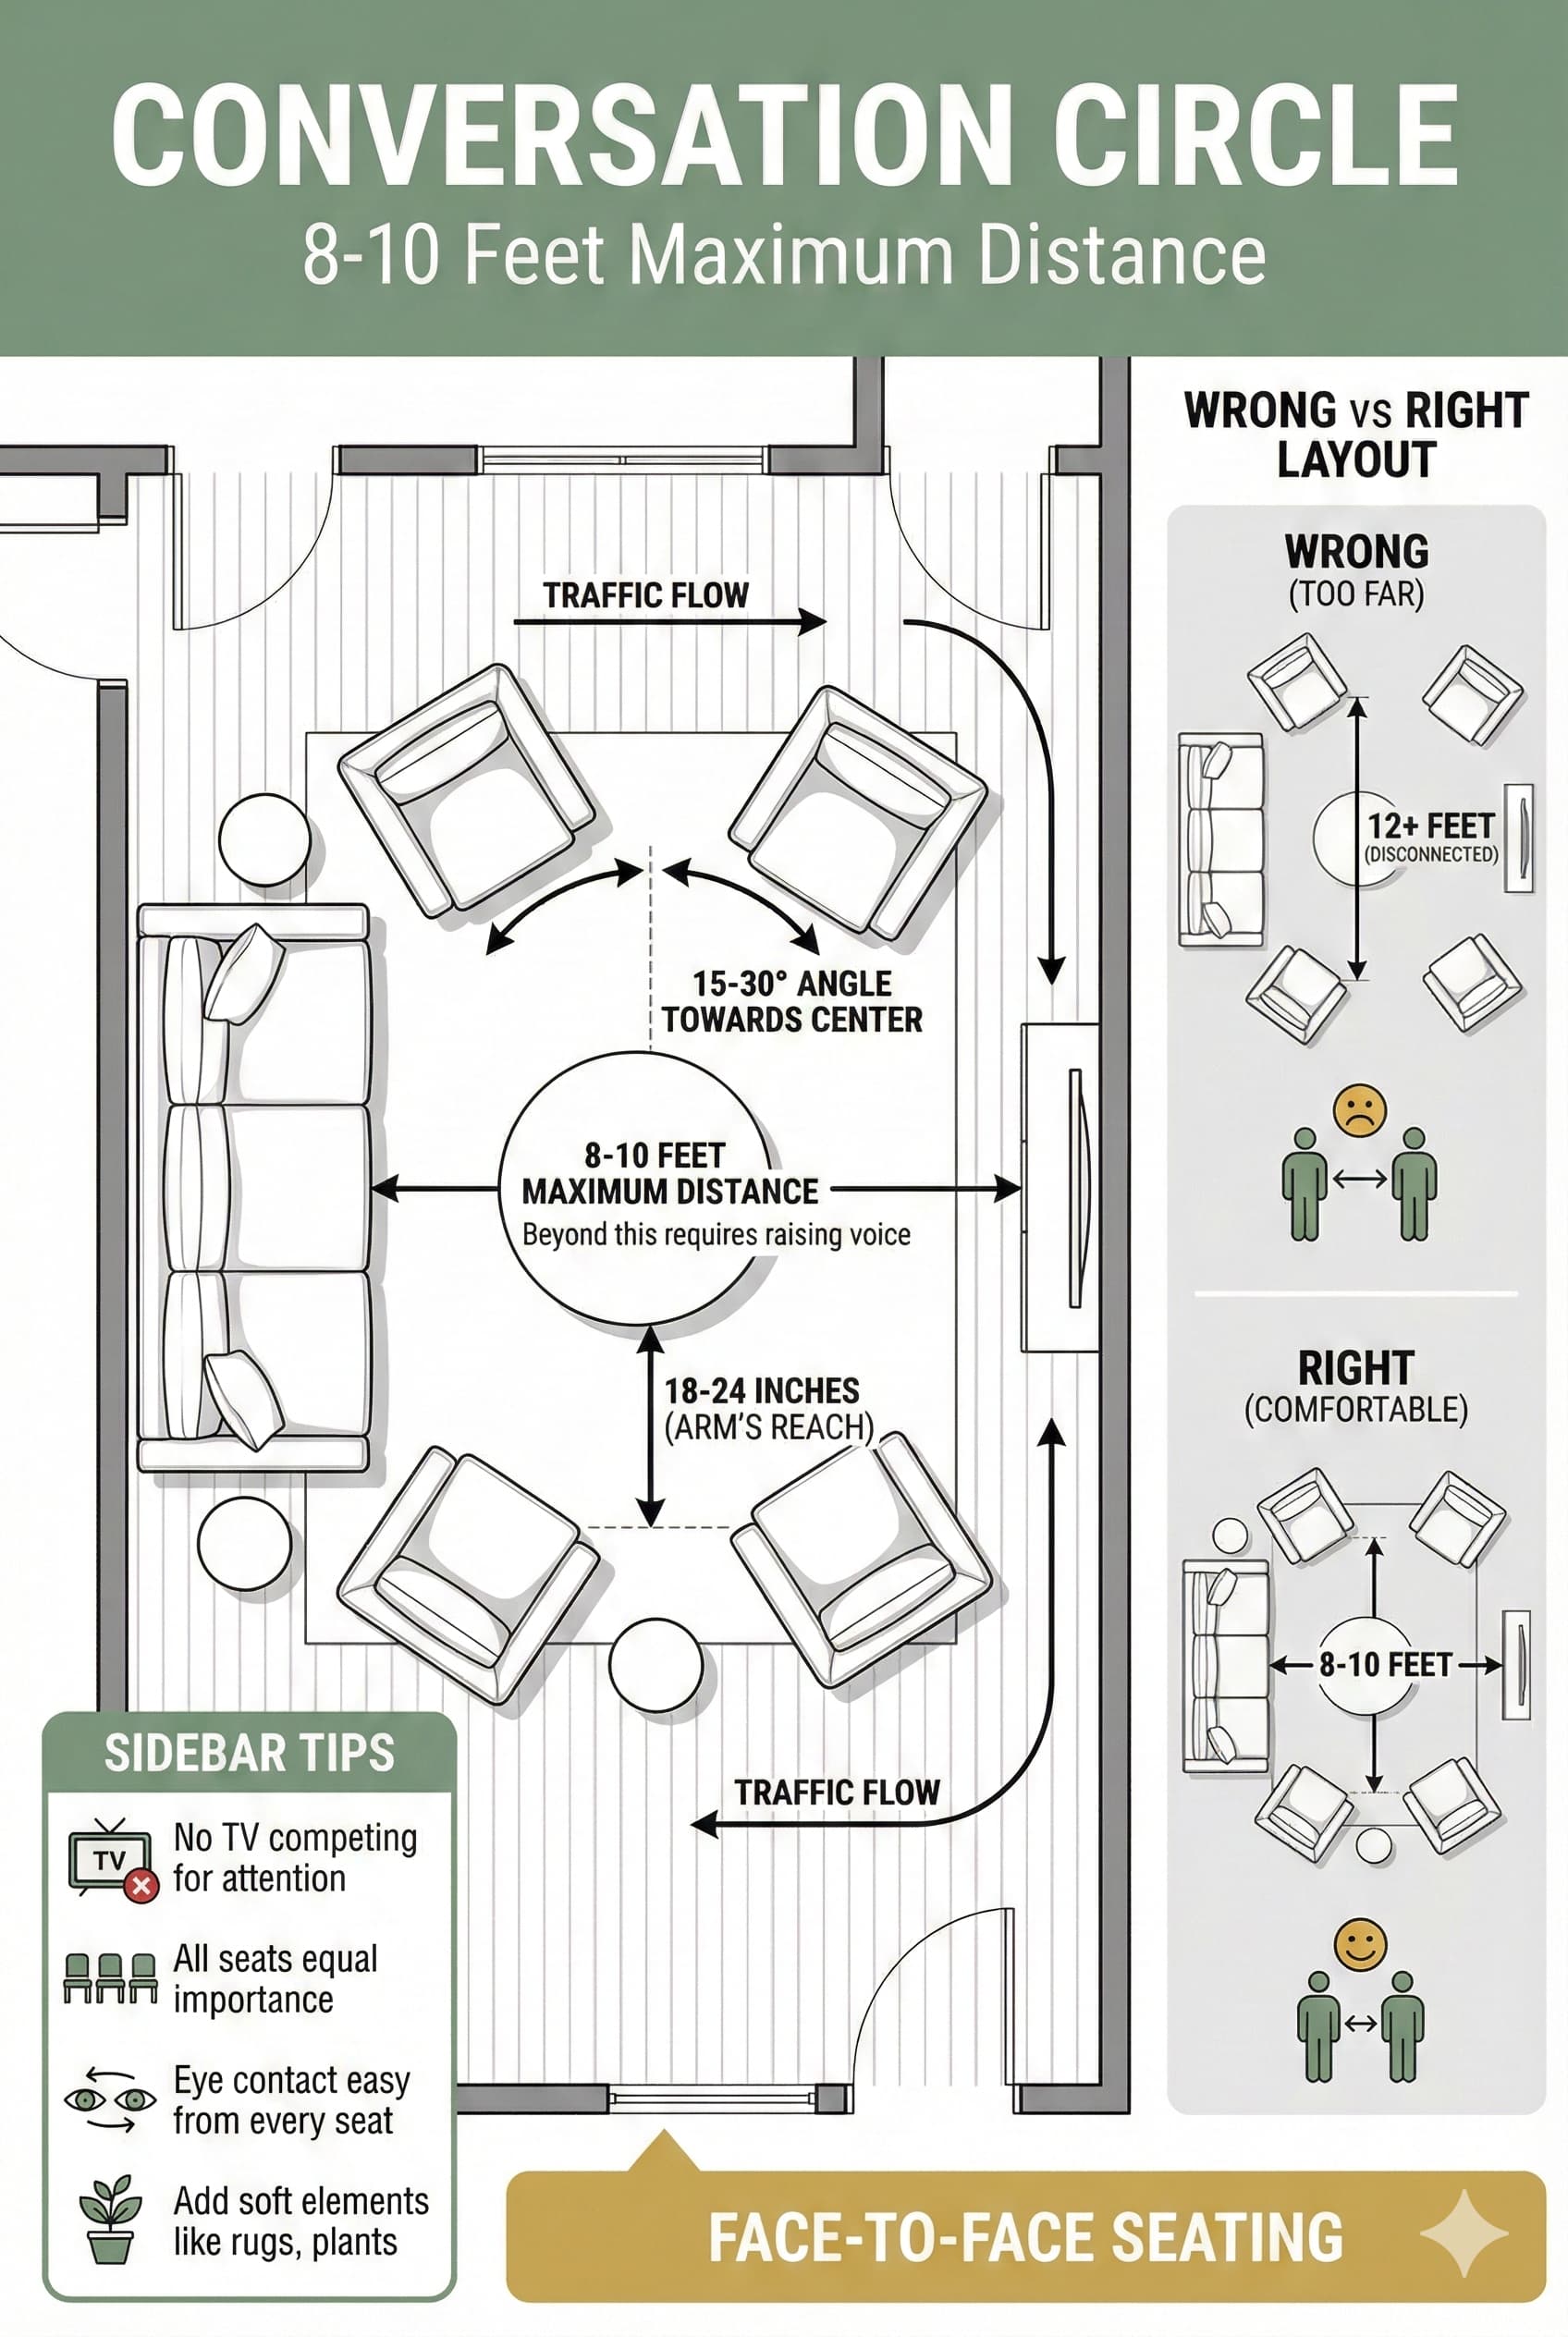
Conversation area planning establishes seating arrangements facilitating comfortable face-to-face interaction at appropriate social distances. Primary conversation seating typically consists of sofa plus two chairs creating U-configuration or sofa plus loveseat/small sofa forming L-configuration. These arrangements place conversation partners 6-10 feet apart supporting comfortable dialogue without voice projection requirements. Coffee tables centered within conversation groupings provide functional surface accessible to all participants.
Seating capacity planning considers both intimate conversation (2-4 people) and expanded gathering (6-10 people) accommodation requirements. Primary seating pieces (sofas, sectionals, loveseats) provide foundational capacity while supplementary seating (chairs, ottomans, poufs) expands accommodation for larger gatherings. Flexible seating including lightweight chairs, ottomans with storage containing spare seating, and floor poufs maintains adaptability supporting varied occupancy levels.
Conversation distance research establishes 4-8 feet as comfortable social interaction range in American cultural contexts. Seating arrangements placing primary conversation partners within this distance range make easier natural dialogue without requiring voice projection. Distances under 3 feet create uncomfortable intimate proximity inappropriate for casual social interaction. Distances exceeding 10 feet inhibit comfortable conversation requiring increased voice volume approaching shouting.
⚠ PAIN POINT: Our living room seating always ends up with people scattered around rather than in conversation groups
✓ SOLUTION: Arrange primary seating (sofa + 2 chairs or sofa + loveseat) in U or L configuration creating defined conversation zone. Limit distance between opposite seating pieces to 8-10 feet maximum. Add coffee table or ottoman in center accessible to all seats. Orient all seating pieces slightly inward (5-10 degrees) toward conversation center rather than strictly parallel. Test arrangement by sitting in each position verifying comfortable sight lines to other seats.
Multi-zone layouts in larger living rooms (400+ square feet) may establish multiple independent seating groupings supporting simultaneous activities. Primary zone oriented toward main focal point (fireplace or television) fits 4-6 people for conversation or entertainment viewing. Secondary zone positioned in alternate area creates reading nook, gaming area, or additional conversation space for 2-4 people. Adequate separation (minimum 48 inches) between zones prevents spatial and functional conflict.
Furniture angling improves conversation ergonomics compared to strictly perpendicular arrangements. Seating pieces angled 5-10 degrees inward toward conversation center creates more direct face-to-face positioning. This subtle adjustment significantly improves interaction comfort without requiring explicit room center focus. Avoid excessive angling (beyond 15 degrees) disrupting furniture relationship to architectural features or creating awkward furniture footprints complicating space planning.
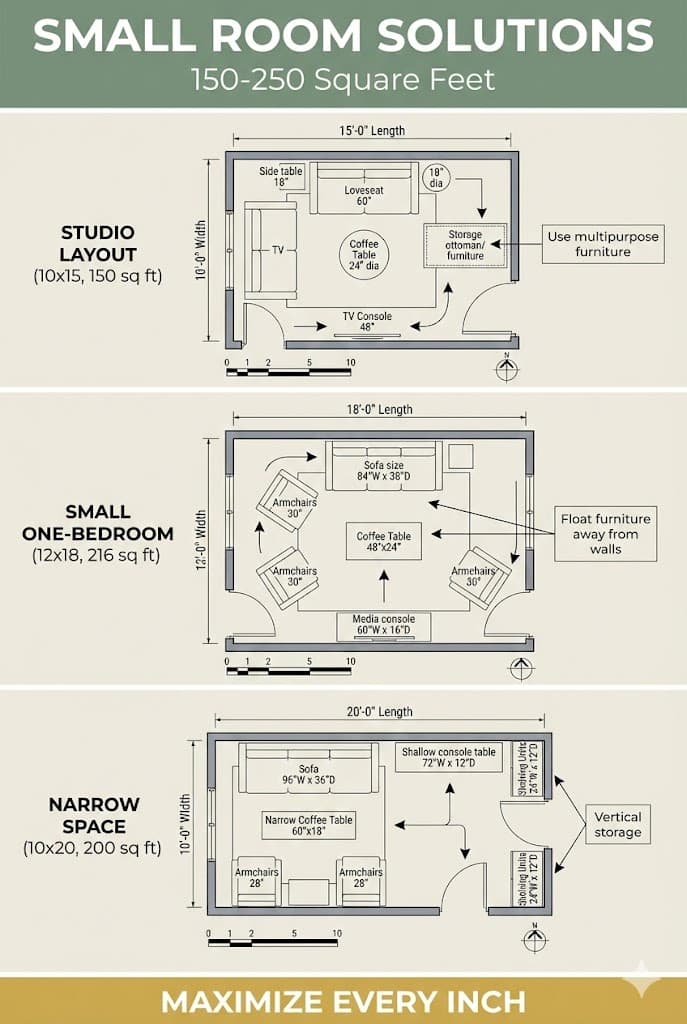
Small living room layout planning for spaces measuring 150-250 square feet requires strategic furniture selection emphasizing appropriately scaled pieces and multi-functional solutions. Oversized furniture overwhelms small spaces creating cramped environments inhibiting comfortable use. Standard residential sofas measuring 84-90 inches long often exceed appropriate dimensions for small living rooms, necessitating apartment-scale sofas (72-78 inches) or loveseats (58-72 inches) maintaining proportional relationships with spatial constraints.
Furniture quantity limitations in small living rooms typically allow primary seating (sofa or loveseat), 1-2 supplementary seating pieces (chairs or ottoman), coffee table, and 1-2 end tables maximum. Additional pieces create overcrowding inhibiting traffic flow and spatial function. Multi-functional furniture including storage ottomans, nesting tables, or sofa tables with shelving maximizes utility within piece count constraints. Wall-mounted elements including floating shelves or wall-mounted media consoles preserve floor space enhancing perceived spaciousness.
Compact | 10×15 feet (150 sq ft) | 72-inch loveseat | 3-4 people | 1-2 chairs, small coffee table |
Small Standard | 12×15 feet (180 sq ft) | 78-inch apartment sofa | 4-5 people | 2 chairs, coffee table, end table |
Small Plus | 12×18 feet (216 sq ft) | 84-inch sofa | 5-6 people | 2 chairs, coffee table, 2 end tables |
Compact Square | 14×14 feet (196 sq ft) | 78-inch sofa | 4-5 people | 2 chairs, coffee table, console |
Perimeter furniture placement along walls maximizes functional floor area in small living rooms. This arrangement creates larger central open space improving perceived spaciousness and traffic flow. Strategic floating placement may position one or two key pieces (sofa, chairs) away from walls when spatial dimensions allow adequate clearances and walkways. Complete perimeter hugging creates uninviting rigid arrangements – balance wall placement with subtle angling or positioning creating more organic spatial flow.
Visual lightness strategies including furniture with exposed legs (rather than skirted or solid bases), glass or acrylic elements (coffee tables, accent tables), and wall-mounted pieces maintain visual openness. Heavy solid furniture with closed bases and dark finishes increases perceived weight and spatial enclosure. Light neutral colors on walls, furniture, and flooring create brightness enhancing spacious feeling. Minimal window treatments maximizing natural light preserve openness rather than heavy draperies creating visual weight.
⚠ PAIN POINT: My small living room feels cramped and cluttered regardless of what I try
✓ SOLUTION: Reduce furniture piece count – remove anything not serving essential function. Downsize sofa from standard (84-90 inches) to apartment scale (72-78 inches). Replace bulky coffee table with smaller version, nesting tables, or ottoman. Mount television on wall eliminating media console. Install floating shelves rather than floor bookcases. Limit decorative accessories to 3-5 meaningful pieces. Maintain predominantly light neutral color palette with minimal pattern.
Sight line preservation through strategic furniture height selection maintains visual continuity enhancing perceived space. Low-profile furniture with seat backs under 32 inches prevents visual barriers fragmenting space. This approach particularly benefits small living rooms in open floor plans where maintaining sight lines to adjacent spaces preserves spatial connections. Traditional higher-back seating (seat backs 36-40 inches) creates enclosure appropriate in larger spaces but may overwhelm small rooms.
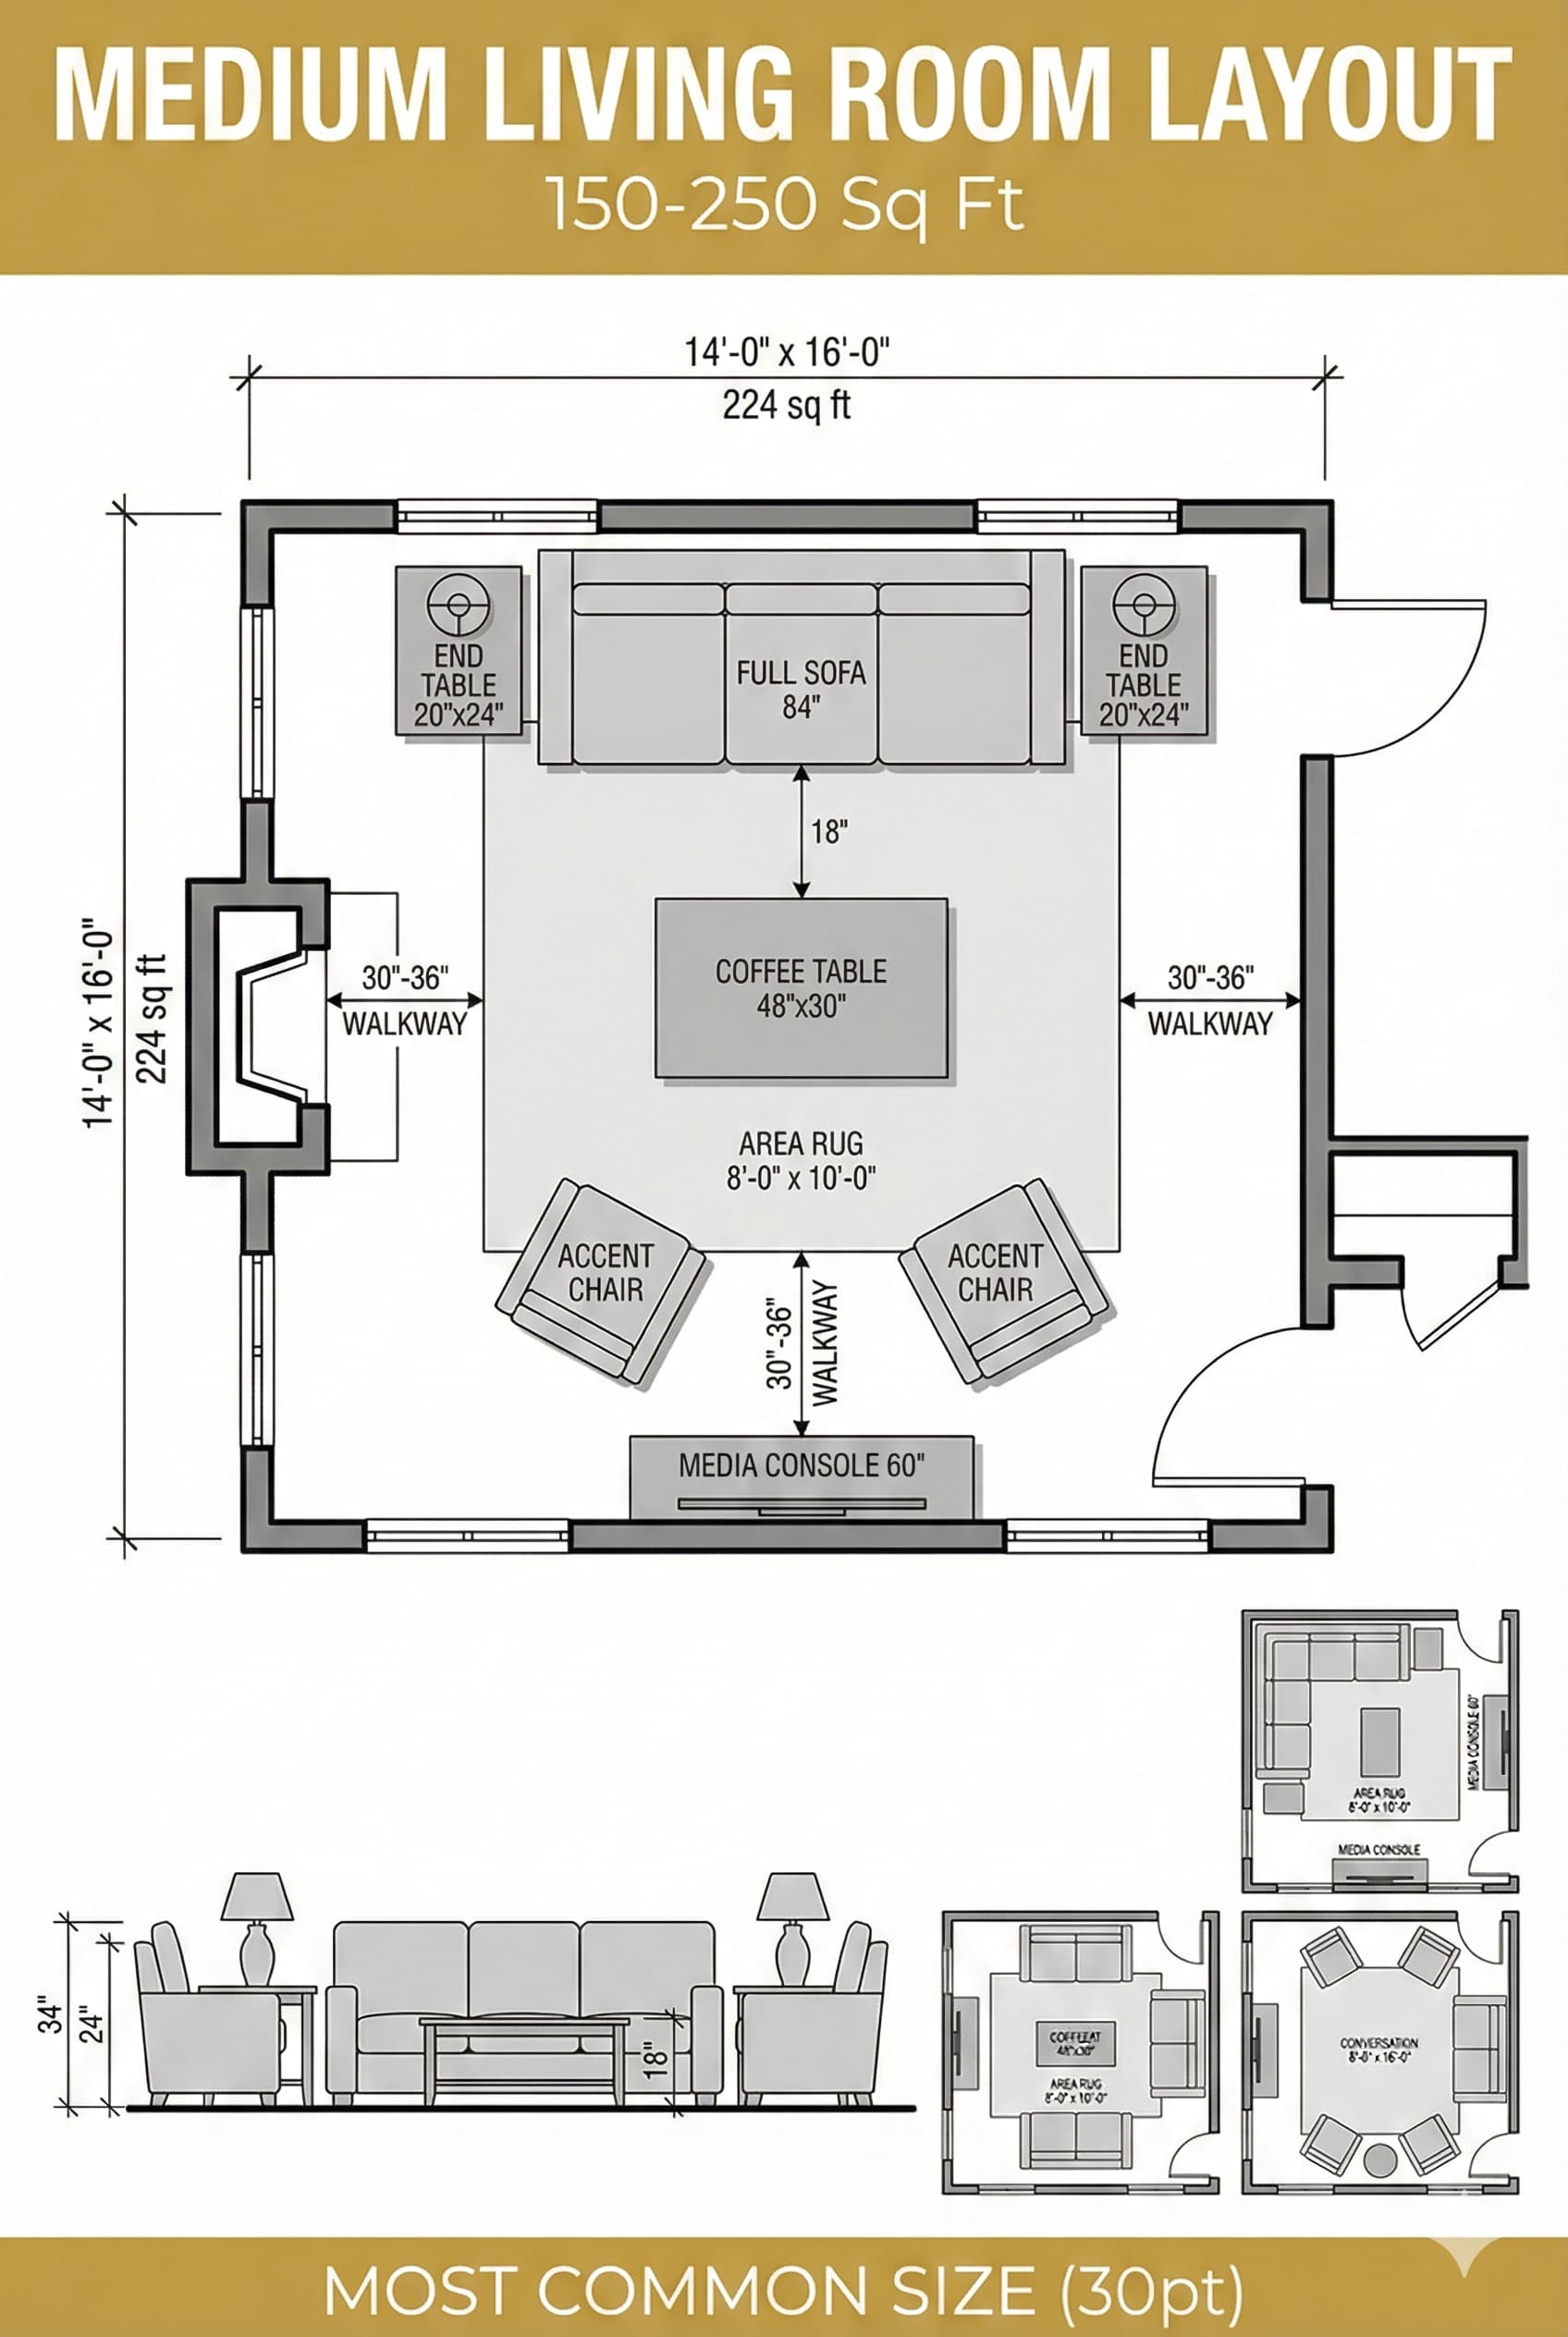
Medium living room layouts for spaces measuring 250-350 square feet fit standard residential furniture scaled appropriately for American homes. Rooms in this size range comfortably fit standard sofas (84-90 inches), full-size conversation seating groups including sofa plus two chairs, and supplementary furniture including coffee tables, end tables, and media consoles. Medium living rooms provide sufficient spatial flexibility supporting varied furniture arrangement options.
Furniture arrangements in medium living rooms establish primary conversation groupings oriented toward main focal points while maintaining clear traffic circulation. L-shaped configurations position sofa along one wall with two chairs perpendicular creating open conversation zone. U-shaped arrangements add opposing loveseat or small sofa across from primary sofa accommodating larger gatherings. Both configurations benefit from central coffee tables providing functional surfaces accessible to all seating positions.
Medium Compact | 14×18 feet (252 sq ft) | 84-inch sofa + 2 chairs | 5-6 people | 6-8 pieces |
Medium Standard | 15×20 feet (300 sq ft) | 90-inch sofa + 2 chairs | 6-7 people | 8-10 pieces |
Medium Large | 16×20 feet (320 sq ft) | 90-inch sofa + loveseat + 2 chairs | 7-8 people | 10-12 pieces |
Medium Plus | 18×20 feet (360 sq ft) | Sectional + 2 chairs | 8-10 people | 10-14 pieces |
Focal point orientation establishes spatial organization logic in medium living rooms. Primary seating arrangement faces main focal point (fireplace, entertainment center, picture window with view) creating clear hierarchical organization. Perpendicular or angled supplementary seating maintains sight lines to focal point while supporting conversation within grouping. Television placement requires careful consideration balancing optimal viewing angles with furniture arrangement and traffic flow preservation.
Furniture flexibility including movable lightweight chairs, nesting tables, and modular seating expands adaptability supporting varied use scenarios. Medium living rooms fit both intimate daily use (2-4 people) and expanded gatherings (8-10 people) through supplementary seating deployment. Storage ottomans containing spare folding chairs or floor poufs provide hidden capacity accessed when needed without daily spatial impact.
⚠ PAIN POINT: My medium-sized living room feels empty with current furniture but overstuffed when I add more pieces
✓ SOLUTION: Add visual anchoring through area rug defining conversation zone (8×10 or 9×12 feet). Include layering elements: table lamps on end tables, floor lamp beside reading chair, throw pillows on sofa (6-8 pillows), throw blanket draped over seating, artwork on walls. These elements add visual interest and comfortable completion without additional furniture occupying floor space. Scale up coffee table size if current version appears diminutive relative to spatial proportions.
Zoning strategies in medium living rooms approaching upper size range (320-360 square feet) may differentiate primary conversation area from secondary functional zones. Primary zone fits main seating grouping oriented toward focal point. Secondary zone behind sofa or in alternate area creates console table surface for display, reading nook with chair and lamp, or gaming area with small table and chairs. Clear spatial definition through furniture placement and area rugs differentiates zones functionally and visually.
Sight line management through strategic furniture placement and height selection preserves visual flow while creating functional definition. Sofa backs measuring 32-36 inches maintain openness in medium living rooms without creating excessive visual barriers. Console tables positioned behind sofas provide functional surfaces without obstructing sight lines due to lower profile (30-32 inches tall) compared to seating backs. Bookcases and tall storage units require strategic positioning avoiding primary sight line obstruction through spaces.
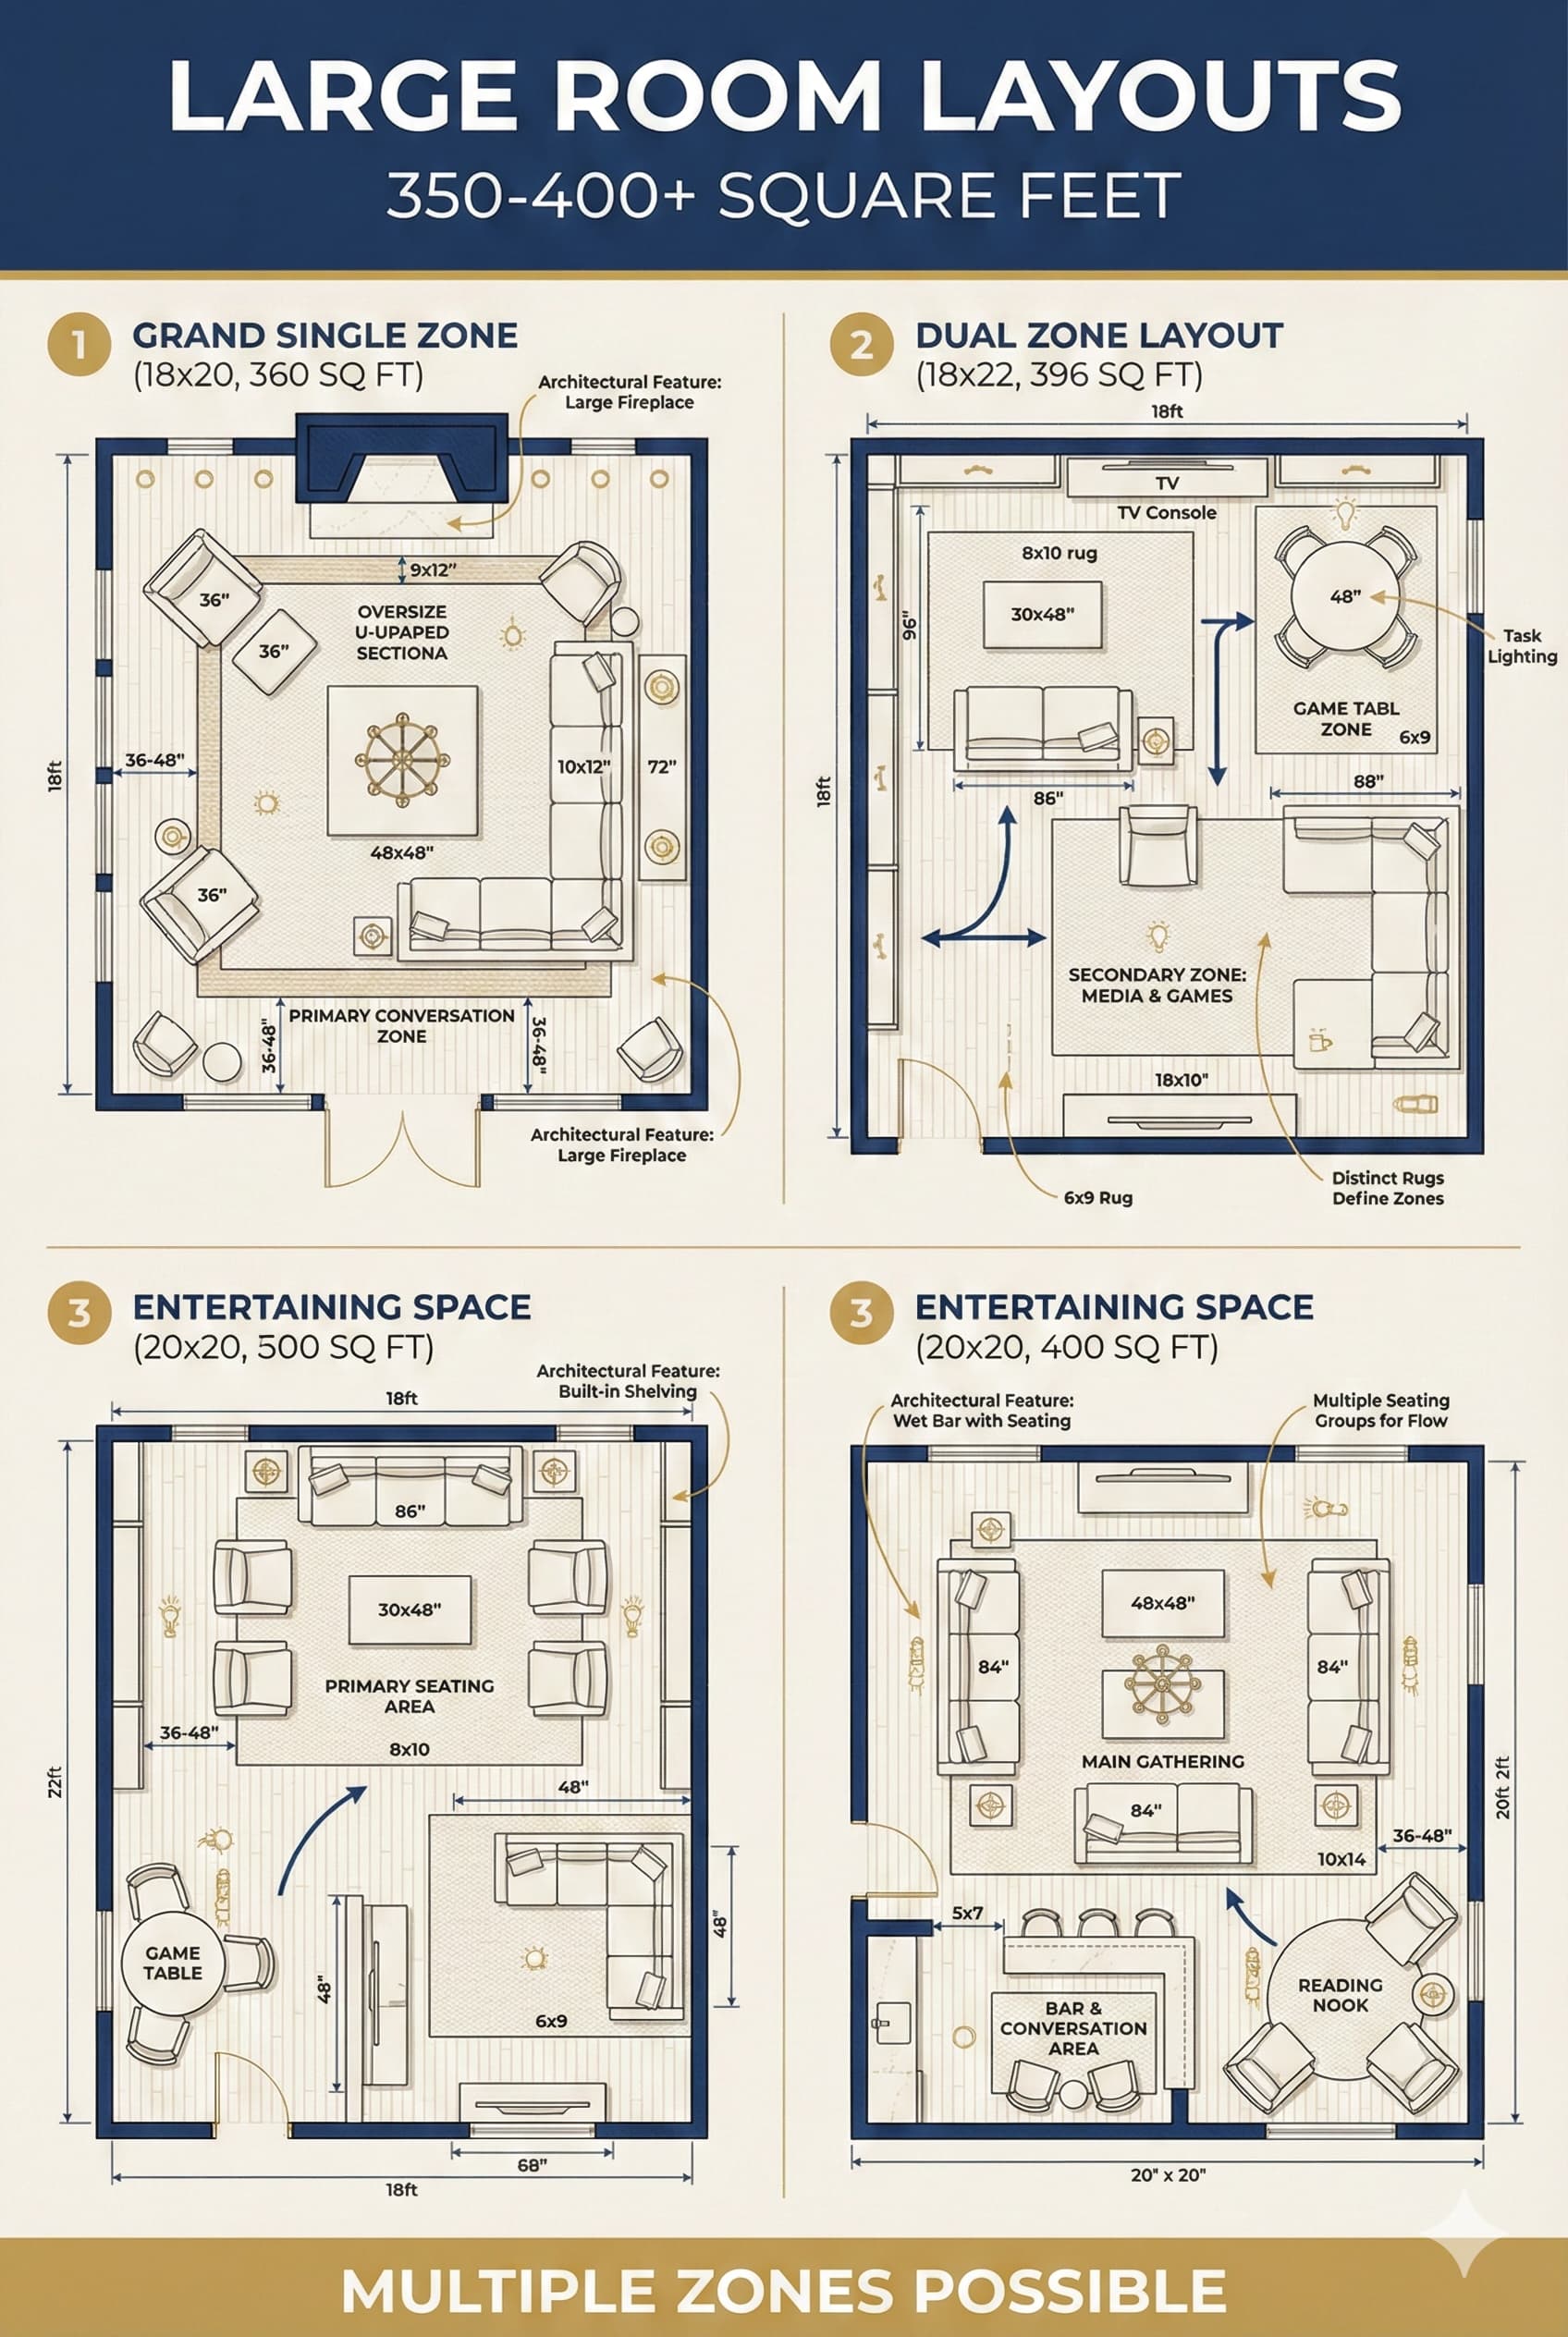
Large living room layouts for spaces measuring 350-450+ square feet fit expanded furniture arrangements including sectional sofas, multiple seating groupings, and substantial storage and display furniture. Rooms in this size range support elaborate conversation configurations, dedicated entertainment zones, and supplementary activity areas including reading nooks, gaming spaces, or workspace integration. Large living rooms require intentional zoning preventing vast undefined central areas creating spatial ambiguity and uncomfortable scale.
Multiple seating zones establish functional organization in large living rooms supporting simultaneous independent activities. Primary zone oriented toward main focal point (fireplace, entertainment center) fits 6-10 people through sectional sofa or comprehensive seating grouping. Secondary zone positioned in alternate area creates intimate conversation space for 2-4 people, reading area with comfortable chair and lighting, or gaming zone with table and chairs. Minimum 48-60 inches separation between zones prevents functional and visual conflict.
Large Standard | 18×22 feet (396 sq ft) | Large sectional (3-piece) | Reading chair + ottoman | 10-12 people |
Large Plus | 20×24 feet (480 sq ft) | Large sectional + 2 chairs | Loveseat conversation area | 12-15 people |
Extra Large | 22×26 feet (572 sq ft) | U-shaped seating (sofa + loveseat + 4 chairs) | Game table + 4 chairs | 15-18 people |
Great Room | 24×28 feet (672 sq ft) | Two complete seating groups | Console workspace | 18-20 people |
Furniture anchoring through area rugs, architectural features, or lighting defines functional zones preventing furniture appearing lost within expansive spaces. Primary conversation area benefits from large area rug (9×12 or larger) anchoring seating arrangement visually. Overhead lighting including chandeliers or substantial pendant fixtures reinforces spatial definition from above. Architectural elements including ceiling coffers, beam treatments, or varied ceiling heights naturally define zones in purpose-built large living rooms.
Symmetrical arrangements create formal balanced compositions appropriate for traditional large living room aesthetics. Matching furniture pairs flanking focal points establish visual equilibrium. Central axis organization with balanced furniture distribution on either side creates controlled formal space feeling. Asymmetrical arrangements in contemporary large living rooms achieve balance through varied elements of similar visual weight creating dynamic compositions avoiding rigid formality.
⚠ PAIN POINT: My large living room feels like a furniture showroom – pieces float disconnected without cohesive purpose
✓ SOLUTION: Anchor primary seating zone with substantial area rug (10×14 or 12×15 feet) defining spatial boundaries. Add console table behind sofa creating defined edge and functional surface. Install substantial overhead lighting fixture (chandelier or large pendant) reinforcing primary zone definition. Create secondary defined zone using area rug, furniture grouping, and dedicated lighting. Connect zones through consistent color palette, style approach, and architectural relationship avoiding competing disconnected spaces.
Architectural intervention in large living rooms may include built-in storage, partial walls creating subtle zone definition, or ceiling treatments differentiating spatial areas. Built-in bookcases flanking fireplaces or entertainment centers provide substantial storage while anchoring focal walls. Half walls (36-42 inches tall) separate zones while maintaining visual connection and sight line preservation. Ceiling beam installations, varied ceiling planes, or architectural lighting define zones from overhead without floor space consumption.
Scale considerations in large living rooms require appropriately substantial furniture avoiding diminutive appearance. Standard residential sofas (84-90 inches) may appear inadequate in rooms exceeding 400 square feet. Large-scale sectionals, extended sofas (96-108 inches), or multiple seating pieces create appropriate visual weight. Artwork, accessories, and architectural elements must scale correspondingly – small-scale pieces appear lost on expansive walls requiring oversize artwork, gallery wall groupings, or architectural treatments.

Open concept living room planning addresses spatial challenges inherent in combined living-dining-kitchen layouts where spatial boundaries lack architectural definition. These connected spaces require careful zoning strategies differentiating functional areas while maintaining visual continuity supporting openness. Furniture placement, area rugs, lighting design, and architectural elements create subtle definition without walls or doors fragmenting space.
Back-of-sofa placement provides common open concept zoning strategy using sofa as space divider between living room and dining area. Console table positioned behind sofa creates defined edge, provides functional surface, and establishes clear spatial boundary while maintaining visual permeability through space. This arrangement works particularly effectively when circulation paths avoid passing between sofa back and console, instead routing around conversation area entirely.
Living Zone | Sofa, area rug, coffee table | 36-inch perimeter circulation | Primary seating grouping |
Dining Zone | Dining table, rug, pendant light | 36-48 inches table to walls | Formal or casual dining set |
Conversation Bridge | Console table, chairs | 48-60 inches between zones | Transition furniture |
Kitchen Sight Line | Open or partial wall | Maintains visual connection | Bar seating integration |
Area rug zoning clearly defines functional areas in open concept layouts without architectural boundaries. Living room zone receives substantial area rug (8×10 feet minimum, 9×12 or larger preferred) anchoring seating arrangement. Dining zone receives appropriately sized rug (typically 8×10 or 9×12 feet) accommodating table plus chair pullout space. Kitchen zone typically remains without rugs due to spill potential and cleaning complexity. Maintaining 12-24 inches unrug flooring between adjacent rugs creates clear zone definition.
Sight line management through strategic furniture arrangement and height selection maintains visual connection between zones supporting open concept advantages while providing functional differentiation. Lower profile furniture (seat backs under 34 inches) preserves sight lines between living room and adjacent spaces. Console tables, low bookcases, or partial walls (42 inches tall maximum) define zones without creating visual barriers obstructing space perception.
 PAIN POINT: My open concept space feels chaotic – living room, dining, and kitchen blend together confusingly
✓ SOLUTION: Define each zone using area rugs establishing clear boundaries. Position sofa as room divider with back facing dining area – add console table behind sofa creating defined edge. Install distinct overhead lighting for each zone (chandelier over dining table, pendant over kitchen island, flush mount or recessed in living area). Maintain consistent style and color palette throughout preventing visual fragmentation while establishing functional clarity through zoning strategies.
Color zoning uses consistent color palette throughout open concept space while introducing subtle variation defining functional areas. Living room may emphasize cool tones (blues, grays) while dining area features warm accents (orange, gold) creating distinction within overall color harmony. Kitchen maintains neutral backgrounds linking spaces while allowing character variation. Avoid dramatic color shifts creating visual fragmentation – limit variation to 2-3 related tones maintaining overall spatial unity.
Lighting zoning differentiates functional areas through varied fixture types establishing clear spatial definition from overhead. Living room zone utilizes ambient lighting through recessed cans or flush mounts combined with task lighting from table and floor lamps. Dining zone features statement chandelier or pendant fixture creating focal point and illuminating table surface. Kitchen employs task lighting under cabinets, pendant fixtures over islands, and recessed ambient lighting creating layered functional illumination distinct from adjacent zones.
Living room color schemes establish emotional atmosphere, influence spatial perception, and create cohesive visual environments supporting intended aesthetic goals. Color psychology research demonstrates measurable physiological and psychological responses to color exposure including heart rate variations, mood alterations, and perceived temperature changes. Living room colors selected strategically enhance intended space character while supporting occupant wellbeing and comfort.
Neutral color palettes including whites, grays, beiges, and greiges provide versatile foundations accommodating varied furniture styles and allowing accent color modification without complete redesign. These understated backgrounds create calm sophisticated environments while maximizing natural light reflection enlarging perceived spatial dimensions. Modern living room color approaches typically favor neutral foundations with strategic accent color introduction through artwork, pillows, and accessories rather than dominant wall color applications.
Color coordination strategies extend beyond wall paint selection encompassing furniture upholstery, window treatments, flooring tones, and decorative accessories creating comprehensive color relationships. Successful living room design maintains color consistency across elements while introducing sufficient variation preventing monotonous uniformity. The 60-30-10 color rule provides practical framework: 60 percent dominant color (walls, large furniture), 30 percent secondary color (accent furniture, window treatments), 10 percent accent color (pillows, artwork, accessories).
PAIN POINT: I love multiple colors but my living room looks chaotic mixing them all together
✓ SOLUTION: Select three colors maximum: one dominant neutral (60 percent application), one secondary complementary color (30 percent application), one bold accent (10 percent application). Use color wheel relationships selecting analogous colors (adjacent on wheel) for harmonious schemes or complementary colors (opposite on wheel) for dynamic contrast. Test paint samples on multiple walls observing under different lighting conditions before committing to full room application.
Color psychology examines emotional and physiological responses to color exposure informing strategic color selection for living room environments. Warm colors including reds, oranges, and yellows stimulate activity, elevate mood, and increase perceived warmth. Cool colors including blues, greens, and purples promote relaxation, reduce perceived temperature, and create calming atmospheres. Living room color selections should align with intended space use and desired emotional response.
Research in environmental psychology documents measurable physiological responses to color including altered heart rates, blood pressure changes, and modified brain wave patterns. Red exposure increases arousal and stimulation – appropriate for social entertaining spaces but potentially excessive for relaxation-focused living rooms. Blue exposure reduces arousal promoting calm – ideal for relaxation but potentially too sedating for active family spaces requiring energy and engagement.
Warm Reds | Energizing, stimulating | Increased heart rate | Accent walls, accessories |
Warm Oranges | Welcoming, enthusiastic | Appetite stimulation | Accent colors, artwork |
Warm Yellows | Cheerful, optimistic | Elevated mood | Accent walls, accessories |
Cool Blues | Calming, serene | Decreased heart rate | Main walls, upholstery |
Cool Greens | Balanced, restful | Relaxation response | Main walls, accessories |
Cool Purples | Sophisticated, creative | Contemplative state | Accent walls, accessories |
Neutrals (Gray) | Balanced, contemporary | Neutral response | Main walls, large furniture |
Neutrals (Beige) | Warm, comfortable | Neutral response | Main walls, upholstery |
Cultural color associations vary significantly across populations requiring consideration in color selection. White symbolizes purity in Western contexts but mourning in some Asian cultures. Red indicates danger or stopping in Western contexts but prosperity and celebration in Chinese culture. Living room colors selected for multicultural households or households with international connections benefit from researching cultural color symbolism avoiding unintended negative associations.
Personal color preferences strongly influence color satisfaction in residential environments. Research demonstrates individual differences in color preference correlate with personality characteristics, cultural background, and life experiences. Living room color selections should prioritize occupant preferences over design trends, as spaces occupied daily require personal resonance over impersonal fashionability. Color preferences evolve over lifespan with age-related shifts documented in color research.
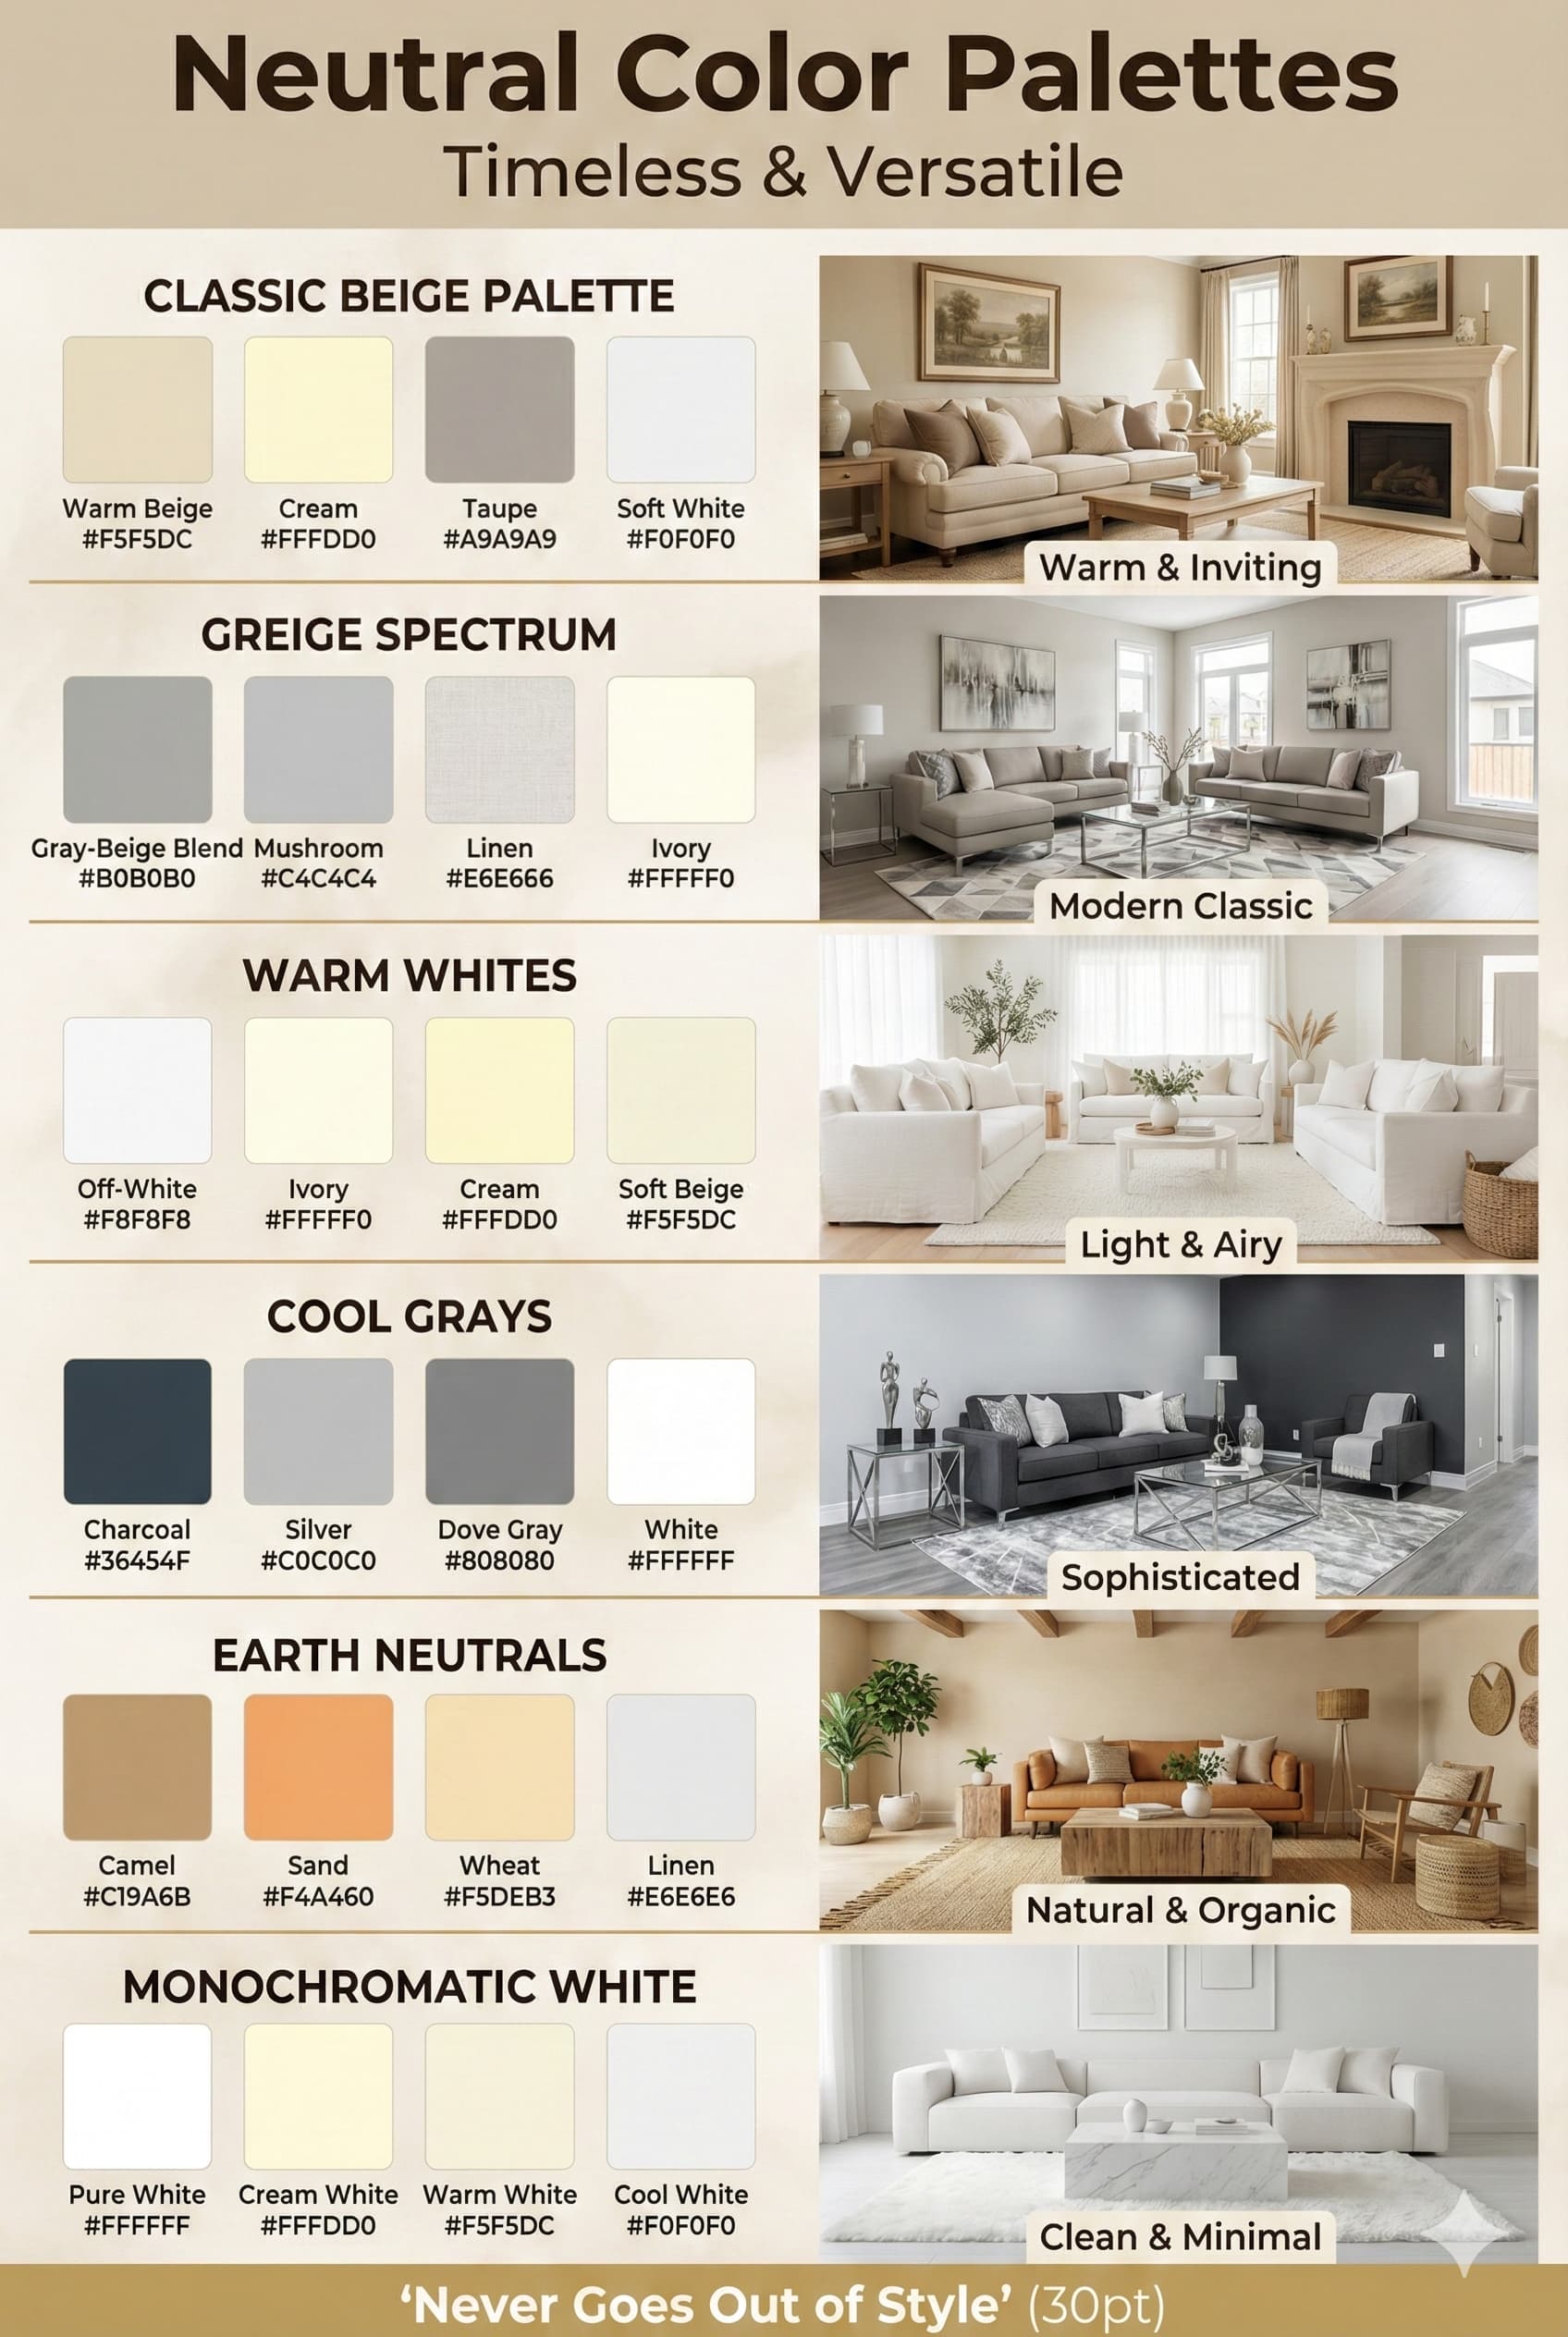
Neutral living room color palettes utilize whites, grays, beiges, greiges, taupes, and warm whites creating sophisticated understated backgrounds supporting varied design styles. These versatile foundations fit changing accent colors through accessories and artwork without requiring complete redesign. Neutral colors maximize light reflection enlarging perceived spatial dimensions – particularly beneficial in small living rooms or spaces with limited natural light.
White living rooms create bright airy atmospheres emphasizing spaciousness and cleanliness. Pure whites (no undertone) appear crisp and modern but may feel sterile without layered textures and materials. Warm whites with beige or yellow undertones create inviting comfortable environments avoiding clinical coldness. Cool whites with blue or gray undertones suit contemporary aesthetics but require warm material layering preventing perceived coldness. White paint selection requires testing multiple options as subtle undertone variations significantly impact final appearance.
Gray living rooms provide contemporary neutral alternatives to traditional beige with undertone variations ranging from warm gray (greige with brown undertone) to cool gray (with blue undertone). Light grays (LRV 50-70) create spacious bright environments while dark grays (LRV 20-40) establish dramatic sophisticated backdrops. Gray color schemes benefit from varied gray tones creating subtle depth avoiding flat monotony. Combining 2-3 gray values with white trim establishes dimensional interest within neutral palette.
⚠ PAIN POINT: My neutral living room looks boring and bland without any personality or interest
✓ SOLUTION: Layer abundant texture through varied materials: linen upholstery, wool area rug, velvet pillows, leather chair, wood furniture, stone accessories, woven baskets, live plants. Introduce subtle pattern through geometric pillows, textured wallpaper on accent wall, or patterned area rug maintaining neutral color palette. Add metallics (brass, bronze, black metal) through lighting fixtures, hardware, and accessories creating visual interest within neutral framework. Include meaningful artwork providing color focus points.
Beige living rooms offer warm welcoming alternatives to stark whites maintaining light-reflective properties enhancing spaciousness. Traditional beige includes yellow or orange undertones creating cozy inviting atmospheres. Greige (gray-beige hybrid) provides transitional option combining gray contemporary feel with beige warmth. Beige color palettes coordinate readily with natural wood tones, warm metals (brass, gold), and earth-toned accents creating cohesive organic color stories.
Pure White | 85-95 LRV | None (true neutral) | Any color accent |
Warm White | 80-90 LRV | Beige, cream, yellow | Earth tones, warm colors |
Cool White | 80-90 LRV | Blue, gray | Cool tones, metallics |
Light Gray | 60-75 LRV | Warm or cool | Blues, greens, yellows |
Medium Gray | 40-60 LRV | Warm or cool | Bold accent colors |
Dark Gray | 20-40 LRV | Warm or cool | White, metallics |
Greige | 50-70 LRV | Gray-beige blend | Warm and cool tones |
Beige | 60-75 LRV | Yellow, pink | Earth tones, warm colors |
Taupe living rooms combine gray coolness with brown warmth creating sophisticated versatile neutrals. Taupe undertones vary from purple-brown to green-brown to pink-brown requiring careful selection and testing. These complex neutrals provide depth exceeding simple beige or gray while maintaining neutral versatility. Taupe color schemes coordinate with varied accent colors from cool blues to warm oranges depending on undertone selection.
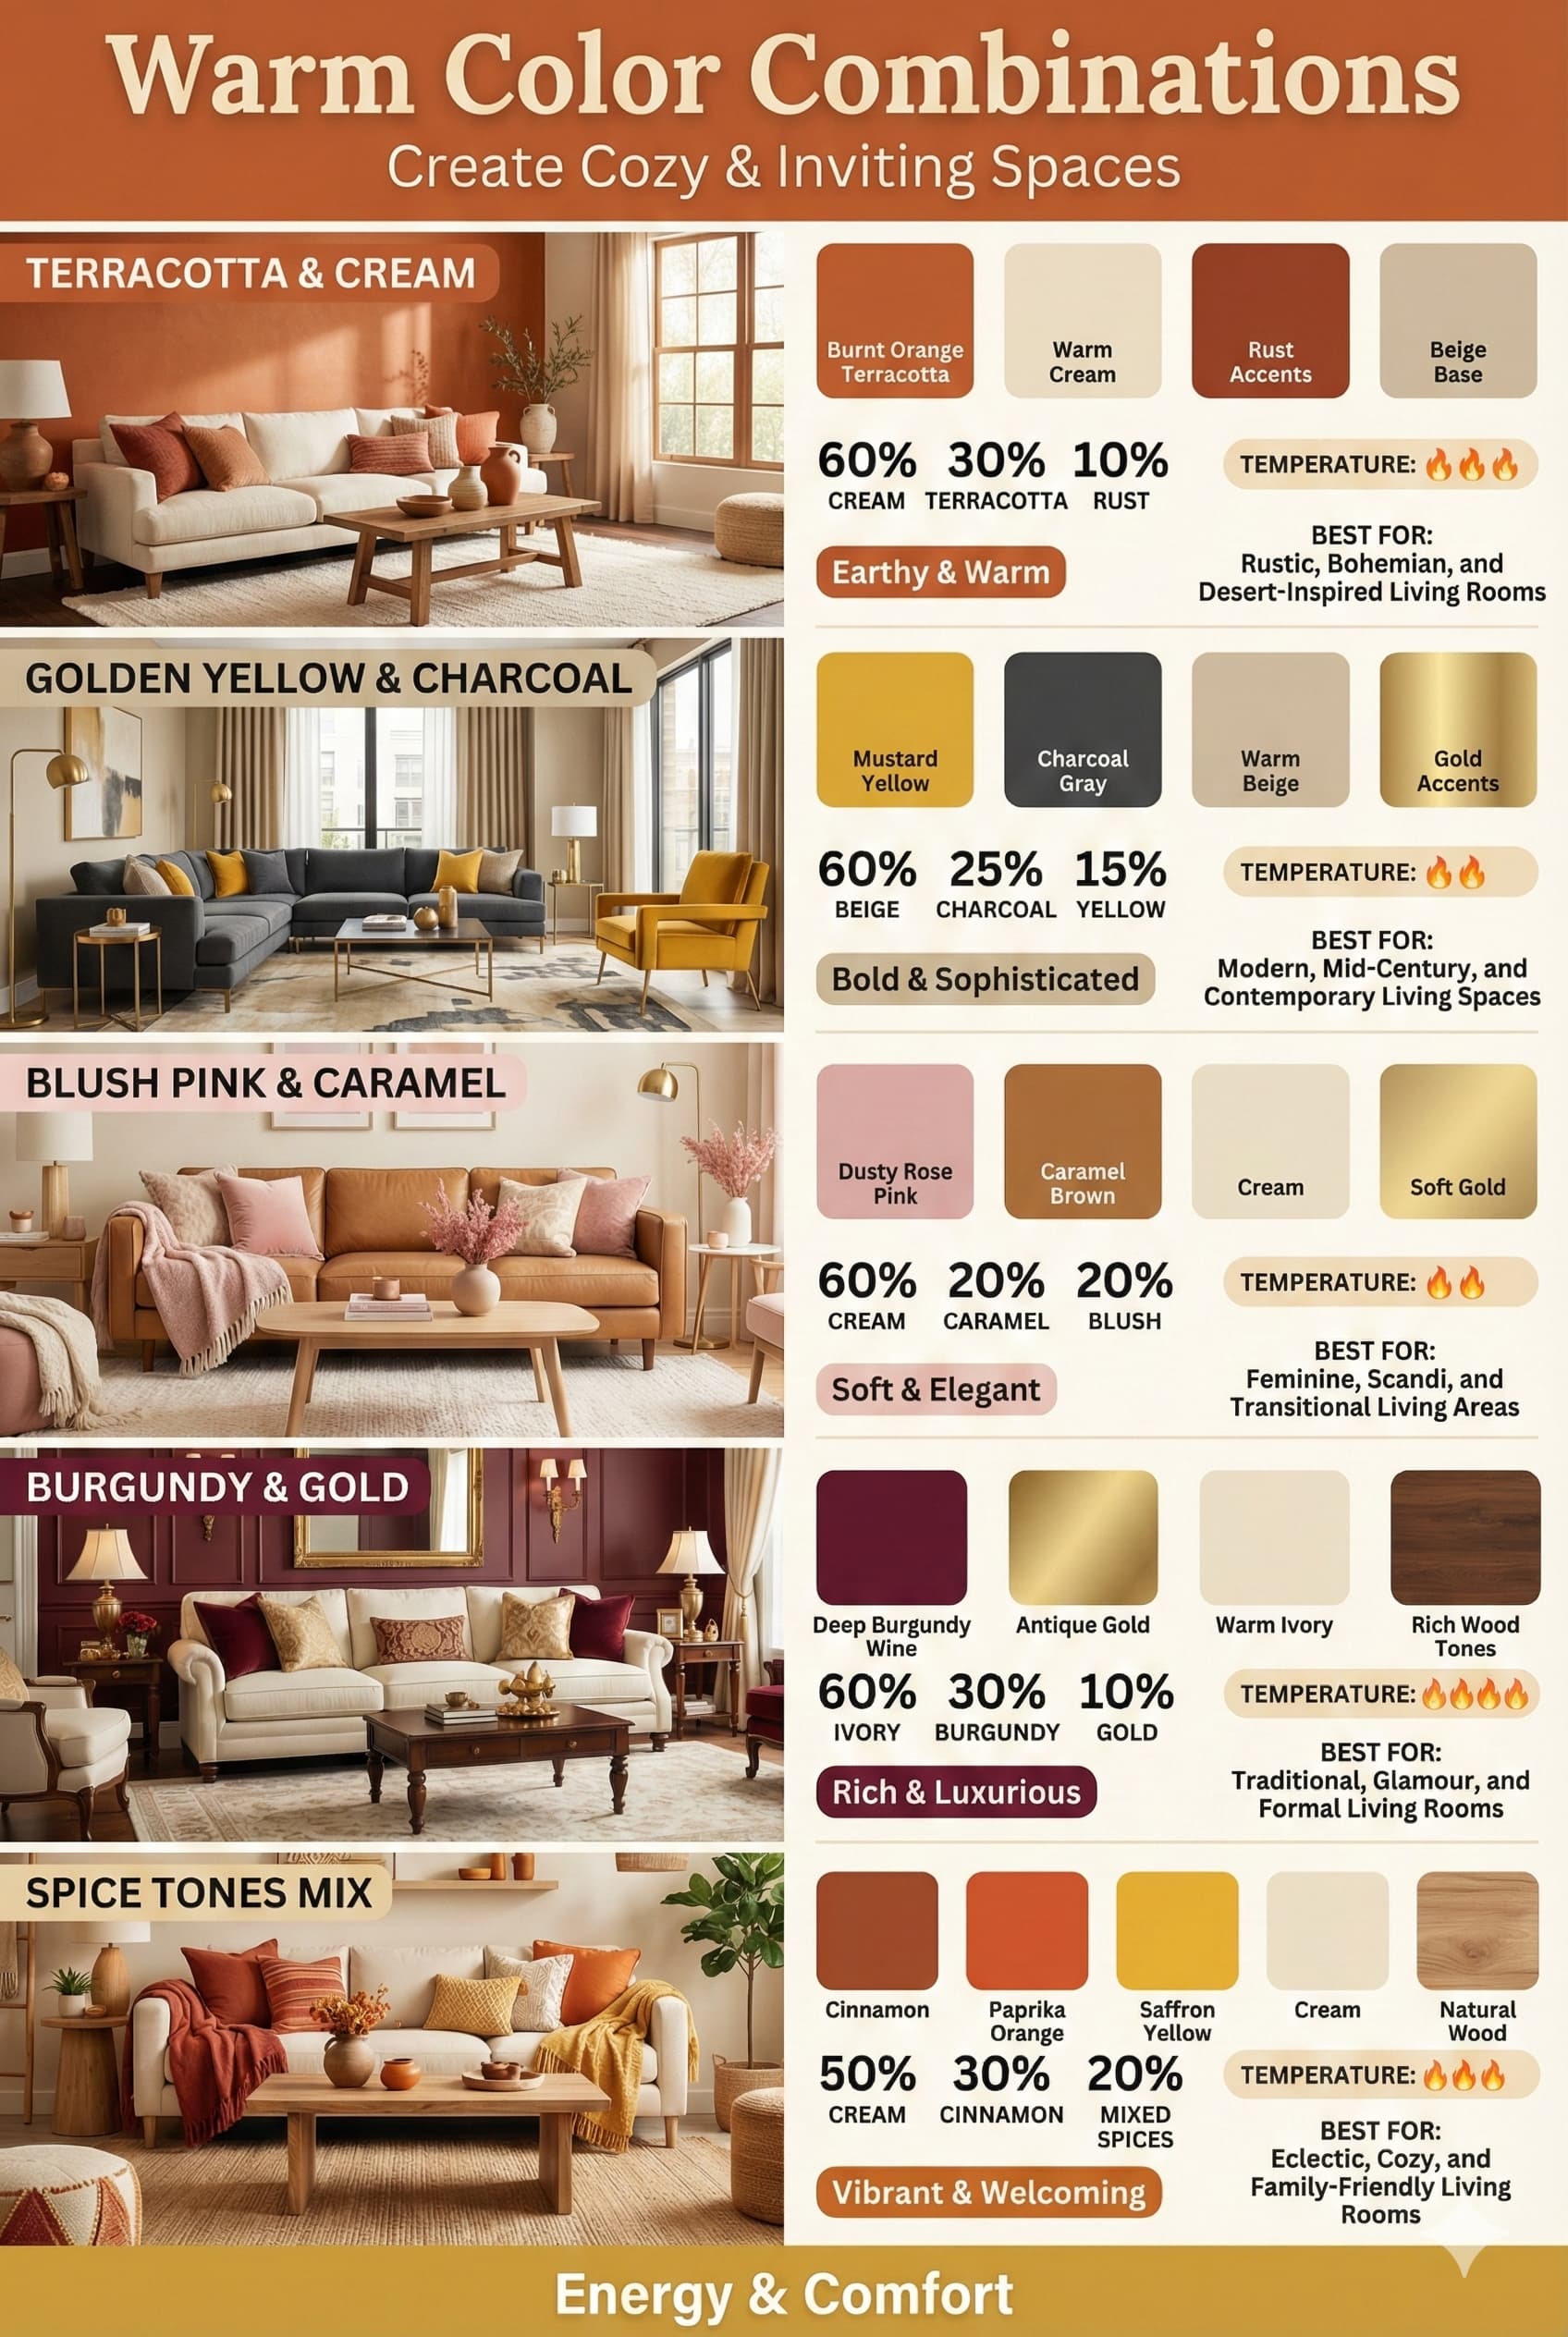
Warm color schemes using reds, oranges, yellows, and warm neutrals create energetic welcoming living room environments promoting social interaction and activity. These stimulating palettes suit spaces prioritizing entertaining, family gatherings, and lively engagement over quiet relaxation. Warm living room colors increase perceived temperature – valuable in cool climate spaces but potentially excessive in hot sunny exposures requiring temperature perception reduction.
Red living rooms make bold dramatic statements appropriate for formal entertaining spaces or accent wall applications rather than entire room envelopment. Deep burgundy reds create rich traditional atmospheres while bright true reds appear contemporary and energetic. Red significantly impacts perceived temperature and arousal levels – research documents 3-4 degree fahrenheit perceived temperature increases in red environments. Red accent walls behind sofas or on fireplace walls provide color impact without overwhelming spatial experience.
Orange living rooms project enthusiasm and warmth in tones ranging from soft peachy corals to vibrant saturated oranges. Muted terracotta and burnt orange suit southwestern or bohemian aesthetics while bright tangerine appears contemporary and bold. Orange stimulates appetite and conversation – appropriate for living rooms connected to dining spaces supporting meal sharing and social gathering. Orange color requires careful proportion management as excessive application overwhelms spaces creating visual fatigue.
⚠ PAIN POINT: I love warm colors but they make my small living room feel even smaller and darker
✓ SOLUTION: Use warm colors strategically on single accent wall rather than entire room perimeter. Select lighter warm tones (peachy coral, soft yellow, warm beige) rather than saturated versions. Maintain white or light ceiling preserving vertical spaciousness. Incorporate abundant white trim and light-colored furniture balancing warm wall colors. Maximize natural light through minimal window treatments. Add reflective surfaces (mirrors, glass, metallics) bouncing light throughout space counteracting warm color light absorption.
Yellow living rooms create cheerful optimistic environments in tones from soft buttery creams to vibrant sunflower yellows. Pale yellows appear warm and inviting without excessive stimulation while saturated yellows demand attention as accent applications. Yellow reflects substantial light – second only to white in light reflectance – making it valuable for dark north-facing rooms requiring brightness enhancement. Yellow color schemes coordinate with gray, white, or blue creating fresh contemporary combinations.
Soft Coral | Low-medium | Full room or accent wall | White, gray, navy blue |
Terracotta | Medium | Accent wall, accessories | Cream, sage green, blue |
Burnt Orange | Medium-high | Accent wall only | Charcoal gray, cream |
Peachy Beige | Low | Full room | White, gray, soft blue |
Butter Yellow | Low-medium | Full room | White, gray, soft blue |
Golden Yellow | Medium-high | Accent wall, accessories | Navy, charcoal, white |
Deep Burgundy | High | Accent wall, rich accents | Cream, gold, forest green |
Warm neutral combinations including combinations of beige, cream, tan, and caramel create comfortable inviting living rooms without bold color intensity. These subtle palettes provide warmth and welcome while maintaining versatility and broad appeal. Varying saturation levels within warm neutral palette (light cream walls, medium tan sofa, dark caramel accent chair) establishes dimensional interest within color family. Warm neutral living rooms coordinate with natural wood furniture, warm metallic finishes (brass, copper, gold), and earth-toned accents.
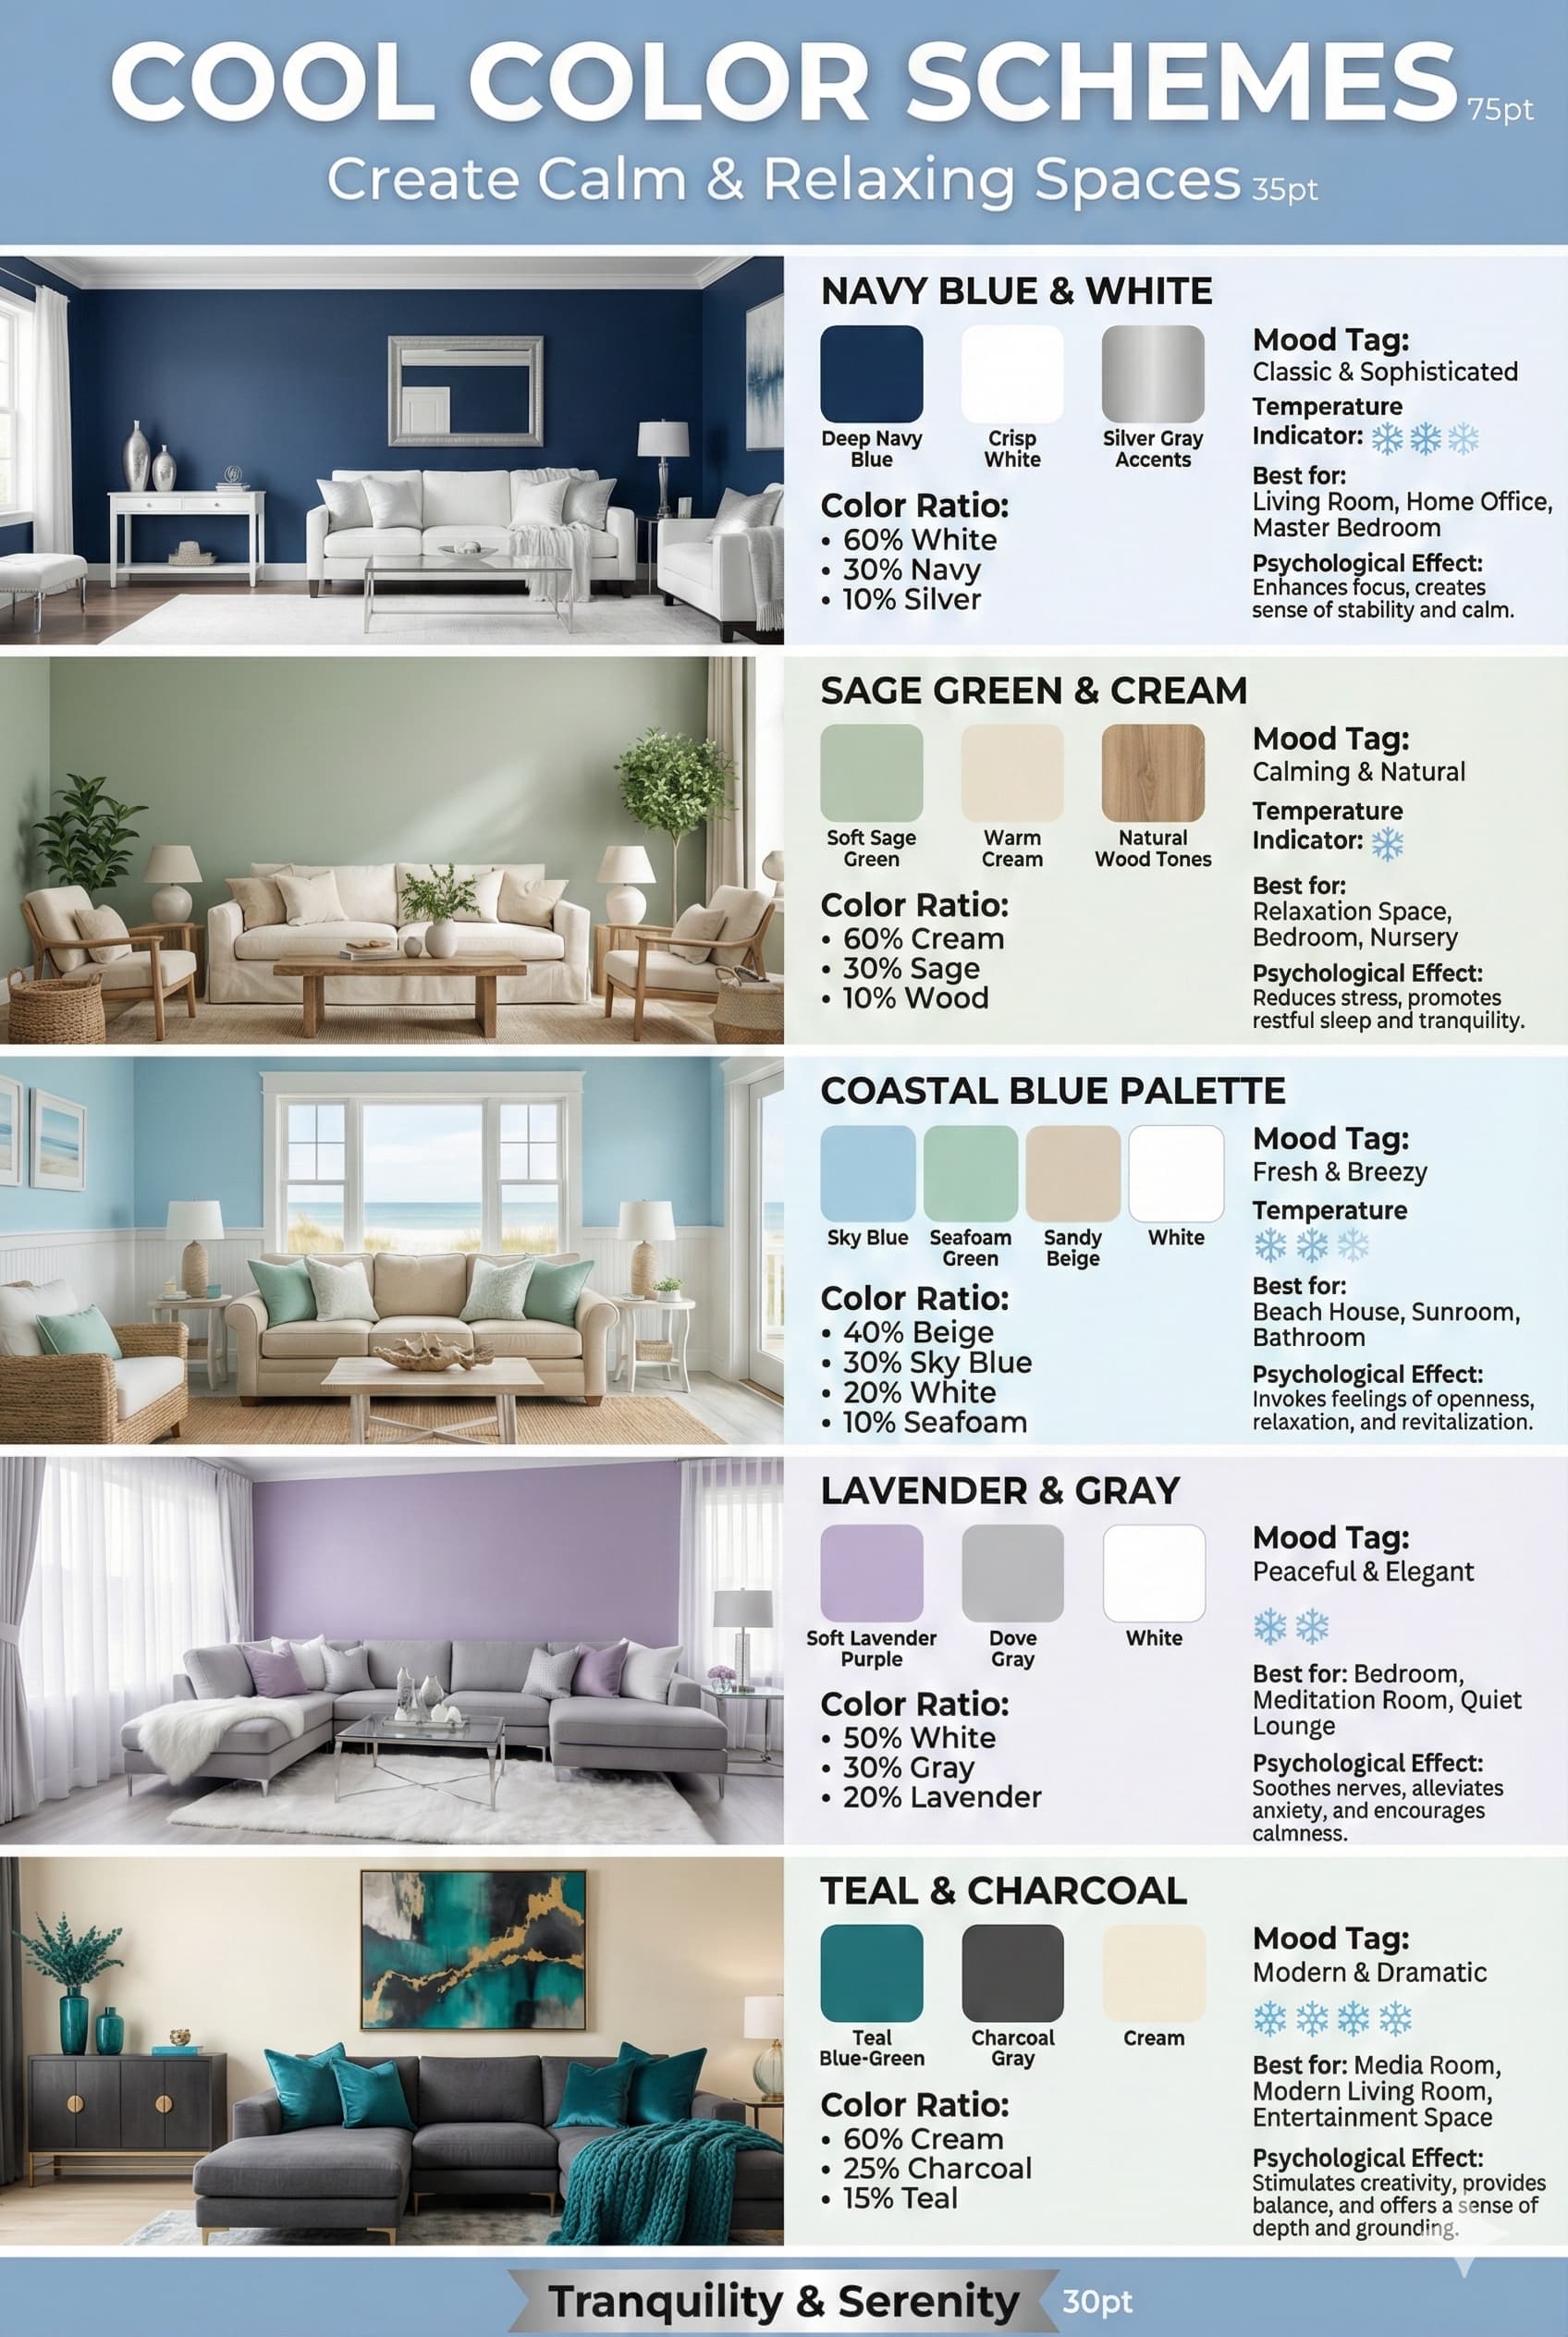
Cool color schemes featuring blues, greens, and purples create calming serene living room environments promoting relaxation and contemplation. These palettes suit spaces prioritizing quiet unwinding, reading, meditation, or stress recovery over active social engagement. Cool living room colors decrease perceived temperature – valuable in warm climate spaces or rooms with excessive solar heat gain requiring psychological cooling effects.
Blue living rooms consistently rank as most popular color choices in American residential interiors according to paint manufacturer surveys. Blue promotes relaxation, reduces stress responses, and creates perception of expanded space. Light blues appear fresh and coastal while navy blues establish sophisticated traditional atmospheres. Blue color psychology documents decreased heart rate and blood pressure in blue environments supporting relaxation and calm – ideal for living rooms prioritizing comfort over stimulation.
Green living rooms connect interior spaces with nature creating balanced harmonious environments. Green resides at color spectrum center producing minimal eye strain and creating restful comfortable perception. Sage green provides popular neutral-adjacent option while emerald green makes bold sophisticated statements. Green color schemes range from yellow-greens appearing fresh and springlike to blue-greens creating cool tranquil atmospheres. Green coordinates naturally with wood furniture and natural materials establishing organic cohesive palettes.
⚠ PAIN POINT: Cool colors make my living room feel cold and unwelcoming despite loving blue and green
✓ SOLUTION: Layer warm materials and textures: wood furniture, warm metallic lighting (brass, copper), natural fiber area rugs (jute, sisal), warm wood-toned flooring, leather or warm-toned upholstery. Add warm accent colors through pillows and accessories (rust, gold, warm coral). Select blue-greens or warm-toned cool colors rather than pure cool blues or blue-purples. Increase lighting intensity using 3000K-3500K bulbs providing warmth. Include live plants adding organic warmth within cool color palette.
Purple living rooms create sophisticated dramatic environments in shades from soft lavender to deep eggplant. Light purples appear romantic and ethereal while dark purples project luxury and richness. Purple occurs rarely in nature making it appear artificial or contrived when applied extensively – accent wall applications or accessory use typically more successful than full room treatment. Purple color stimulates creativity and contemplation according to color psychology research – appropriate for living rooms incorporating creative activities or quiet reflection.
Pale Blue | Low | Full room | Warm wood, brass, coral |
Sky Blue | Medium | Full room or accent | Natural wood, warm beige |
Navy Blue | High | Accent wall, rich accents | Cream, gold, caramel |
Sage Green | Low-medium | Full room | Warm wood, terra cotta |
Emerald Green | High | Accent wall, accessories | Gold, cream, warm gray |
Soft Lavender | Low | Full room or accent | Warm gray, natural wood |
Eggplant Purple | High | Accent wall only | Cream, gold, warm beige |
Cool neutral combinations including various grays with blue undertones create contemporary sophisticated living rooms with subtle color presence. These refined palettes avoid bold color intensity while providing more character than pure neutrals. Combining 2-3 gray-blue tones with crisp white trim establishes dimensional interest. Cool neutral living rooms coordinate with cool-toned wood flooring, brushed nickel or chrome hardware, and contemporary furniture profiles creating cohesive modern aesthetics.
Bold living room colors including saturated jewel tones, deep rich hues, and high-contrast combinations create dramatic distinctive spaces making strong design statements. These confident color applications suit personalities favoring uniqueness over conventional approaches and spaces where impact and memorability take priority over subtle sophistication. Dramatic color schemes require commitment as they dominate spatial experience significantly and necessitate complete redesign for modification.
Jewel tone living rooms featuring emerald green, sapphire blue, ruby red, or amethyst purple create luxurious saturated environments. These rich colors work best in rooms with abundant natural light preventing dark cave-like atmospheres. Jewel tone colors coordinate with metallic finishes including gold, brass, and copper creating opulent sophisticated combinations. Application typically succeeds on accent walls or through upholstery rather than complete room envelope due to intensity levels.
Black living rooms or black accent walls create maximum drama and sophistication when executed properly with adequate lighting and thoughtful material layering. Black walls display artwork dramatically and make colorful furnishings appear more vibrant through high contrast relationships. Black absorbs substantial light requiring increased artificial illumination – plan for 1.5-2x typical lighting levels in black living rooms. This dramatic approach suits contemporary aesthetics and personalities comfortable with bold unconventional choices.
PAIN POINT: I love bold colors but worry about commitment since painting is expensive and time-consuming to change
✓ SOLUTION: Test bold colors on single accent wall rather than entire room. Use removable wallpaper in bold patterns allowing easy modification. Introduce bold color primarily through changeable elements: large artwork, area rug, accent furniture, abundant pillows. Paint just lower wall section below chair rail or picture frame molding limiting bold color scope. Select bold paint colors in living rooms only if prepared for 3-5 year commitment or budgeting for professional repainting costs ($800-2,000 for average room).
High contrast combinations pairing black with white, navy with white, or charcoal with cream create graphic architectural living rooms with strong visual impact. These dramatic schemes require precise execution maintaining balanced proportions between contrast elements. Unbalanced applications (90 percent dark, 10 percent light) create oppressive environments while balanced approaches (60-40 or 70-30 splits) achieve drama with livability. High contrast living rooms suit contemporary modern aesthetics particularly well.
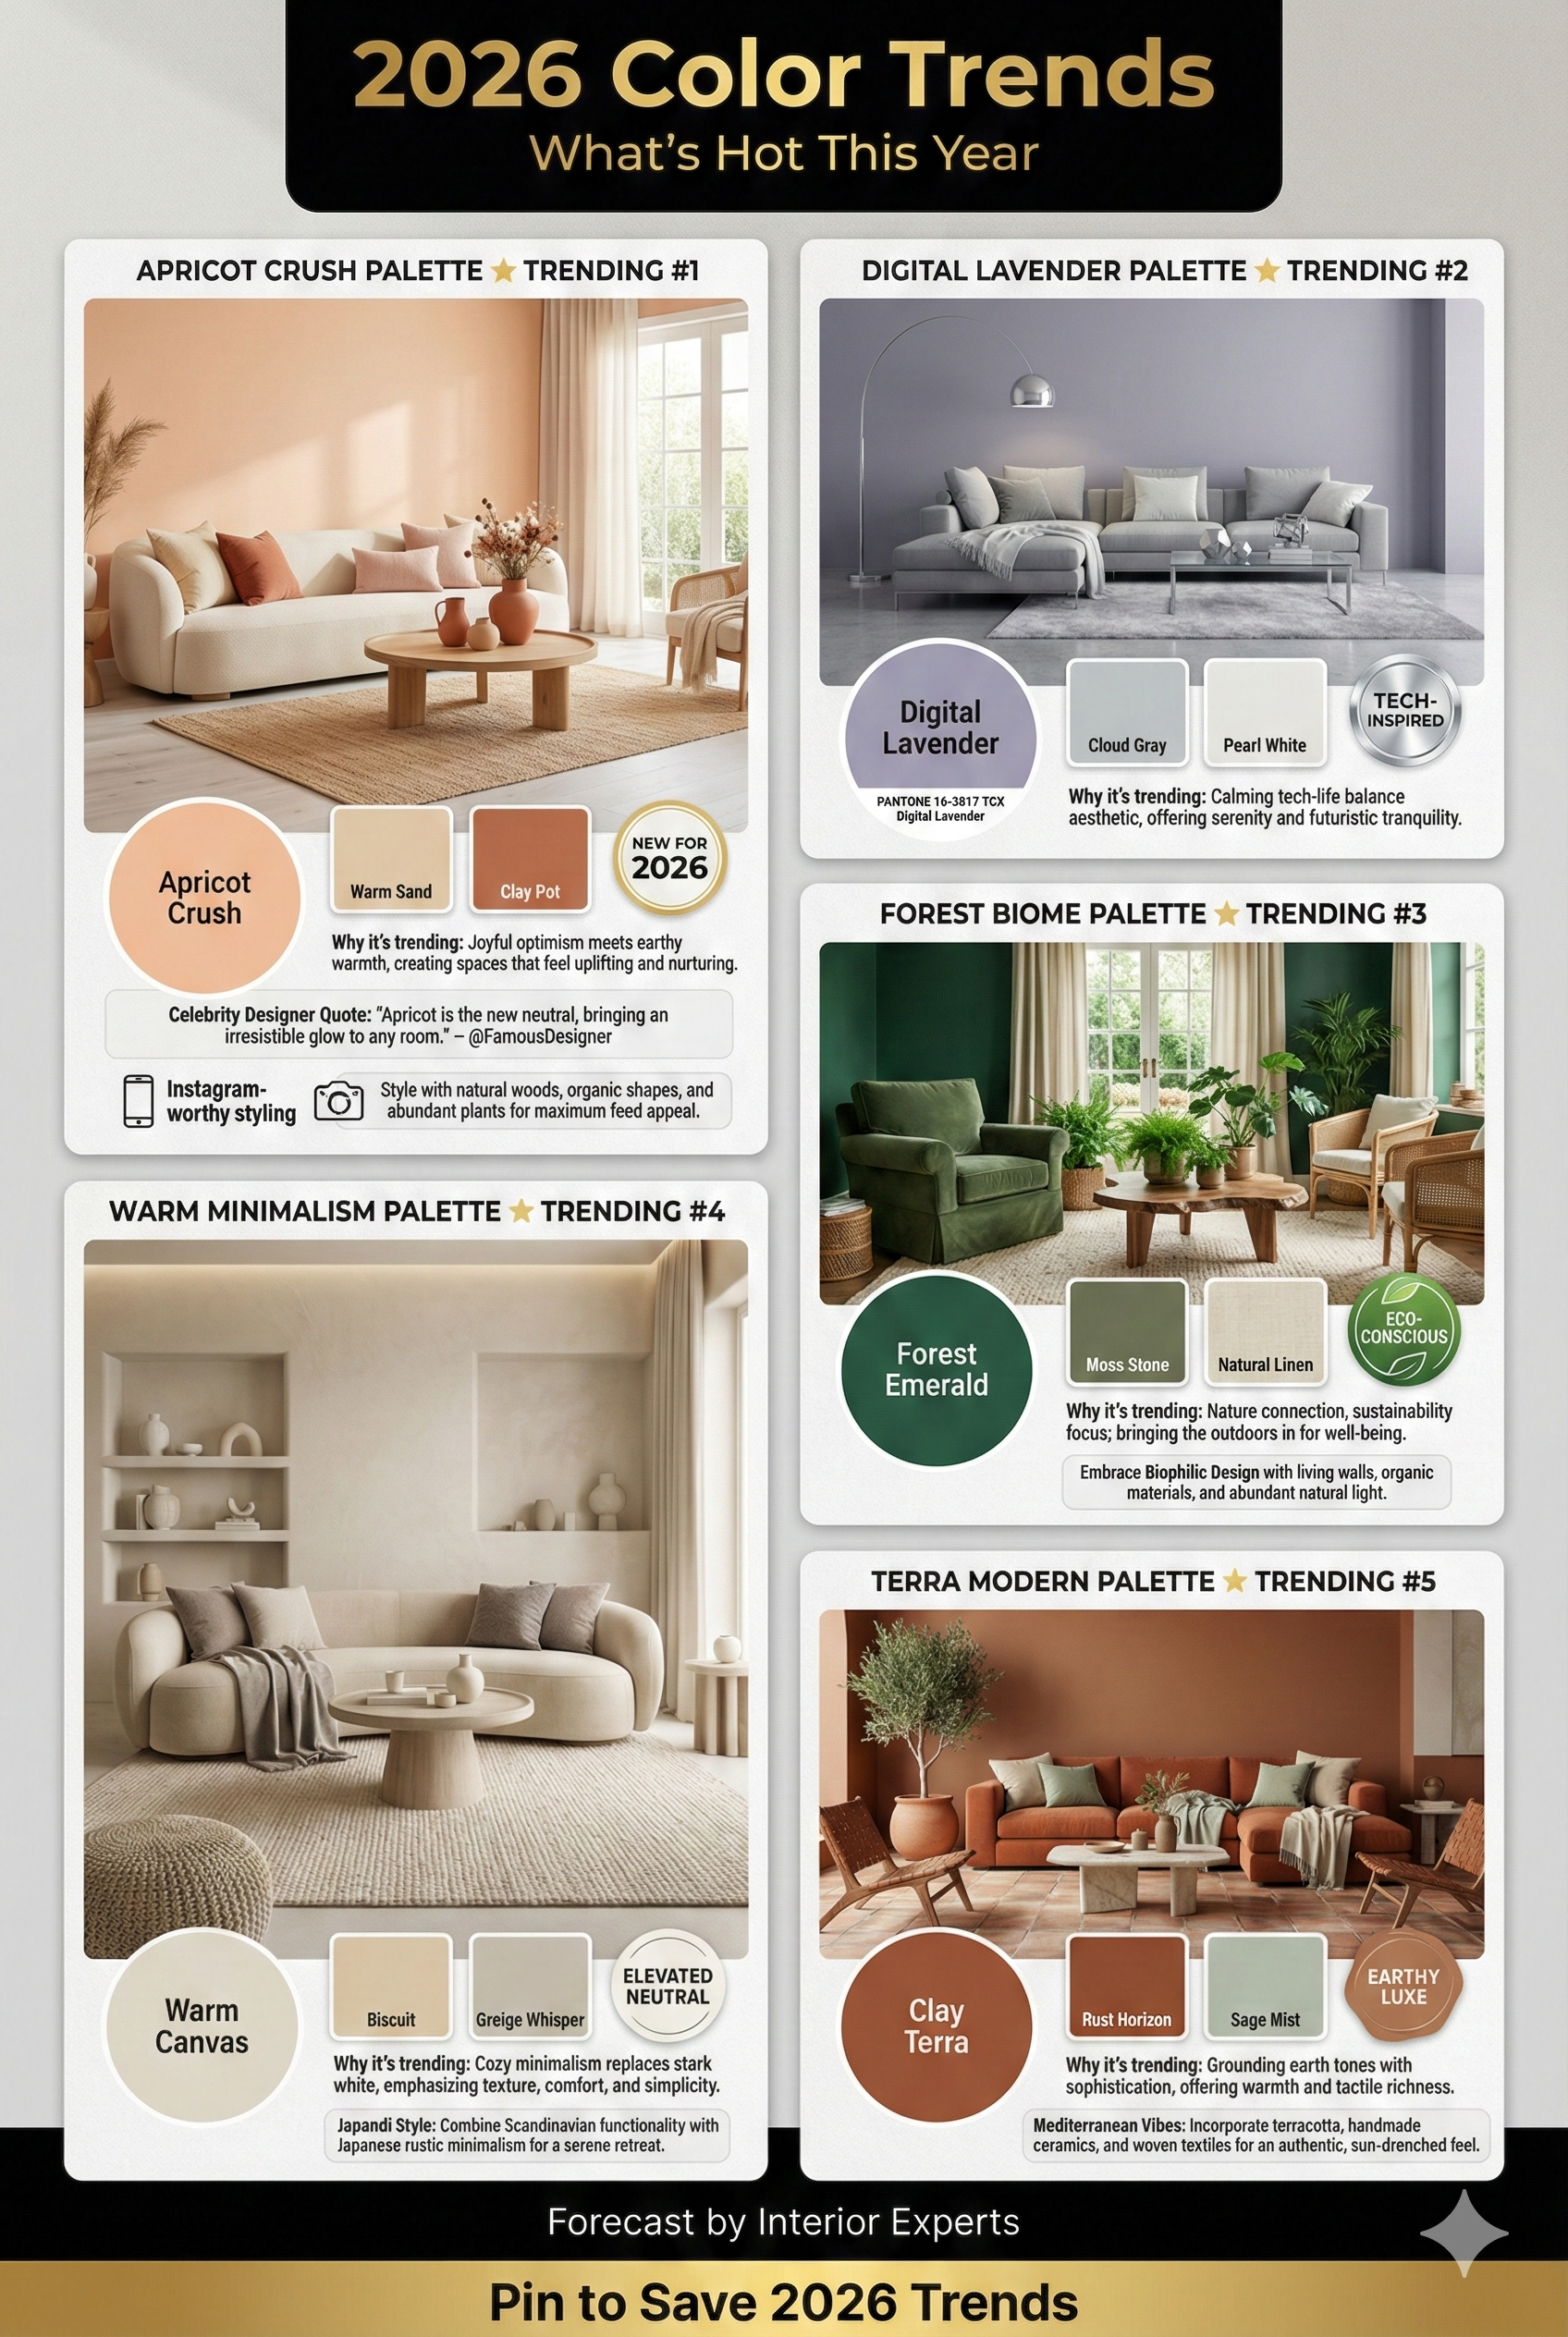
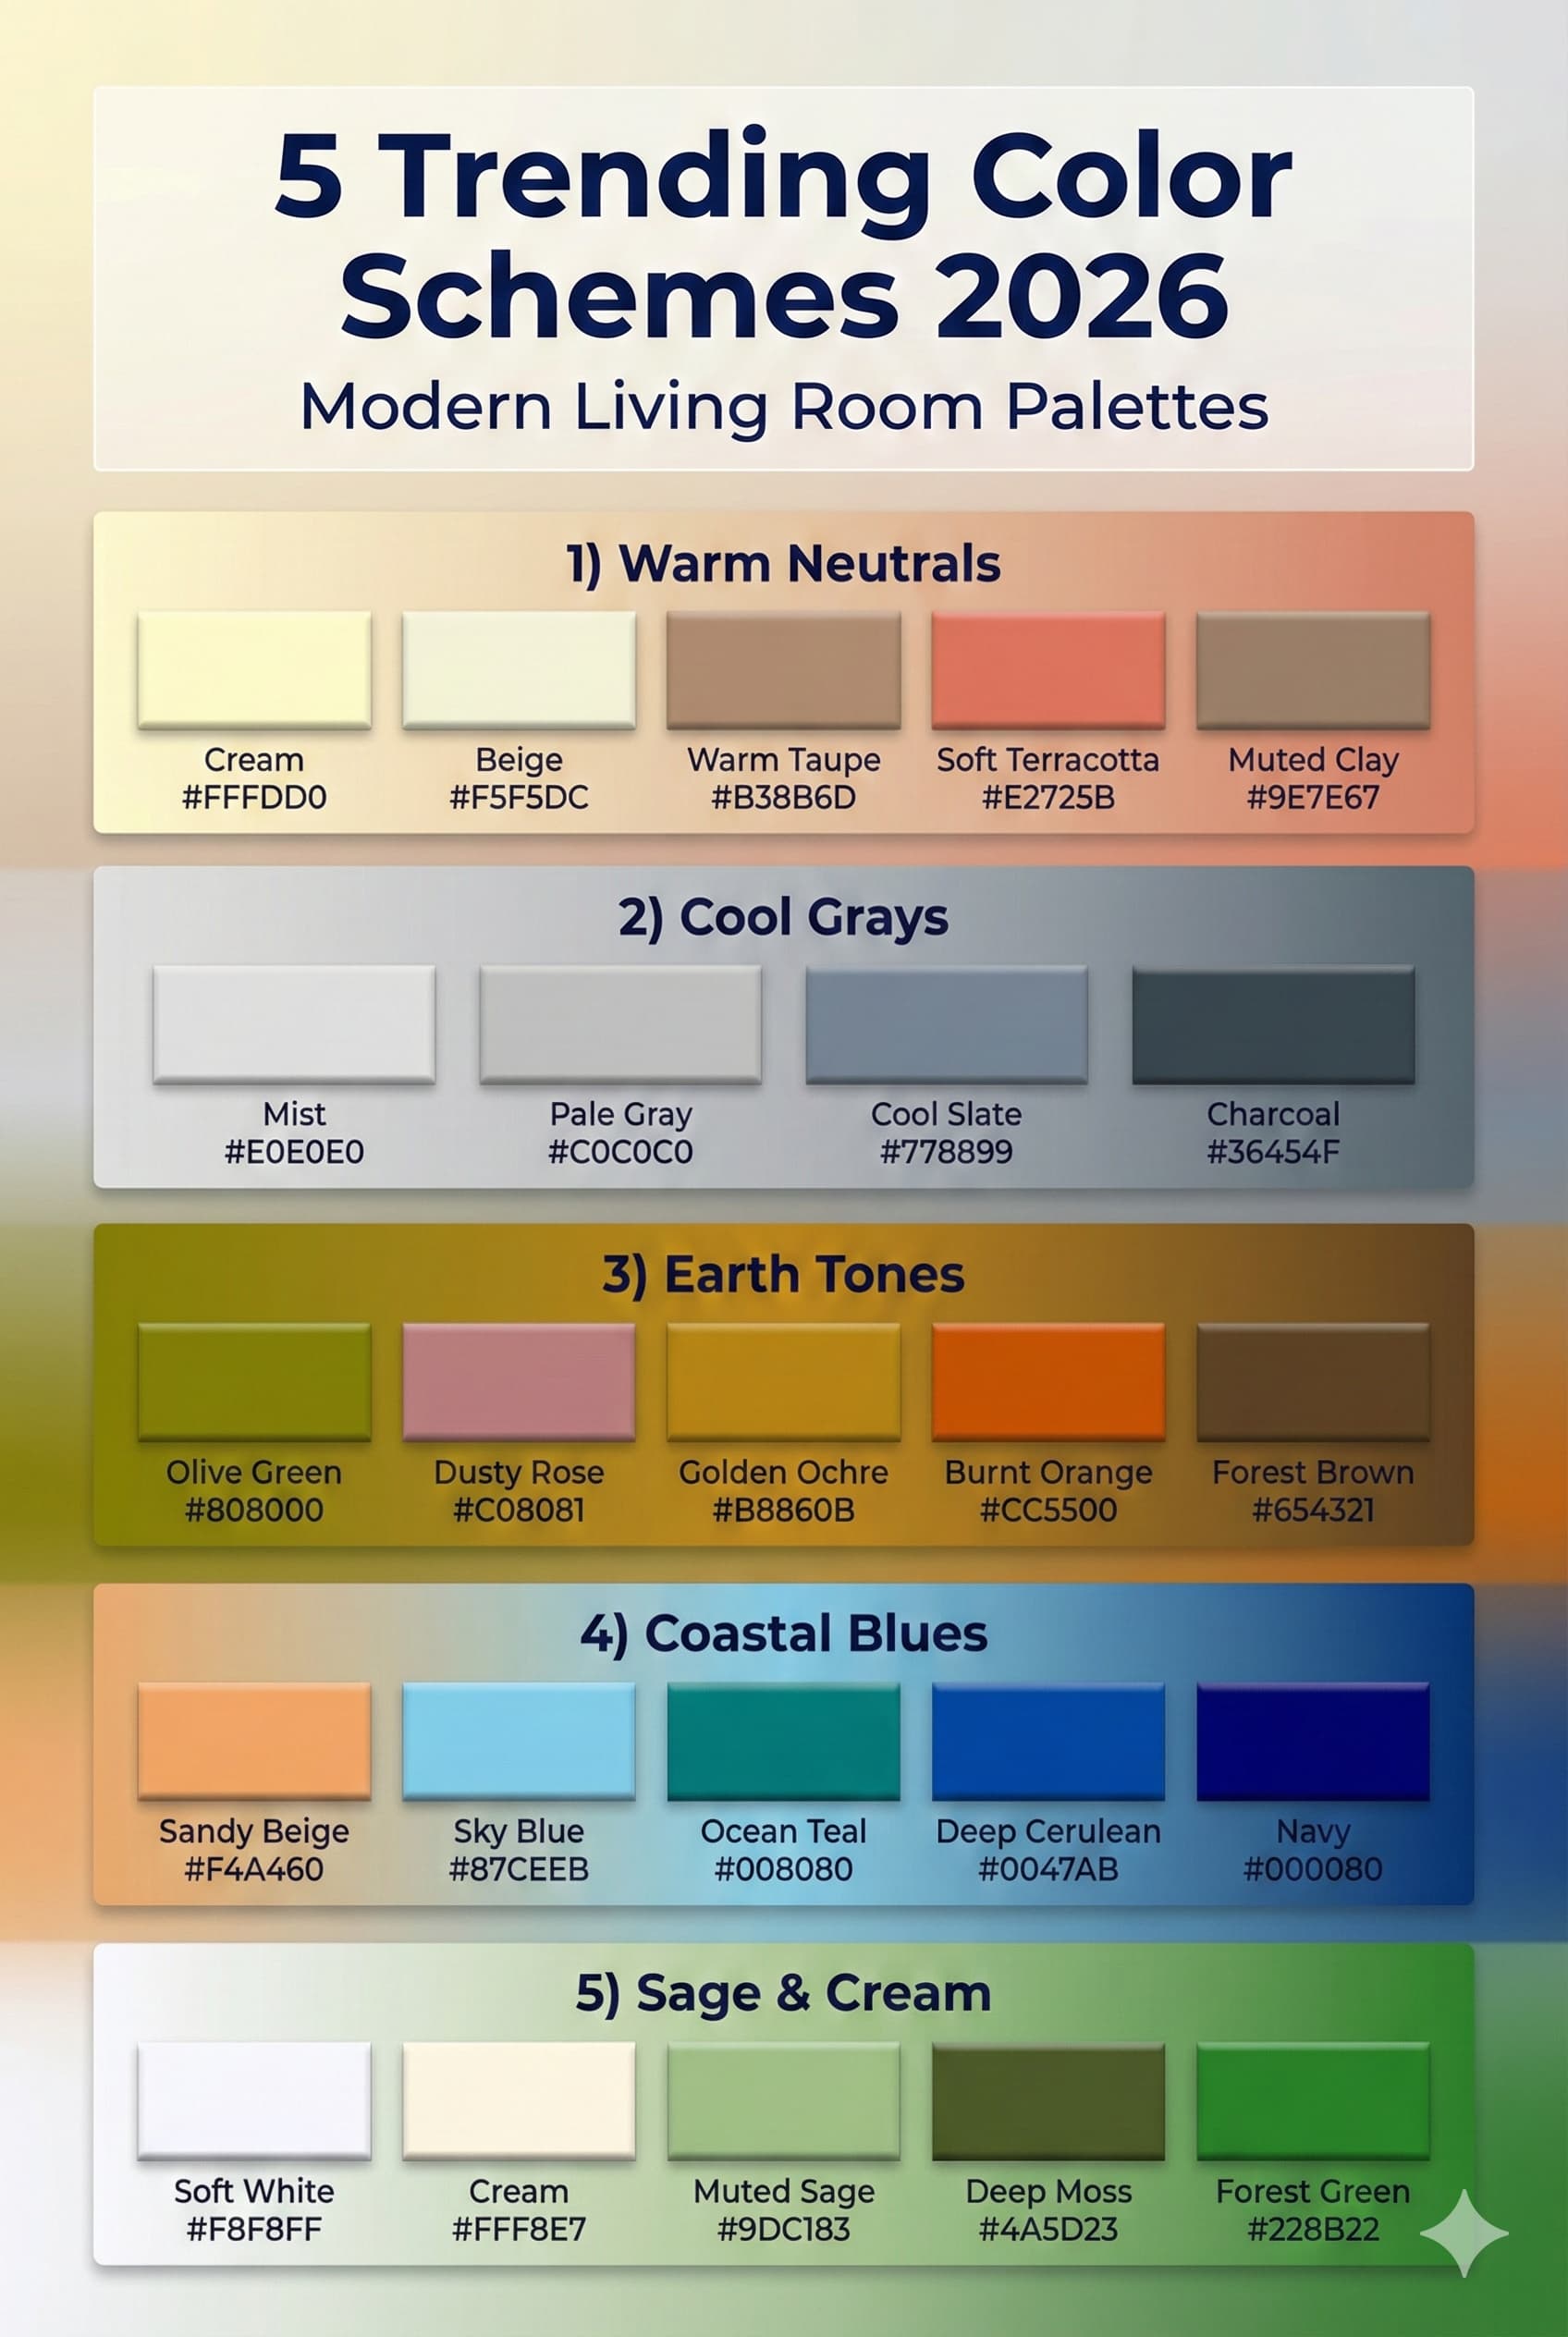
Living room color trends for 2026 reflect broader societal shifts including increased environmental consciousness, desire for comfort amid uncertainty, and appreciation for natural organic aesthetics. Paint manufacturers including Sherwin-Williams, Benjamin Moore, and Behr announce annual Color of the Year selections influencing residential design directions. 2026 color palettes emphasize warm nurturing neutrals, earthy organic tones, and nature-inspired greens reflecting post-pandemic priorities around home comfort and wellness.
Warm greige (gray-beige hybrid) continues dominating neutral color selections combining gray contemporary feel with beige warmth and versatility. These complex neutrals provide sophisticated alternatives to stark grays or yellows beiges appealing to broad demographic ranges. Greige undertone variations range from purple-brown to green-brown allowing personalization within trending color family. Greige living rooms coordinate with varied accent colors and design styles maintaining long-term relevance despite trend evolution.
Earthy terracotta and rust tones gain prominence as accent colors reflecting increased appreciation for natural clay colors and organic materials. These warm earth tones coordinate with natural wood, rattan, and plant-filled spaces creating cohesive biophilic design approaches. Terracotta appears more sophisticated than bright oranges while providing similar warmth and energy. Earth tone living rooms align with sustainable design priorities and natural material preferences trending across residential design sectors.
⚠ PAIN POINT: I want trendy colors but worry about them looking dated in 3-5 years
✓ SOLUTION: Use trending colors as accents (20-30 percent of palette) rather than dominant applications. Maintain neutral foundation (white, gray, greige walls and large furniture) allowing accent modification without major renovation. Select higher-quality classic pieces in neutral colors investing trend budget in changeable elements: pillows ($30-80 each), throws ($40-100), artwork ($50-300), accessories ($20-150). This approach allows trend participation with minimal financial commitment and easy updates as preferences evolve.
Sage green and olive tones reflect growing preference for nature-inspired colors promoting calm and connection to outdoor environments. These muted greens work effectively as main wall colors or accent applications depending on saturation levels. Sage green coordinates with warm neutrals, natural woods, and earthy accent colors creating organic cohesive palettes. Green color trends align with houseplant enthusiasm and biophilic design priorities emphasizing human-nature connections in built environments.
Warm Greige | Main walls, large furniture | White, warm and cool accents | Transitional, contemporary |
Sage Green | Main walls or accent wall | Cream, warm wood, terracotta | Organic modern, transitional |
Terracotta/Rust | Accent wall, accessories, pillows | Cream, sage, warm gray | Bohemian, organic modern |
Warm Taupe | Main walls, upholstery | White, brass, warm accents | Transitional, modern classic |
Soft Navy | Accent wall, upholstery | Brass, cream, warm wood | Traditional, transitional |
Warm White | Main walls, trim | Any accent color | Universal application |
Layered neutral palettes combining multiple neutral tones (cream walls, greige sofa, taupe rug, gray-blue curtains) create sophisticated depth without bold color intensity. This approach provides visual interest through subtle variation while maintaining versatile neutral foundation. Neutral layering aligns with minimalist aesthetic preferences and allows focal attention on architectural features, artwork, or statement furniture rather than color dominating spatial experience.
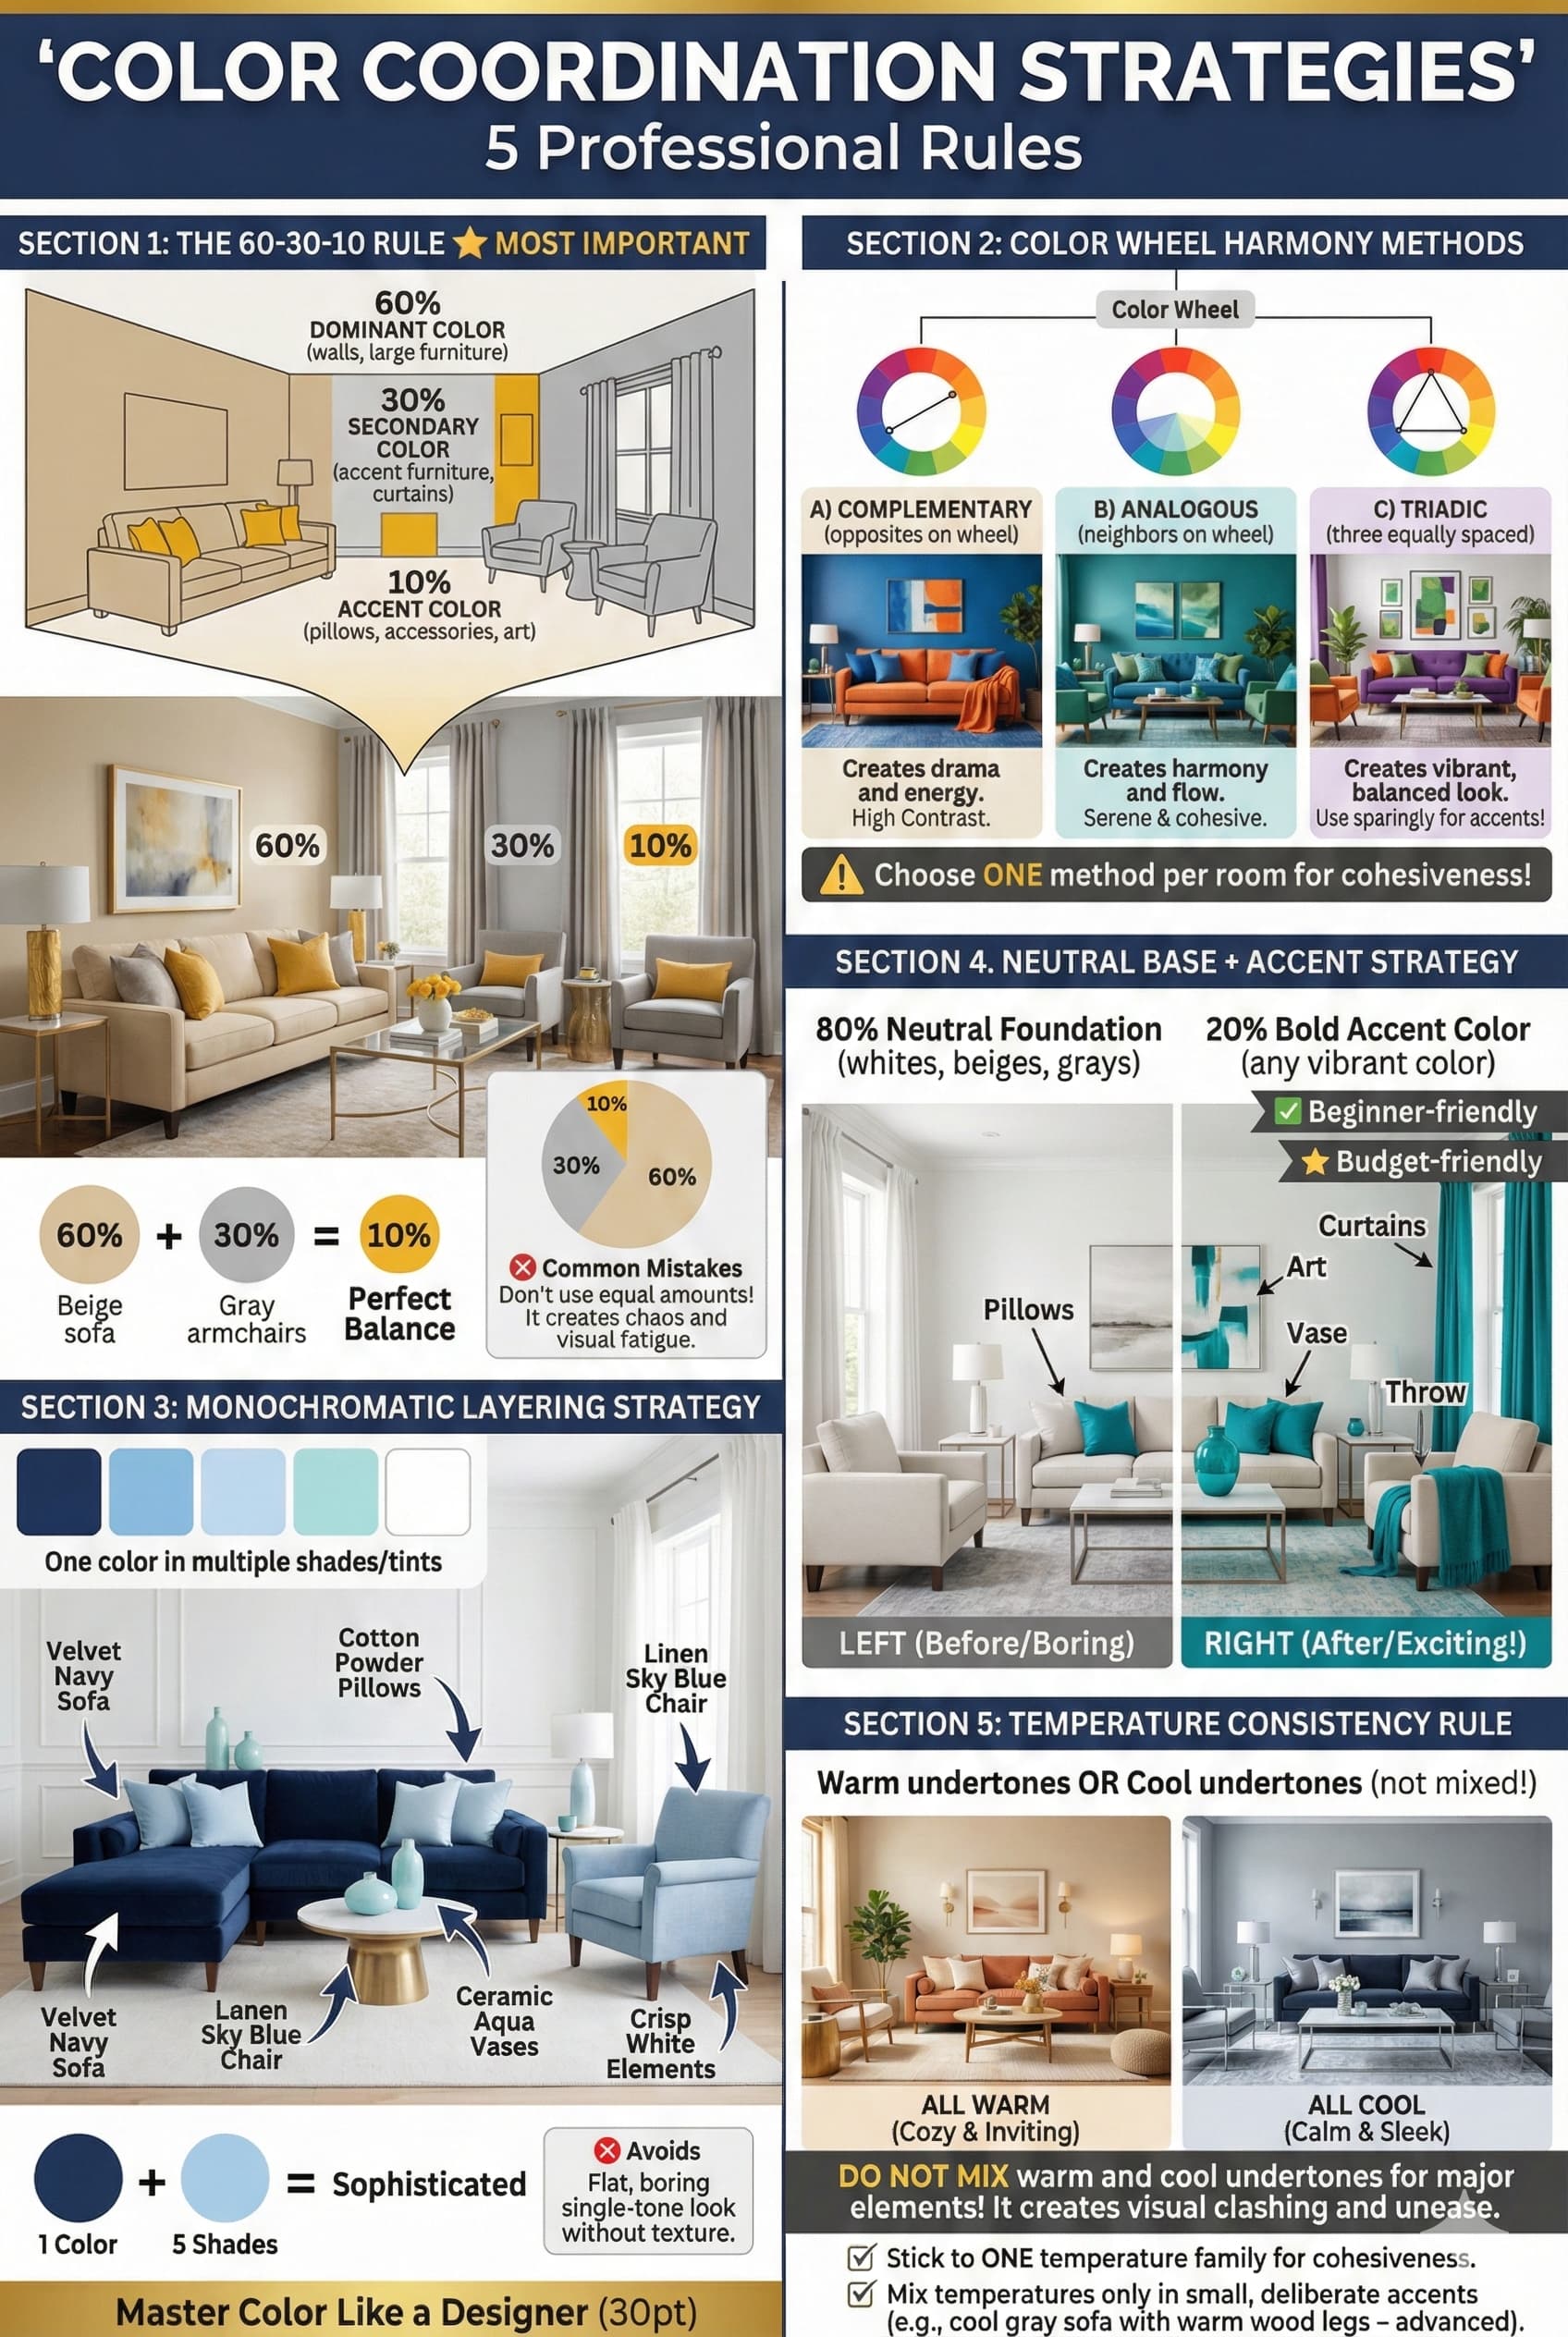
Color coordination across living room elements including walls, furniture, window treatments, flooring, and accessories creates cohesive harmonious environments avoiding chaotic disconnected appearances. The 60-30-10 proportioning rule provides practical framework: 60 percent dominant color, 30 percent secondary color, 10 percent accent color. This distribution establishes clear color hierarchy preventing excessive color competition and visual confusion.
Color wheel relationships guide effective color combination selection through established harmony principles. Analogous color schemes (colors adjacent on wheel like blue, blue-green, green) create harmonious unified palettes. Complementary color schemes (colors opposite on wheel like blue and orange) generate dynamic high-contrast combinations. Triadic schemes (three colors equally spaced on wheel) produce balanced energetic palettes. Living room color selections benefit from deliberate color theory application rather than intuitive random combinations.
Undertone matching ensures color elements coordinate properly avoiding clashing undertone combinations. Warm undertones (yellow, orange, red) coordinate with warm metals (brass, gold, copper) and warm woods (cherry, walnut). Cool undertones (blue, green, purple) coordinate with cool metals (chrome, brushed nickel) and cool-toned woods (gray wash, white wash). Mixing warm and cool undertones within single space creates visual discord – maintain undertone consistency across major elements for cohesive results.
⚠ PAIN POINT: Colors that looked perfect together in my mind clash horribly when actually combined in my living room
✓ SOLUTION: Test color combinations using large samples before committing. Create sample board with paint chips, fabric swatches, flooring samples, and finish samples viewed together under living room lighting conditions. Order furniture fabric samples (usually free or $5-10) testing against wall paint samples. Photograph sample combinations observing color relationships in photos revealing issues human eye adjusts for in person. Use online color coordination tools visualizing room renderings with selected colors before purchasing materials.
Pattern mixing within living room color schemes requires scale variation, limited color palette, and dominant pattern establishment. Combine large-scale pattern (large floral, geometric) with medium-scale pattern (stripe, small geometric) and small-scale pattern (mini dot, texture) avoiding multiple same-scale patterns competing visually. Maintain shared color elements across patterns creating cohesive relationships. Limit patterns to 3-4 maximum within single space preventing visual chaos.
Flooring color significantly impacts overall color scheme and must coordinate with furniture and wall colors. Dark floors (LRV under 15) create dramatic contrast with light walls and furniture but show dust readily and may make small rooms feel smaller. Medium floors (LRV 15-40) provide versatile backgrounds coordinating with varied wall and furniture colors. Light floors (LRV 40+) create bright spacious feelings but show dirt easily and may limit furniture color options. Living room flooring selection should precede or coordinate with wall color selection given expense and permanence of flooring installations.
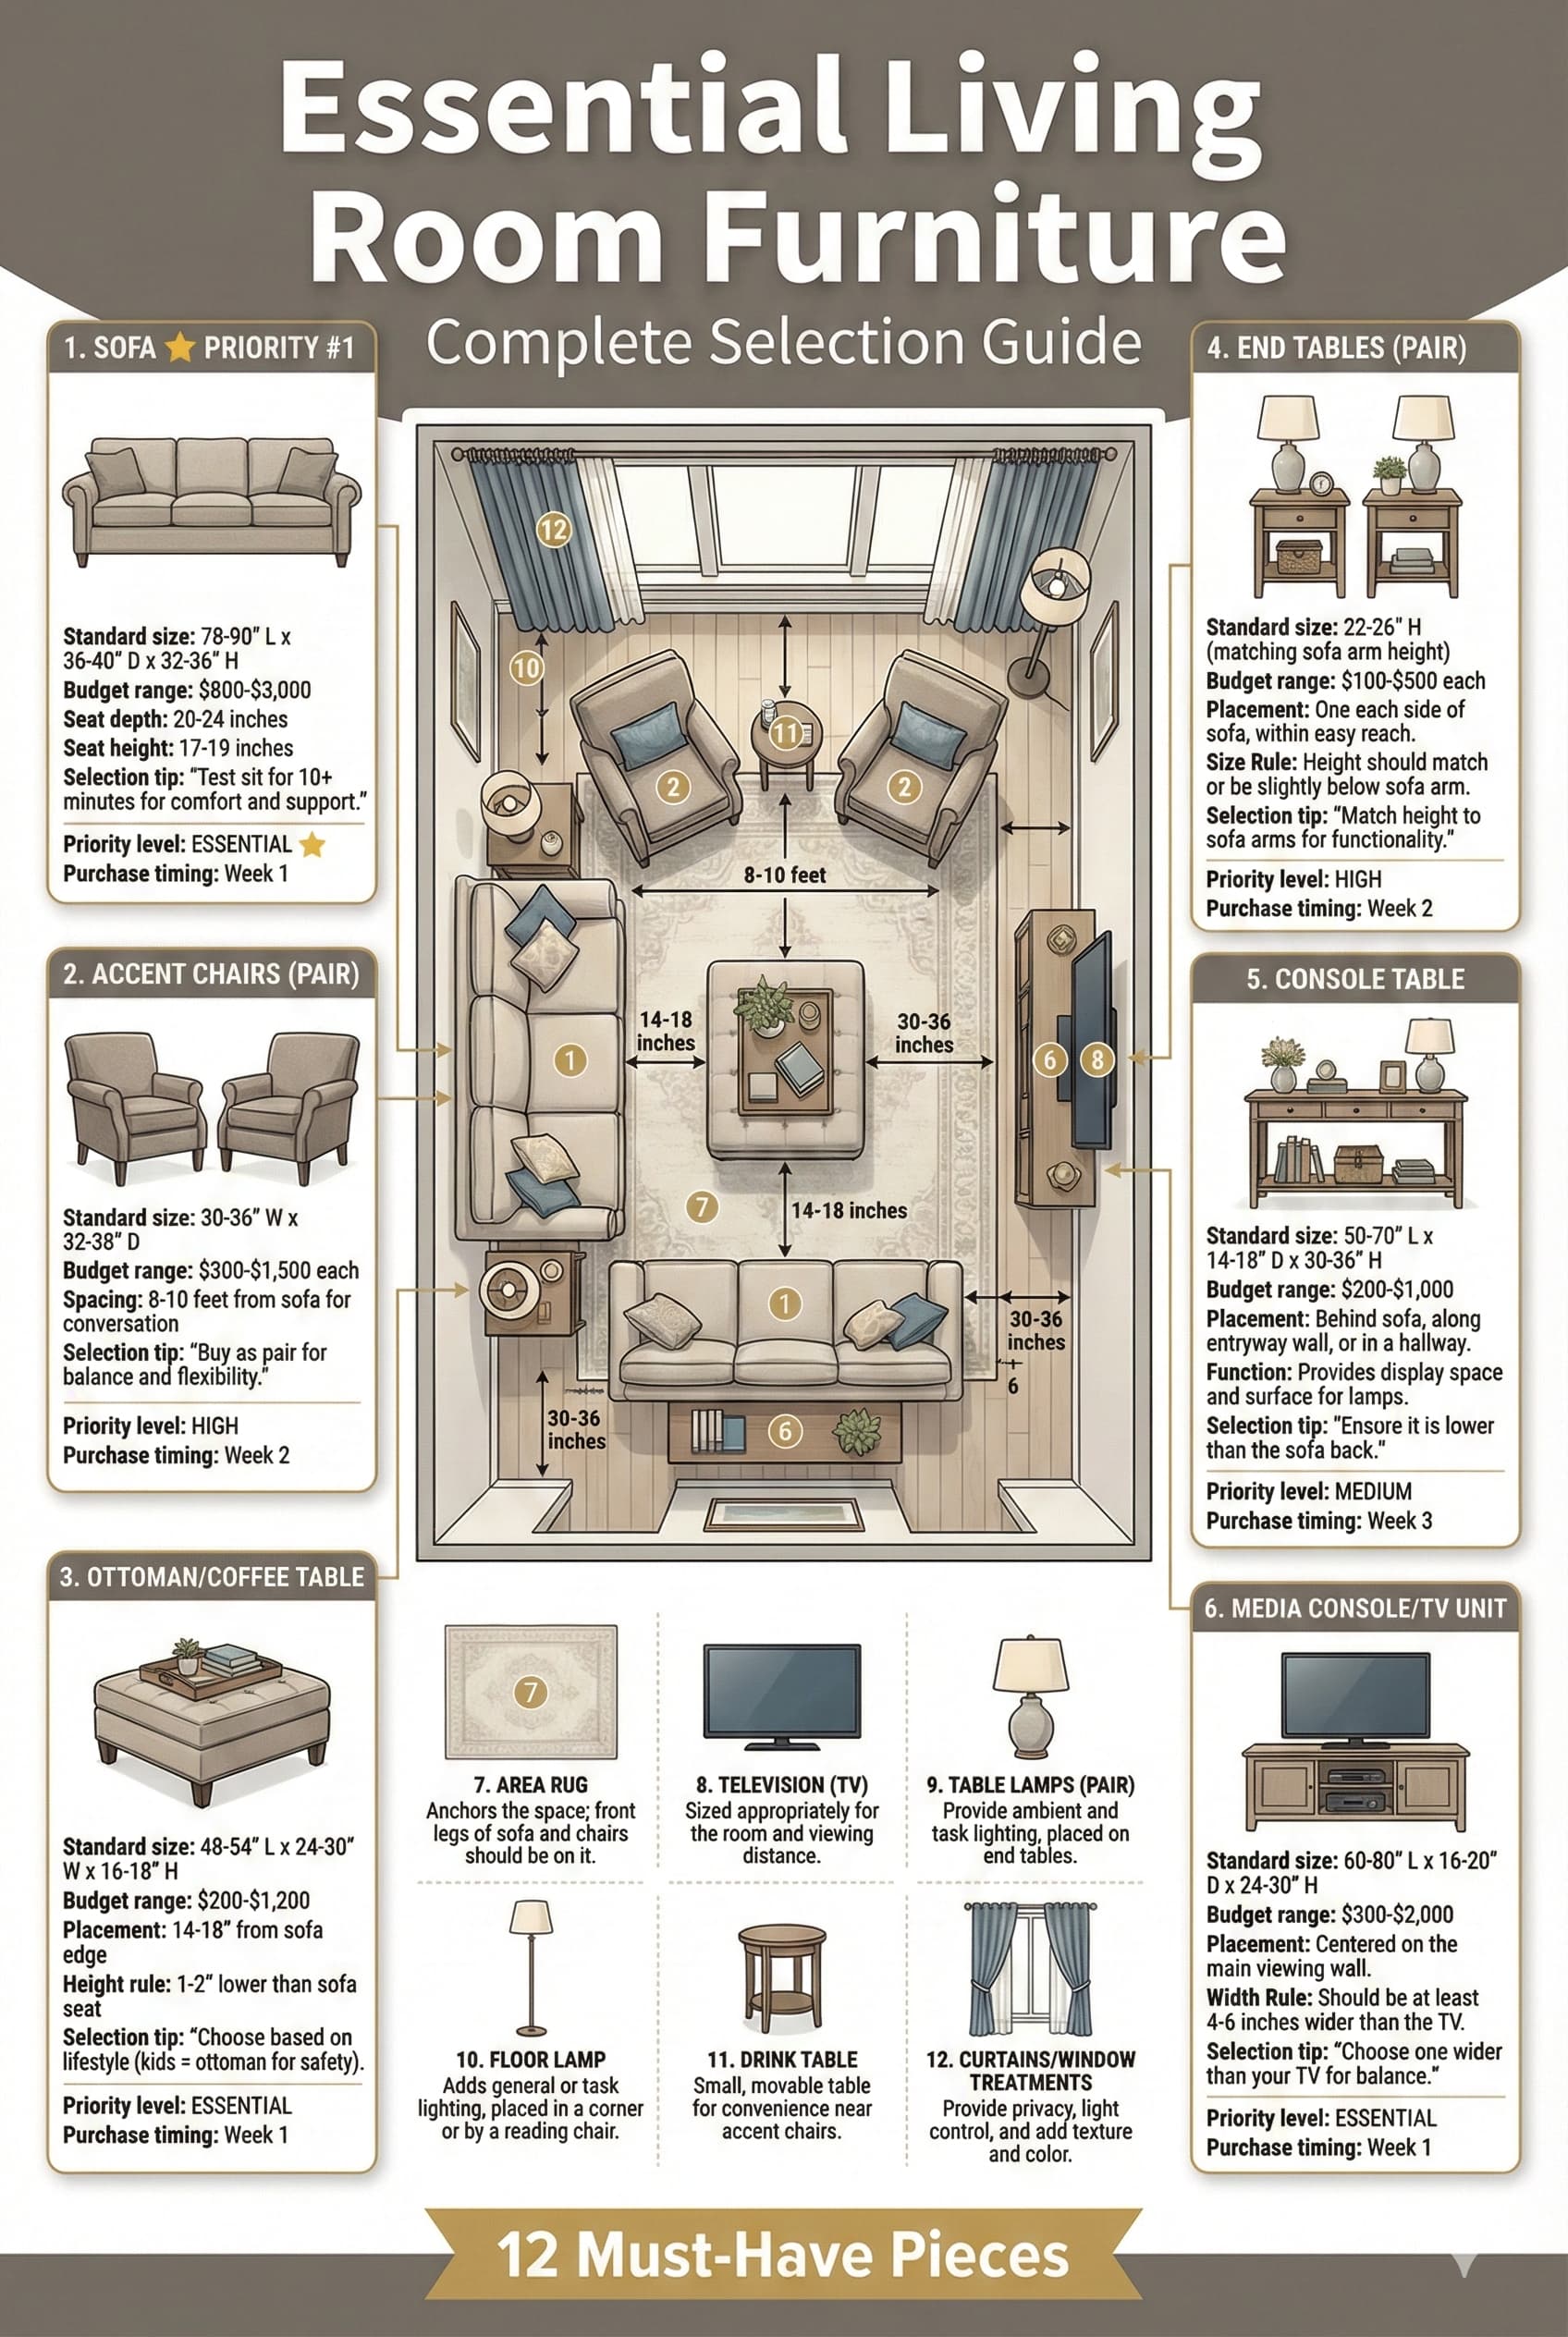
Living room furniture selection establishes spatial function, determines seating capacity, and significantly impacts aesthetic character. Furniture quality, dimensions, upholstery materials, and style characteristics require careful evaluation balancing immediate appeal with long-term durability and lifestyle appropriateness. Furniture investment represents substantial financial commitment ($3,000-20,000+ for complete living room furnishing) necessitating informed decision-making rather than impulsive purchases.
Furniture sizing relative to room proportions critically impacts spatial function and visual balance. Oversized furniture in small spaces creates cramped uncomfortable environments inhibiting circulation and use. Undersized furniture in large spaces appears lost and fails to provide adequate visual weight or functional capacity. Standard residential furniture dimensions evolved for typical American living rooms measuring 250-350 square feet – spaces significantly smaller or larger require appropriately scaled alternatives.
Quality assessment evaluates frame construction, cushion materials, upholstery fabric durability, and joinery methods determining furniture longevity and performance. Budget furniture using stapled construction, low-density foam, and polyester fabrics typically lasts 3-5 years with regular use. Mid-range furniture with screwed joints, medium-density foam, and durable upholstery functions 5-10 years. High-quality furniture featuring mortise-and-tenon joinery, high-density foam or down cushions, and premium natural fiber upholstery lasts 15-25+ years with proper care.
PAIN POINT: I bought furniture that looked perfect in the showroom but feels completely wrong in my actual living room
✓ SOLUTION: Measure existing room dimensions and create detailed floor plan before shopping. Research furniture dimensions from retailer websites noting length, depth, and height specifications. Bring room dimensions, photos, floor plan, and existing furniture dimensions when shopping. Mark furniture footprints on living room floor using painter’s tape visualizing size before purchase. Measure doorways, hallways, and staircases verifying furniture passage during delivery. Test furniture extensively in showroom sitting, reclining, and evaluating comfort matching intended use patterns.
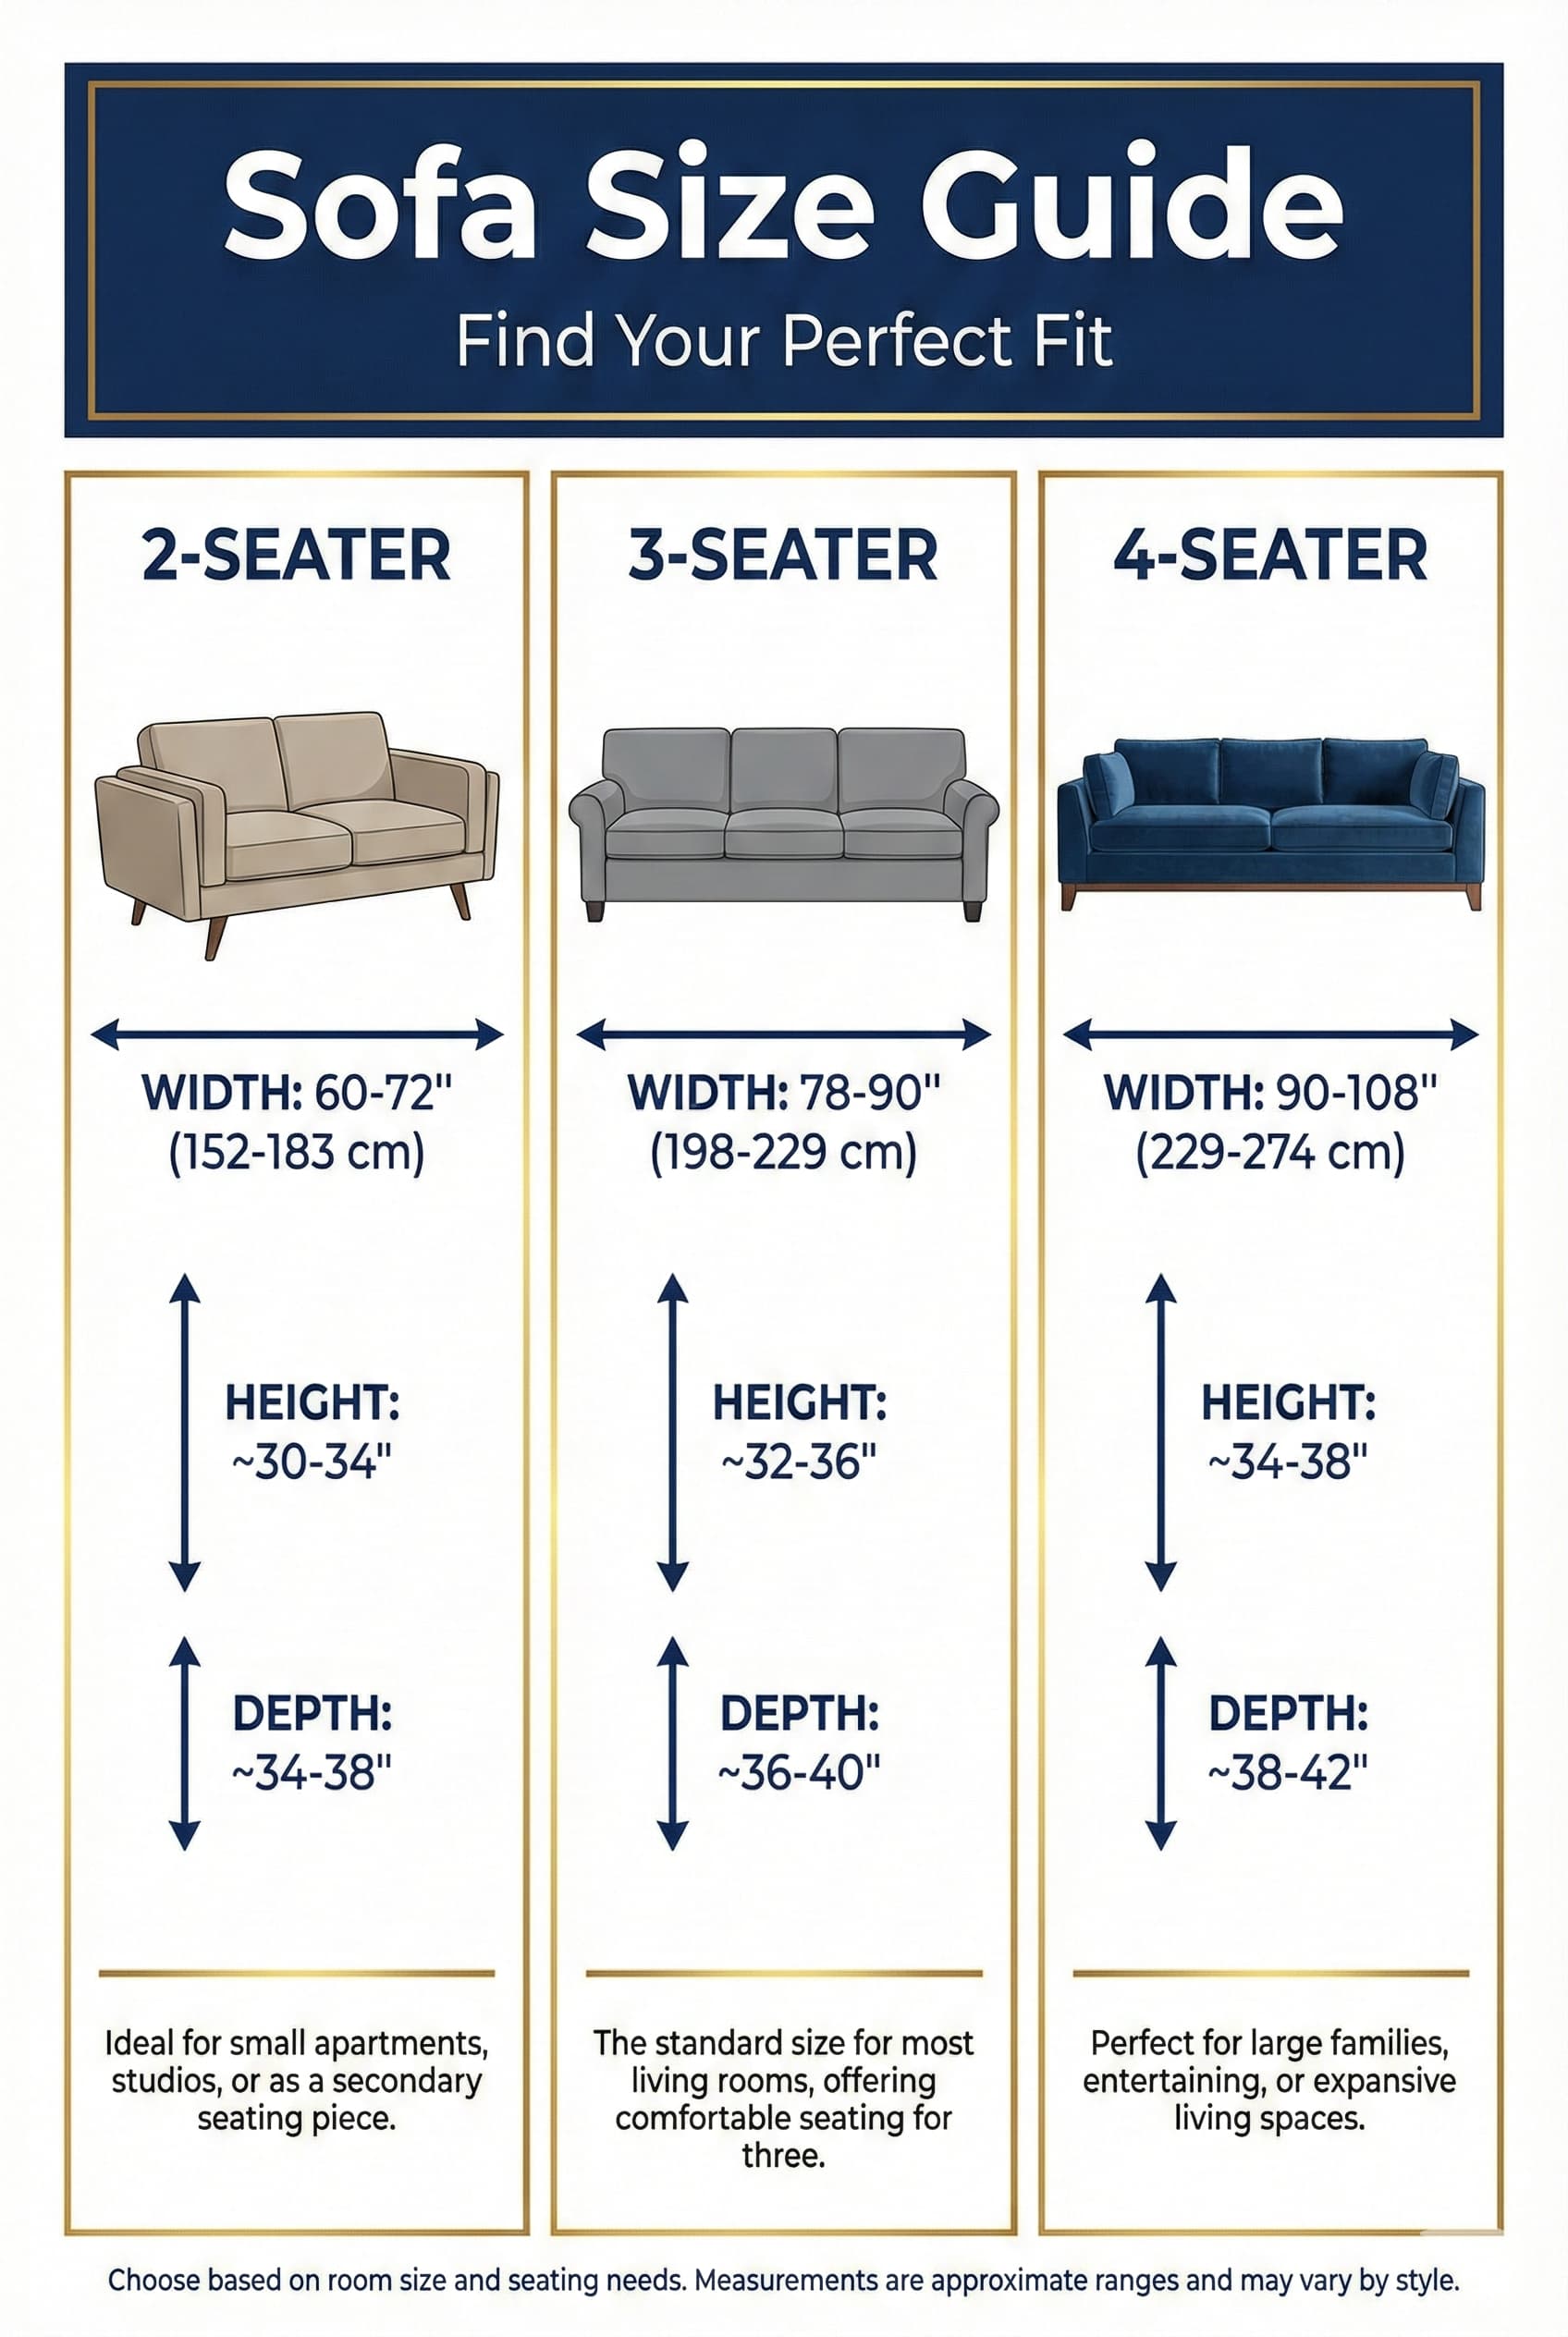
Sofa selection represents the most significant furniture investment in living room furnishing typically costing $800-5,000+ depending on quality, size, and upholstery. This central seating piece establishes spatial organization, determines primary color and style direction, and provides functional accommodation for daily use. Sofa dimensions including length, depth, and height must balance seating capacity requirements with spatial proportions avoiding oversized or undersized installations.
Sofa length measurements typically range from 72 inches (apartment sofa) to 96 inches (oversized sofa) with standard residential sofas measuring 84-90 inches. Length determines seating capacity – allow 22-24 inches per person for comfortable seating. A 84-inch sofa theoretically seats 4 people but comfortably fits 3 adults given actual body dimensions and personal space preferences. Small living rooms (under 250 square feet) typically require apartment-scale sofas (72-78 inches) or loveseats (58-72 inches) maintaining proportional relationships with spatial constraints.
Loveseat | 58-72 inches | 2 people | 32-38 inches | Small rooms (150-200 sq ft) |
Apartment Sofa | 72-78 inches | 2-3 people | 32-36 inches | Small-medium (180-250 sq ft) |
Standard Sofa | 84-90 inches | 3-4 people | 36-40 inches | Medium (250-350 sq ft) |
Oversized Sofa | 92-96 inches | 4 people | 38-42 inches | Large (350+ sq ft) |
Extra Deep Sofa | 84-90 inches | 3-4 people | 42-48 inches | Large with depth space |
Sofa depth affects comfort and spatial footprint – standard depths measure 36-40 inches including back cushions. Shallow sofas (32-36 inches) fit small spaces but may not comfortably fit tall individuals or lounging positions. Deep sofas (40-48 inches) provide luxurious comfort and lounging capability but consume substantial floor space unsuitable for small living rooms. Depth measurement includes all cushioning – seat depth (front edge to back cushion) typically measures 20-24 inches providing actual sitting surface.
Sofa height including arm height and back height impacts sight line preservation and spatial openness. Low-profile sofas with backs under 32 inches maintain visual transparency beneficial in small spaces or open concept layouts. Standard sofas with backs 32-36 inches provide moderate enclosure and traditional comfort. High-back sofas 36-40 inches tall create cozy enclosure but may overwhelm small rooms or obstruct views in open layouts. Sofa proportions must balance comfort with spatial appropriateness.
Frame construction quality determines sofa longevity and performance over years of use. Kiln-dried hardwood frames (oak, maple, ash) with corner blocks and mortise-and-tenon joinery last decades with proper care. Engineered wood frames with screwed joints function adequately 5-10 years. Softwood or particle board frames with stapled construction fail rapidly (3-5 years) under regular use. Frame quality typically correlates with price – sofas under $1,000 rarely feature hardwood construction while $2,000+ sofas usually employ quality frame materials and joinery.
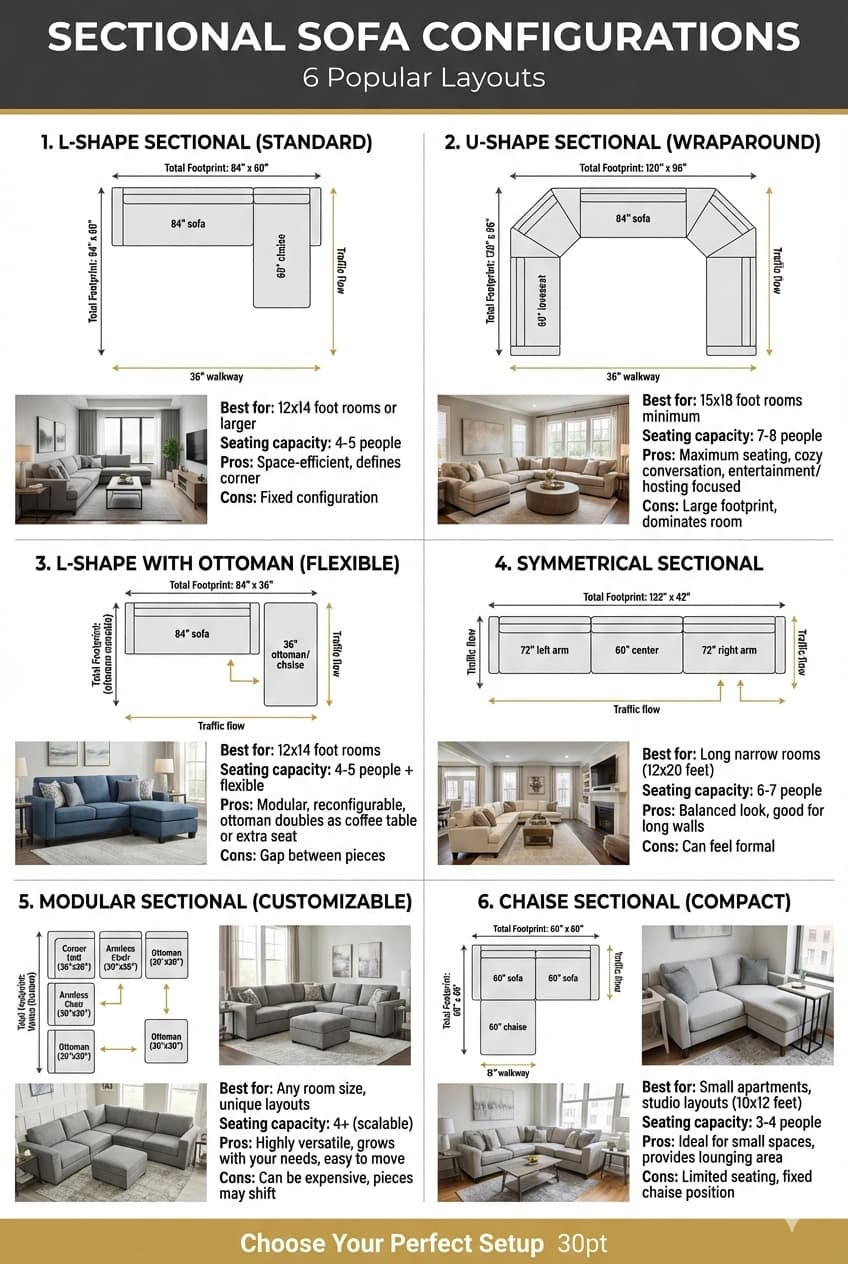
Sectional sofas provide extensive seating capacity within living room spaces efficiently using corners otherwise difficult to furnish effectively. These multi-piece configurations fit 5-10+ people depending on size while defining spatial zones in open concept layouts. Sectional dimensions vary dramatically from compact 3-piece configurations measuring 90×90 inches to expansive 6+ piece arrangements spanning 120×120+ inches requiring substantial spatial allocation.
L-shaped sectionals represent most common configuration combining longer sofa section (typically 84-96 inches) with shorter perpendicular section (typically 60-72 inches) creating corner seating group. This arrangement fits medium living rooms (250-350 square feet) efficiently using corner space while maintaining traffic flow through remaining area. L-configurations orient toward corner focal points (corner fireplaces, angled television placement) or establish room division in open concept spaces.
U-shaped sectionals add third section creating substantial seating capacity (8-12 people) suited for large living rooms (400+ square feet) prioritizing entertaining and gathering capacity. These expansive arrangements require considerable spatial allocation – plan minimum 10×10 feet clear area for compact U-configurations, 12×14 feet for generous sizing. U-shaped sectional sofas work effectively in large spaces but overwhelm medium or small rooms creating cramped environments with inadequate circulation space.
⚠ PAIN POINT: My sectional sofa dominates my living room leaving no space for other furniture or movement
✓ SOLUTION: Verify sectional dimensions appropriateness for room size before purchase. For rooms under 300 square feet, consider apartment-scale 2-piece sectional (72-inch sofa + 60-inch chaise) or standard sofa plus separate chair arrangement instead. Ensure minimum 36-inch traffic paths remain around sectional perimeter. Select low-profile sectional (seat back under 32 inches) maintaining visual openness. Choose sectional with exposed legs rather than skirted base reducing visual weight. Position sectional defining single spatial zone rather than centering in room allowing peripheral furniture placement.
Modular sectionals provide configuration flexibility through independent pieces connecting via hardware or friction. This adaptability allows arrangement modification matching varied spatial contexts or evolving needs. Modular pieces typically include armless chairs, corner chairs, left/right arm chairs, ottomans, and wedges combining into custom configurations. Modular sectional investment ($2,000-8,000+) provides long-term value through reconfiguration capability while fixed-configuration sectionals limit adaptability.
Compact 2-Piece | 2 sections | 4-5 people | 90×65 inches | 250-300 sq ft |
Standard 3-Piece L | 3 sections | 5-6 people | 108×84 inches | 300-350 sq ft |
Large 4-Piece L | 4 sections | 6-8 people | 120×96 inches | 350-400 sq ft |
Compact U-Shape | 5 sections | 7-9 people | 120×108 inches | 400-450 sq ft |
Large U-Shape | 6+ sections | 10-12 people | 144×132 inches | 500+ sq ft |
Chaise sectionals include extended chaise lounge section providing lounging capability with leg extension. Right-arm chaise extends from right side when sitting (chaise on left when viewing front) while left-arm chaise extends from left side. Chaise depth typically measures 60-72 inches consuming substantial floor area – verify adequate spatial allocation before selecting chaise configurations. Chaise sectionals suit spaces prioritizing relaxation and lounging over maximum seating capacity.
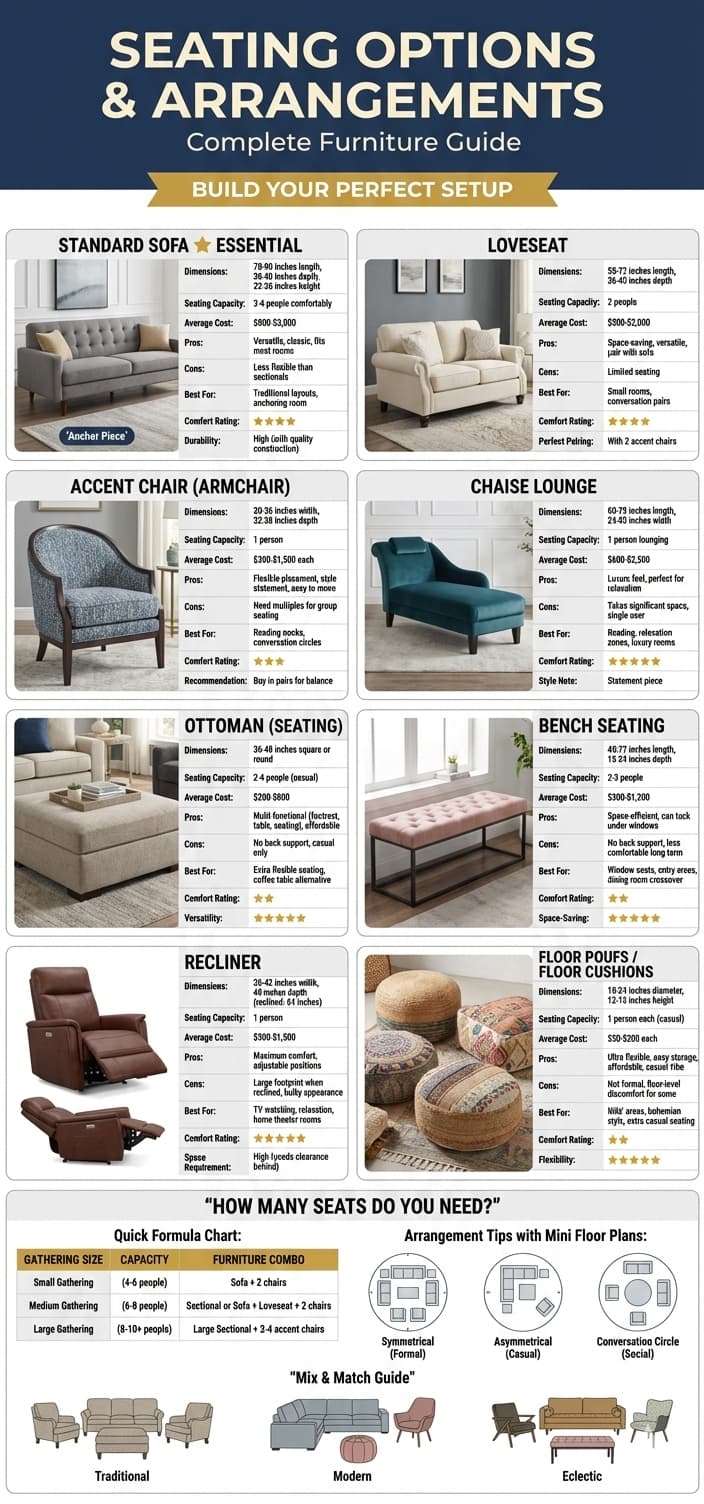
Living room seating beyond primary sofa includes accent chairs, recliners, ottomans, benches, and additional sofas creating comprehensive accommodation for household occupants and guests. Supplementary seating expands capacity during gatherings while providing individual comfortable positions for daily use. Seating variety through multiple furniture types fits diverse user preferences and activity requirements from upright task seating to lounging relaxation chairs.
Accent chairs provide individual seating adding visual interest and style variation to living room arrangements. These standalone pieces typically measure 28-36 inches wide, 30-36 inches deep, and 32-40 inches tall with or without arms. Armless slipper chairs conserve space while armed chairs provide greater comfort. Accent chair placement perpendicular to sofas creates L-shaped conversation groupings or pairs flanking focal points establish symmetrical arrangements. Accent chair selection offers opportunity for bold upholstery, contrasting styles, or pattern introduction within overall color schemes.
Recliners provide mechanical adjustability supporting relaxation through reclining positions and footrest extension. Traditional recliners measure 35-42 inches wide requiring 30+ inches wall clearance for reclining operation. Wall-hugger recliners recline within 6-8 inches of walls accommodating spatial constraints. Recliner seating suits living rooms prioritizing comfort and relaxation though traditional styling may conflict with contemporary aesthetics. Updated recliner designs in leather or contemporary upholstery integrate more successfully with varied design styles.
⚠ PAIN POINT: I want comfortable seating for everyone but my living room looks like a furniture showroom with too many mismatched pieces
✓ SOLUTION: Limit seating types to 2-3 varieties maximum (example: sofa + 2 matching accent chairs OR sectional + 2 different accent chairs). Maintain cohesive color palette across seating – vary pattern/texture rather than color. Select furniture from same style family (all mid-century, all transitional, all traditional). Space furniture pieces with adequate clearances (18-24 inches between pieces) avoiding crowded clustering. Remove or relocate pieces not actively used daily – store spare seating in closets deploying during gatherings rather than permanent display.
Ottoman seating provides versatile multi-functional pieces serving as footrests, supplementary seating, or coffee tables with tray additions. Large ottomans (36×36 inches or larger) substitute for coffee tables while providing soft surface and hidden storage. Small ottomans (18×18 to 24×24 inches) function as pull-up seating, side tables, or footrests. Ottoman furniture offers flexibility particularly valuable in small living rooms requiring multi-purpose solutions. Storage ottomans conceal blankets, pillows, or media items within upholstered exterior.
Accent Chair (Armed) | 32×34 inches | 1 person | 36×36 inches with clearance | Individual seating |
Accent Chair (Armless) | 26×30 inches | 1 person | 30×32 inches with clearance | Space-saving seating |
Recliner (Standard) | 38×40 inches | 1 person | 38×70 inches with recline space | Relaxation seating |
Recliner (Wall-Hugger) | 35×38 inches | 1 person | 35×46 inches with recline space | Compact relaxation |
Ottoman (Large) | 36×36 inches | 1-2 people | 40×40 inches with clearance | Multi-purpose |
Ottoman (Small) | 20×20 inches | 1 person | 24×24 inches with clearance | Flexible seating |
Bench seating provides linear multi-person accommodation suitable for living room window seating, hallway transitions, or supplementary capacity during gatherings. Benches measure 14-20 inches deep and 36-72+ inches long without backs providing space-efficient seating accommodating 2-4 people. Upholstered cushions enhance comfort while storage benches provide hidden capacity. Bench furniture works particularly effectively in transitional spaces or multi-purpose rooms requiring flexible seating options.
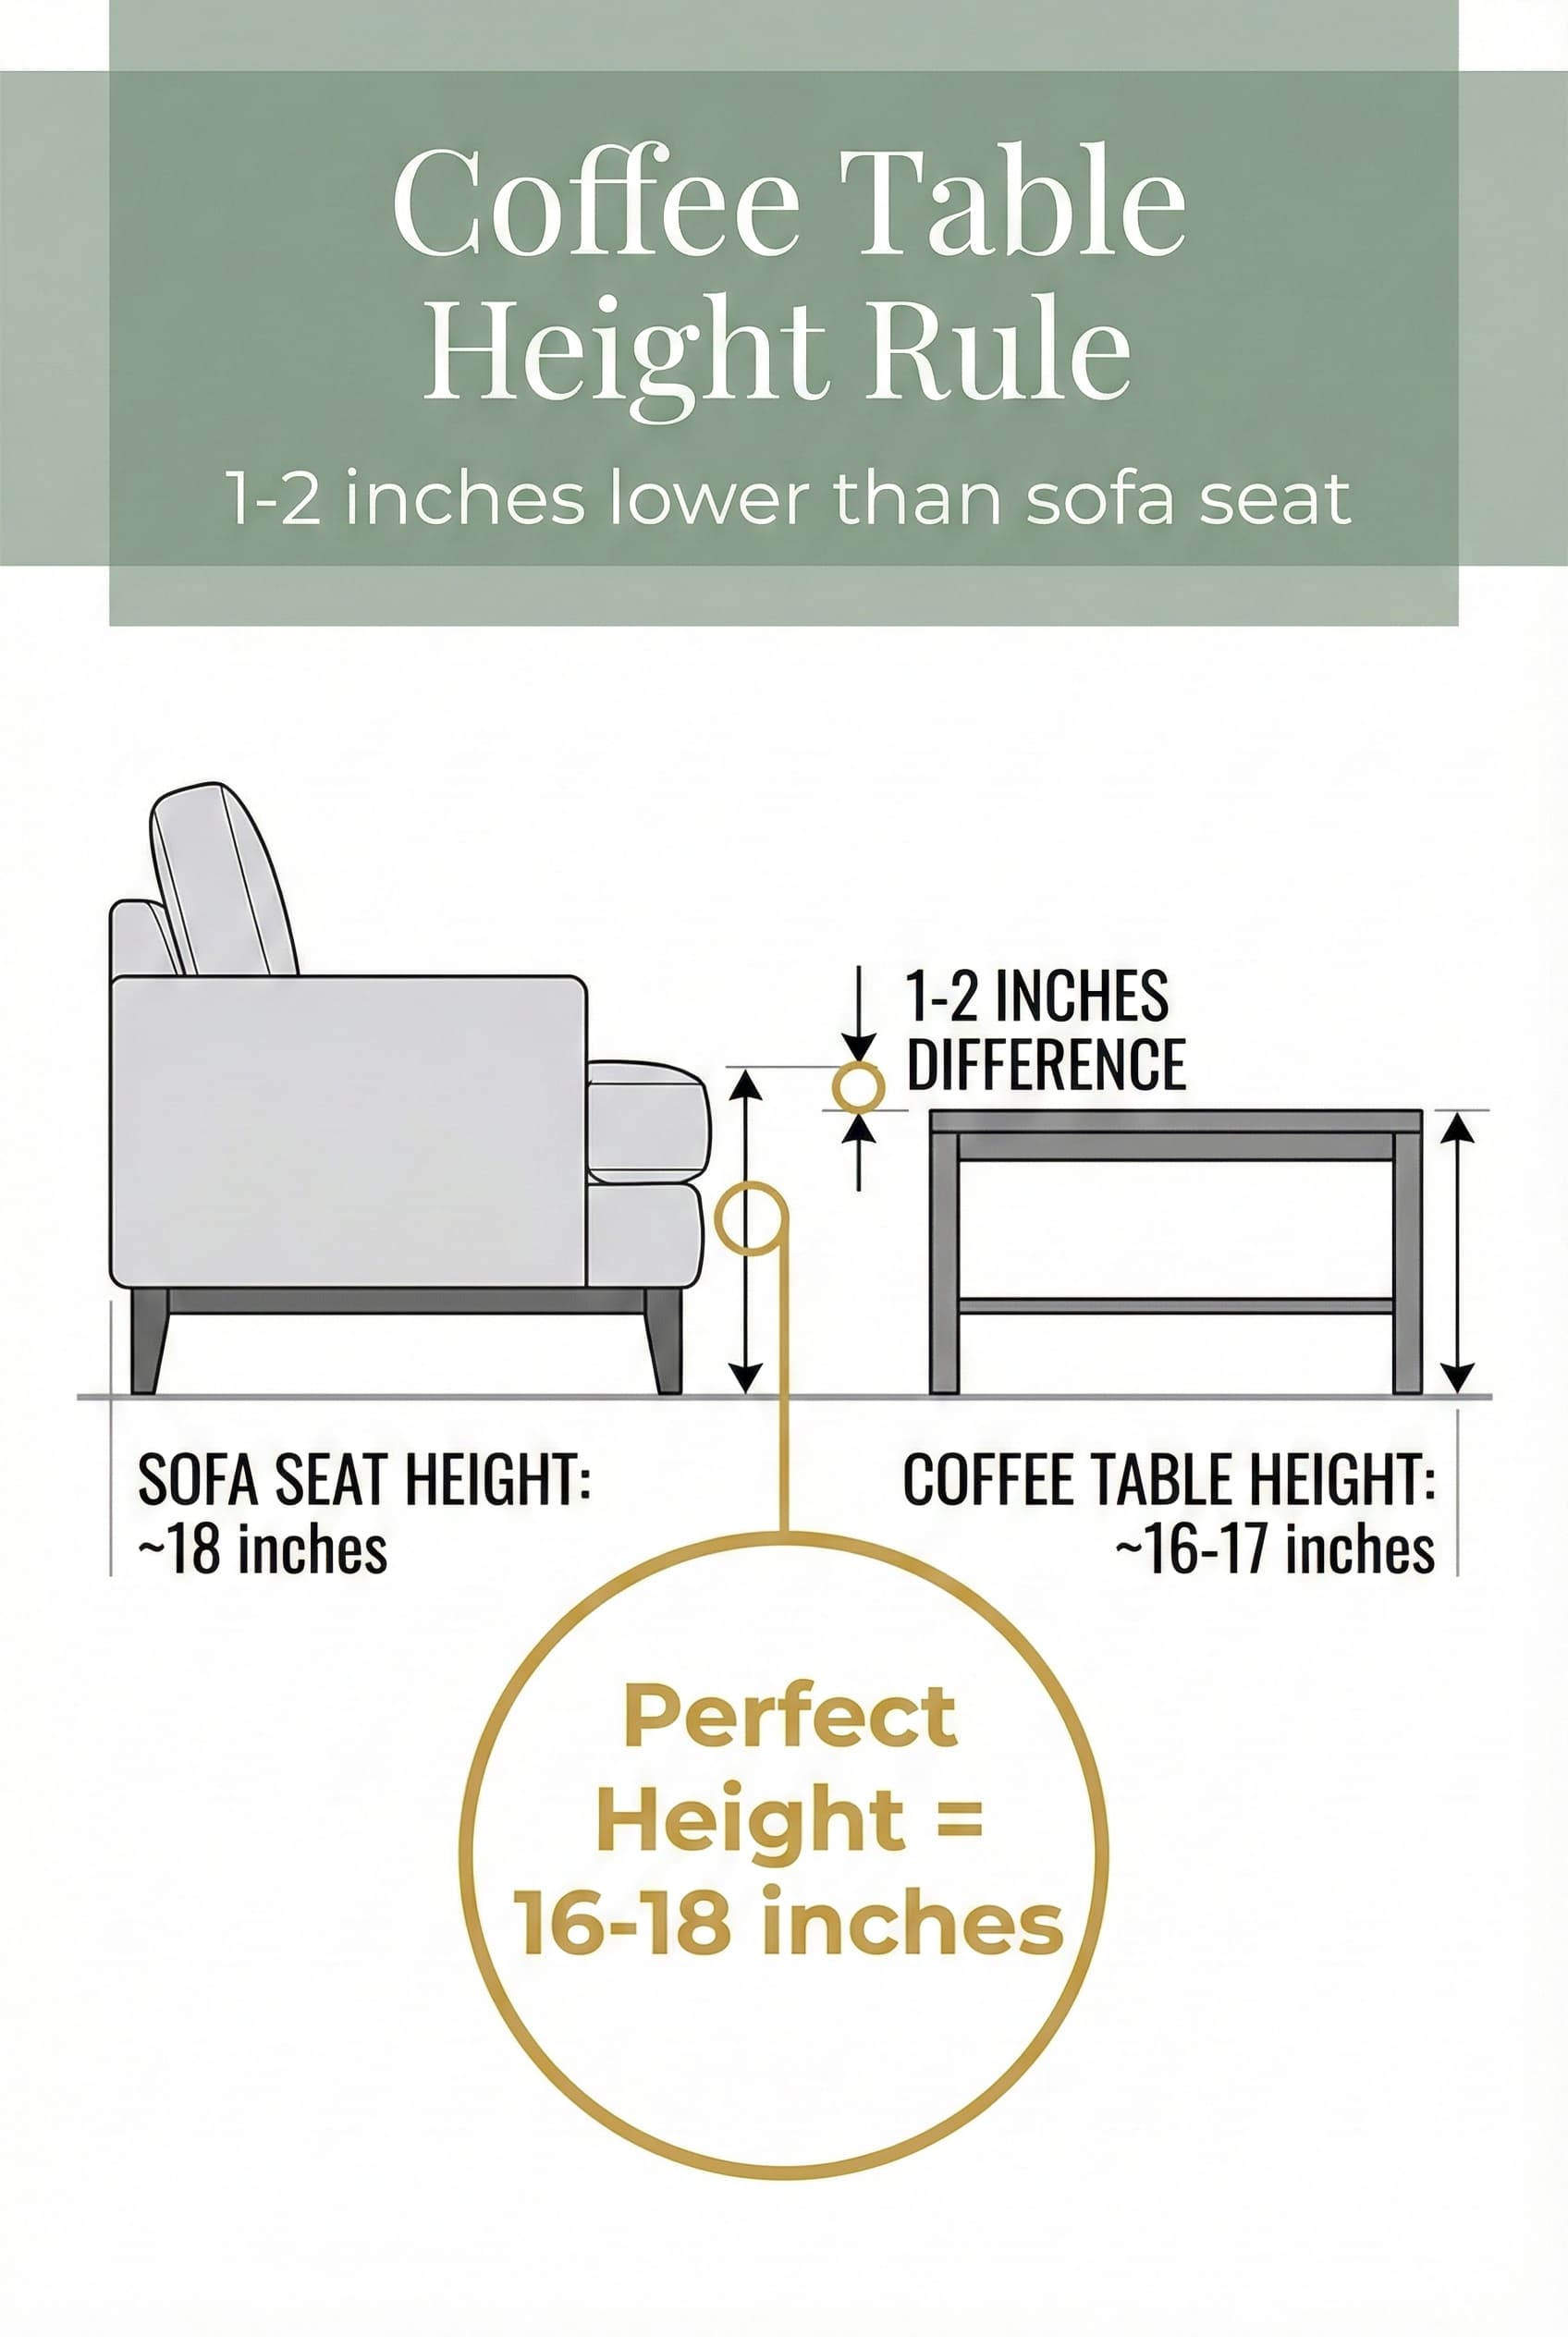
Coffee table selection completes living room conversation groupings providing functional surface for beverages, remotes, books, and decorative displays. This central furniture piece must balance size proportions with seating scale, height coordination with sofa cushions, and functional requirements with aesthetic contribution. Coffee table dimensions follow established sizing rules ensuring appropriate relationships with surrounding seating furniture.
Coffee table length should measure two-thirds sofa length for balanced proportions. An 84-inch sofa pairs appropriately with 54-60 inch coffee table while 72-inch loveseat requires 48-54 inch table. Undersized coffee tables appear inadequate providing insufficient surface area and appearing lost within furniture grouping. Oversized tables dominate conversation areas and restrict passage around furniture. Coffee table sizing significantly impacts spatial balance and functional performance.
Coffee table height should approximate sofa seat cushion height (typically 17-19 inches) allowing comfortable reach from seated positions. Tables 1-2 inches lower than cushions function acceptably while tables 3+ inches lower require awkward reaching. Tables higher than cushions create visual and functional awkwardness. Standard coffee table heights measure 16-18 inches though contemporary low-profile designs may measure 14-16 inches coordinating with low-profile modern seating.
⚠ PAIN POINT: My coffee table is either too close to my sofa (banging shins) or too far away (can’t reach items comfortably)
✓ SOLUTION: Position coffee table 14-18 inches from sofa front edge measured to table edge nearest sofa. 14 inches provides minimum legroom for average adults, 16-18 inches fits larger individuals comfortably. Distances under 14 inches create shin-banging hazards while distances over 20 inches require uncomfortable reaching from seated positions. Test distance before finalizing placement sitting on sofa and reaching toward table verifying comfortable access. Adjust position if needed – this spacing significantly impacts daily use comfort.
Coffee table materials include wood, metal, glass, stone, or combinations creating varied aesthetic and functional characteristics. Wood tables provide traditional warmth and durability but may require coaster protection against water rings. Glass tables maintain visual lightness suitable for small living rooms but show fingerprints and smudges requiring frequent cleaning. Stone tables (marble, granite) create substantial visual weight appropriate for traditional or luxurious aesthetics. Metal frame tables with wood, glass, or stone tops combine materials creating transitional or industrial aesthetics.
Small Table | 36-42 inches | 16-18 inches | Loveseat (60-72 inches) | Wood, glass, metal |
Standard Table | 48-54 inches | 16-18 inches | Standard sofa (84-90 inches) | All materials |
Large Table | 56-60 inches | 16-18 inches | Oversized sofa (92-96 inches) | Wood, stone, combinations |
Ottoman Table | 36×36 inches | 16-18 inches | Small arrangements | Upholstered, wood |
Nesting Tables | Set of 2-3 | 16-22 inches | Flexible arrangements | Wood, metal, glass |
Coffee table alternatives including oversized ottomans, benches, or groupings of small tables provide functional variations accommodating spatial constraints or style preferences. Large upholstered ottomans with tray tops serve dual purposes as soft seating and functional surfaces. Nesting tables store compactly while deploying expanded surface area when needed. Alternative coffee tables suit small living rooms requiring flexible multi-functional furniture solutions or contemporary aesthetics favoring unconventional approaches.
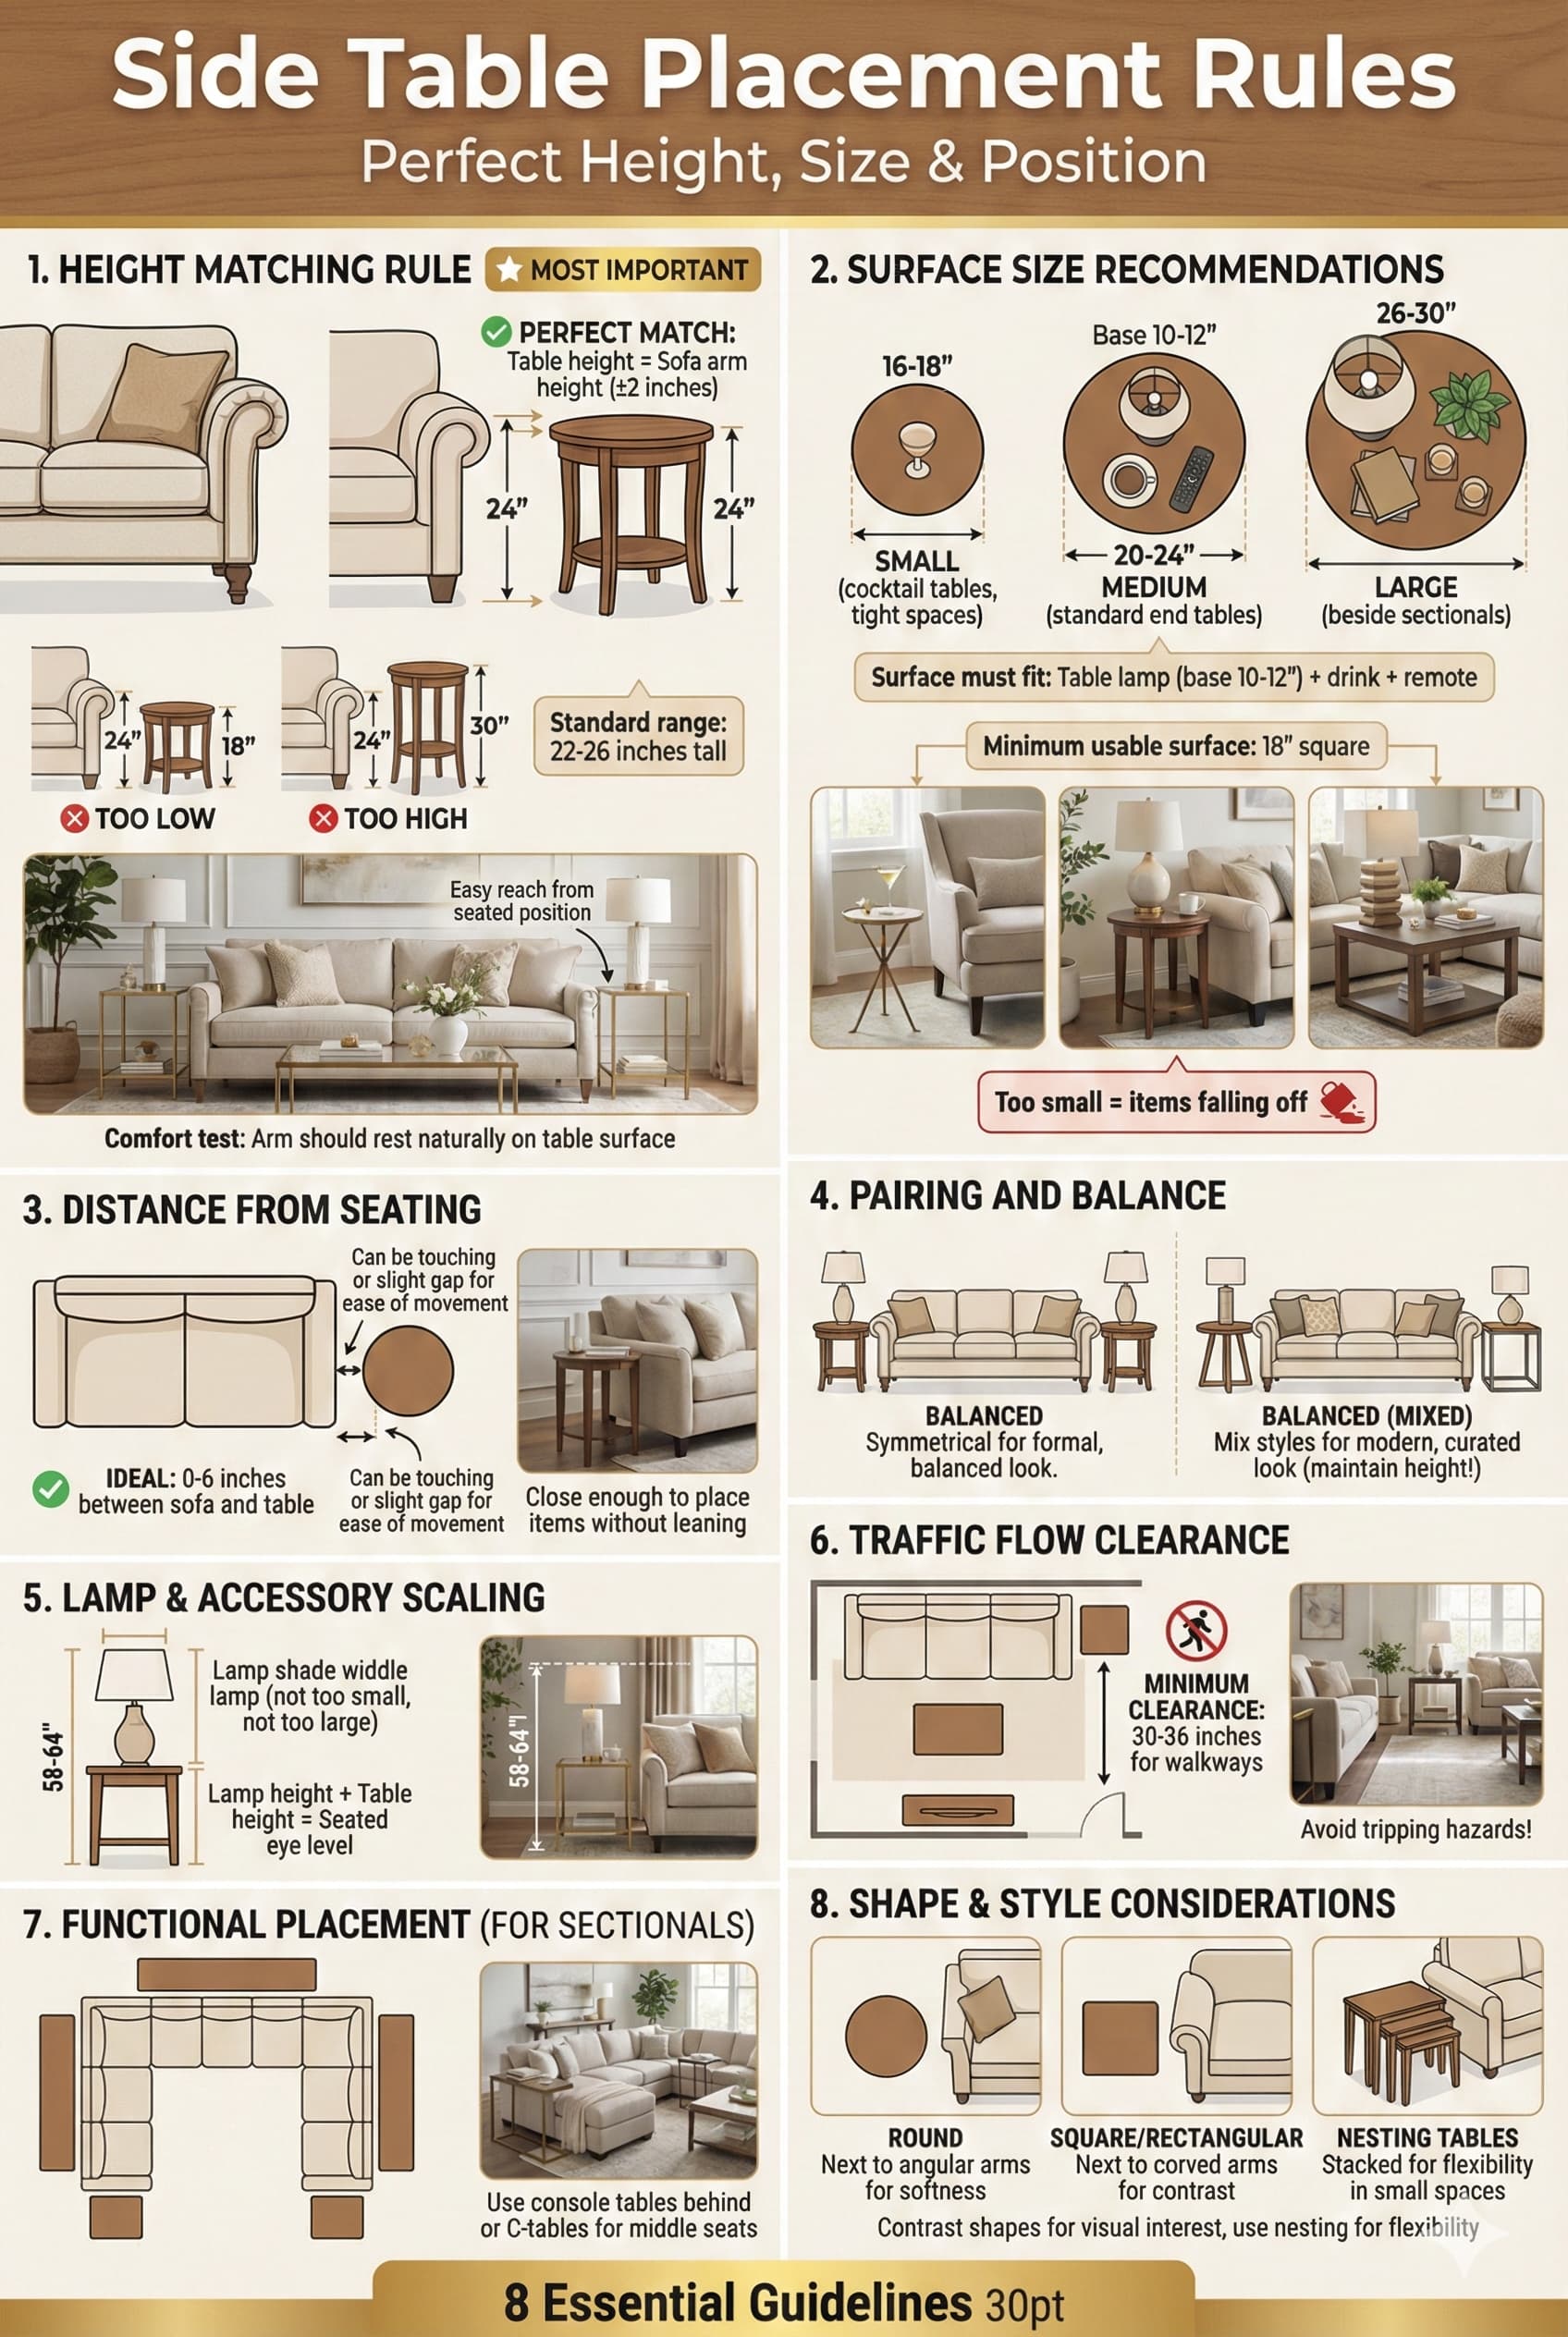
Side tables provide functional surfaces beside seating furniture for table lamps, beverages, remotes, books, and decorative objects. These supplementary pieces measure 14-24 inches wide, 18-24 inches deep, and 22-26 inches tall positioning lamp bases at appropriate heights for reading illumination. End table placement beside sofas and chairs creates convenient access to functional surfaces from primary seating positions.
End table height should approximate sofa arm height (typically 24-26 inches) allowing comfortable reach from seated positions. Tables significantly lower than arms require uncomfortable reaching while tables substantially higher appear disproportionate. Armless sofas and chairs pair with tables approximating seat cushion height plus 4-8 inches. Side table proportions relative to adjacent seating significantly impact visual balance and functional performance.
Side table quantity depends on seating configuration and spatial availability. Standard arrangements typically include two end tables flanking sofas providing symmetrical functional access for seated occupants. L-shaped arrangements may include 1-2 tables servicing primary sofa section with floor lamp supplementing illumination near perpendicular seating. Small living rooms may fit only single end table due to spatial constraints – prioritize placement beside primary seating position.
⚠ PAIN POINT: My end tables look tiny next to my sofa or they overwhelm the space
✓ SOLUTION: Select end tables measuring 1/2 to 2/3 sofa arm height maintaining visual proportion. Table surface should measure 18-24 inches square or round – smaller appears inadequate while larger dominates. Match table height to sofa arm height within 2 inches for balanced relationship. Test table beside sofa before purchasing verifying visual and functional appropriateness. Round tables conserve space in compact arrangements while square tables provide larger surface area. Nesting tables offer flexibility storing compactly while deploying expanded surface when needed.
Accent table varieties include C-tables sliding under seating edges, drum tables providing enclosed storage, console tables positioned behind sofas, and small round tables fitting tight corners. C-tables suit small spaces or reclining seating arrangements sliding underneath while supporting surfaces over laps. Console tables behind sofas define spatial boundaries in open concepts while providing display and storage surfaces. Accent table selection addresses specific spatial constraints and functional requirements within living room contexts.
End Table (Standard) | 22x24x26 inches tall | Beside sofa/chair arms | Lamp base, beverage |
End Table (Small) | 16x18x24 inches tall | Beside armless seating | Compact surface |
C-Table | 12x20x26 inches tall | Under sofa edge | Laptop, beverage surface |
Console Table | 48-72 inches long | Behind sofa | Display, storage, division |
Drum Table | 20-24 inch diameter | Any location | Enclosed storage |
Nesting Tables | Set of 2-3 tables | Beside seating | Flexible surface expansion |
Table lamp pairing with side tables requires dimensional coordination ensuring stable proportional relationships. Table lamp bases should measure no more than 2/3 table surface width preventing overhang. Total lamp height (base plus shade) typically measures 24-27 inches positioning light source approximately 40 inches above floor – appropriate for reading illumination from seated positions. Table lamp and end table selection requires coordinated consideration ensuring visual and functional compatibility.

Media console furniture fits televisions, media components, gaming systems, and media storage within living rooms. These functional pieces measure 48-84+ inches wide, 18-24 inches deep, and 20-30 inches tall providing sufficient surface and storage for entertainment equipment. Media console dimensions must coordinate with television size, seating distance, and spatial proportions maintaining balanced relationships within furniture groupings.
Media console width should equal or exceed television width measured at stand base creating visually balanced relationship. A 65-inch television measuring approximately 58 inches wide requires 60-72 inch media console width. Substantially wider consoles (20+ inches wider than television) appear imbalanced while narrower consoles create unstable appearance. Television placement on console centers over furniture piece with equal overhang on both sides maintaining symmetrical balance.
Media console height positions television screen at appropriate viewing height for primary seating. Optimal screen center height measures approximately eye level when seated (typically 42-48 inches above floor) for comfortable viewing without neck strain. Standard 24-inch tall consoles position 40-inch television centers near 44 inches – appropriate for average seating. Lower consoles suit larger televisions while taller consoles work with smaller screens. Viewing comfort significantly impacts daily use satisfaction justifying careful height consideration.
⚠ PAIN POINT: My television is mounted or positioned at awkward height causing neck strain during viewing
✓ SOLUTION: Position television screen center 42-48 inches above floor measured from floor to screen center point matching typical seated eye height. Mounting televisions above fireplaces creates excessively high placement (60+ inches) causing uncomfortable upward viewing angles – avoid this placement or select reclining seating compensating for high screen position. For wall mounting without console, position center 42-48 inches high unless seating includes recliners or loungers allowing comfortable upward viewing. Test viewing angle before permanent mounting sitting in primary viewing positions and evaluating comfort.
Storage capacity within media consoles fits media components (cable boxes, streaming devices, gaming consoles, sound systems) plus media collections (DVD/Blu-ray, video games, remote controls). Open shelving provides ventilation for heat-generating electronics while closed cabinets conceal visual clutter. Cable management features including rear cutouts and internal grommets organize wiring preventing tangled appearances. Media storage requirements have decreased substantially as streaming services replace physical media collections.
Compact Console | 48-60 inches | 2-3 shelves/cabinets | 43-55 inch TV | Small rooms, apartments |
Standard Console | 60-72 inches | 3-4 shelves/cabinets | 55-65 inch TV | Medium rooms |
Large Console | 72-84 inches | 4-6 shelves/cabinets | 65-75 inch TV | Large rooms |
Entertainment Center | 72-120 inches | Extensive storage | 55-75 inch TV | Traditional spaces |
Floating Console | 48-72 inches | Minimal storage | 43-65 inch TV | Contemporary spaces |
Media console alternatives including floating wall-mounted consoles, built-in entertainment centers, or forgoing consoles entirely through wall television mounting provide varied approaches matching spatial constraints and aesthetic preferences. Floating consoles maintain floor space visibility enhancing spacious perception in small living rooms. Built-in entertainment centers provide comprehensive storage and architectural integration in traditional living rooms. Wall-mounted televisions eliminate furniture requirements entirely though require concealed wiring and may limit flexibility for future modifications.
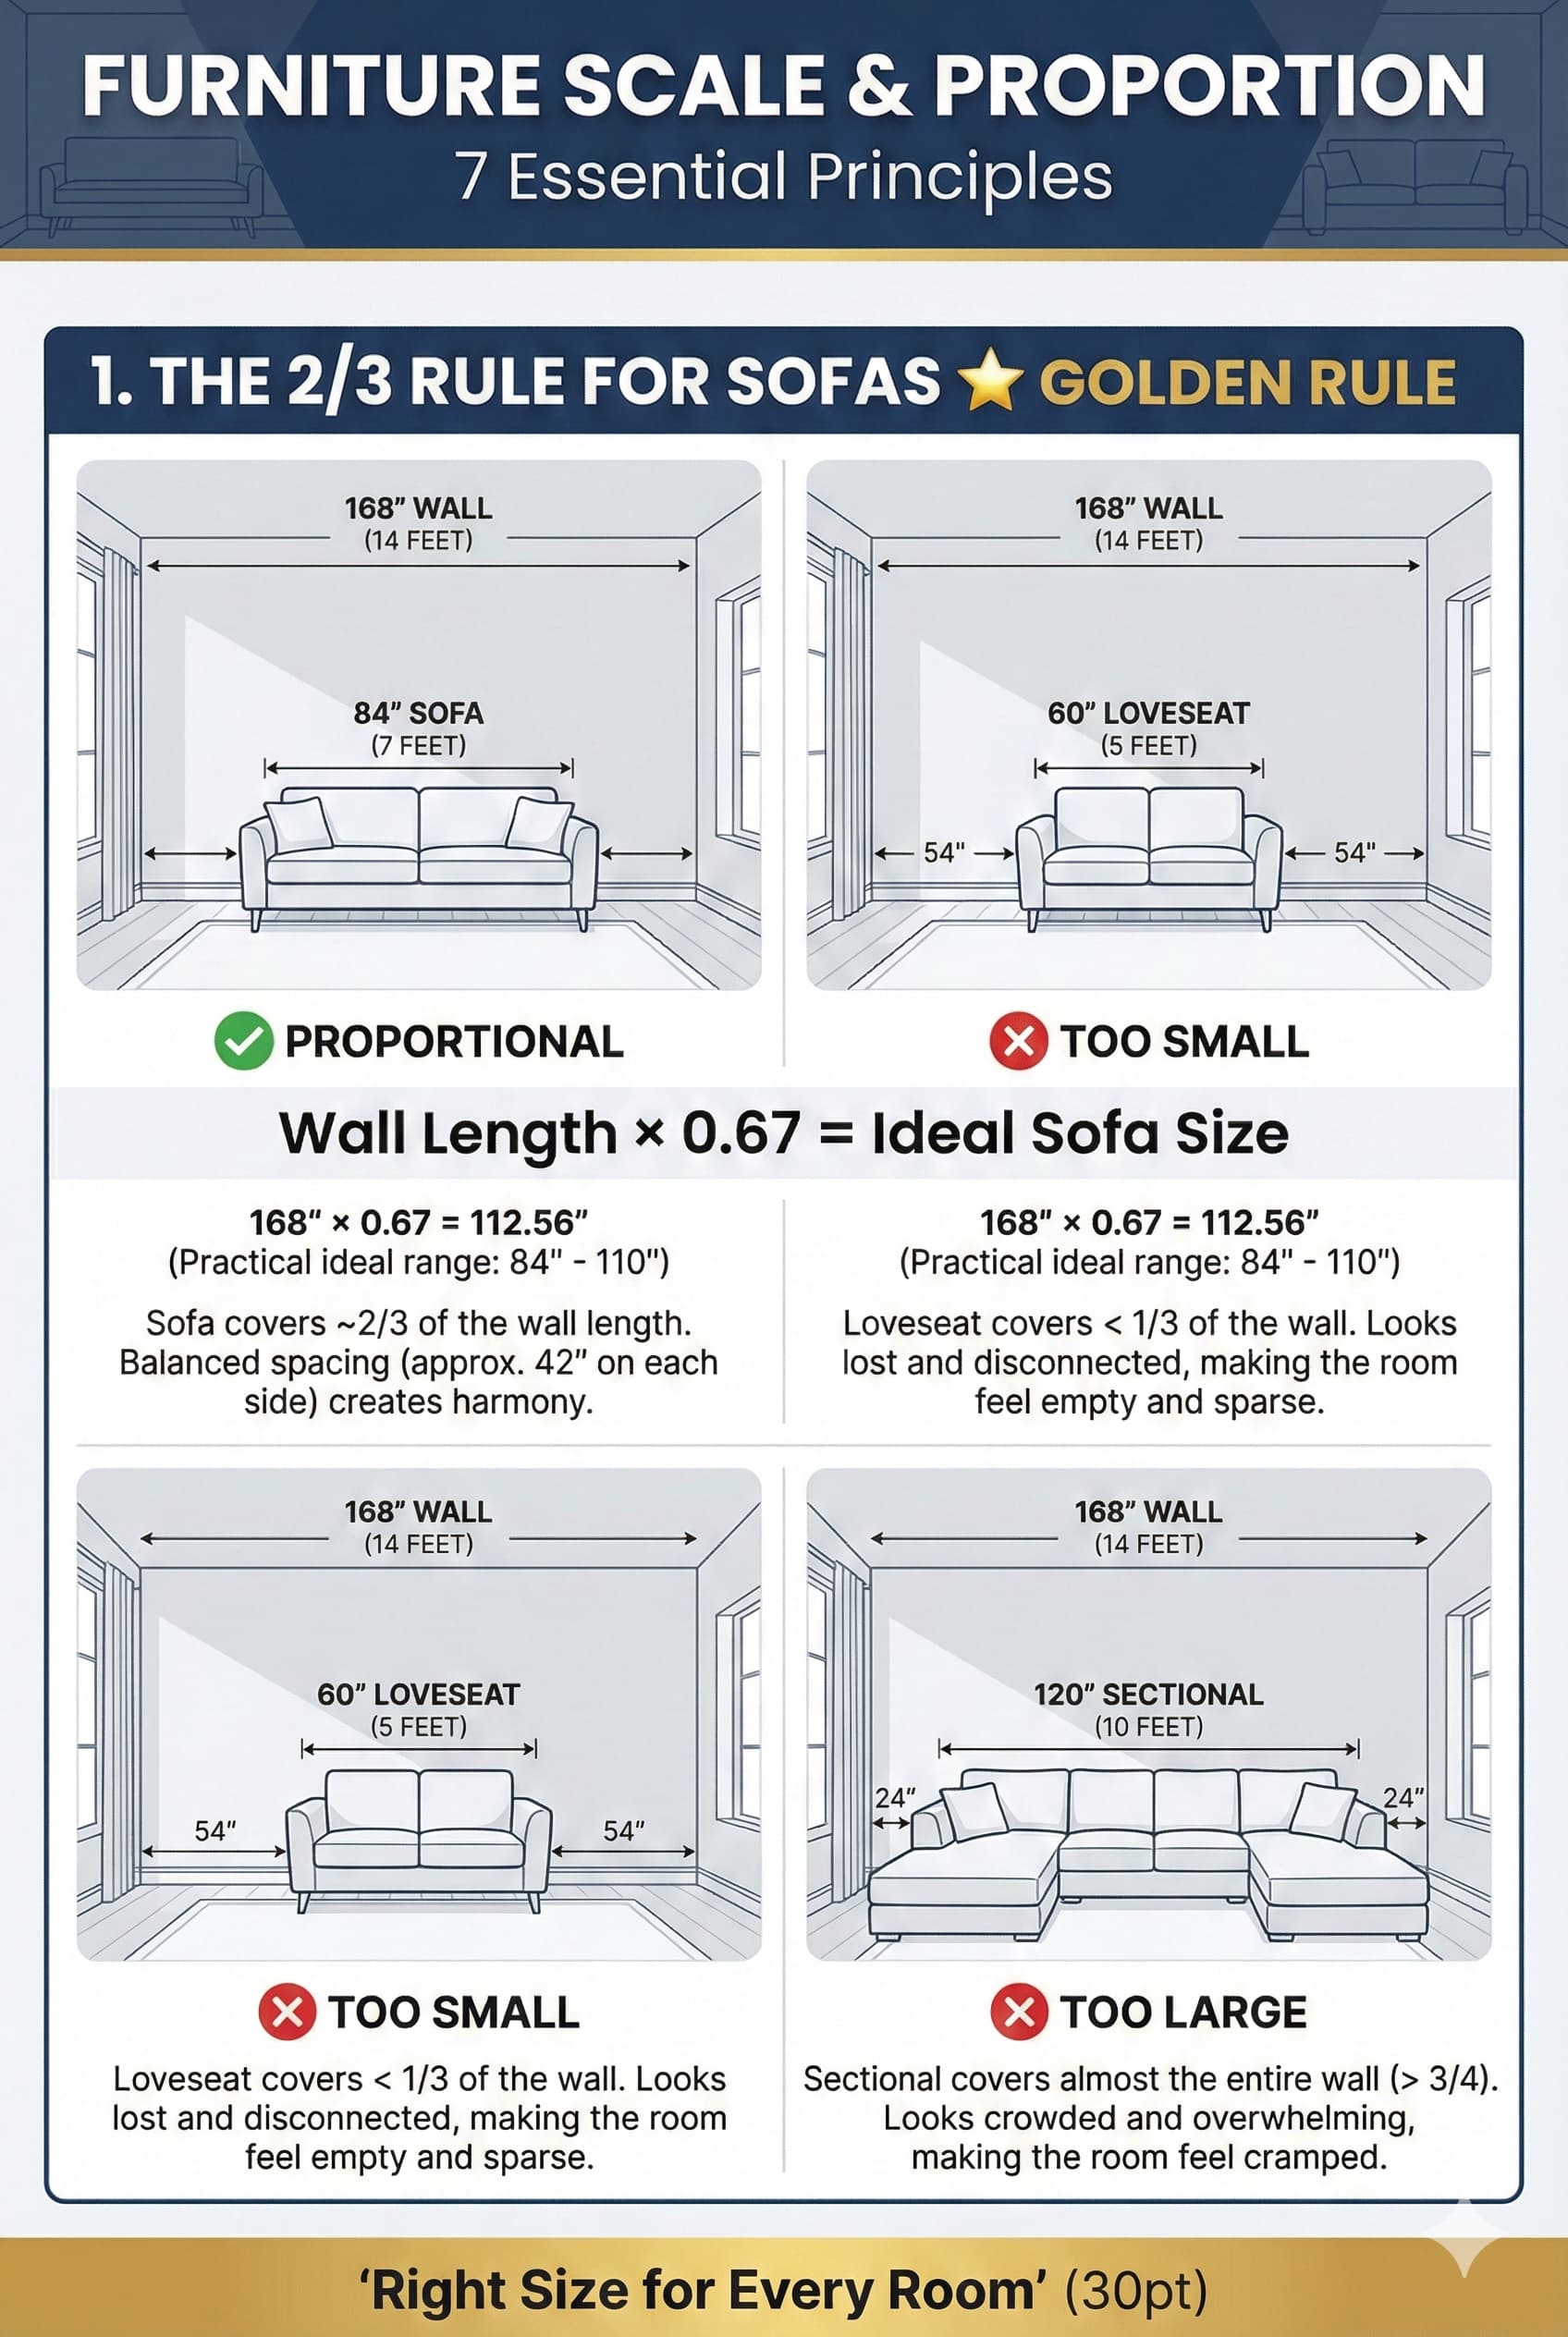
Furniture scale describes size relationships between furniture pieces and between furniture and architectural space. Appropriate scaling creates balanced harmonious living rooms where furniture feels neither overwhelming nor inadequate. Scale principles require evaluating multiple dimensions including furniture height, width, depth, and visual weight in relation to room proportions and adjacent pieces.
Vertical scale addresses furniture height relationships with ceiling heights and window proportions. Standard 8-foot ceilings fit furniture up to 36-40 inches tall without creating oppressive enclosure. Higher ceilings (9-10 feet) support taller furniture including high-back sofas and substantial bookcases without appearing disproportionate. Low ceilings (7-8 feet) benefit from lower-profile furniture maintaining vertical spaciousness. Furniture height significantly impacts spatial perception and comfort.
Horizontal scale examines furniture length and width relative to room dimensions and wall lengths. Long walls (12+ feet) require substantial furniture (84+ inch sofas, 60+ inch media consoles) preventing diminutive appearance. Short walls (8-10 feet) suit smaller furniture (72-inch loveseats, 48-inch consoles) avoiding oversized installations. Living room furniture should generally occupy 50-65 percent of wall length on primary furniture walls maintaining balanced relationships between solid and open space.
⚠ PAIN POINT: My furniture is either all too big or too small – I can’t find pieces that feel right together
✓ SOLUTION: Select anchor piece first (typically sofa) scaled appropriately for room size. Dimension all other furniture relative to anchor piece: accent chairs 2/3 sofa size, coffee table 2/3 sofa length, end tables 2/3 sofa arm height. Maintain consistent furniture profile (all low-profile or all standard height) avoiding mixed heights appearing disjointed. Create floor plan with scaled furniture templates verifying proportional relationships before purchasing. Visit showrooms measuring and photographing furniture assessing scale compatibility with owned pieces.
Visual weight describes perceived heaviness or lightness of furniture pieces influenced by color, material, detail level, and base style. Dark solid furniture on closed bases appears heavier than light-colored furniture on exposed legs despite identical dimensions. Heavy visual weight suits large living rooms requiring substantial pieces while light visual weight benefits small spaces maintaining openness. Balanced living room design distributes visual weight throughout space avoiding heavy concentration in single area creating spatial imbalance.
Proportion principles examine relationships between furniture parts including arm-to-back ratios, seat-to-arm ratios, and leg-to-body ratios. Well-proportioned furniture displays balanced relationships where no single element dominates inappropriately. Oversized arms on narrow sofas, elongated backs on shallow chairs, or diminutive legs on substantial bodies create visual awkwardness. Quality furniture demonstrates refined proportions though style variations (traditional, contemporary, mid-century) employ different proportional relationships reflecting aesthetic priorities.
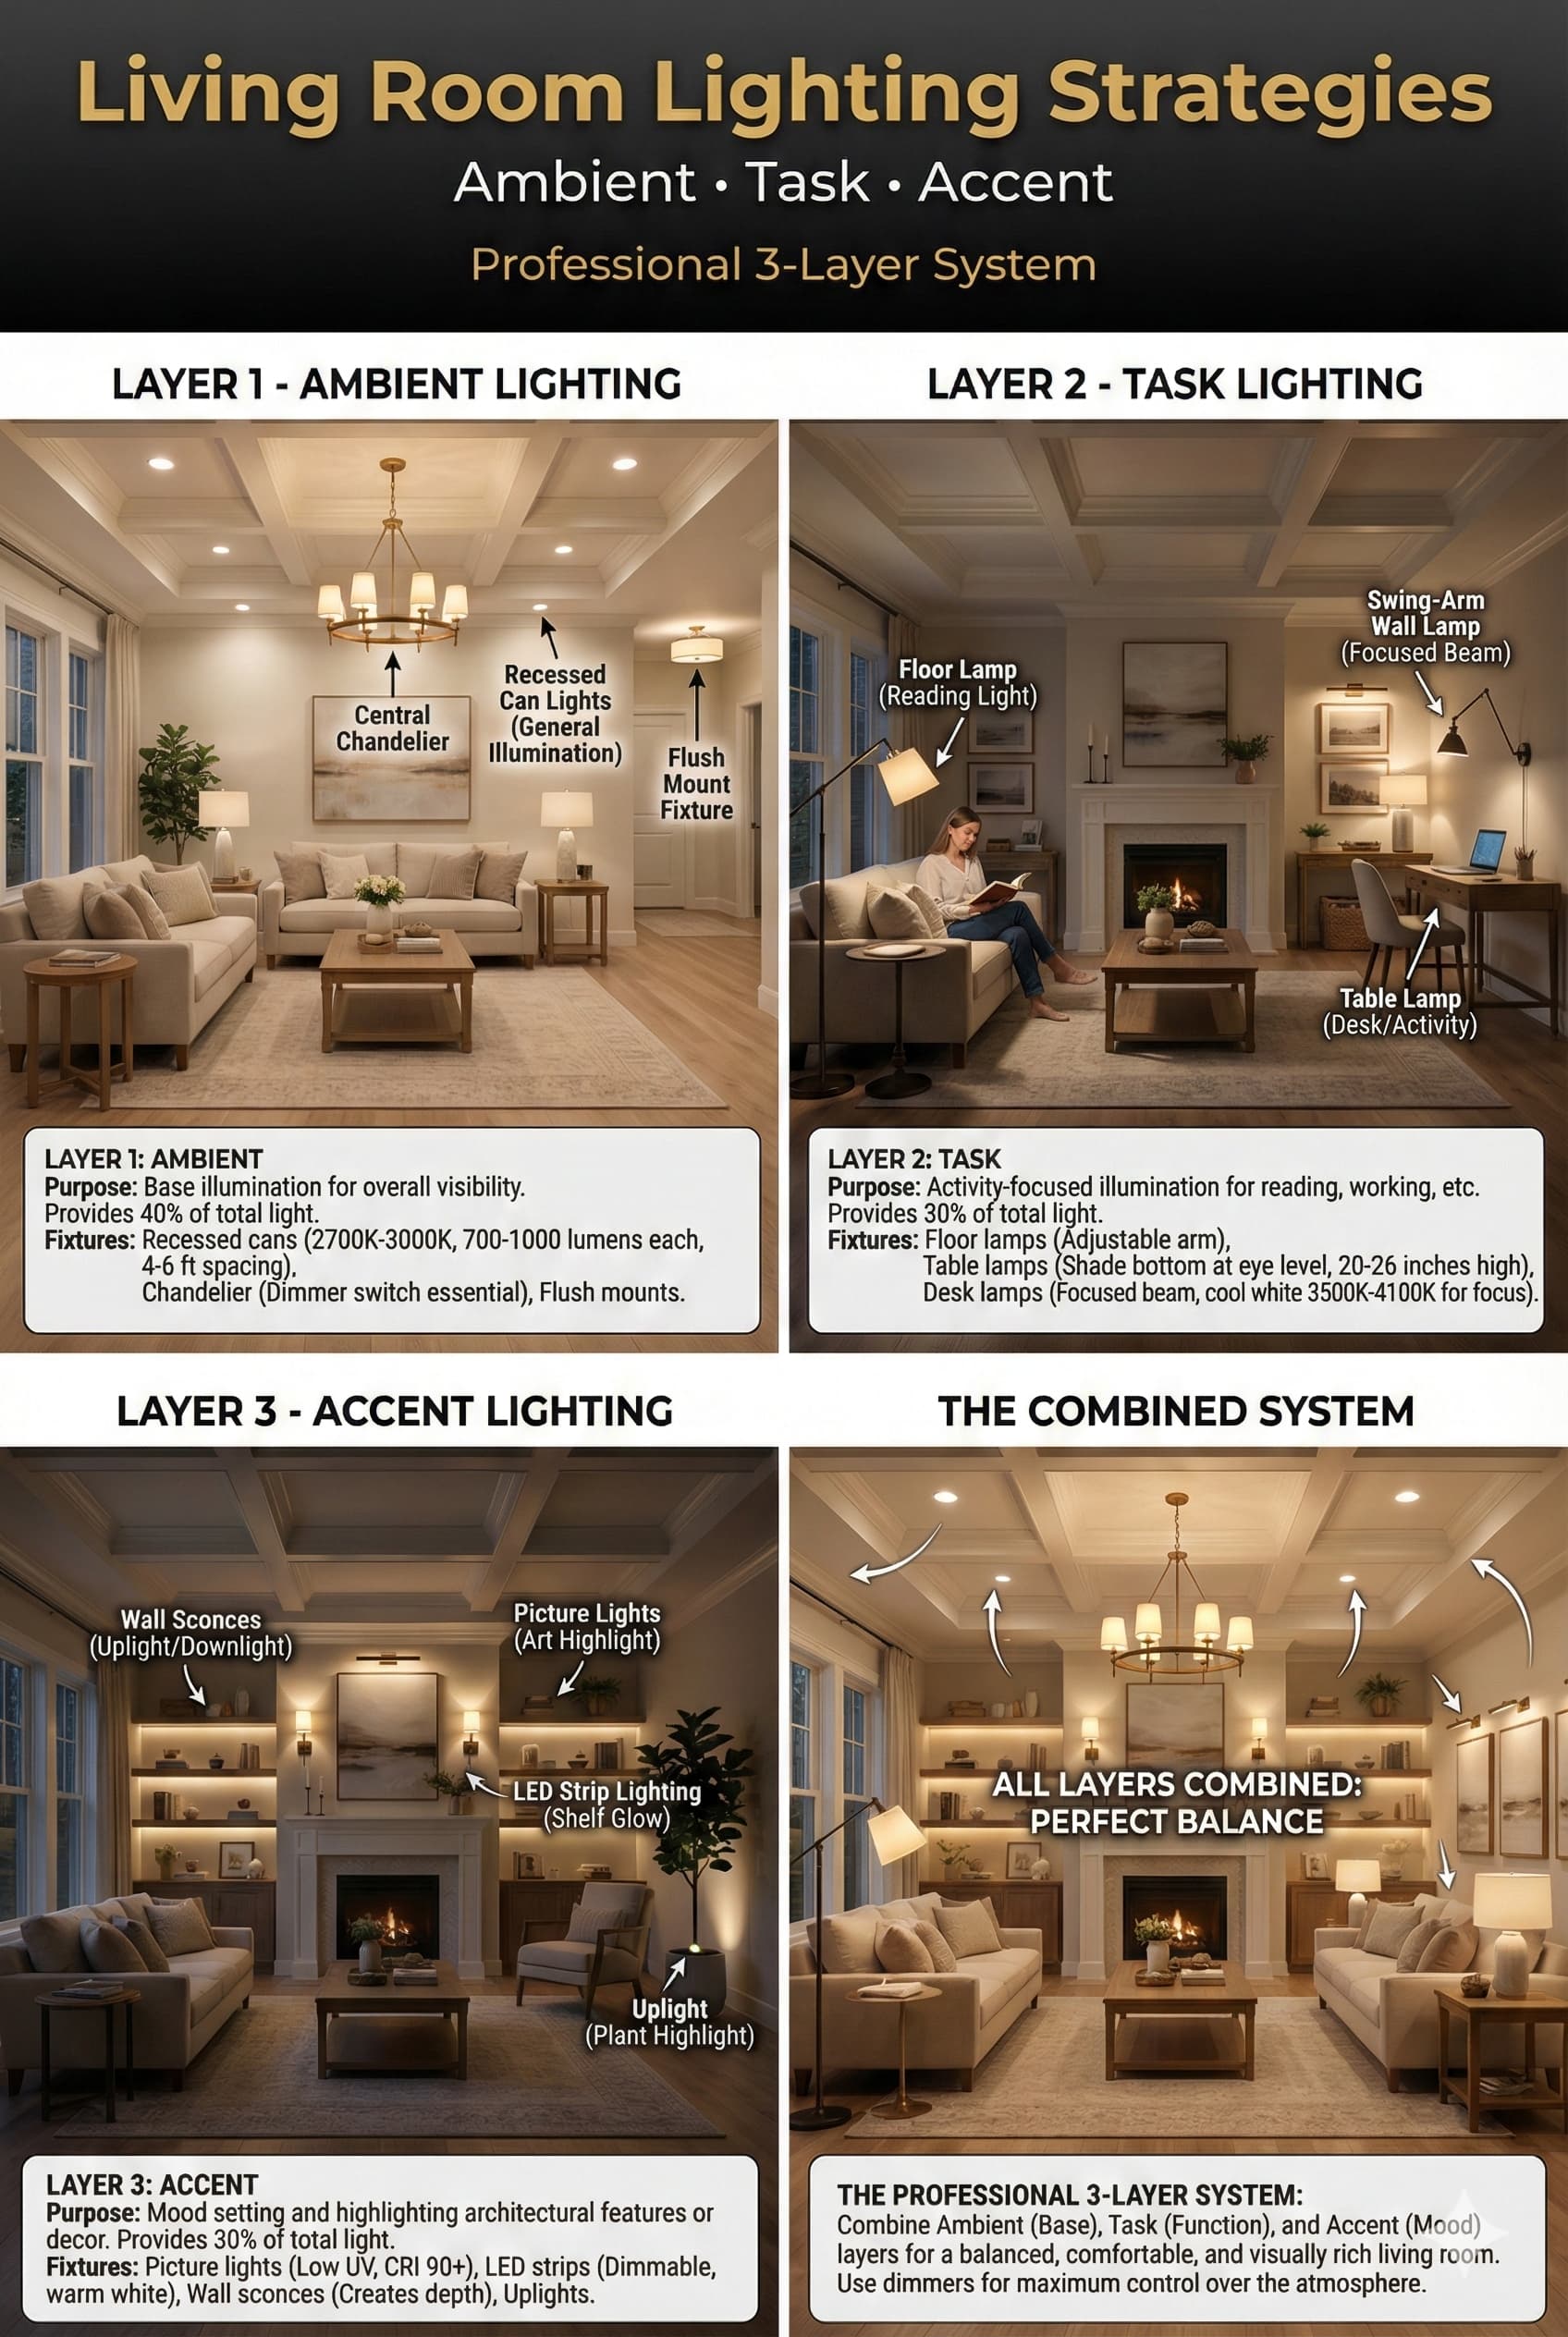
Professional lighting design follows established engineering standards for optimal illumination. Living room lighting requires three-layer approach combining ambient illumination, task lighting, and accent lighting creating functional flexible environments supporting varied activities and mood requirements. This comprehensive methodology provides general illumination, focused task support, and decorative highlighting establishing sophisticated lighting design exceeding single-source central fixture approaches. Layered lighting allows intensity adjustment matching activities from bright cleaning illumination to subdued evening entertainment viewing.
Ambient lighting provides general overall illumination establishing baseline visibility throughout living room spaces. This foundational layer typically employs ceiling-mounted fixtures including recessed cans, flush mounts, semi-flush fixtures, or chandeliers distributing light broadly. Ambient illumination should achieve 20-30 foot-candles (lumens per square foot) for general activities increasing to 50-75 foot-candles for detailed tasks. Living room ambient lighting creates comfortable base illumination supplemented by additional layers.
Task lighting provides focused illumination for specific activities including reading, crafts, homework, or detailed work requiring enhanced visibility. Table lamps, floor lamps, and adjustable fixtures positioned near activity locations deliver concentrated light where needed. Task lighting should achieve 50-75 foot-candles at task surface for reading and detailed activities. Reading lamps positioned beside seating direct light downward onto lap or side table supporting comfortable extended reading without eye strain.
PAIN POINT: My living room has overhead lights but still feels dark and I need all lights on simultaneously to see anything
✓ SOLUTION: Add layered lighting sources at multiple heights and locations. Install dimmer switches on overhead fixtures allowing intensity adjustment (15-20 percent typical cost increase). Add table lamps on end tables beside seating providing localized task lighting. Include floor lamp beside reading chair or in dark corner. Install wall sconces or picture lights adding mid-level illumination. Use 2700K-3000K warm white LED bulbs creating inviting atmosphere rather than harsh cool white (4000K+) appearing institutional.
Accent lighting highlights architectural features, artwork, plants, or decorative objects creating visual interest and dimensional depth. Track lighting, picture lights, uplights, and LED strips provide focused directional illumination emphasizing desired elements. Accent lighting typically employs higher wattage than ambient (3:1 ratio) ensuring highlighted elements attract visual attention. Decorative lighting transforms living rooms from flat single-dimension spaces into layered sophisticated environments with depth and character.
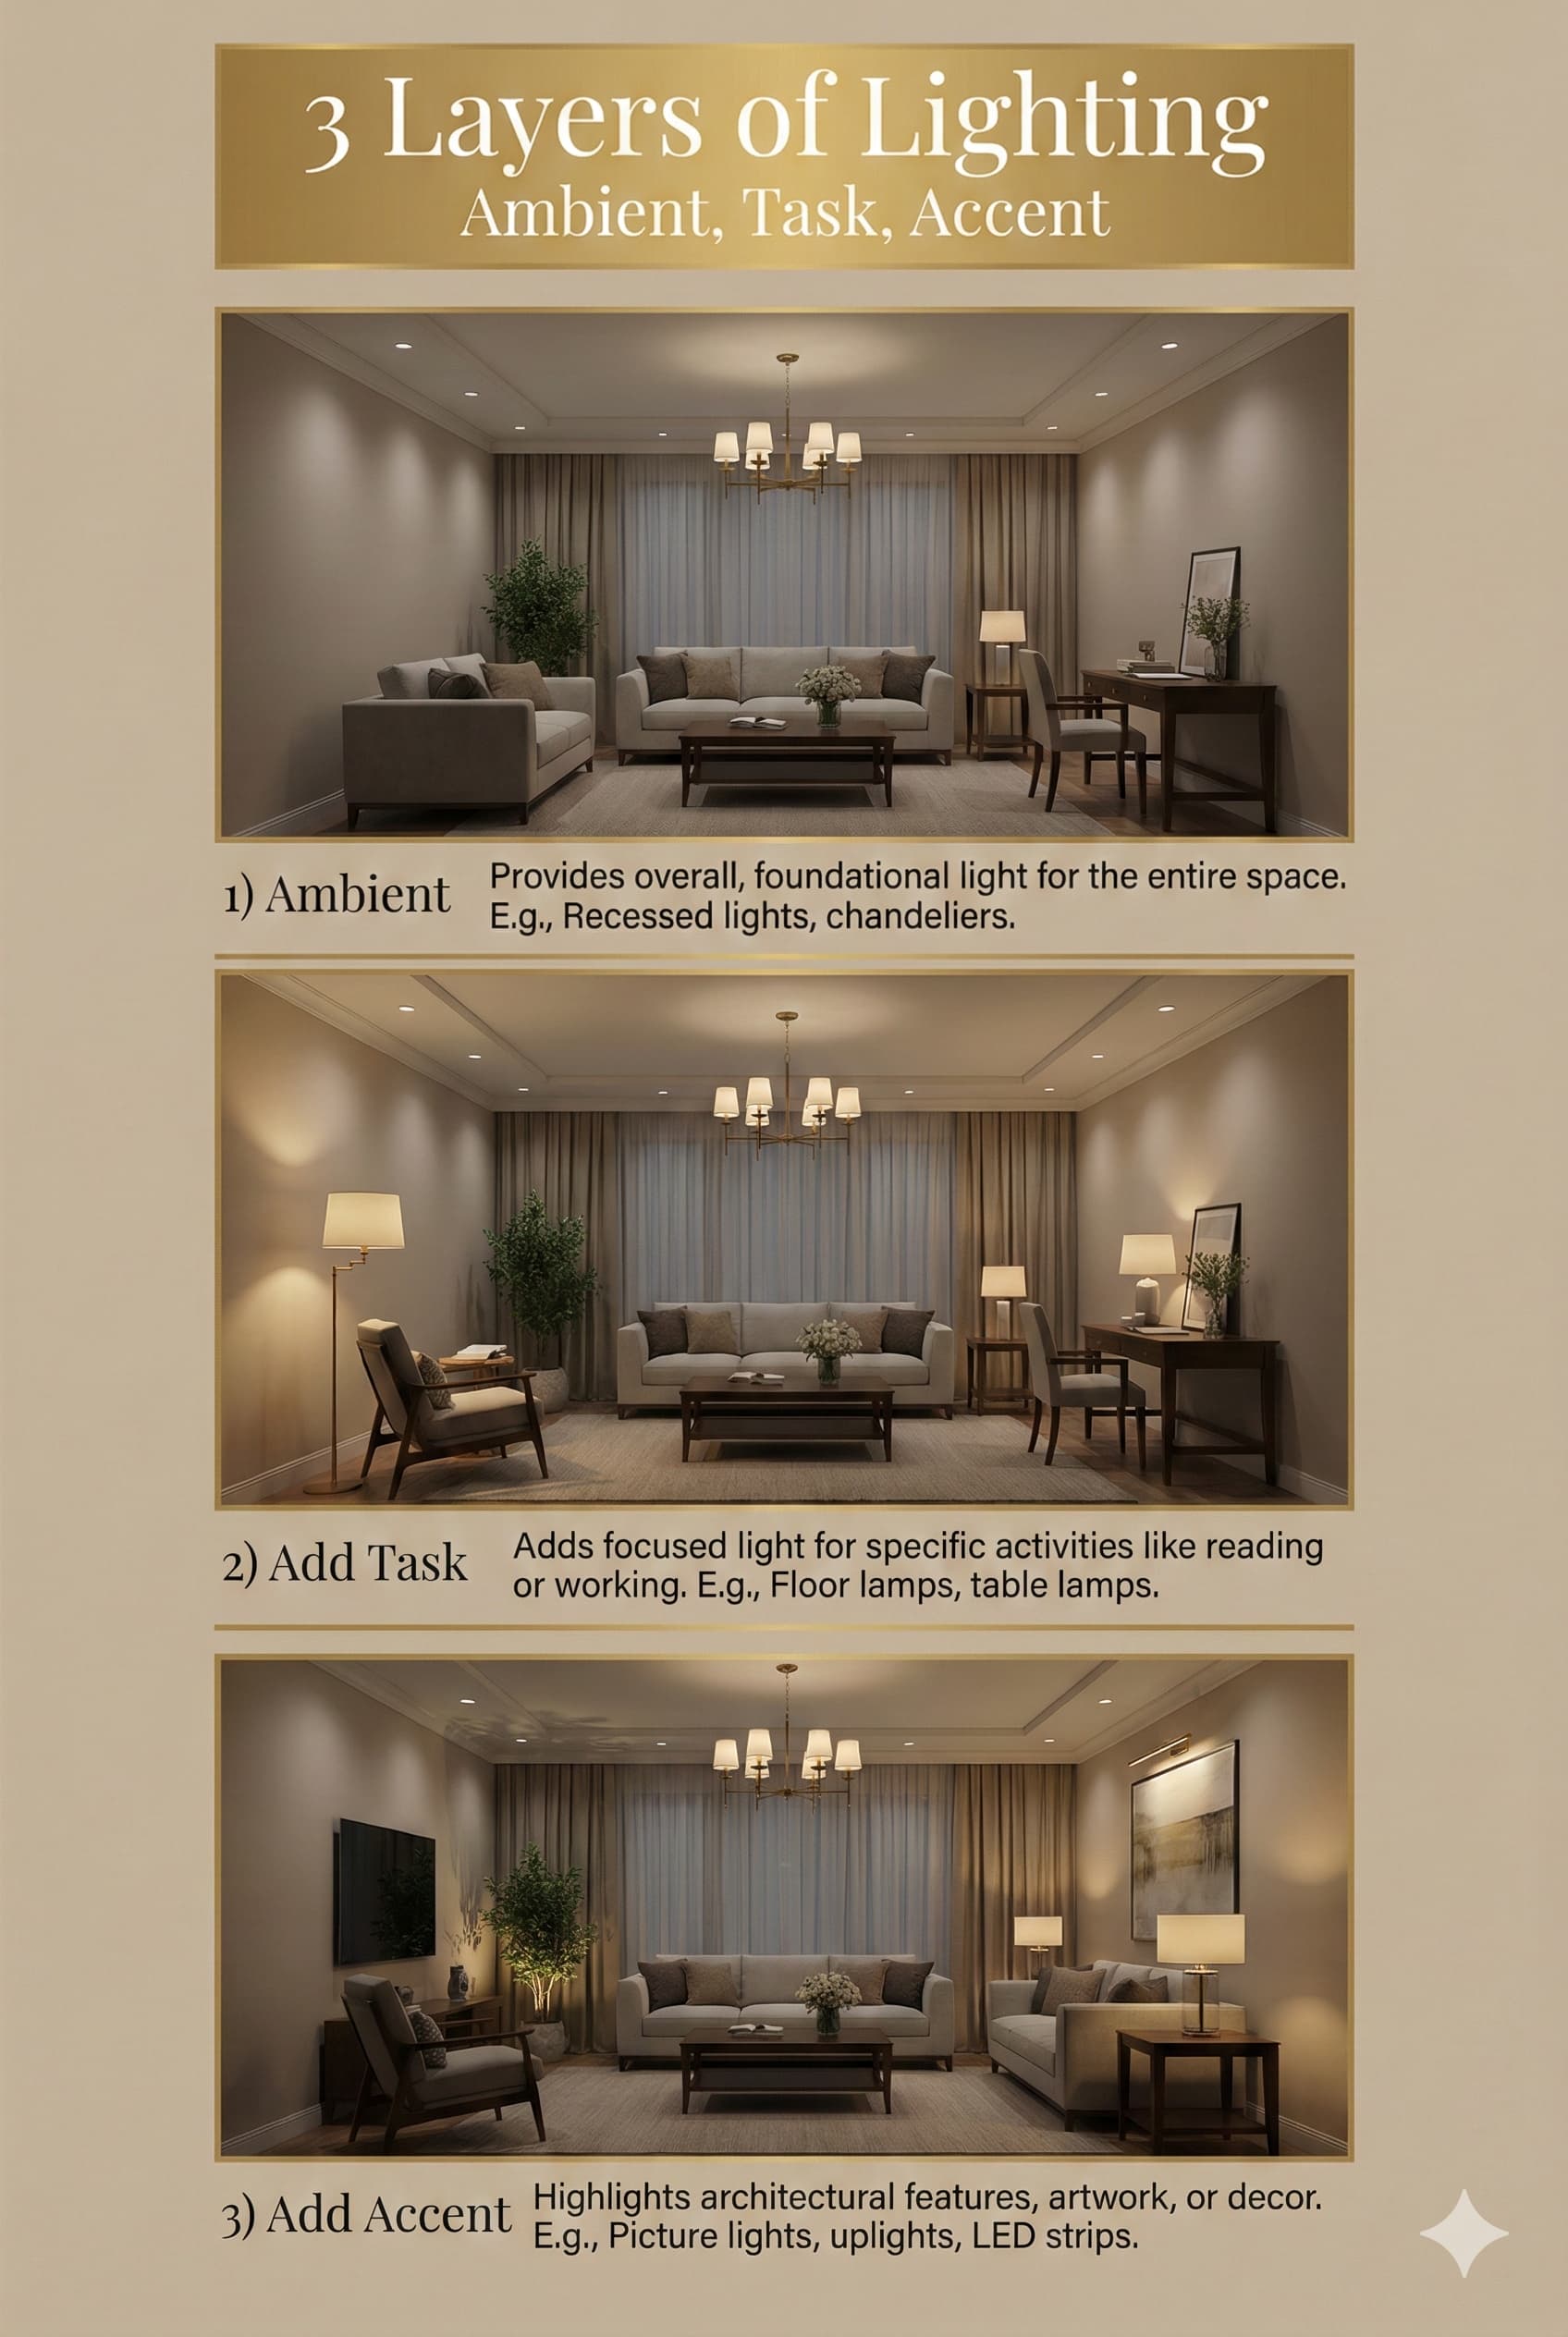
Three-layer lighting methodology structures living room illumination through ambient, task, and accent light sources working independently or in combination supporting varied activities and atmospheric requirements. This systematic approach provides flexibility absent in single-source lighting allowing customization matching specific needs. Layered lighting design professional recommendation stems from human factor research documenting superior user satisfaction and functional performance compared to single-source approaches.
Layer proportion recommendations suggest ambient lighting provides 40-50 percent total illumination, task lighting contributes 30-40 percent, and accent lighting adds 10-20 percent. These proportions create balanced lighting supporting general visibility while allowing focused task illumination and decorative highlighting. Actual put in placeation varies based on living room activities, natural light availability, and personal preferences. Flexibility through dimmer controls and independent switching enables proportion adjustment matching changing needs.
Switch planning requires strategic circuiting allowing independent layer control. Ambient fixtures should switch independently from task lamps enabling overhead use without forcing table lamp illumination. Multiple switch locations at room entries and exits provide convenient control. Dimmer switches on ambient and accent circuits allow intensity modulation matching activities and time of day. Living room lighting control significantly impacts daily use satisfaction justifying thoughtful planning during design phases.
⚠ PAIN POINT: I installed recessed lights everywhere but my living room still looks flat and uninviting
✓ SOLUTION: Recessed ambient lighting alone creates flat single-dimension illumination. Add table lamps (2-3 positions), floor lamp (1-2 positions), and accent lighting (picture lights, uplights, LED strips) creating layered varied light sources at multiple heights. Dim overhead recessed lights to 40-50 percent allowing layered sources to dominate during evening hours creating warm inviting atmosphere. Position lamps near seating creating pools of warm light contrasting with darker surrounding areas producing dramatic dimensional effect.
Color temperature selection impacts atmospheric quality and coordination with other light sources. Warm white (2700K-3000K) creates cozy inviting living room atmospheres resembling traditional incandescent bulbs. Neutral white (3000K-3500K) provides balanced approach suitable for contemporary spaces. Cool white (4000K+) appears institutional and unflattering in residential settings. Consistent color temperature across fixtures prevents color clashing when multiple sources operate simultaneously. LED bulbs in 2700K-3000K range replicate traditional warm incandescent quality most users prefer.
Ambient | 20-30 foot-candles | Recessed, flush mount, chandelier | Dimmer switch, centrally switched | 40-50% |
Task | 50-75 foot-candles at surface | Table lamps, floor lamps, reading lights | Individual switches, 3-way bulbs | 30-40% |
Accent | 3x ambient level at focal point | Picture lights, track lights, uplights | Switched independently | 10-20% |
Natural light integration requires artificial lighting coordination with daylight variations throughout day. Abundant daytime natural light may require minimal artificial supplementation while evening hours demand comprehensive artificial lighting. Window orientation impacts natural light quality – south-facing living rooms receive direct sunlight requiring glare management while north-facing rooms receive consistent diffuse light. Lighting design should complement natural light rather than competing with it during daylight hours.
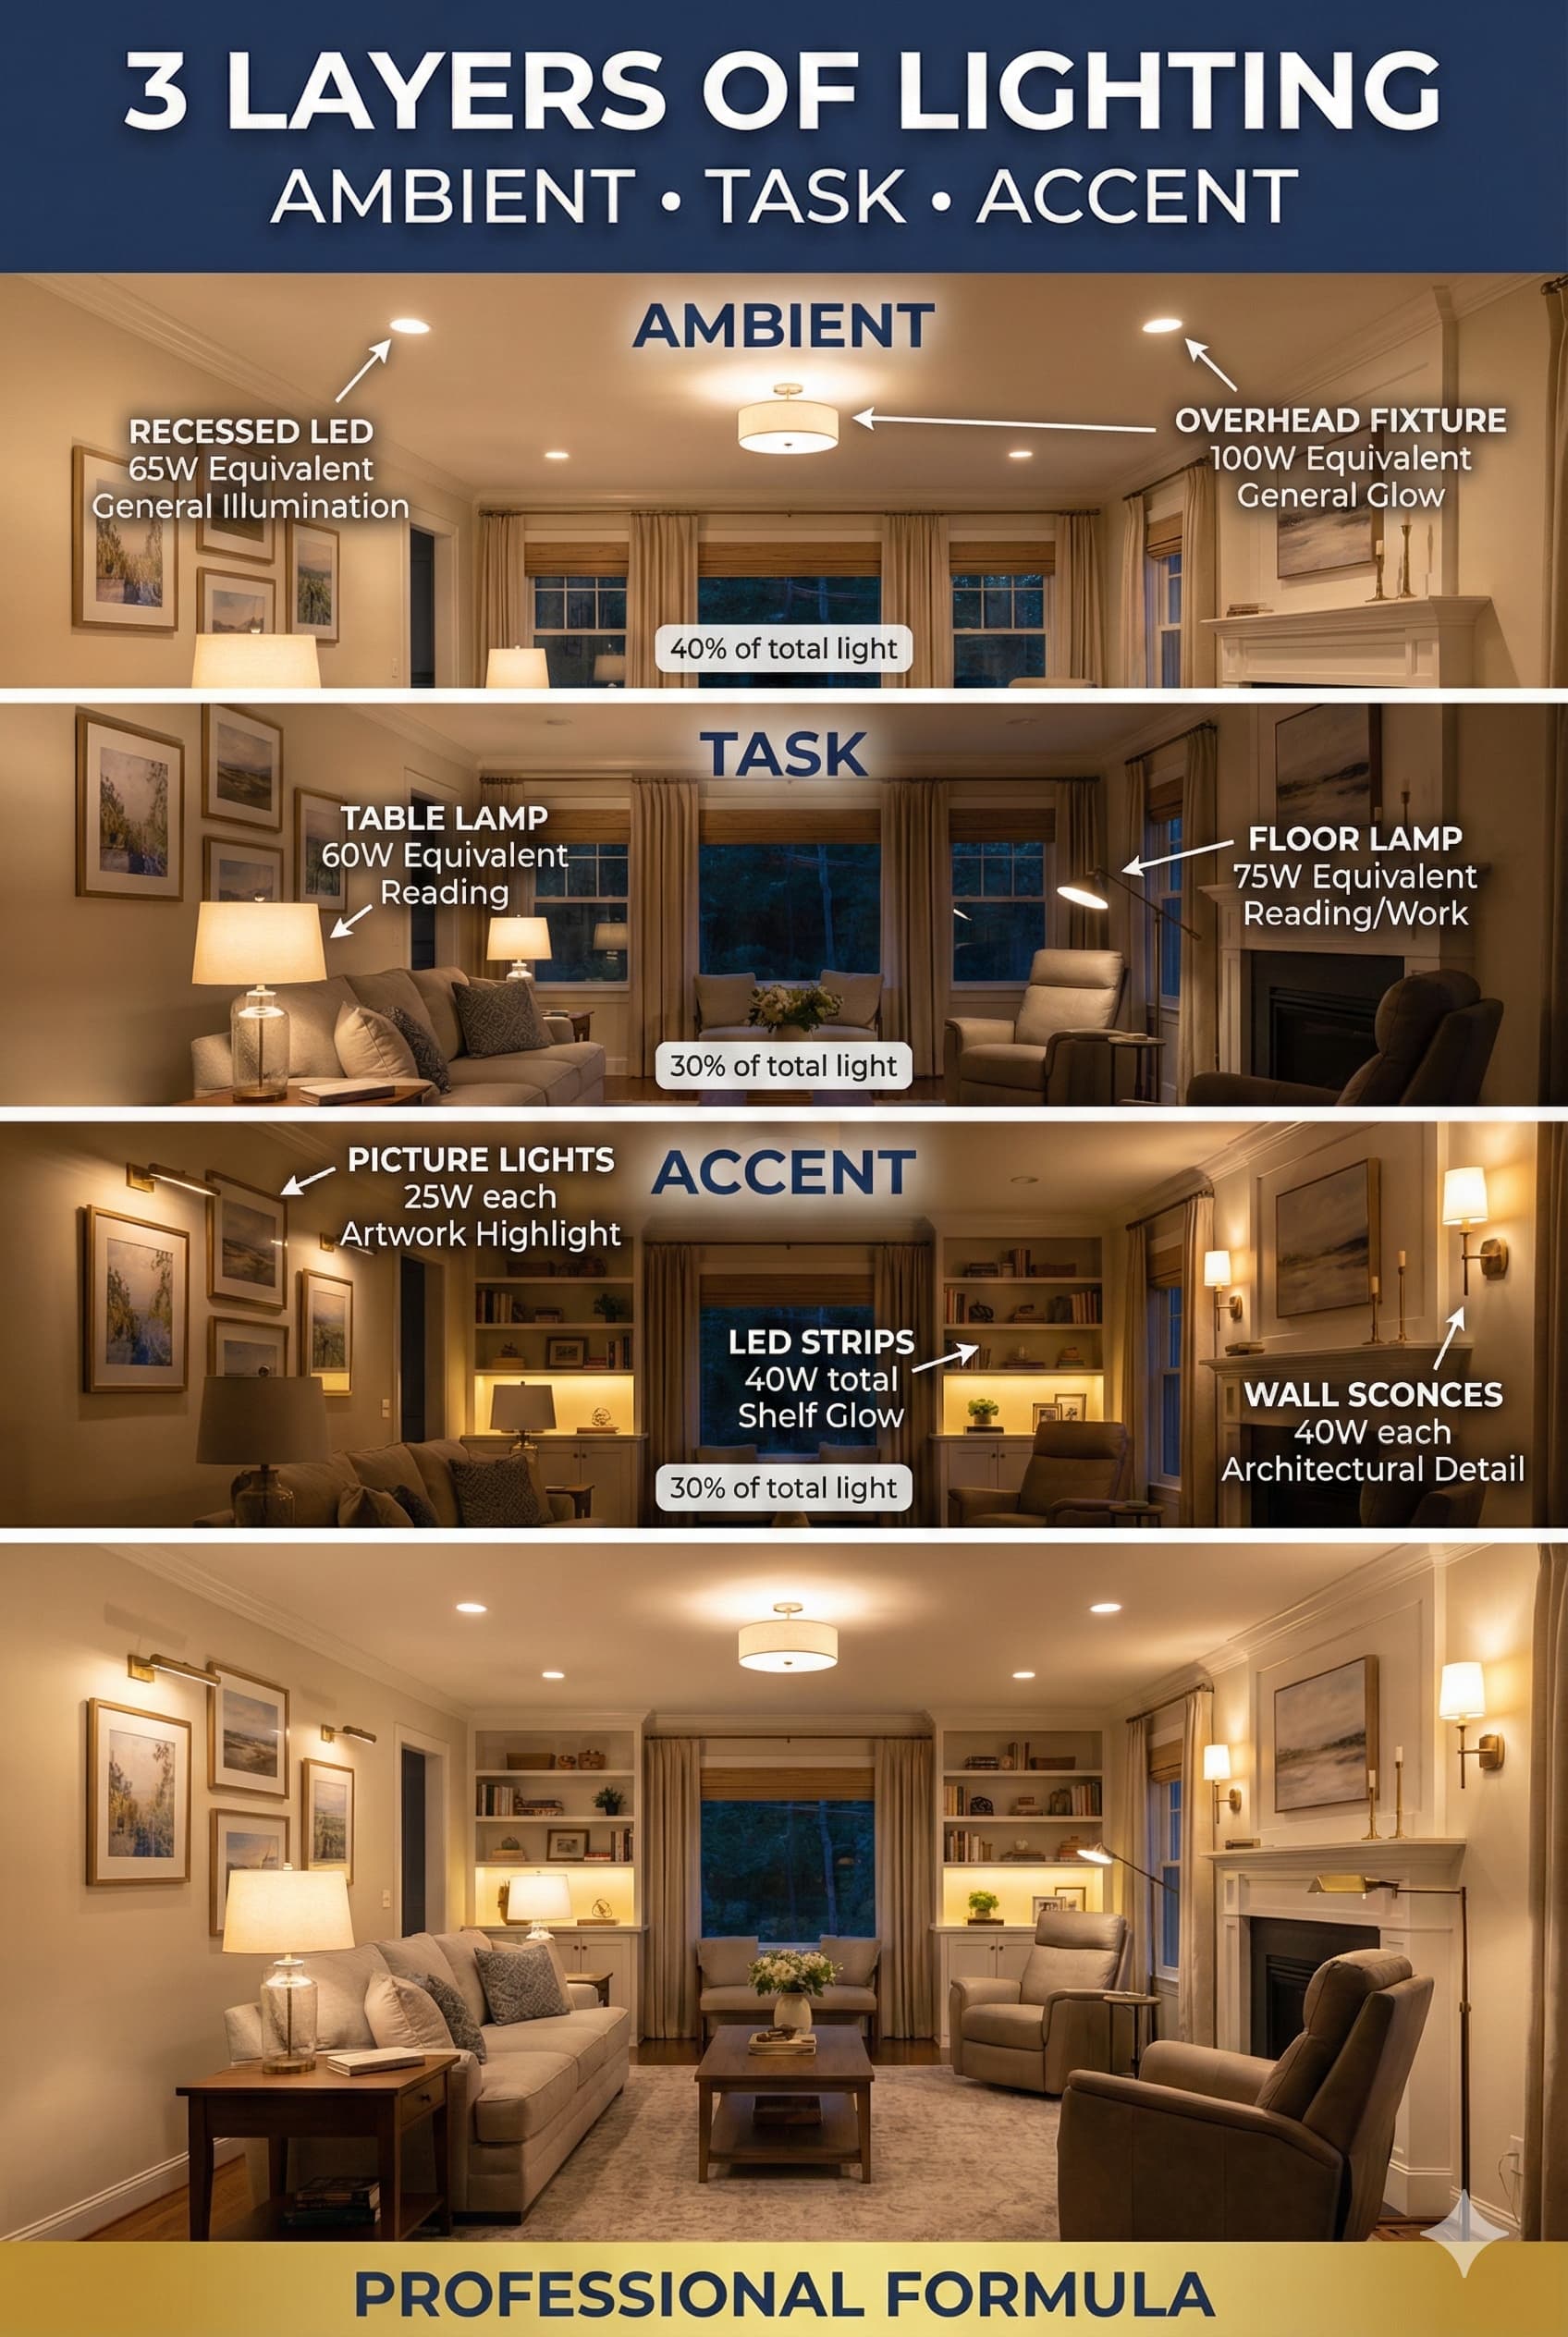
Ambient lighting fixtures for living rooms include recessed cans, flush mount ceiling fixtures, semi-flush mounts, chandeliers, and pendant lights providing general overhead illumination. Fixture selection depends on ceiling height, room dimensions, design style, and desired light distribution patterns. Ceiling lighting establishes foundational illumination supplemented by task and accent layers creating comprehensive lighting schemes.
Recessed lighting provides unobtrusive contemporary ambient illumination through can fixtures installed in ceiling cavities. Standard 6-inch cans space 4-6 feet apart providing even illumination across living room areas. LED retrofit trims offer energy efficiency and long lifespans (25,000-50,000 hours) eliminating frequent bulb replacement. Adjustable gimbal trims allow light direction modification useful for accent applications. Recessed can quantity calculation: room square footage divided by 5-6 equals approximate can count for general illumination.
Flush mount fixtures attach directly to ceiling surfaces without stem or chain suspension suitable for standard 8-foot ceilings. These fixtures typically measure 12-20 inches diameter providing concentrated light directly below installation point. Larger rooms require multiple flush mounts or supplementary lighting sources as single fixtures illuminate limited areas. Flush ceiling fixtures suit traditional or transitional living rooms requiring decorative lighting elements rather than minimal recessed cans.
⚠ PAIN POINT: My chandelier looks perfect but doesn’t provide enough light for actual living room use
✓ SOLUTION: Chandeliers primarily serve decorative functions rather than functional general illumination. Supplement chandelier with recessed perimeter lighting (4-8 cans around room edges) providing functional ambient light. Install dimmer on chandelier maintaining low decorative glow while recessed lights provide working illumination. Alternatively, select chandelier accommodating higher wattage bulbs (6-8 bulbs at 60W equivalent = 480W total) providing adequate illumination. Verify chandelier specifications support required wattage before installation.
Semi-flush mount fixtures suspend 4-12 inches below ceiling providing slightly more directional light distribution than flush mounts while accommodating standard ceiling heights. These transitional fixtures suit various design styles from traditional to contemporary. Drum shade semi-flush mounts diffuse light broadly while multi-arm fixtures direct light in specific patterns. Semi-flush fixtures appropriate for living rooms with 8-9 foot ceilings requiring decorative ambient lighting.
Recessed Can (6-inch) | 6-inch diameter | Any height | 25-36 sq ft per can | Universal contemporary |
Flush Mount | 12-20 inch diameter | 8 feet | 80-120 sq ft | Traditional to contemporary |
Semi-Flush Mount | 14-24 inch diameter | 8-9 feet | 100-150 sq ft | Traditional to transitional |
Chandelier (small) | 20-24 inch diameter | 9+ feet | 120-200 sq ft (decorative) | Traditional to contemporary |
Chandelier (large) | 28-36 inch diameter | 10+ feet | 200-300 sq ft (decorative) | Traditional to contemporary |
Pendant Light | 10-16 inch diameter | 9+ feet | 50-80 sq ft | Contemporary to industrial |
Chandelier sizing for living rooms follows formula: room length plus width in feet equals chandelier diameter in inches. A 15×18 foot room (33 feet combined) suits 30-36 inch diameter chandelier. Smaller chandeliers appear inadequate while oversized fixtures overwhelm spaces. Chandelier height above floor should measure 7-7.5 feet minimum for standard ceiling installations preventing head collisions. Higher ceilings allow lower chandelier suspension creating dramatic focal points.
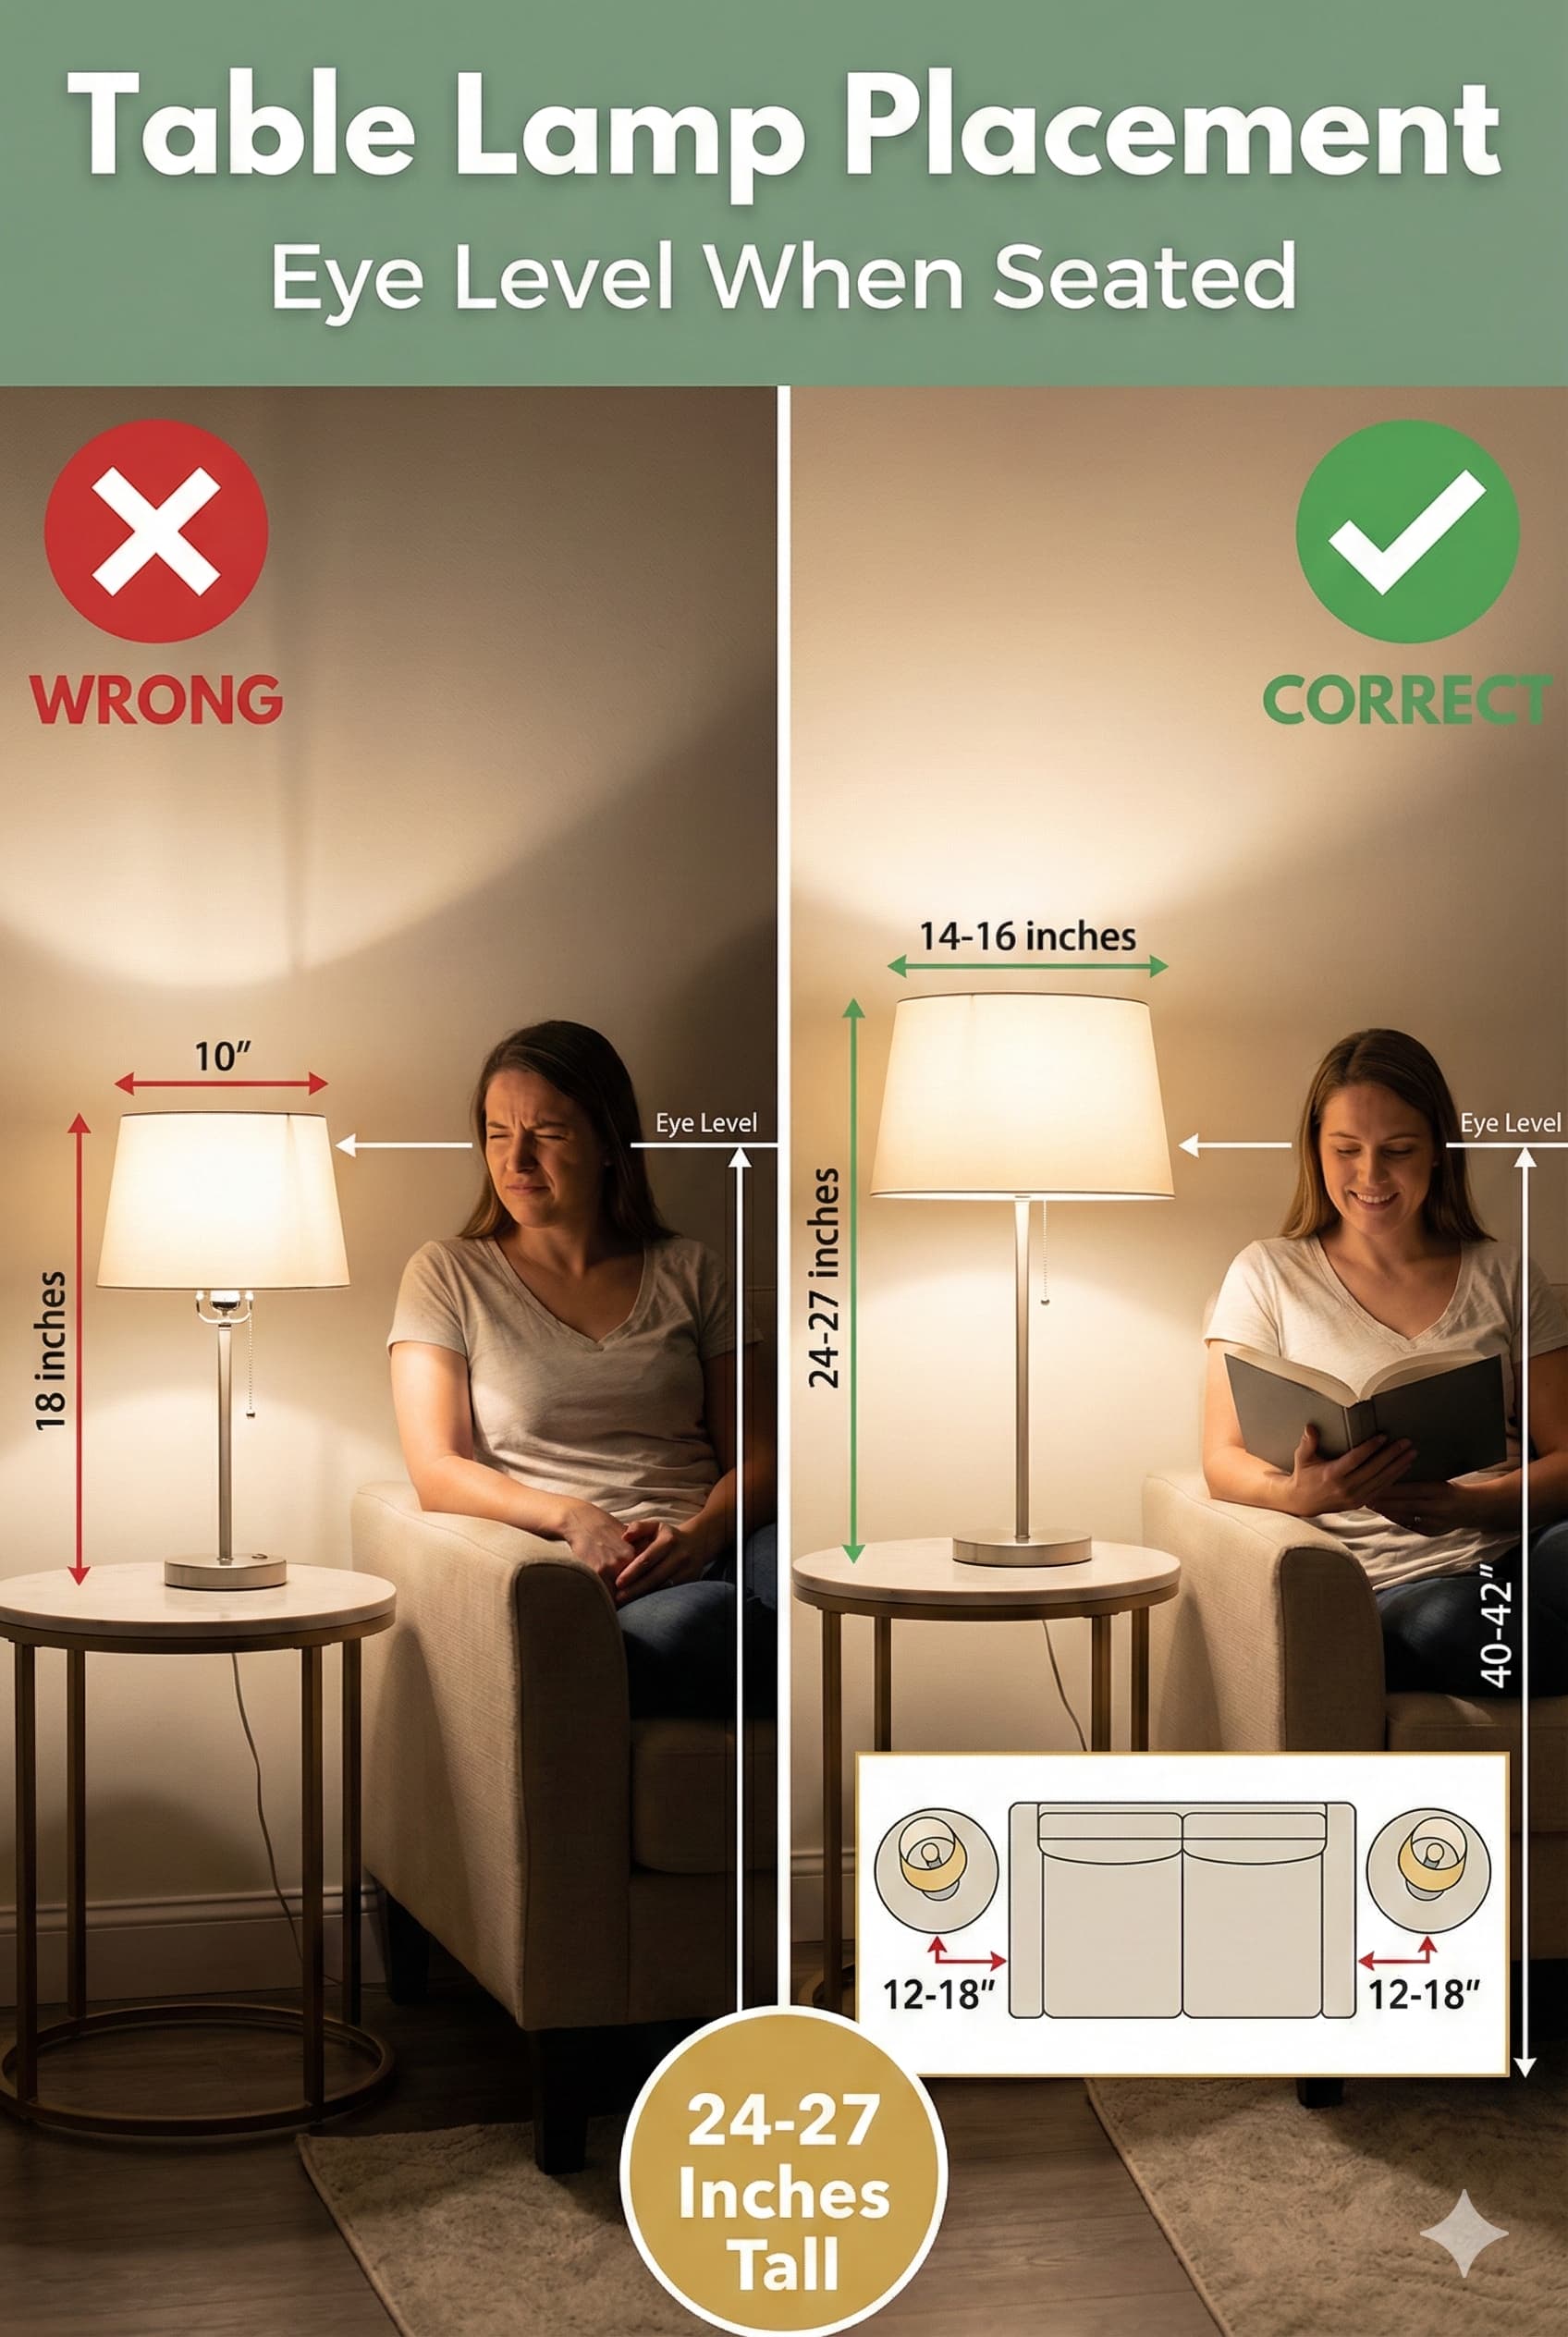
Task lighting in living rooms supports specific activities requiring focused illumination including reading, crafts, homework, grooming, or detailed work. These localized light sources position near activity locations providing 50-75 foot-candles illumination at task surface – substantially higher than 20-30 foot-candle ambient levels. Table lamps and floor lamps represent primary task lighting solutions for residential living spaces.
Table lamp placement on end tables beside seating provides convenient localized lighting for reading and tasks. Lamps should position slightly behind and to side of seating (not directly beside head) directing light downward onto lap area. Lamp height including shade should measure 24-27 inches positioning bulb 40-42 inches above floor approximating shoulder height when seated. Shades measuring 14-18 inches diameter at bottom provide appropriate light spread for reading without excessive glare. Table lamp sizing must coordinate with supporting furniture dimensions maintaining proportional relationships.
Floor lamp positioning beside chairs or at sofa ends provides flexible task lighting movable to alternate locations as needed. Arc floor lamps extend over seating directing light downward mimicking table lamp positioning without requiring side table. Adjustable floor lamps allow light direction modification supporting varied activities. Tripod floor lamps provide stable substantial bases preventing tipping. Reading floor lamps should position slightly behind seating directing light onto reading material rather than creating glare or shadows.
⚠ PAIN POINT: I have lamps everywhere but still get eye strain when reading in my living room
✓ SOLUTION: Position reading lamps 15-20 inches behind shoulder level directing light over shoulder onto reading material rather than beside head creating shadows. Use 800-1100 lumen bulbs (60-75W incandescent equivalent) in reading lamps providing adequate illumination. Select lamp shades allowing bottom light emission rather than only top diffusion. Avoid colored or dark lamp shades absorbing light output – white or cream shades maximize light transmission. Position lamps to right side for right-handed readers (left side for left-handed) preventing hand shadows across reading material.
Swing-arm lamps mounted on walls beside seating provide adjustable task lighting without consuming table surface area. These space-saving solutions suit small living rooms lacking floor space for table or floor lamps. Wall mounting positions at 40-42 inches above floor (seated shoulder height) for reading illumination. Swing-arm extension allows 10-18 inches reach from wall accommodating varied seating depths. Wall-mounted task lights require electrical planning during construction or renovation for proper power supply.
Table Lamp (standard) | 24-27 inches tall | End table beside seating | 800-1100 lumens | General reading, tasks |
Table Lamp (small) | 18-22 inches tall | Small tables, narrow surfaces | 450-800 lumens | Accent, minimal tasks |
Floor Lamp (traditional) | 58-64 inches tall | Beside seating, room corners | 1000-1500 lumens | Primary reading light |
Arc Floor Lamp | 65-80 inches tall reach | Behind or beside sofa | 800-1200 lumens | Over-sofa task lighting |
Tripod Floor Lamp | 58-65 inches tall | Open floor areas | 800-1200 lumens | Ambient-task hybrid |
Swing-Arm Wall Lamp | 8-18 inch reach | Wall beside seating | 450-800 lumens | Space-saving tasks |
Three-way bulbs in table and floor lamps provide adjustable light levels (typically 50-100-150W equivalent or 400-800-1200 lumens) allowing intensity customization matching activities without dimmer switches. Low settings suit ambient supplementation while high settings provide task illumination. Medium settings serve multipurpose between ambient and task levels. Three-way lamp functionality requires lamps equipped with three-way sockets – standard sockets fit only single brightness level regardless of bulb capability.
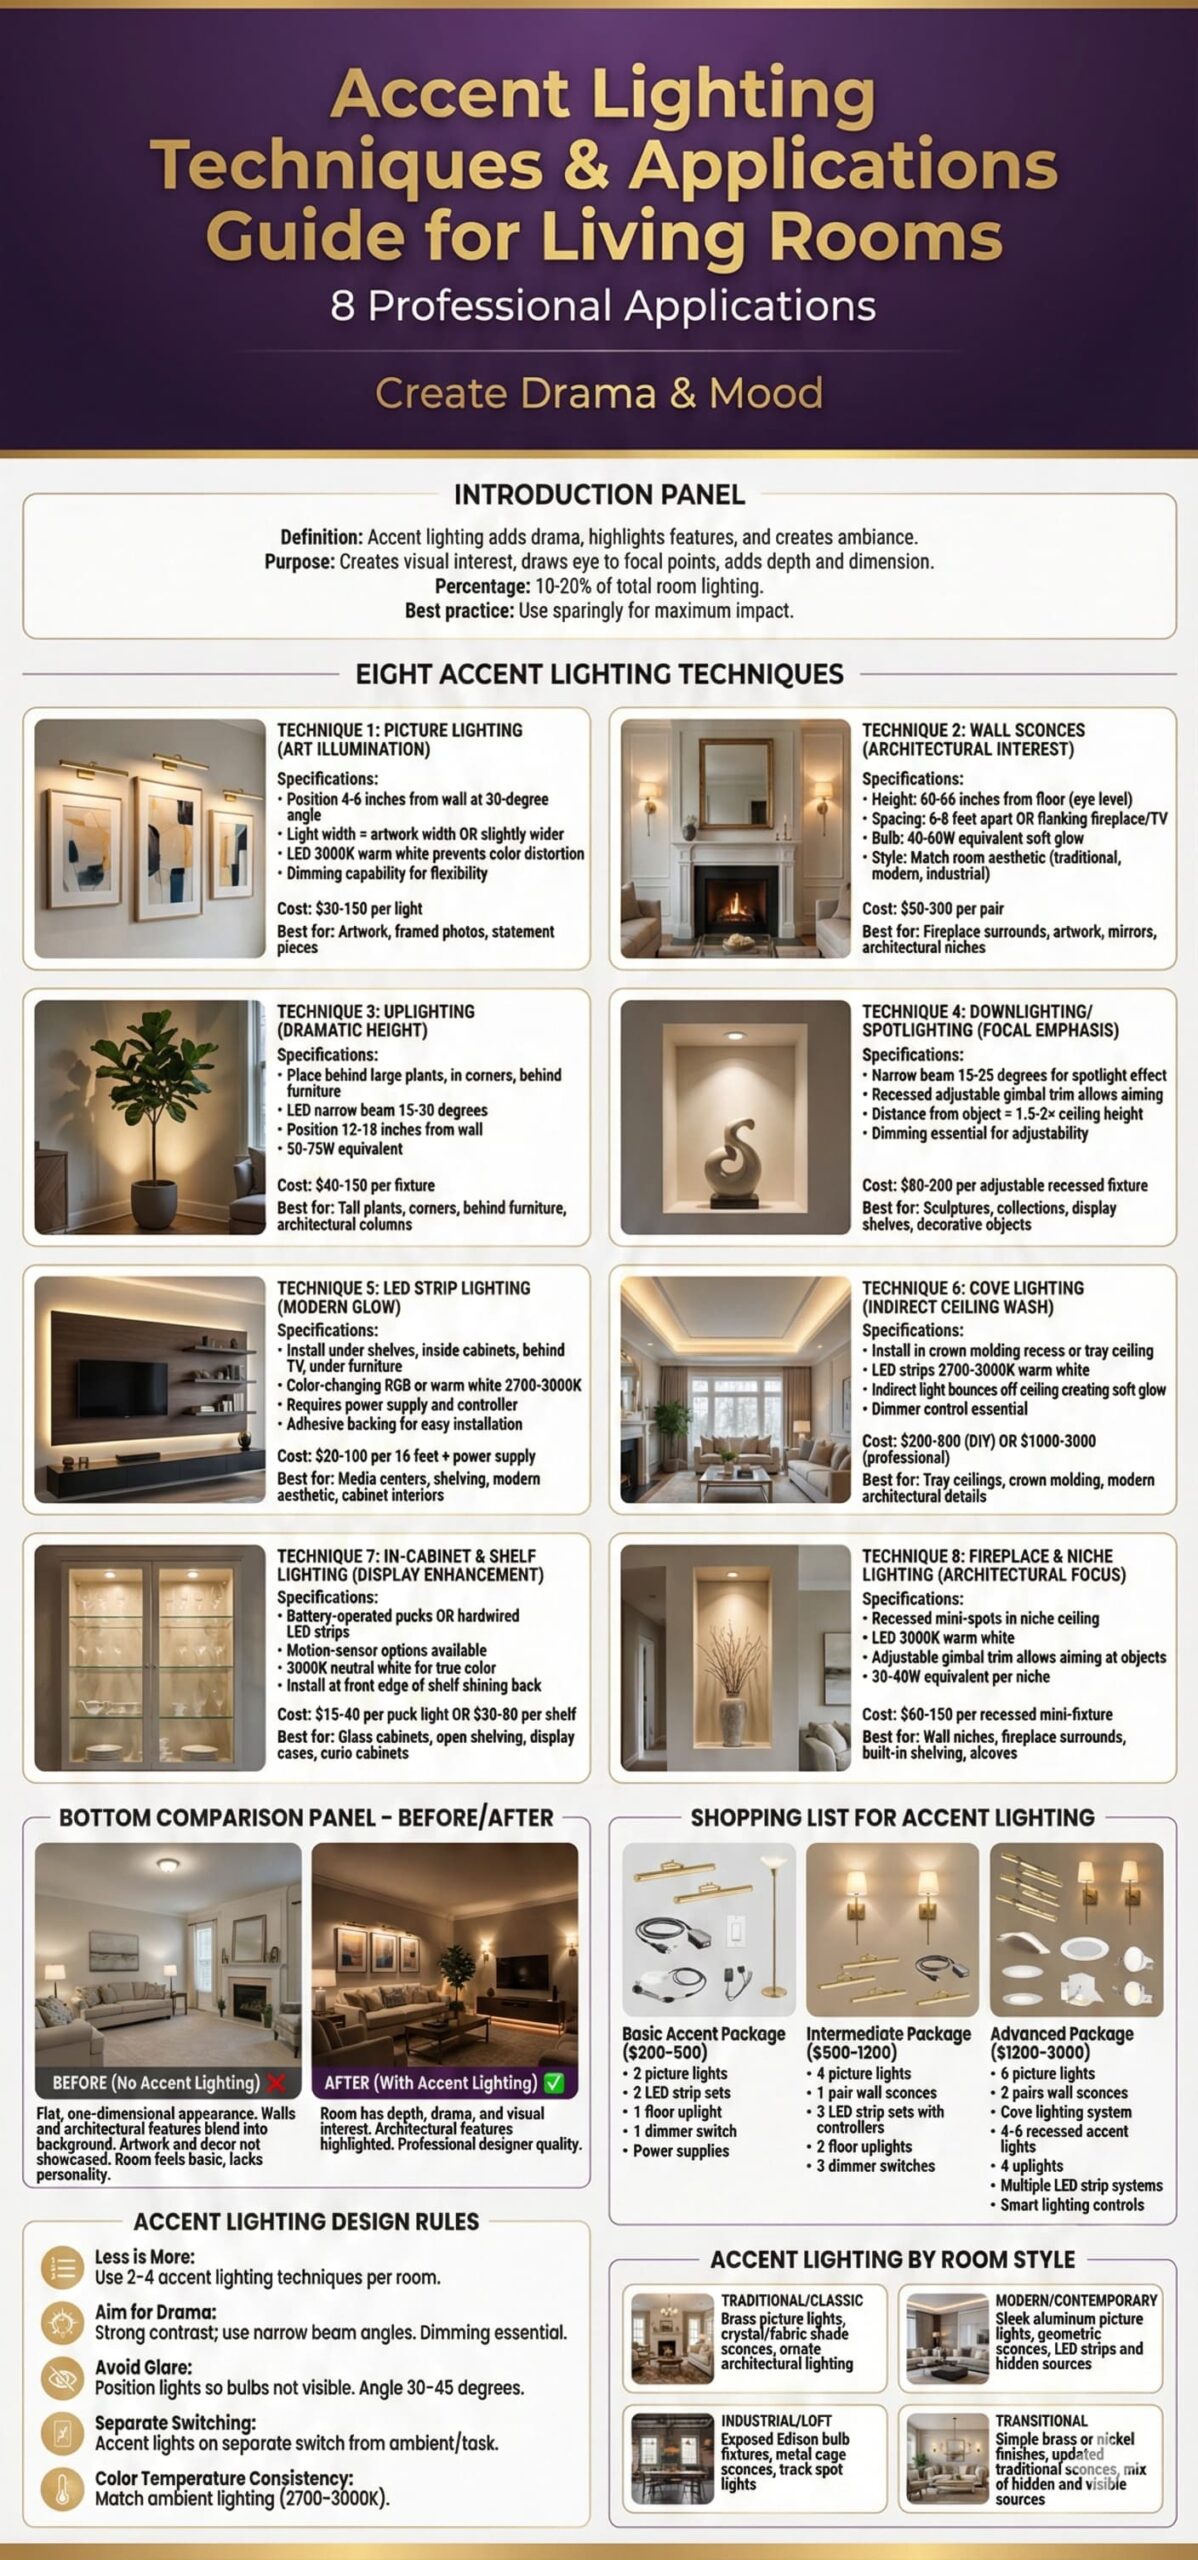
Accent lighting highlights specific living room elements including artwork, architectural features, plants, collections, or decorative objects creating visual interest and dimensional depth. This selective illumination directs attention to desired focal points while establishing dramatic contrast between illuminated subjects and surrounding areas. Accent lights typically employ narrow beam angles (15-40 degrees) and higher intensity than ambient lighting (3:1 ratio) ensuring highlighted elements attract visual attention.
Picture lights mounted above or below artwork provide dedicated illumination emphasizing art collections. These specialized fixtures measure 4-36 inches wide with adjustable heads directing light onto art surfaces. LED picture lights offer energy efficiency and minimal heat output protecting artwork from heat damage. Wireless battery-operated picture lights install without electrical work suitable for rental properties or simplified installations. Artwork lighting enhances visual impact and perceived value of displayed art pieces.
Track lighting provides flexible accent lighting through adjustable heads positioned along ceiling-mounted tracks. Individual heads rotate and aim independently allowing customizable highlighting of multiple elements. Track systems accept varying head quantities and styles accommodating changing needs over time. Track light installations suit contemporary living rooms and gallery-style artwork displays requiring professional presentation quality. White or black track finishes integrate with varied ceiling colors and design styles.
⚠ PAIN POINT: My accent lighting creates harsh spotlights rather than subtle highlighting
✓ SOLUTION: Reduce accent light intensity to 2-3x ambient level rather than 5-10x creating softer highlighting. Use wider beam angle bulbs (40-60 degrees) rather than narrow spots (15-25 degrees) providing gentler light spread. Position accent lights further from subjects (8-12 feet) rather than close placement (3-5 feet) softening illumination. Install dimmer controls allowing intensity adjustment matching ambient light levels. Avoid aiming lights directly at subjects from sharp angles – position 30-45 degrees from vertical creating flattering illumination without harsh shadows.
Uplighting directs light upward onto ceilings or walls creating indirect ambient-accent hybrid illumination. Floor-positioned uplights behind plants, furniture, or in room corners cast light upward reflecting off ceilings for diffuse ambient contribution while creating decorative visual interest. Wall washing techniques using uplights positioned near walls create gradient illumination emphasizing architectural textures or materials. Uplight placement requires concealment behind furniture or plants preventing direct viewing of bright bulbs creating uncomfortable glare.
Picture Light (LED) | 40-60 degrees | 5-15W LED | Wall mount above art | Artwork up to 48 inches wide |
Track Head (LED) | 15-40 degrees | 7-12W LED | Track mounted ceiling | Multiple adjustable accents |
Recessed Accent Can | 15-40 degrees | 7-15W LED | Ceiling recessed | Permanent accent positions |
Uplight Floor Can | 40-80 degrees | 10-20W LED | Floor positioned | Plants, architectural features |
LED Strip Lighting | 120 degrees | 5-20W per foot | Under surfaces, coves | Indirect ambient-accent |
Puck Light | 40-60 degrees | 3-8W LED | Under cabinet, shelves | Display cabinets, shelving |
LED strip lighting provides continuous linear illumination suitable for cove lighting, under-furniture illumination, or architectural feature highlighting. These flexible strips install adhesively in concealed locations creating indirect accent lighting. Dimmable LED strips allow intensity control while color-changing RGB strips offer decorative color modification capabilities. LED strip applications in living rooms include under floating consoles, behind televisions reducing eye strain, or in architectural coves creating indirect ambient-accent contributions.
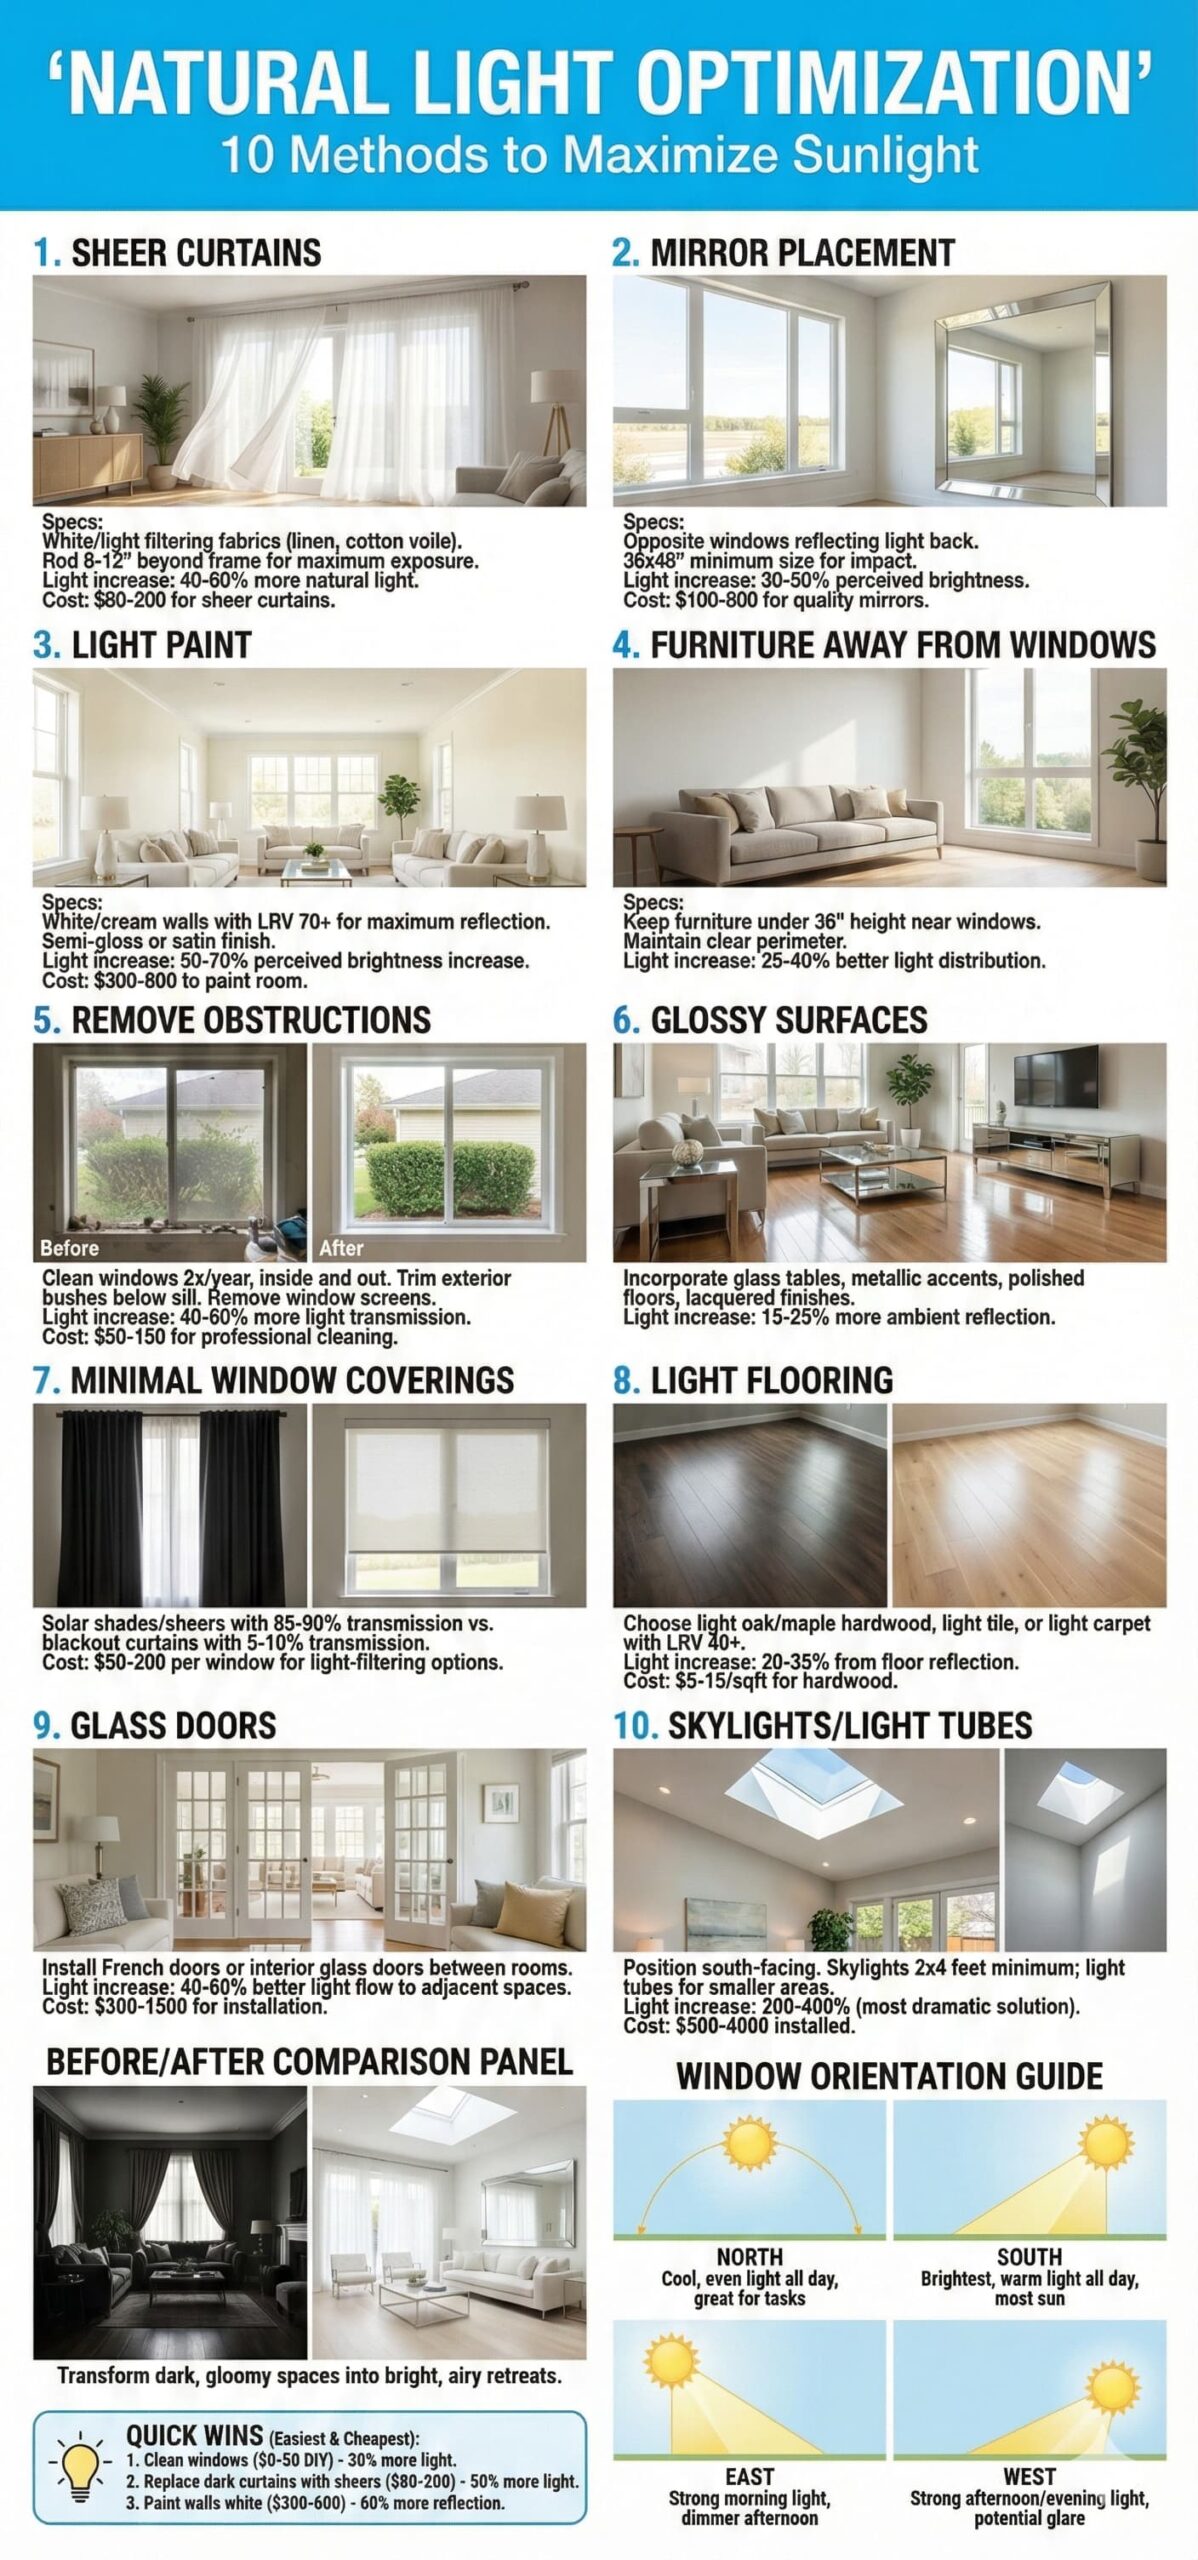
Natural light from windows, skylights, and glass doors provides free sustainable illumination reducing artificial lighting requirements and offering documented psychological and health benefits. Living room windows should remain minimally obstructed maximizing daylight penetration while managing glare, heat gain, and privacy concerns through strategic window treatment selection. Natural light optimization strategies balance maximum light admission with temperature control and glare management maintaining comfortable usable spaces.
Window treatment selection significantly impacts natural light transmission and quality. Sheer curtains allow 80-90 percent light transmission while providing daytime privacy through diffusion. Light-filtering cellular shades transmit 40-60 percent light while reducing heat gain and glare. Blackout curtains block 95-100 percent light suitable for entertainment viewing but eliminating natural light benefits. Living room window treatments typically employ light-filtering or sheer options maintaining daylight access while controlling glare and heat.
Mirror placement strategically positioned opposite or adjacent to windows reflects natural light deeper into living room spaces amplifying illumination and creating brighter environments. Large mirrors (36×48 inches minimum) provide substantial light reflection while smaller mirrors contribute minimally. Mirror positioning approximately eye level when standing (60-65 inches center) directs reflected light throughout space most effectively. Avoid positioning mirrors reflecting direct sunlight creating uncomfortable glare. Mirror light reflection increases perceived brightness particularly beneficial in small or dark living rooms.
PAIN POINT: My living room gets harsh afternoon sun creating glare and excessive heat
✓ SOLUTION: Install light-filtering window treatments (cellular shades, light-filtering curtains, or solar shades) blocking 40-60 percent light intensity while maintaining view and daylight admission. Apply window film products reducing heat gain 30-50 percent without dark appearance. Position furniture avoiding direct sun paths during peak afternoon hours. Add adjustable exterior awnings or interior solar shades controlling sun admission. Orient conversation areas perpendicular to window rather than facing directly toward preventing glare on faces and television screens.
Light-reflective surfaces including light wall colors, glossy finishes, and light flooring amplify available natural light through reflection. White or light-colored walls reflect 80-90 percent light while dark colors absorb 80-90 percent reducing brightness. Glossy or semi-gloss paint finishes reflect more light than flat or matte finishes. Light wood floors or light carpet enhance brightness compared to dark flooring. Light color schemes in living rooms with limited natural light maximize available illumination creating brighter environments without additional fixtures.
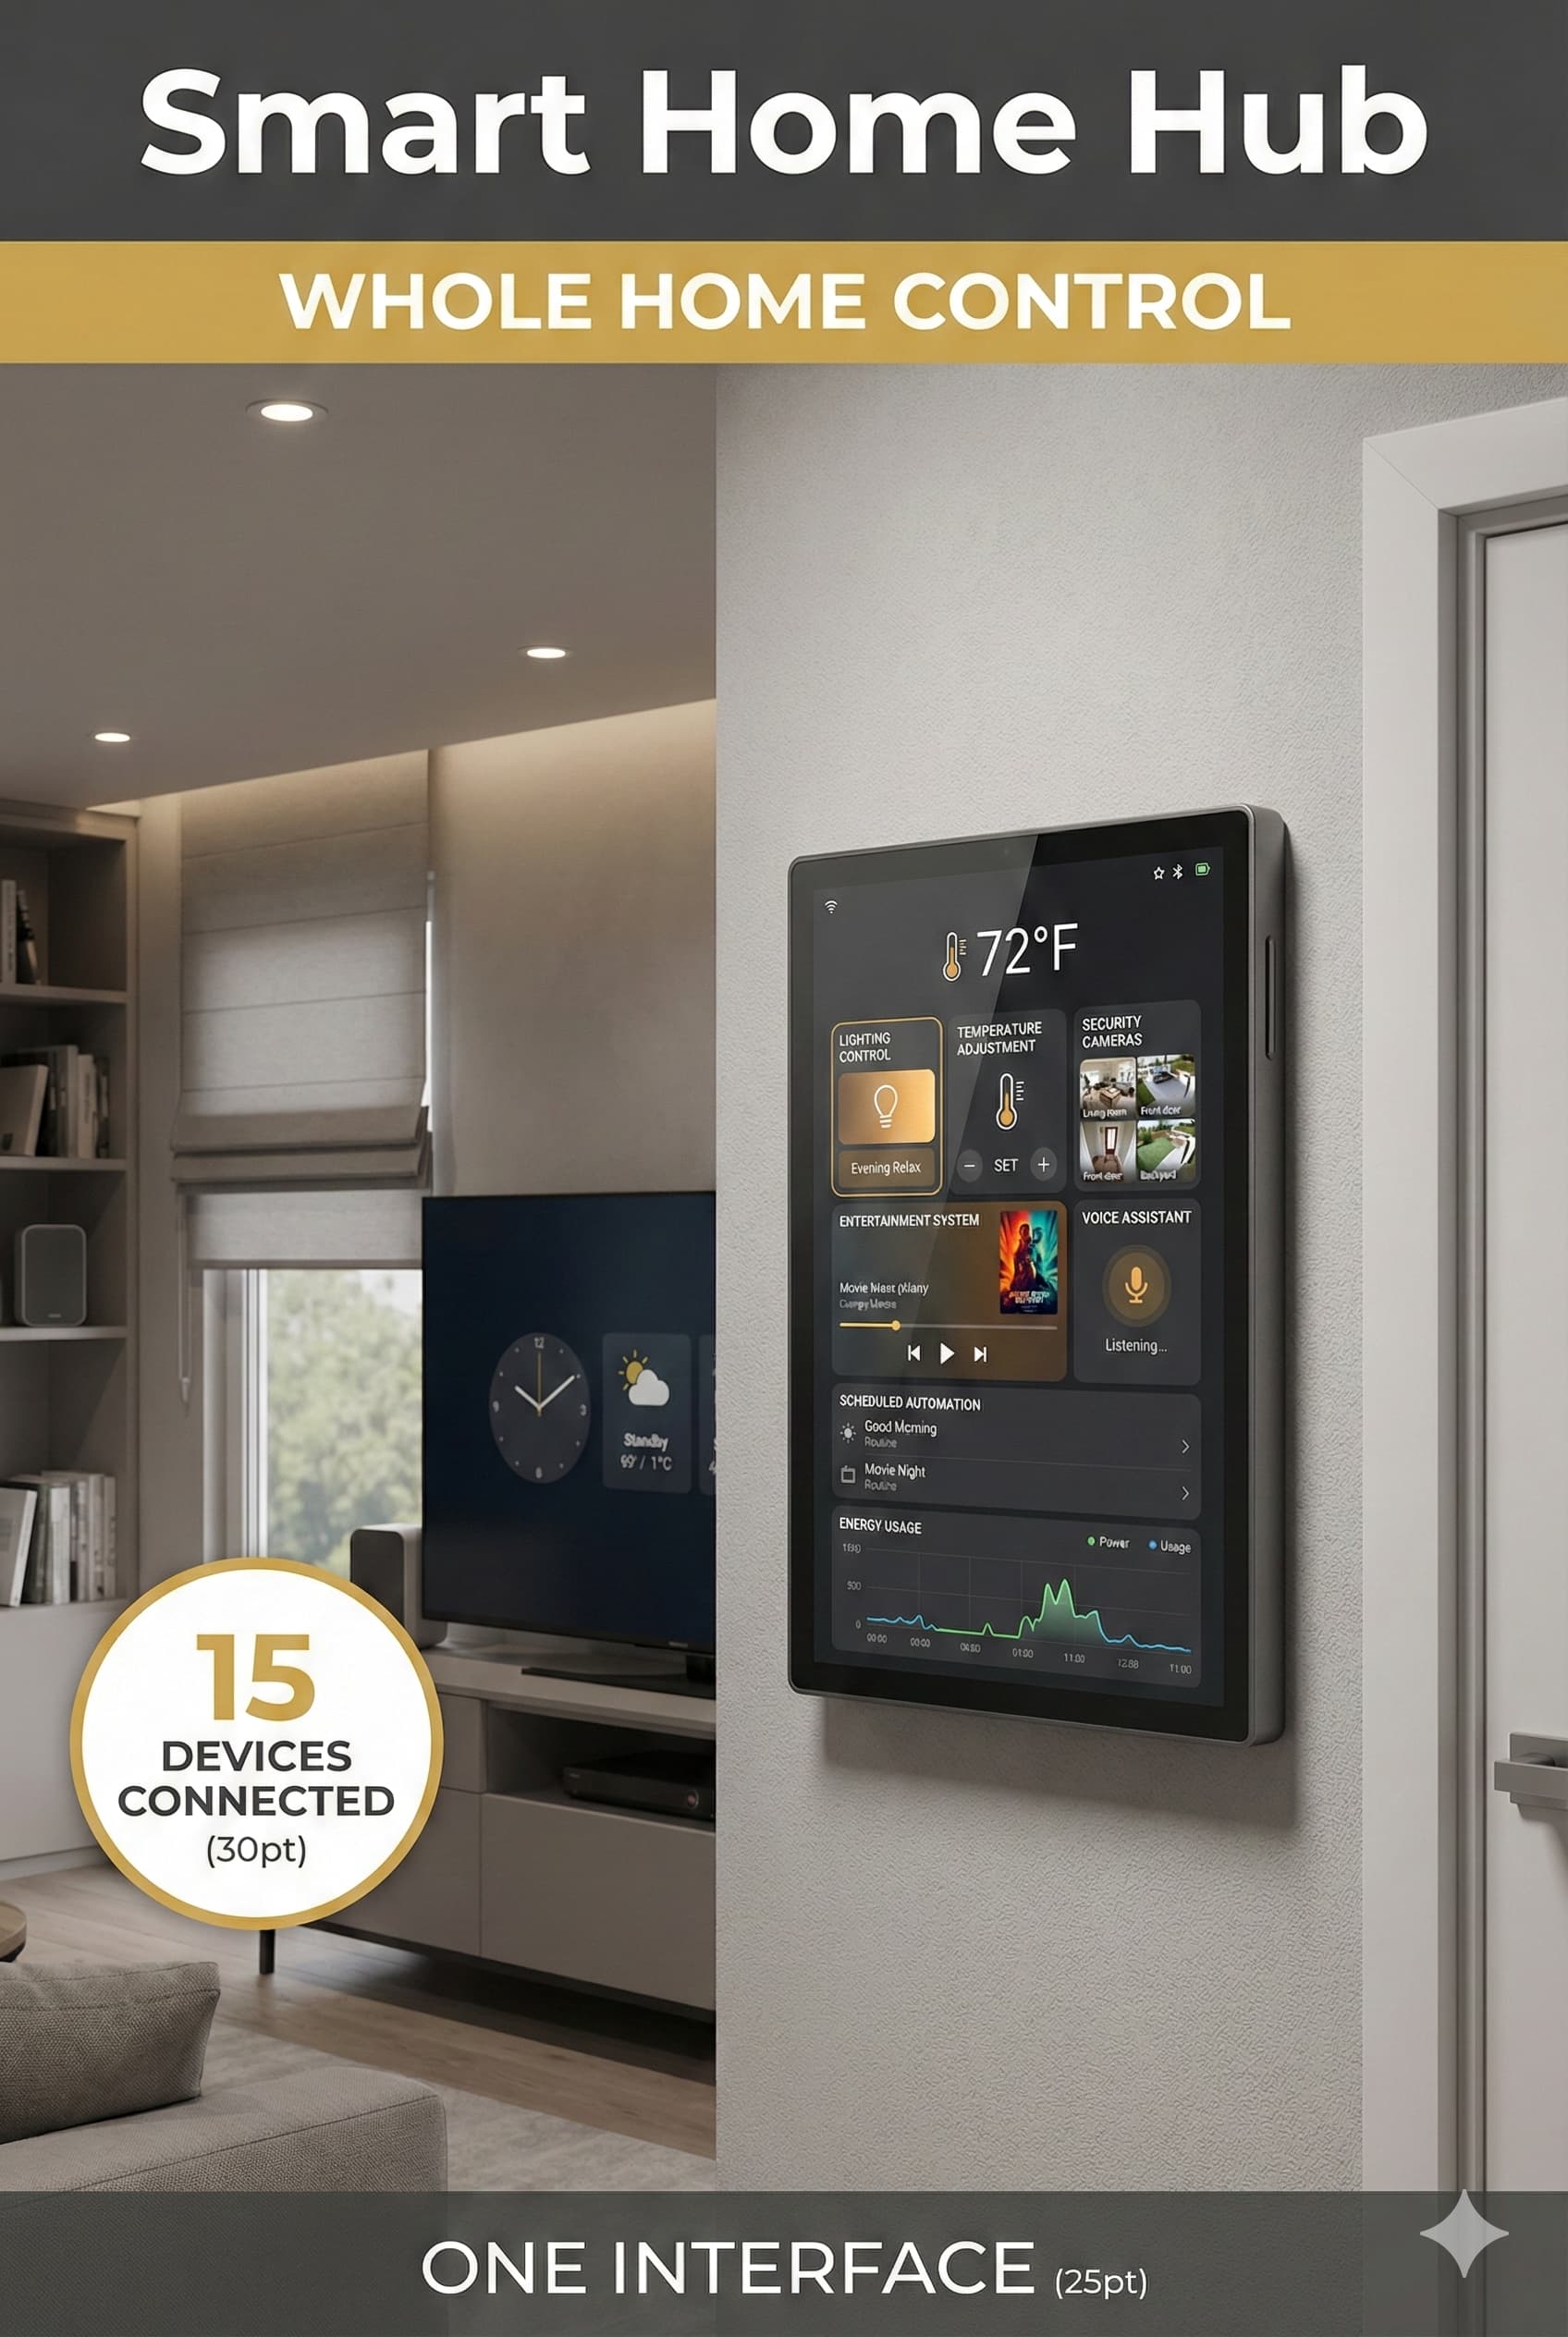
Smart lighting systems allow remote control, scheduling, color adjustment, and voice activation through connected LED bulbs, smart switches, or complete home automation platforms. These technologies provide enhanced lighting flexibility and convenience while offering energy monitoring and automation capabilities. Smart home lighting adoption increases annually as products become more affordable and compatible with varied ecosystems including Amazon Alexa, Google Assistant, and Apple HomeKit.
Smart bulbs directly replace standard bulbs in existing fixtures providing app-based control without electrical modifications. These bulbs connect via WiFi or hub-based systems (Zigbee, Z-Wave) allowing individual bulb control, dimming, color temperature adjustment, and scheduling. Premium smart bulbs ($15-50 each) offer color-changing capabilities while budget options ($8-15) provide white-only dimming. Smart bulb installation allows gradual smart lighting adoption without comprehensive system commitment.
Smart switches replace existing wall switches providing comprehensive fixture control without bulb replacement. These switches control all bulbs on circuit simultaneously maintaining compatibility with standard bulbs while adding smart capabilities. Smart switches cost $30-60 each requiring basic electrical installation skills or professional installation ($75-150 per switch). Smart switch approach proves economical for fixtures with multiple bulbs (chandeliers, recessed lighting groups) compared to individual smart bulb costs.
⚠ PAIN POINT: I installed smart bulbs everywhere but they stop working when someone uses wall switches
✓ SOLUTION: Smart bulbs require constant power – wall switch off disconnects power preventing smart control. Solution 1: Replace wall switches with smart switches or button panels maintaining power to smart bulbs while providing physical controls. Solution 2: Place switch covers preventing accidental off switching while training household members to use apps/voice only. Solution 3: Remove wall switches installing blank cover plates (code compliant if bulbs remain controllable via app). Explain smart bulb requirements to all household members preventing frustration from disconnected bulbs.
Lighting scenes pre-program multiple light settings recalling desired combinations through single command. Evening scene might dim ambient lights to 30 percent, brighten task lamps to 80 percent, and activate accent lights creating relaxed atmosphere. Entertainment scene could dim all lights to 20 percent reducing television glare. Living room lighting scenes fit varied activities and times of day through programmable combinations avoiding manual adjustment of multiple switches and dimmers.
Smart Bulb (white) | $8-15 per bulb | Screw-in replacement | App, voice, schedule | Table/floor lamps |
Smart Bulb (color) | $15-50 per bulb | Screw-in replacement | App, voice, schedule, color | Accent lighting |
Smart Switch | $30-60 per switch | Electrical replacement | App, voice, schedule, physical | Ceiling fixtures |
Smart Dimmer Switch | $40-80 per switch | Electrical replacement | App, voice, schedule, dimming | All fixture types |
Smart Hub System | $50-200 hub only | Requires compatible devices | Centralized app control | Whole-home integration |
Smart Plug | $10-25 per plug | Plug-in installation | App, voice, schedule | Plug-in lamps |
Energy monitoring features in smart lighting systems track electricity consumption by fixture or bulb providing usage insights and cost tracking. This data identifies excessive consumption patterns suggesting opportunities for efficiency improvements or behavior modifications. LED bulbs consume 75-85 percent less energy than incandescent equivalents while lasting 15-25 times longer reducing replacement frequency and associated costs. Smart lighting combined with LED technology achieves substantial long-term cost savings offsetting higher initial investments.
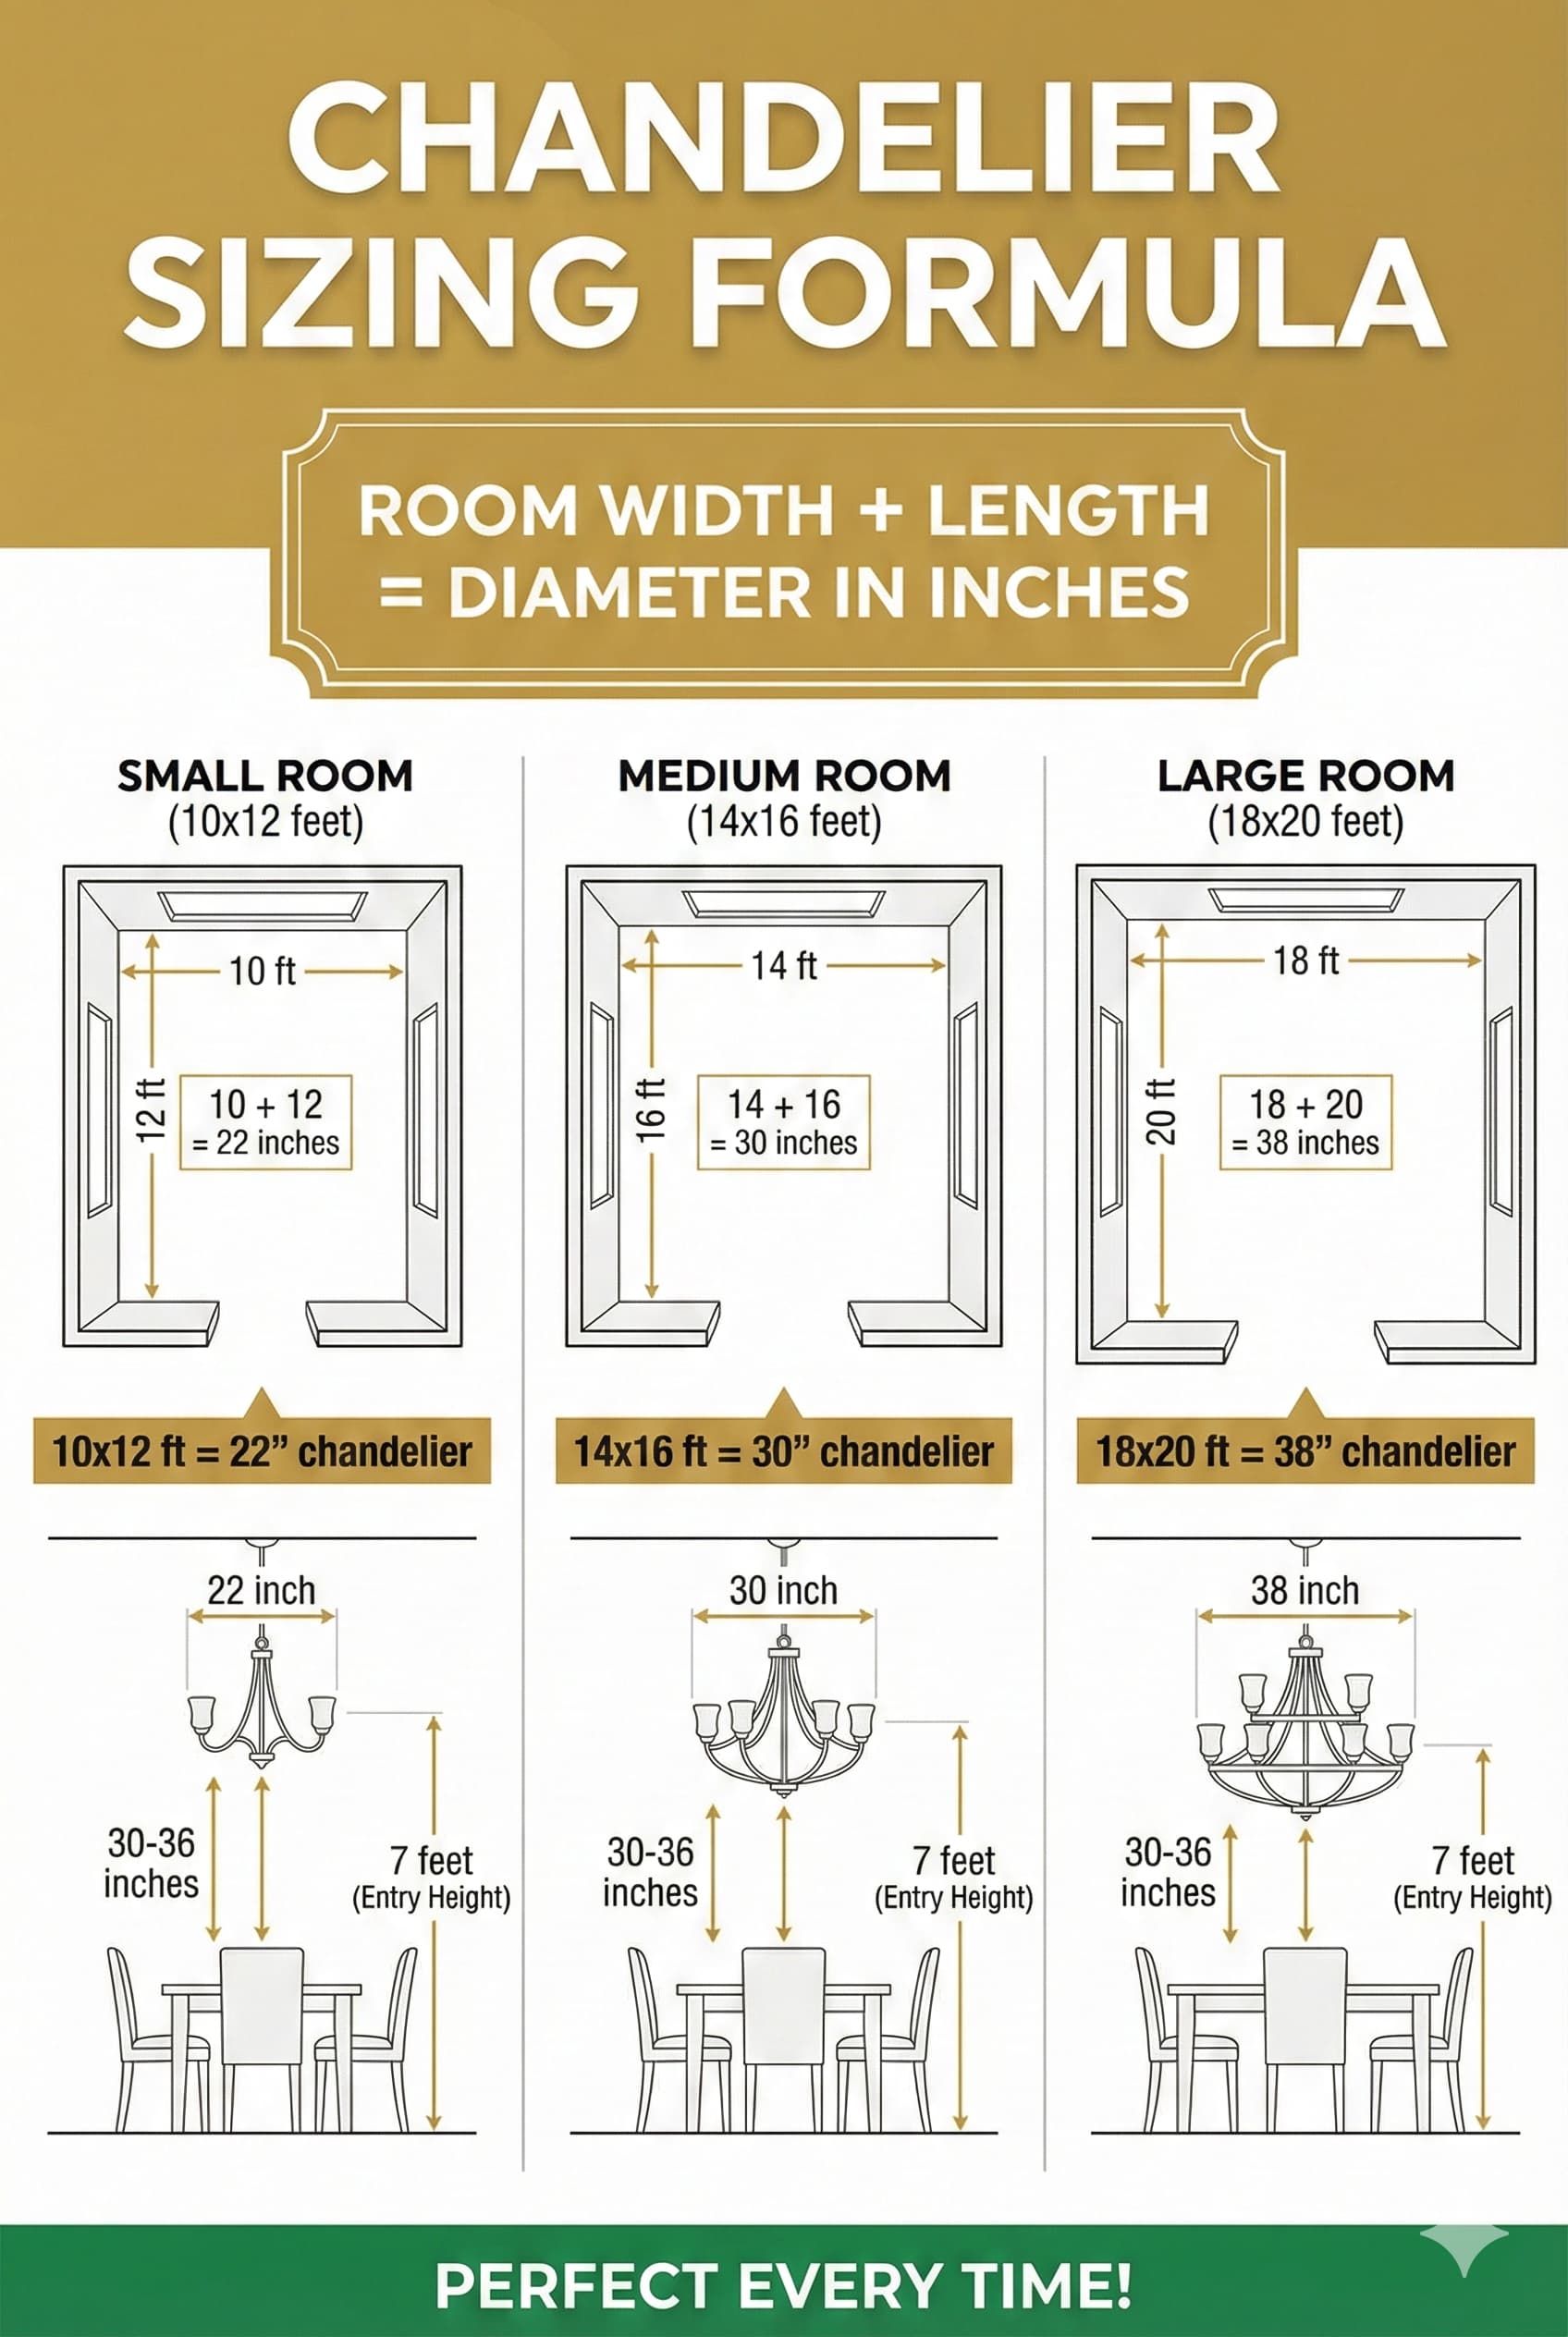
Lighting fixture aesthetic selection should coordinate with overall living room design style maintaining cohesive visual relationships. Each design style employs characteristic fixture forms, materials, finishes, and details creating recognizable aesthetic consistency. Fixture selection represents significant decorative opportunity establishing or reinforcing intended style direction while providing essential illumination functions.
Modern lighting features clean geometric forms, minimal ornamentation, metal or glass materials, and simple finishes including brushed nickel, chrome, or matte black. Globe pendants, linear chandeliers, and minimalist flush mounts suit modern living room aesthetics. Exposed bulbs or simple glass shades maintain uncluttered appearances avoiding elaborate detailing. Contemporary LED integration provides modern technological character. Modern fixture selection emphasizes function and form clarity over decorative embellishment.
Traditional lighting employs ornate detailing, curved forms, multiple arms or tiers, and warm metal finishes including brass, bronze, or gold. Crystal chandeliers, candlestick-style arms, and fabric drum shades characterize traditional aesthetics. Decorative elements including scrollwork, cast details, and applied ornamentation create rich visual interest. Traditional fixtures typically require higher maintenance due to detailed construction and delicate materials. Traditional living room lighting projects established elegance and refined craftsmanship.
⚠ PAIN POINT: My new light fixtures clash with my existing living room style despite looking great in the store
✓ SOLUTION: Photograph existing living room including furniture, colors, and other fixtures before shopping. Bring photos when selecting new fixtures verifying style compatibility. Match metal finishes across room (all brass, all nickel, all black) maintaining cohesive appearance. Select fixtures from same style family as existing furniture (traditional fixtures with traditional furniture, modern fixtures with modern furniture). Online visualization tools allow digital fixture placement in room photos previewing compatibility before purchasing. Order samples or verify generous return policies allowing home testing before final commitment.
Transitional lighting blends traditional and contemporary elements creating adaptable fixtures coordinating with varied design approaches. Simplified traditional forms, mixed materials, updated finishes, and reduced ornamentation characterize transitional aesthetics. Drum chandeliers with minimal detail, simple metal pendants, and clean lined flush mounts suit transitional living rooms. This versatile approach appeals to broad demographic ranges uncertain about committing to pure traditional or contemporary styles.
Modern | Geometric, minimal detail | Metal, glass | Chrome, brushed nickel, black | Globe pendant, linear chandelier, simple flush |
Contemporary | Current trends, mixed elements | Varied materials | Updated finishes | Drum pendant, mixed material chandelier |
Traditional | Ornate detail, curved forms | Metal, crystal, fabric | Brass, bronze, oil-rubbed bronze | Crystal chandelier, multi-arm sconces |
Transitional | Simplified traditional | Metal, fabric | Brushed nickel, bronze | Drum chandelier, simple pendant |
Farmhouse | Simple forms, rustic elements | Wood, metal, galvanized | Black, aged metal | Mason jar fixtures, lantern pendants |
Industrial | Utilitarian forms, exposed bulbs | Metal, aged finishes | Black, raw metal | Cage pendants, pipe fixtures |
Mid-Century | Organic forms, Sputnik style | Metal, wood, glass | Brass, black | Sputnik chandelier, globe fixtures |
Coastal lighting emphasizes light colors, natural materials, and relaxed styling suitable for beach-inspired living rooms. White or weathered wood finishes, rope details, and glass elements characterize coastal fixtures. Lantern-style fixtures, drum shades in natural linens, and driftwood chandeliers create coastal atmospheres. These fixtures coordinate with light color palettes and casual furniture creating cohesive beach house aesthetics.
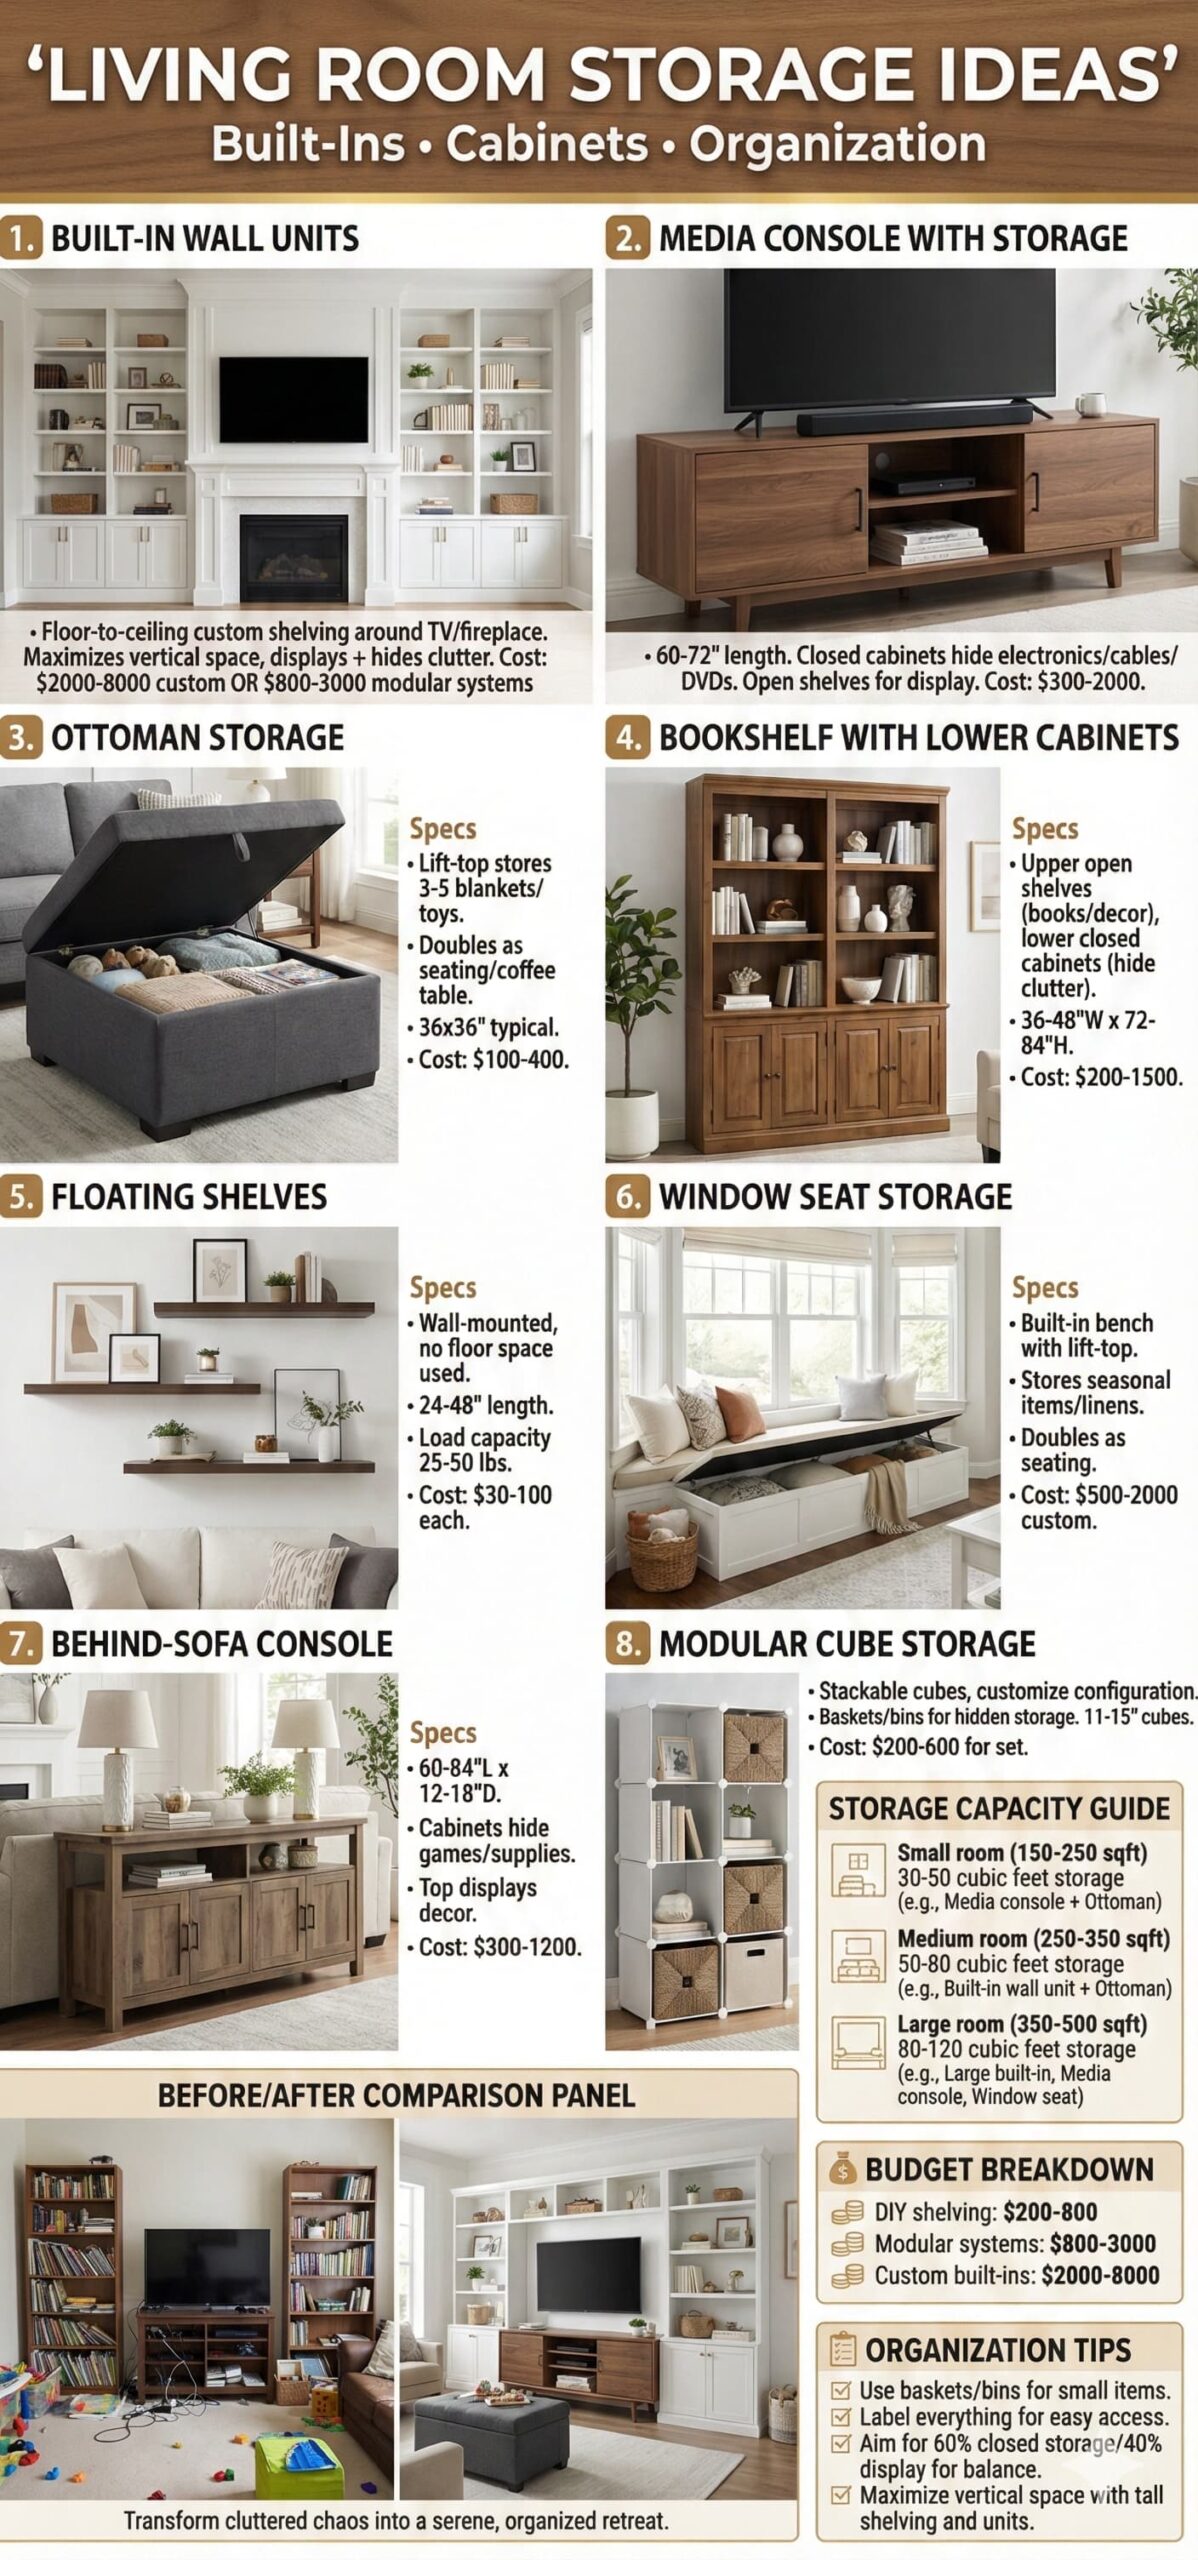
Effective storage organization follows professional organizing principles and best practices. Living room storage fits media collections, books, decorative objects, games, blankets, and miscellaneous items requiring organized accessible storage preventing visual clutter. Storage solutions range from permanent built-in installations to flexible furniture-based systems balancing concealed closed storage with open display shelving. Organized living rooms maintain functional usability and visual appeal through strategic storage planning eliminating chaotic cluttered appearances undermining design investments.
Storage capacity requirements depend on household size, lifestyle patterns, and item accumulation tendencies. Minimalist households require minimal storage while families with children, hobbyists, or collectors need substantial capacity. Average living rooms benefit from 8-16 cubic feet concealed storage (approximately 2-4 standard storage cabinets) plus open shelving for display items. Insufficient storage forces visible clutter while excessive storage enables hoarding behaviors – balance capacity with actual organizational needs.
Concealed versus open storage balance impacts visual weight and maintenance requirements. Closed cabinets hide visual clutter maintaining clean streamlined appearances but require organizational systems preventing chaotic interiors. Open shelving displays collections and decorative objects creating visual interest but requiring curation and regular dusting. Living room storage design typically combines 60-70 percent concealed storage with 30-40 percent open display achieving functional organization with decorative character.
PAIN POINT: My living room has tons of storage but it’s always messy and disorganized anyway
✓ SOLUTION: Storage alone doesn’t create organization – systematic organization methods required. Implement categories for stored items (media, games, blankets, office supplies, miscellaneous). Label storage containers or cabinet shelves identifying contents. Establish “homes” for all items returning them after use. Conduct quarterly purging removing items not used in 6+ months. Limit collections to designated spaces – when space fills, remove items before adding new ones. Storage provides capacity but organizational discipline maintains order.
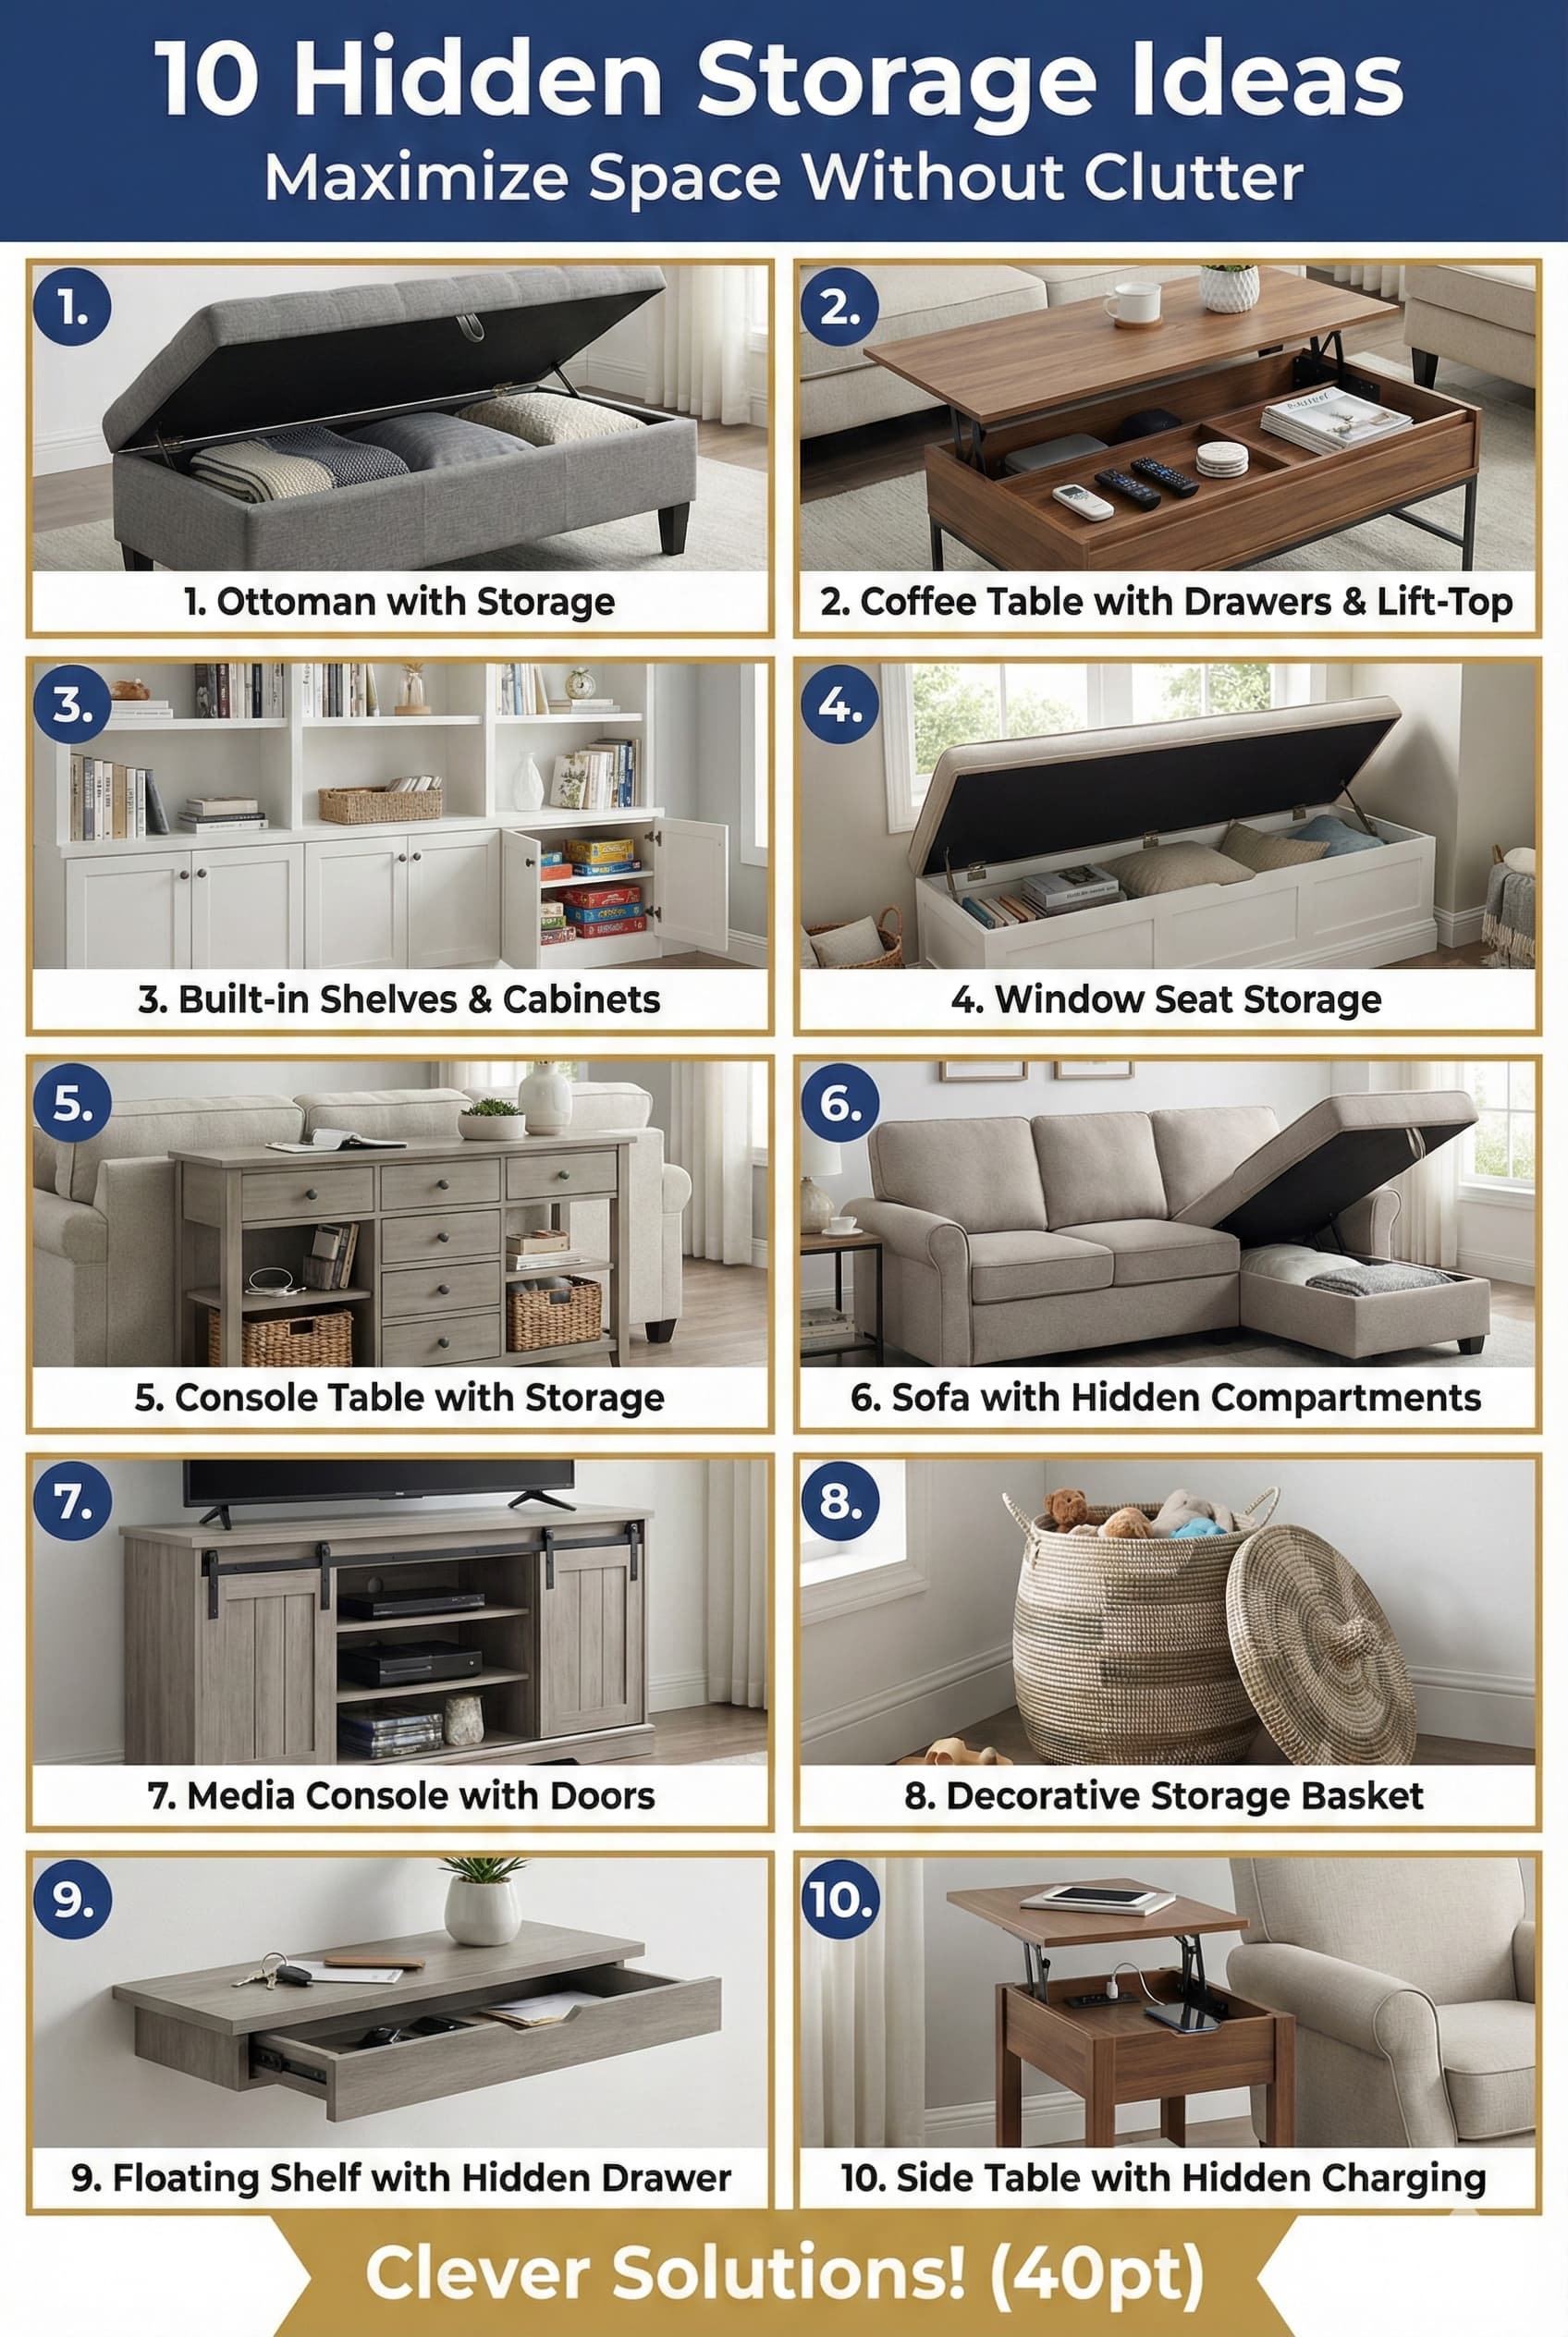
Built-in storage including bookcases, media centers, and window seats provides permanent architectural storage solutions maximizing space utilization and adding home value. These custom installations integrate with room architecture creating cohesive finished appearances exceeding furniture-based storage aesthetics. Built-in living room storage costs $2,000-15,000+ depending on size, materials, and finish quality but provides substantial storage capacity and permanence justifying investment.
Floor-to-ceiling bookcases flanking fireplaces or spanning entire walls provide maximum storage capacity while creating architectural impact. These substantial installations typically measure 84-96 inches tall, 12-16 inches deep, and span 6-12+ feet wide accommodating hundreds of books plus decorative objects. Built-in construction allows custom dimensions perfectly fitting architectural openings and ceiling heights. Bookcase built-ins suit traditional and transitional living rooms where books and collections display prominently.
Media center built-ins provide integrated storage for televisions, media components, and collections through combination of open and closed storage compartments. These comprehensive systems span 8-12+ feet wide organizing entertainment equipment while concealing wiring and providing display surfaces. Custom sizing fits specific television dimensions and component requirements. Ventilation provisions including rear openings or screened doors prevent equipment overheating. Built-in entertainment centers suit traditional living rooms while contemporary spaces typically favor minimal wall-mounted televisions.
⚠ PAIN POINT: I want built-in storage but can’t afford $10,000+ custom cabinetry installation
✓ SOLUTION: Consider semi-custom or modular built-in alternatives costing $2,000-5,000. IKEA Billy bookcases with custom trim and face frame applications create built-in appearance at fraction of custom costs. Hire finish carpenter adding face frames, crown molding, and baseboards to modular units creating custom look. Build simple shelving units from plywood/MDF then hire painter for professional finish. Accept furniture-based storage solutions (console cabinets, bookcases, credenzas) providing substantial capacity without permanent installation commitment.
Window seat storage integrates seating with under-bench storage creating multi-functional solutions in living rooms with large windows. Hinged lift-up tops or pull-out drawers provide access to concealed storage suitable for blankets, pillows, games, or seasonal items. Cushioned tops create comfortable seating or lounging surfaces. Window seats typically measure 18-20 inches deep, 16-18 inches tall, and span window width creating architectural built-in character. These installations require carpentry skills and cost $500-2,000 depending on size and finish quality.
Floor-to-Ceiling Bookcase | 10-12 feet wide x 96 inches tall | 150-300 books | $3,000-8,000 | Traditional living rooms |
Media Center Built-In | 8-12 feet wide x 80-90 inches tall | 100-200 cubic feet | $4,000-12,000 | Traditional living rooms |
Window Seat | Window width x 20 inches deep | 10-20 cubic feet | $500-2,000 | Rooms with large windows |
Half-Wall Bookcase | 6-8 feet wide x 48 inches tall | 50-100 books | $1,500-4,000 | Defining room zones |
Built-In Bench | 4-6 feet wide x 18 inches deep | 8-15 cubic feet | $800-2,000 | Entry transitions |
Installation timing for built-in storage ideally occurs during construction or major renovation allowing electrical integration, structural considerations, and paint coordination. Retrofit installations in existing living rooms require more complex integration including electrical work for built-in lighting, paint matching, and finished coordination. Built-in installations permanent nature needs careful planning ensuring long-term satisfaction rather than impulsive decisions. Professional design assistance justifies cost through optimal spatial utilization and aesthetic integration.
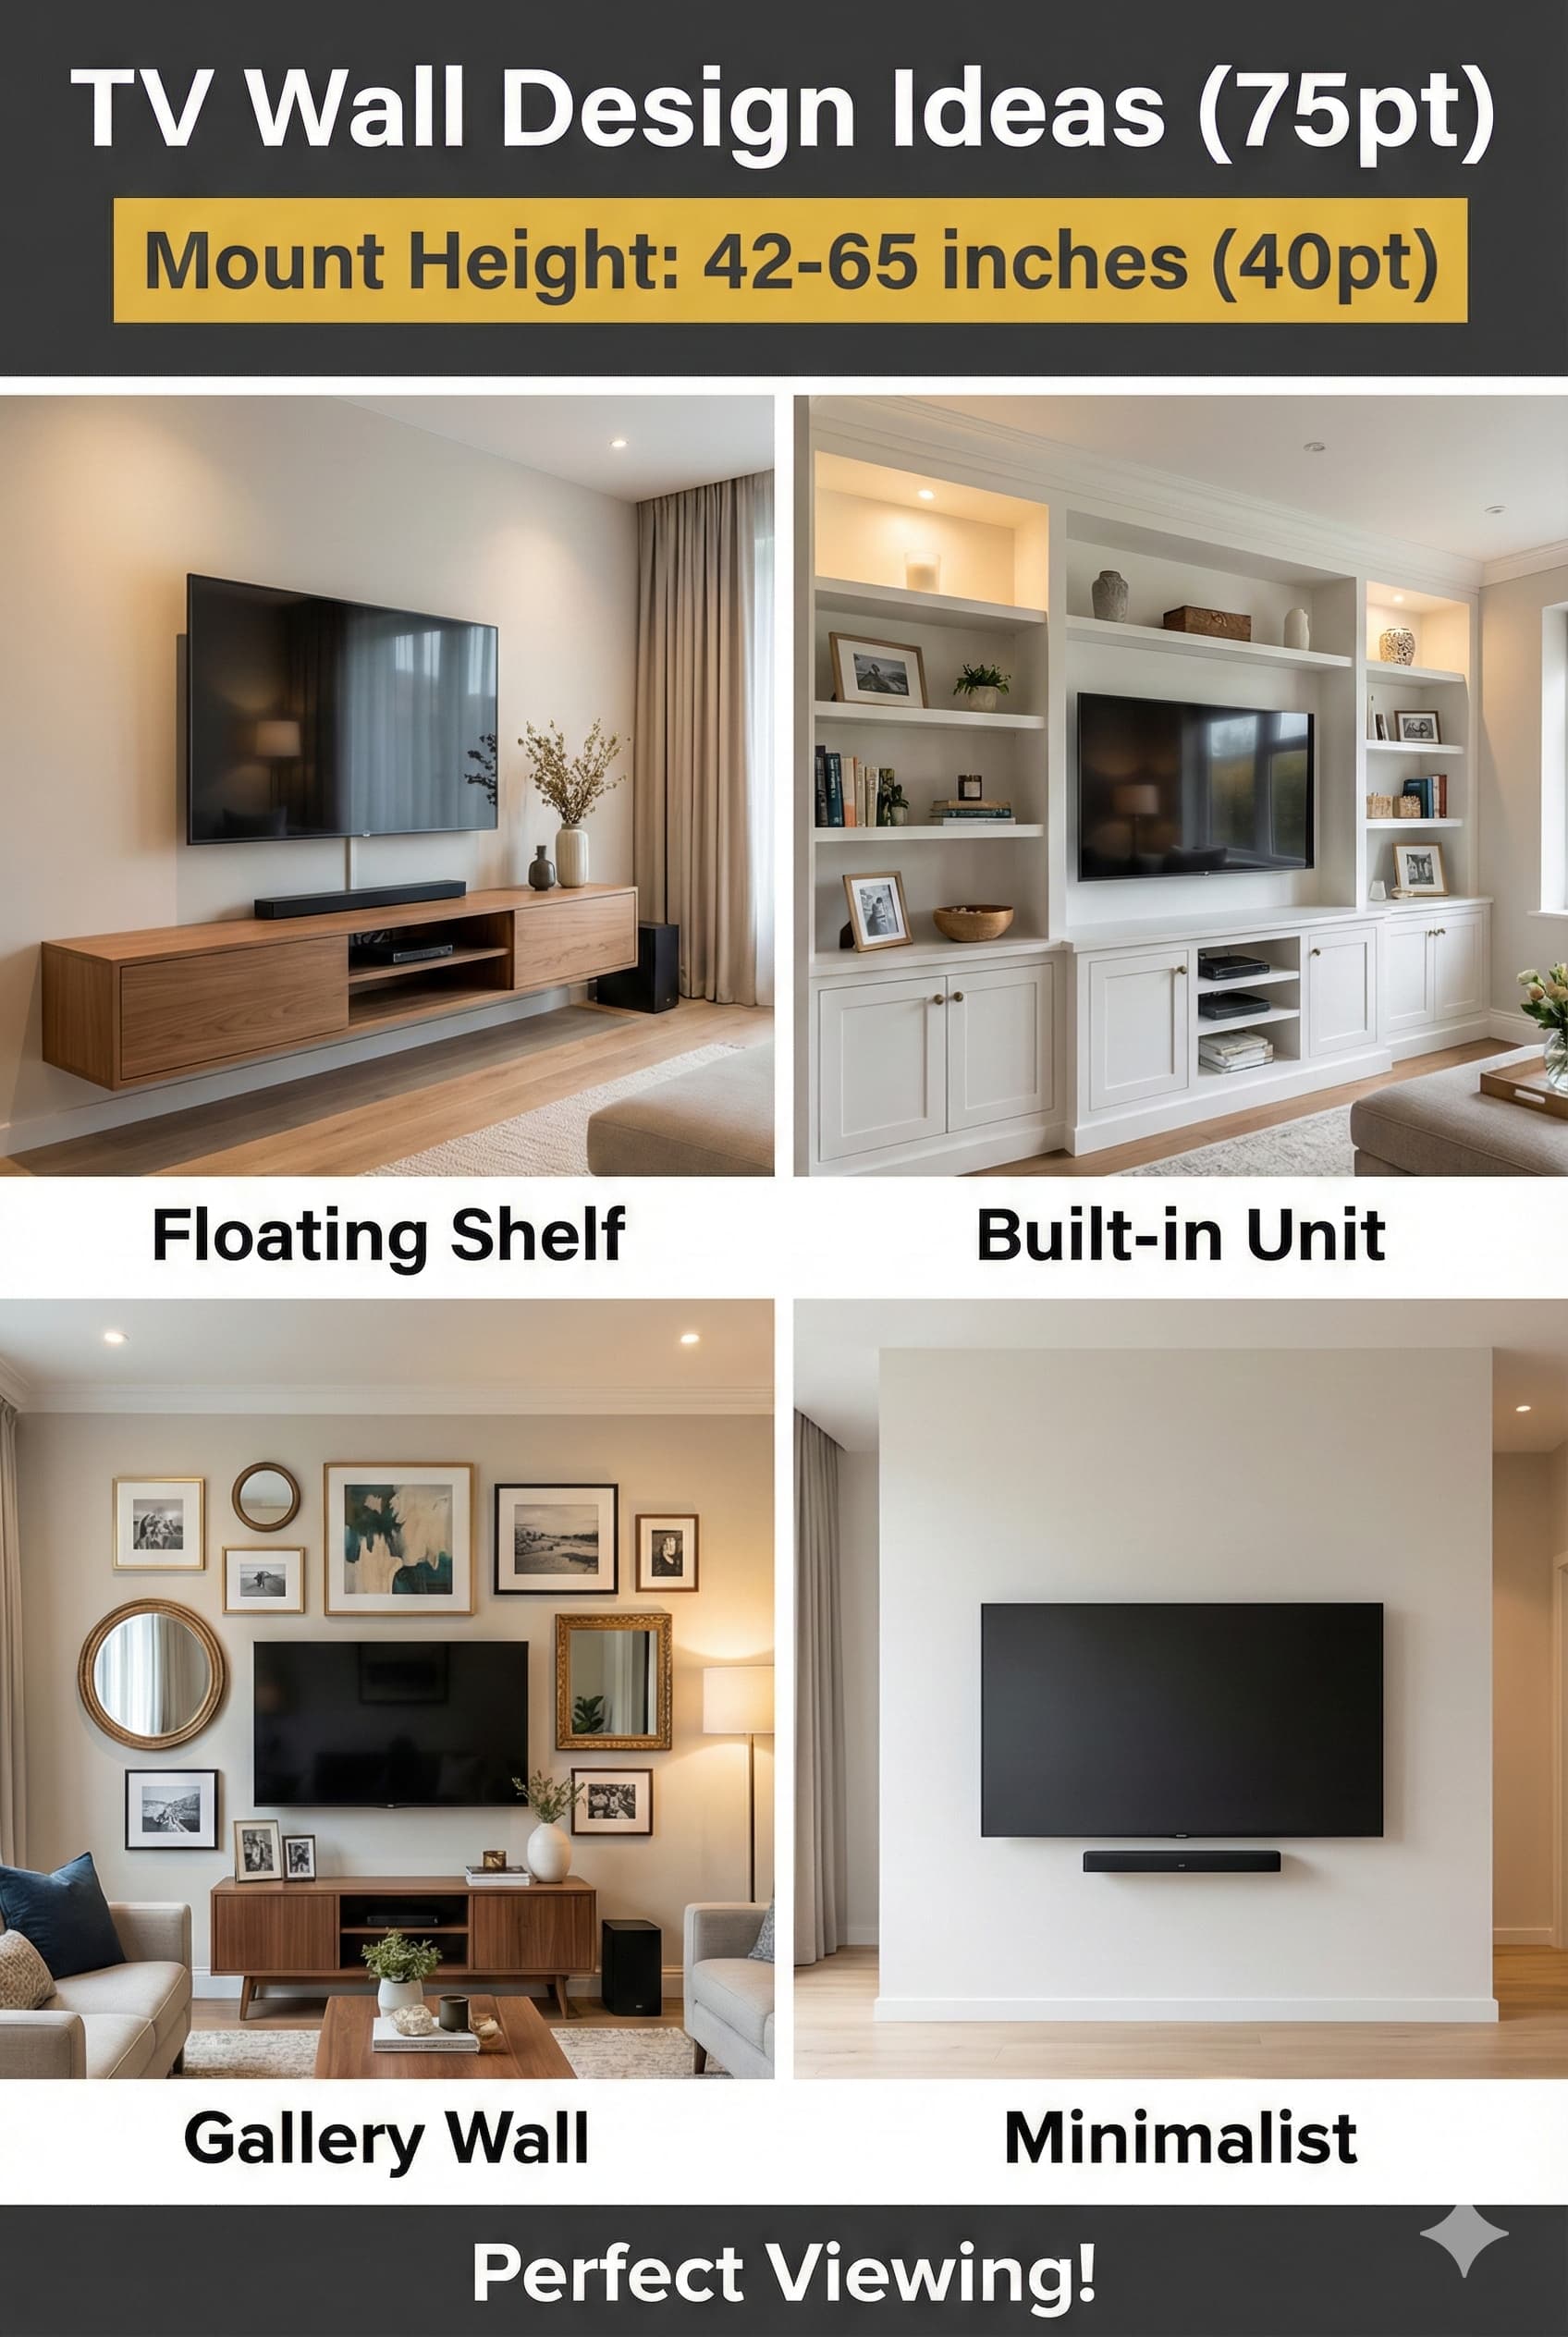
Media storage requirements have decreased substantially as streaming services replace physical media collections though gaming systems, sound equipment, and cable boxes still require accommodation. Living room media storage should provide ventilation for heat-generating electronics, cable management preventing visible wiring tangles, and accessible remote storage. Contemporary minimal aesthetics favor concealed storage while traditional approaches accept visible media display.
Cable management systems organize power cords, HDMI cables, ethernet connections, and audio wiring preventing visible clutter and tripping hazards. Solutions include cable raceways mounted on walls or baseboards, under-furniture cable trays, spiral wrap cord organizers, and in-wall cable routing. Living room wiring becomes increasingly complex with home theater systems, gaming consoles, streaming devices, and smart home components requiring multiple connections. Strategic planning during furniture placement prevents inaccessible cable access once furniture placement finalizes.
Media console storage typically provides open shelving for active components (cable boxes, gaming systems, streaming devices) requiring ventilation plus closed cabinets concealing inactive equipment and cable connections. Rear openings or cable management grommets allow wiring passage between internal and external spaces. Console design should fit current equipment while providing flexibility for future additions given rapid technology evolution requiring equipment replacement every 3-5 years.
⚠ PAIN POINT: I have cable management solutions but my living room wiring still looks messy and chaotic
✓ SOLUTION: Route cables behind furniture rather than across visible floor areas. Use cable clips attaching cords to furniture backs or walls maintaining organized runs. Label cable ends identifying connections simplifying troubleshooting and component changes. Consolidate all wiring at single location (media console interior) using short cables between components minimizing cable length and clutter. Install in-wall cable routing during renovations eliminating visible wiring entirely. Use wireless alternatives where possible (wireless speakers, streaming devices, battery-operated accessories) reducing cable requirements.
Remote control storage prevents lost remotes frustrating daily use while maintaining accessible organization. Solutions include decorative bowls on coffee tables, console drawer organizers, caddy systems, or wall-mounted charging stations for universal remotes. Average households accumulate 3-7 remotes (television, cable, streaming devices, sound systems, gaming) requiring organized storage preventing searching and frustration. Remote organization systems should provide assigned locations for all devices training household members to return items after use.
Open Shelf Console | 2-4 components | Visible | $200-800 | Contemporary minimal |
Cabinet Console | 4-8 components | Concealed | $400-1,500 | Traditional, families |
Floating Wall Shelf | 1-3 components | Visible | $50-200 | Small spaces, minimal |
Media Cabinet | 6-10 components | Concealed | $600-2,000 | Comprehensive storage |
Wall-Mounted Cabinet | 2-4 components | Concealed | $150-600 | Space-saving, contemporary |
Disc storage for remaining DVD, Blu-ray, and gaming disc collections requires dedicated organization preventing scratched discs and lost cases. Binder systems with protective sleeves organize discs compactly discarding bulky cases. Specialized storage furniture with disc slots provides alphabetical organization. Digital conversion services transfer physical media to digital formats eliminating storage requirements entirely though requiring upfront investment. Most households transitioning to streaming services eliminate 80-90 percent physical media collections over 3-5 years reducing storage requirements substantially.

Shelving systems in living rooms display books, decorative objects, photographs, plants, and collections creating personal character while providing functional storage. Open shelving offers maximum display flexibility and accessibility but requires curation preventing cluttered appearances. Living room shelves range from simple floating shelves to comprehensive bookcase systems accommodating varied storage and display needs.
Floating shelves mounted directly to walls without visible brackets create contemporary minimal displays. These simple installations measure 24-72 inches wide, 8-12 inches deep, and support 15-50 pounds per shelf depending on mounting method and wall construction. Multiple shelves spaced 10-14 inches apart vertically create gallery wall displays. Floating shelf installations require proper anchoring to wall studs preventing collapse under weight – toggle bolts or structural screws essential for drywall installations carrying substantial weight.
Bookcase furniture provides freestanding storage and display without permanent installation commitment. These versatile pieces range from narrow 24-inch wide units to comprehensive 72-inch wide systems. Standard bookcases measure 72-84 inches tall, 12-14 inches deep, and feature 4-6 adjustable shelves. Bookcase furniture allows flexibility relocating between rooms or homes without installation expense. Quality considerations including back panel thickness, shelf support methods, and material selection significantly impact longevity and stability.
⚠ PAIN POINT: My shelves display books and objects but still look messy and disorganized rather than curated
✓ SOLUTION: Implement “rule of thirds” placing objects in odd-numbered groupings (3, 5, 7 items) rather than even numbers. Vary object heights within groupings creating visual interest. Incorporate negative space leaving 30-40 percent shelf area empty rather than filling completely. Stack books both vertically and horizontally creating dimensional variation. Group objects by color, material, or theme creating cohesive vignettes. Limit tchotchkes to meaningful pieces removing random clutter. Edit seasonally removing items no longer relevant or loved. Photography shelves from distance evaluating overall appearance identifying cluttered areas requiring editing.
Library ladders provide access to high shelving in living rooms with floor-to-ceiling bookcases. These rolling or stationary ladders add architectural character while solving practical access challenges. Fixed ladders mount permanently at single position while rolling ladders travel along ceiling-mounted tracks. Library ladder installations suit spaces with 9+ foot ceilings and comprehensive bookcase walls creating dramatic traditional aesthetics. Safety considerations including secure mounting and adequate ladder width prevent accidents during use.
Floating Shelf | 24-72 inches wide x 10 inches deep | 15-30 pounds each | Wall mounted | $30-150 per shelf |
Bookcase (small) | 30-36 inches wide x 72 inches tall | 30-50 pounds per shelf | Freestanding | $100-400 |
Bookcase (large) | 60-72 inches wide x 84 inches tall | 40-75 pounds per shelf | Freestanding | $300-1,200 |
Ladder Bookcase | 24-36 inches wide x 72 inches tall | 20-40 pounds per shelf | Freestanding, lean | $150-500 |
Cube Storage | 36-72 inches wide x 36-72 inches tall | 20-40 pounds per cube | Freestanding | $80-400 |
Built-In Shelving | Custom dimensions | 50-100 pounds per shelf | Permanent installation | $1,000-5,000+ |
Shelf styling transforms functional storage into decorative displays contributing to overall living room aesthetics. Balanced asymmetry placing varied object sizes and heights creates dynamic interest. Color coordination grouping similar tones or creating rainbow arrangements provides visual cohesion. Layering objects at varied depths adds dimensional interest. Incorporating greenery through plants or botanicals adds organic softness. Shelf displays require periodic editing and rotation maintaining freshness and preventing stagnant dated appearances.
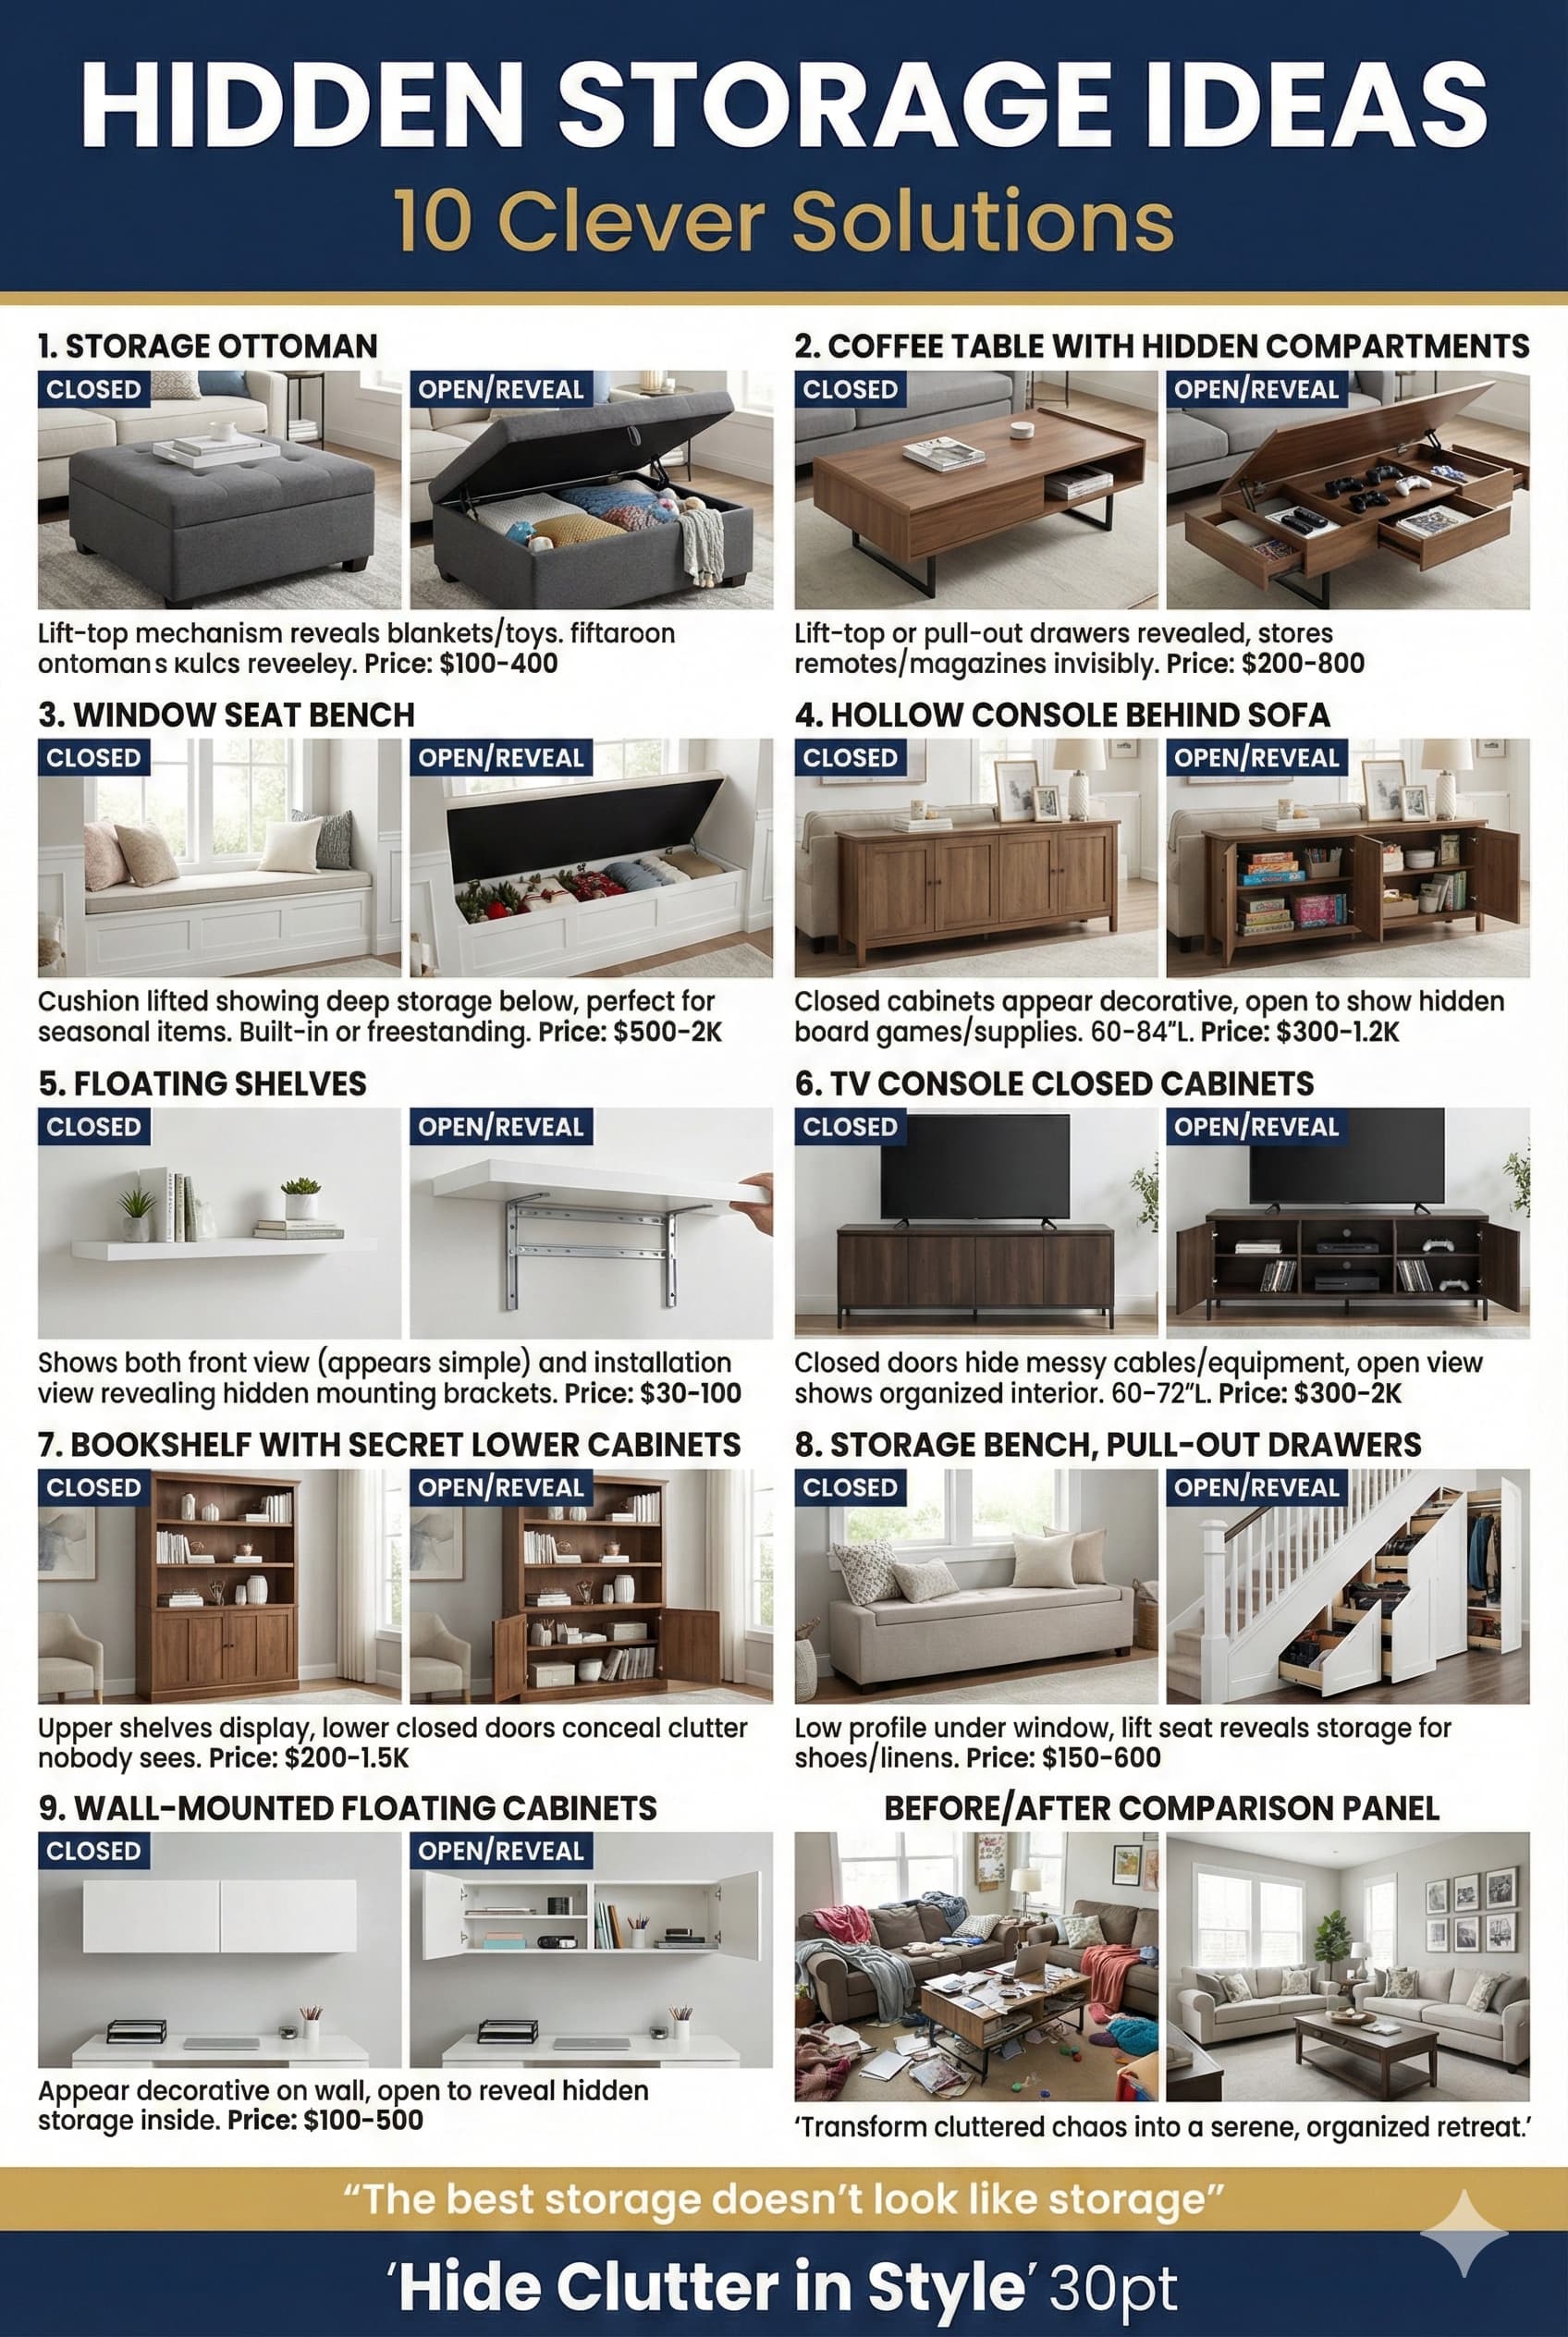
Hidden storage conceals belongings within living room furniture and architecture preventing visual clutter while maintaining accessible storage capacity. These solutions suit minimalist aesthetics prioritizing clean uncluttered appearances or small spaces where visible storage overwhelms spatial perception. Concealed storage requires organizational systems preventing “out of sight, out of mind” chaos within hidden compartments.
Storage ottomans combine seating or coffee table functions with internal storage accessed through lift-up tops. These multi-functional pieces measure 30-48 inches square or rectangular providing 8-20 cubic feet concealed storage. Upholstered exteriors coordinate with furniture while providing soft surfaces. Storage ottomans suit small living rooms maximizing functionality within limited piece counts. Contents remain concealed maintaining streamlined aesthetics though deep interiors may complicate organization and accessibility.
Sofa tables with storage combine display surfaces behind sofas with concealed storage through drawers or cabinets. These pieces measure 48-72 inches wide, 12-16 inches deep, and 30-32 inches tall providing console surface plus hidden capacity. Sofa table placement defines spatial boundaries in open concept living rooms while offering functional storage and display. Slim profiles suit tight spaces between sofas and walls minimizing depth consumption while providing surface utility.
⚠ PAIN POINT: My hidden storage ottomans and cabinets become black holes where items disappear and get forgotten
✓ SOLUTION: Implement internal organization systems within hidden storage: fabric bins, drawer dividers, or stackable containers creating compartmentalized storage. Label bins identifying contents preventing searching through entire ottoman. Conduct quarterly inventory audits removing unused items. Limit hidden storage contents to similar categories (all blankets, all games, all office supplies) preventing miscellaneous chaos. Create inventory lists posted inside storage lids identifying contents. Rotate seasonal items into hidden storage freeing accessible storage for current-use items.
Coffee tables with storage feature lift-up tops, drawers, or lower shelf storage combining functional surfaces with concealed capacity. Lift-up mechanisms raise coffee table tops revealing internal storage suitable for remotes, magazines, and small items. Drawer storage provides easily accessible organization. Lower shelf storage offers semi-concealed capacity maintaining accessibility. Storage coffee tables particularly suit small living rooms requiring multi-functional furniture maximizing utility within limited piece counts.
Storage Ottoman (small) | 4-8 cubic feet | Seating, footrest | Lift-up top | $80-250 |
Storage Ottoman (large) | 10-20 cubic feet | Seating, coffee table | Lift-up top | $200-600 |
Lift-Top Coffee Table | 4-8 cubic feet | Coffee table | Hinged lift mechanism | $250-800 |
Drawer Console Table | 2-4 cubic feet | Display, surface | Pull-out drawers | $300-1,000 |
Storage Bench | 6-12 cubic feet | Seating | Lift-up top or drawers | $150-500 |
Hidden Compartment Furniture | 2-8 cubic feet | Various | Concealed access panels | $400-1,500 |
Under-furniture storage using space beneath sofas and chairs provides additional concealed capacity without additional furniture. Low-profile storage containers measuring 4-6 inches tall slide beneath furniture storing seasonal items, extra blankets, or rarely-used belongings. This approach maximizes spatial utilization in small living rooms requiring every available storage opportunity. Furniture must provide adequate clearance (6+ inches) and lack recessed bases or center support bars obstructing container placement.
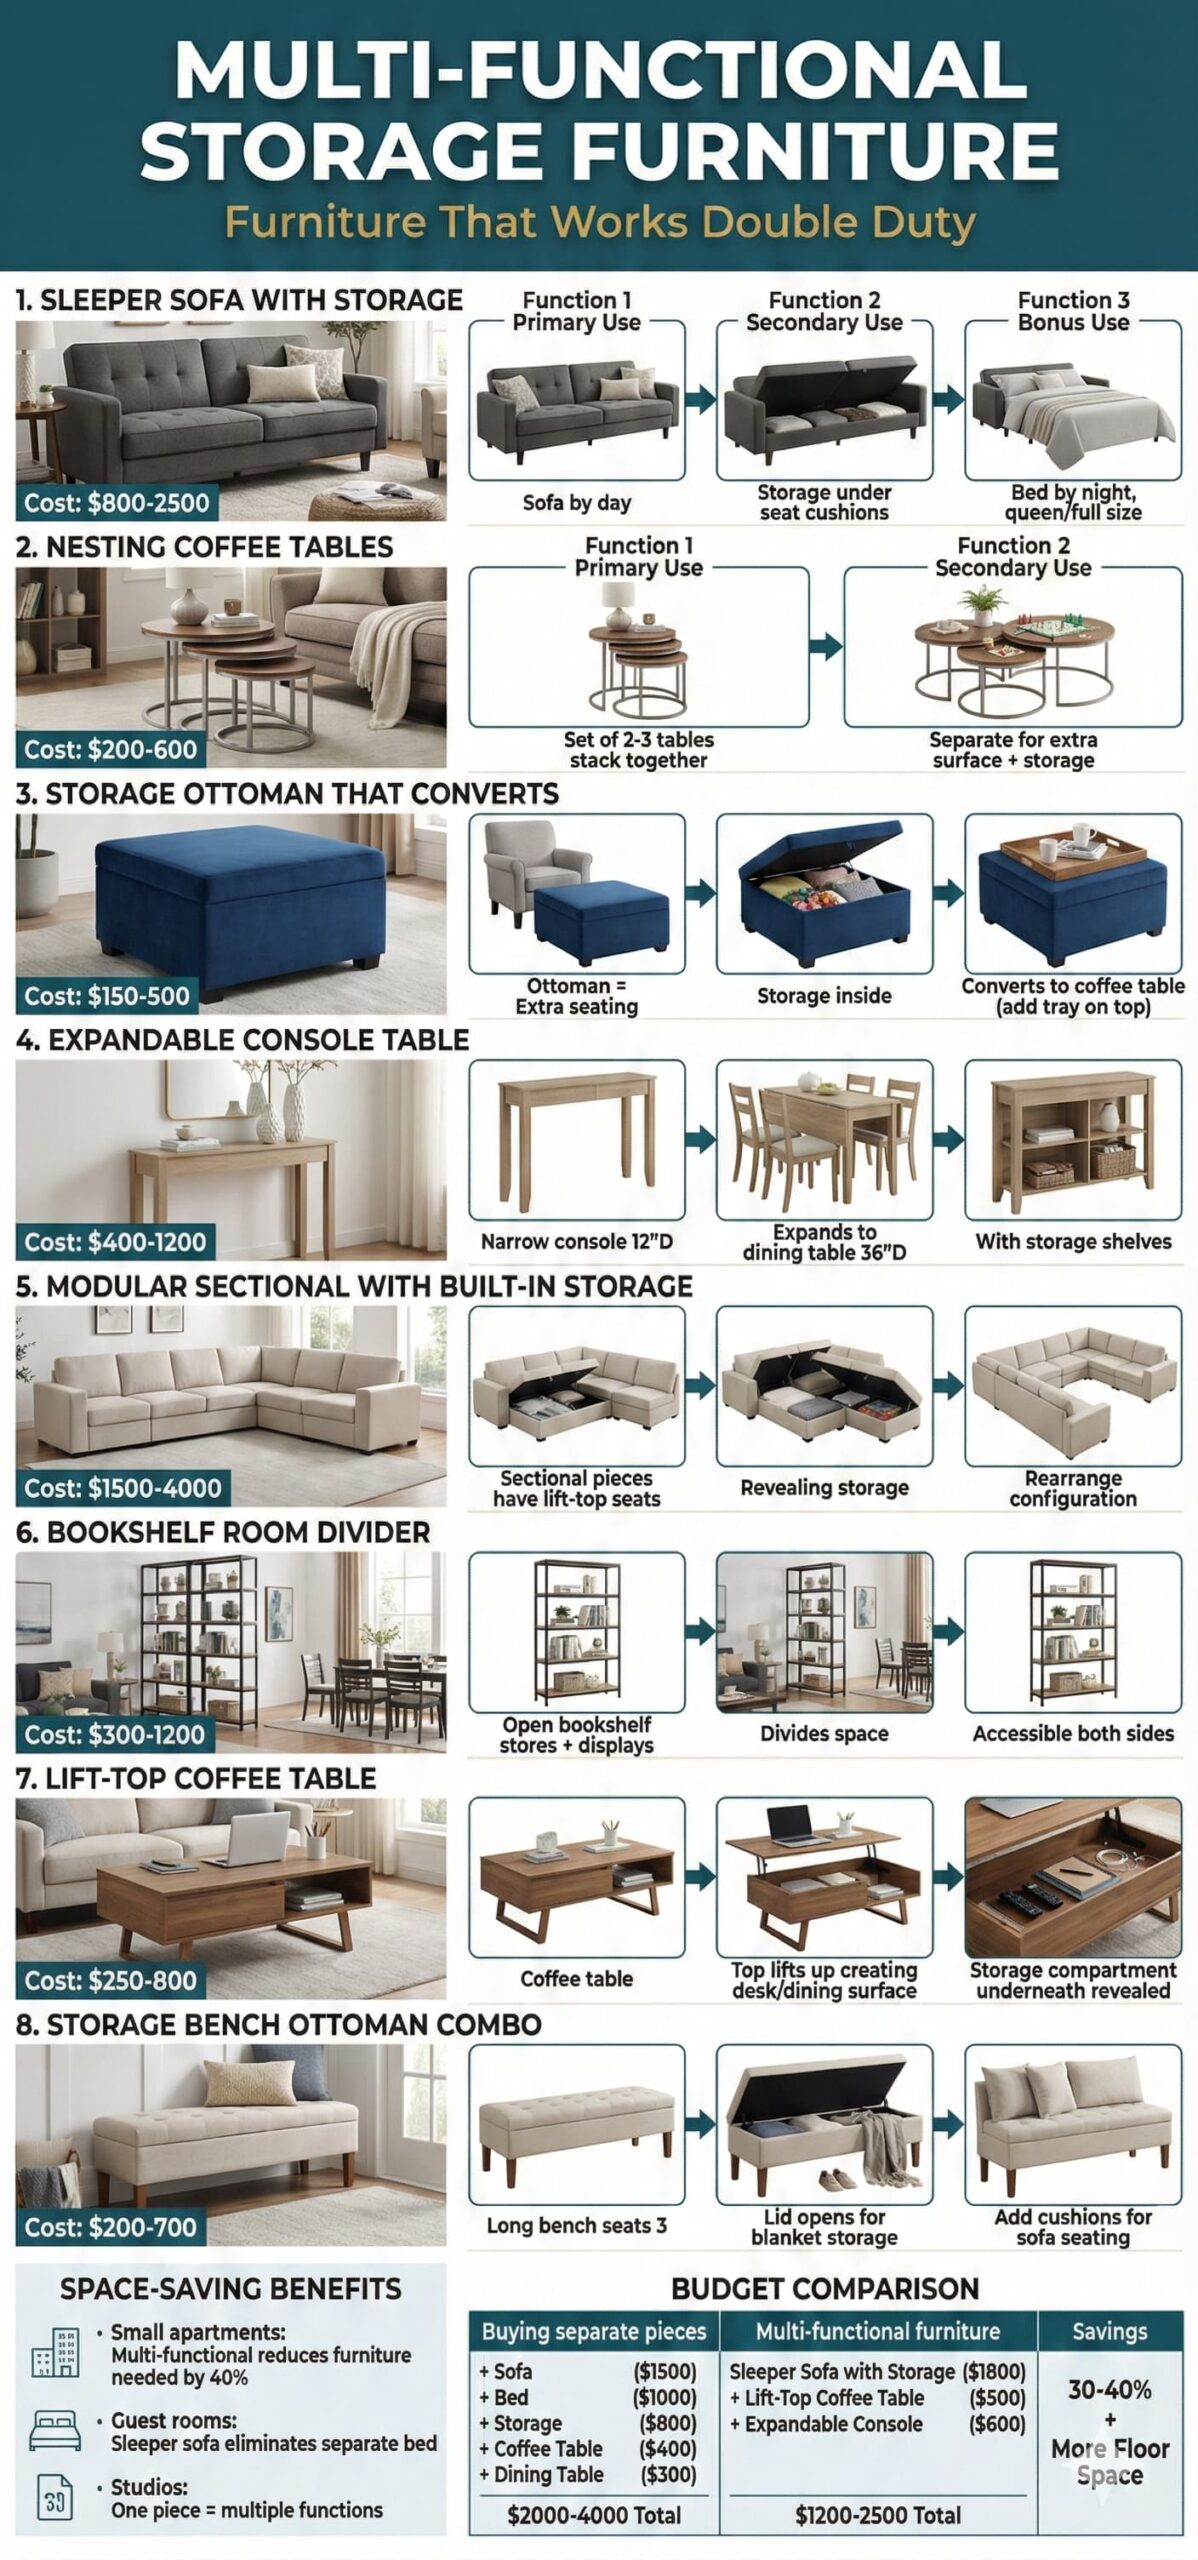
Multi-functional furniture combines storage capacity with primary furniture functions maximizing utility within limited living room piece counts. These efficient solutions suit small spaces, budget-conscious approaches, or minimalist aesthetics prioritizing simplified reduced furniture quantities. Multi-purpose furniture delivers multiple benefits through single pieces though typically costs 20-40 percent more than single-function equivalents.
Sleeper sofas combine daytime seating with guest sleeping accommodation through integrated mattresses deploying from sofa frames. Contemporary sleeper mechanisms including memory foam mattresses and easy-open systems dramatically improve comfort and usability compared to traditional uncomfortable bar-spring designs. Sleeper sofas cost $800-3,000+ depending on quality and mattress type. These dual-purpose pieces suit living rooms serving occasional guest accommodation eliminating dedicated guest bedroom requirements.
Nesting tables provide flexible surface expansion storing compactly when not needed. Sets typically include 2-3 tables at graduated sizes fitting together when stacked. During gatherings, tables separate providing multiple surface locations then store together maintaining minimal spatial footprint. Nesting table sets cost $150-600 offering surface flexibility without permanent large coffee table commitment. Varied table configurations allow asymmetrical arrangements or symmetrical pairings matching current needs.
⚠ PAIN POINT: My multi-functional furniture looks cheap and inadequate compared to dedicated single-purpose pieces
✓ SOLUTION: Invest in quality multi-functional pieces rather than budget alternatives – expect 20-40 percent price premium over basic single-function furniture for well-designed multi-purpose options. Research manufacturer reputation and product reviews verifying mechanisms function reliably long-term. Test furniture extensively before purchasing ensuring transformations operate smoothly and stored position appears finished rather than obviously folding/converting. Select pieces where multi-functionality enhances rather than compromises primary function – sleeper sofa you should comfortable sofa first, adequate bed second. Avoid gimmicky multi-function pieces prioritizing novelty over genuine utility.
Secretary desks combine display cabinet functions with fold-down writing surfaces creating workspace when needed without permanent desk space consumption. These compact pieces measure 30-42 inches wide, 15-20 inches deep, and 72-84 inches tall providing vertical storage and occasional workspace. Secretary desks suit living rooms requiring occasional work-from-home capability without dedicated home offices. Traditional aesthetics make these pieces appropriate for traditional or transitional design approaches though contemporary versions exist.
Sleeper Sofa | Seating | Guest bed | Eliminates guest room need | $800-3,000 |
Storage Ottoman | Seating/footrest | Hidden storage | Eliminates separate storage | $150-500 |
Lift-Top Coffee Table | Coffee table | Storage, laptop desk | Eliminates side tables | $250-800 |
Nesting Tables | Occasional tables | Compact storage | Reduces footprint 60% | $150-600 |
Secretary Desk | Display cabinet | Fold-down desk | Eliminates separate desk | $400-1,500 |
Convertible Console | Console table | Dining table | Eliminates separate dining table | $500-2,000 |
Console-to-dining tables transform from narrow console tables to expanded dining tables accommodating 4-8 people. These convertible pieces suit small apartments or living rooms serving dining functions without dedicated dining rooms. Transformation mechanisms vary from leaf extensions to lifting mechanisms creating substantial table surfaces from compact consoles. While clever space-saving solutions, these pieces typically cost $500-2,000 and require storage for additional seating deployed during dining use. Primary utility targets small space dwellers requiring flexible functionality.
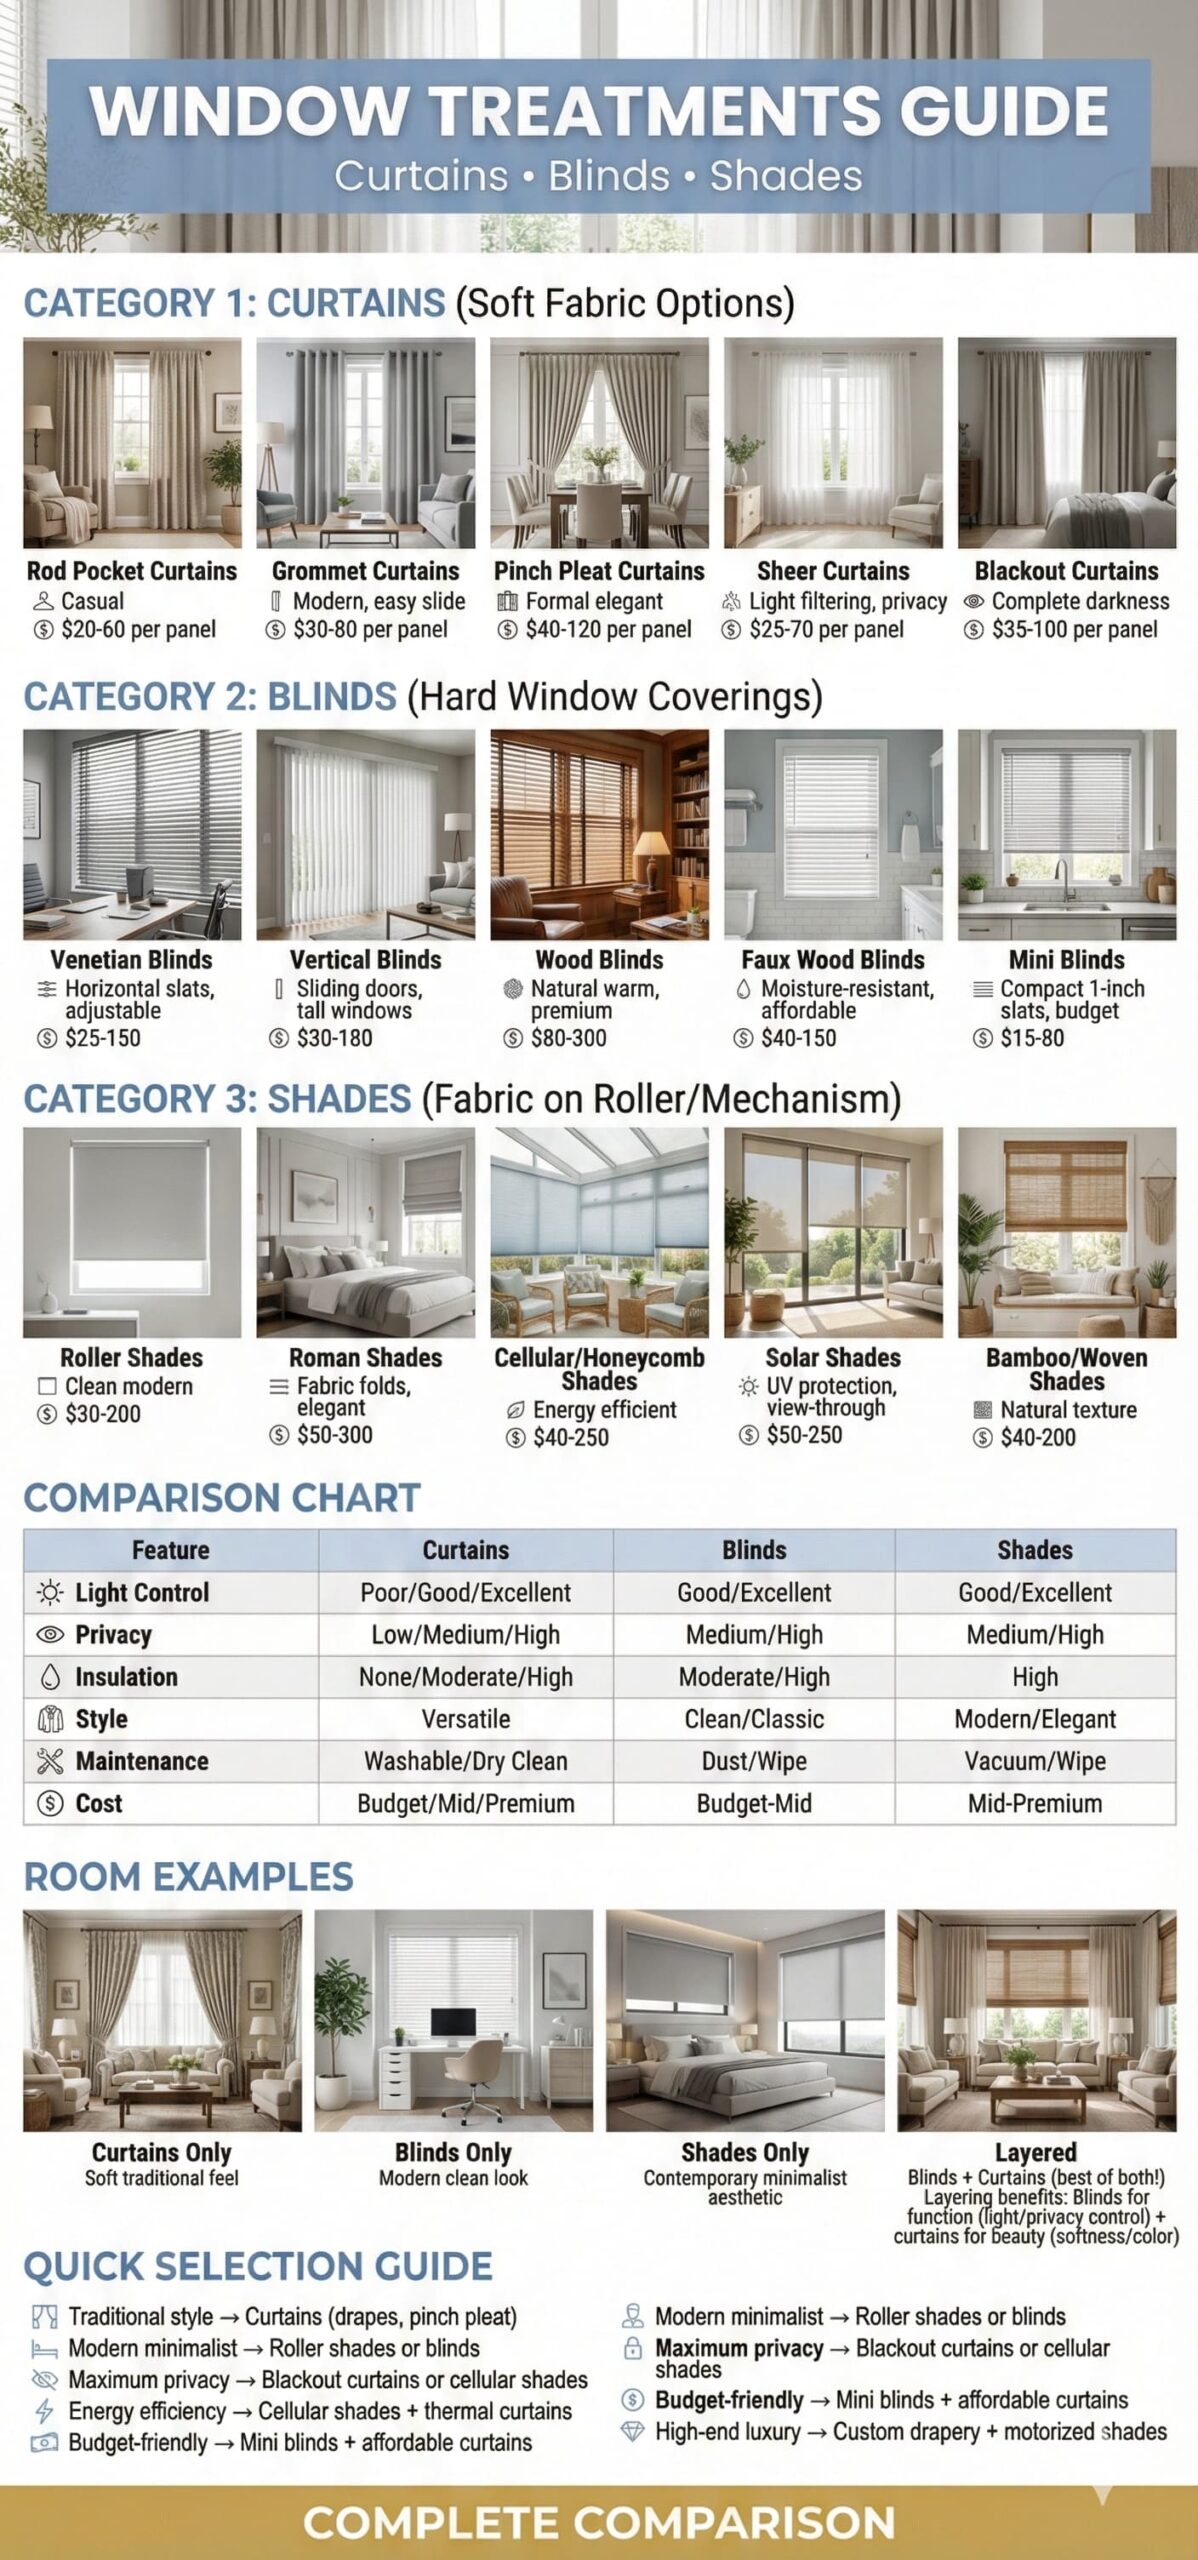
Living room window treatments serve multiple functions including light control, privacy management, temperature regulation, and decorative enhancement. Treatment selection impacts room atmosphere significantly through light filtering characteristics, color contributions, and style expressions. Window covering choices range from minimal contemporary approaches leaving windows bare to elaborate traditional multi-layer drapery treatments creating dramatic window presentations.
Light control requirements vary by window orientation and living room activities. South and west-facing windows receiving direct sunlight benefit from light-filtering or room-darkening treatments managing glare and heat gain. North-facing windows receiving consistent diffuse light may require minimal treatments preserving natural illumination. Entertainment-focused living rooms with large televisions benefit from room-darkening capabilities reducing screen glare during daytime viewing.
Privacy considerations depend on window proximity to neighboring properties and street visibility. Ground-floor living rooms with windows facing sidewalks or adjacent homes require privacy treatments while upper-floor windows or properties with substantial setbacks may function without privacy concerns. Sheer curtains provide daytime privacy through light diffusion while remaining transparent at night when interior lights illuminate. Privacy window treatments should balance concealment requirements with natural light admission and view preservation.
⚠ PAIN POINT: My window treatments block light creating dark rooms or provide no privacy when I need it
✓ SOLUTION: Install layered treatments combining sheer curtains (daytime privacy + light) with heavier curtains or blinds (nighttime privacy + room darkening). Use top-down bottom-up cellular shades allowing lower window coverage for privacy while maintaining upper window light admission. Install exterior solar screens reducing heat gain 30-50 percent while maintaining outward views and natural light. Select light-filtering treatments (cellular shades, solar shades, sheers) blocking 40-60 percent light intensity while preserving view and preventing cave-like darkness.
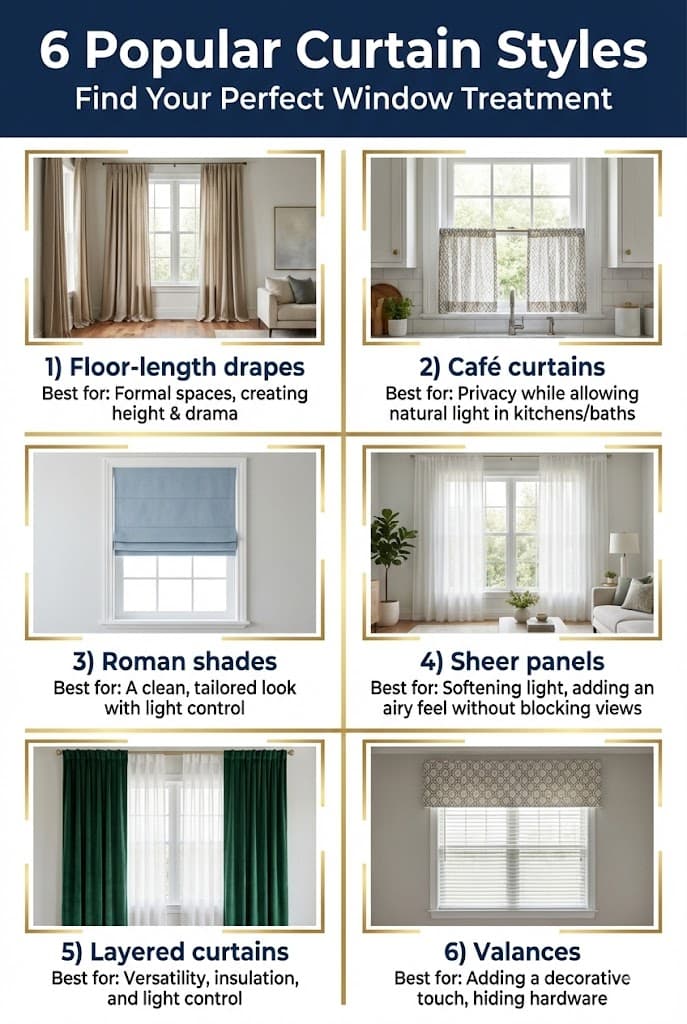
Curtain selection for living rooms considers fabric weight, pattern scale, color coordination, and functional requirements including light filtering or room darkening capabilities. Curtain panels typically sold in pairs though modern asymmetrical styles may employ single panels. Standard panel widths measure 50-54 inches fitting windows up to 48 inches wide using single pair or wider windows using multiple pairs for adequate fullness.
Curtain length measurements determine floor relationship creating varied aesthetic effects. Floor-length curtains ending 1/2-1 inch above floor create clean contemporary appearances avoiding dust accumulation. Curtains “kissing” floor create traditional finished looks. Puddle-length curtains extending 2-6 inches onto floor create luxurious traditional presentations though collect dust and complicate cleaning. Living room curtains typically employ floor-length or kiss-floor lengths avoiding window-length curtains (ending at sill) appearing dated and undersized.
Curtain fullness describes fabric volume relative to window width. Adequate fullness creates attractive gathered folds when closed rather than flat stretched appearances. Standard fullness measures 2-2.5 times window width – 48-inch window requires 96-120 inches total curtain width (two 48-60 inch panels). Sheer curtains require greater fullness (2.5-3 times) while heavy fabrics function with less (1.5-2 times). Curtain panels insufficient width create skimpy inadequate appearances failing to provide proper coverage or attractive folds.
⚠ PAIN POINT: My curtains look cheap and flat rather than full and luxurious like in design photos
✓ SOLUTION: Increase curtain fullness ordering panels totaling 2-2.5x window width rather than just barely covering windows. Mount curtain rods 4-8 inches beyond window frames on each side allowing curtains to stack off glass when open maximizing light admission. Hang curtains from ceiling or near ceiling (within 4-6 inches) rather than directly above window frame elongating walls and increasing perceived ceiling height. Select lined curtains with adequate fabric weight creating attractive folds rather than limp flat appearances. Consider custom curtains if standard sizes inadequate for proper fullness.
Curtain hardware including rods, finials, rings, and brackets impacts functionality and aesthetics. Standard rods measure 28-120 inches accommodating varied window widths. Adjustable rods extend accommodating size variations. Rod diameter affects visual weight – 3/4-1 inch diameter suits lightweight curtains while 1-1/4 to 2 inch diameter suits heavy draperies. Curtain rod finishes should coordinate with other living room metal finishes maintaining cohesive appearances. Decorative finials create finished rod ends in varied styles from traditional to contemporary.
Sheer Curtains | Lightweight | 10-20% blockage | Daytime privacy, light admission | $20-80 per panel |
Light-Filtering | Medium weight | 40-60% blockage | Glare control, privacy | $40-150 per panel |
Blackout Curtains | Heavy lined | 95-100% blockage | Entertainment rooms, bedrooms | $60-200 per panel |
Thermal Curtains | Heavy insulated | 80-95% blockage | Energy efficiency, noise reduction | $50-180 per panel |
Linen Curtains | Medium-heavy | 50-70% blockage | Natural texture, casual elegance | $60-250 per panel |
Velvet Curtains | Heavy luxurious | 70-90% blockage | Traditional luxury, sound dampening | $80-300 per panel |
Curtain maintenance requirements vary by fabric content and construction. Machine-washable cotton or polyester curtains simplify care while dry-clean-only silks or lined draperies require professional cleaning. Light-colored curtains show soil more readily than dark colors requiring more frequent cleaning. Living room curtains typically require cleaning 1-2 times annually depending on dust accumulation and household factors including pets, smoking, or cooking odors.
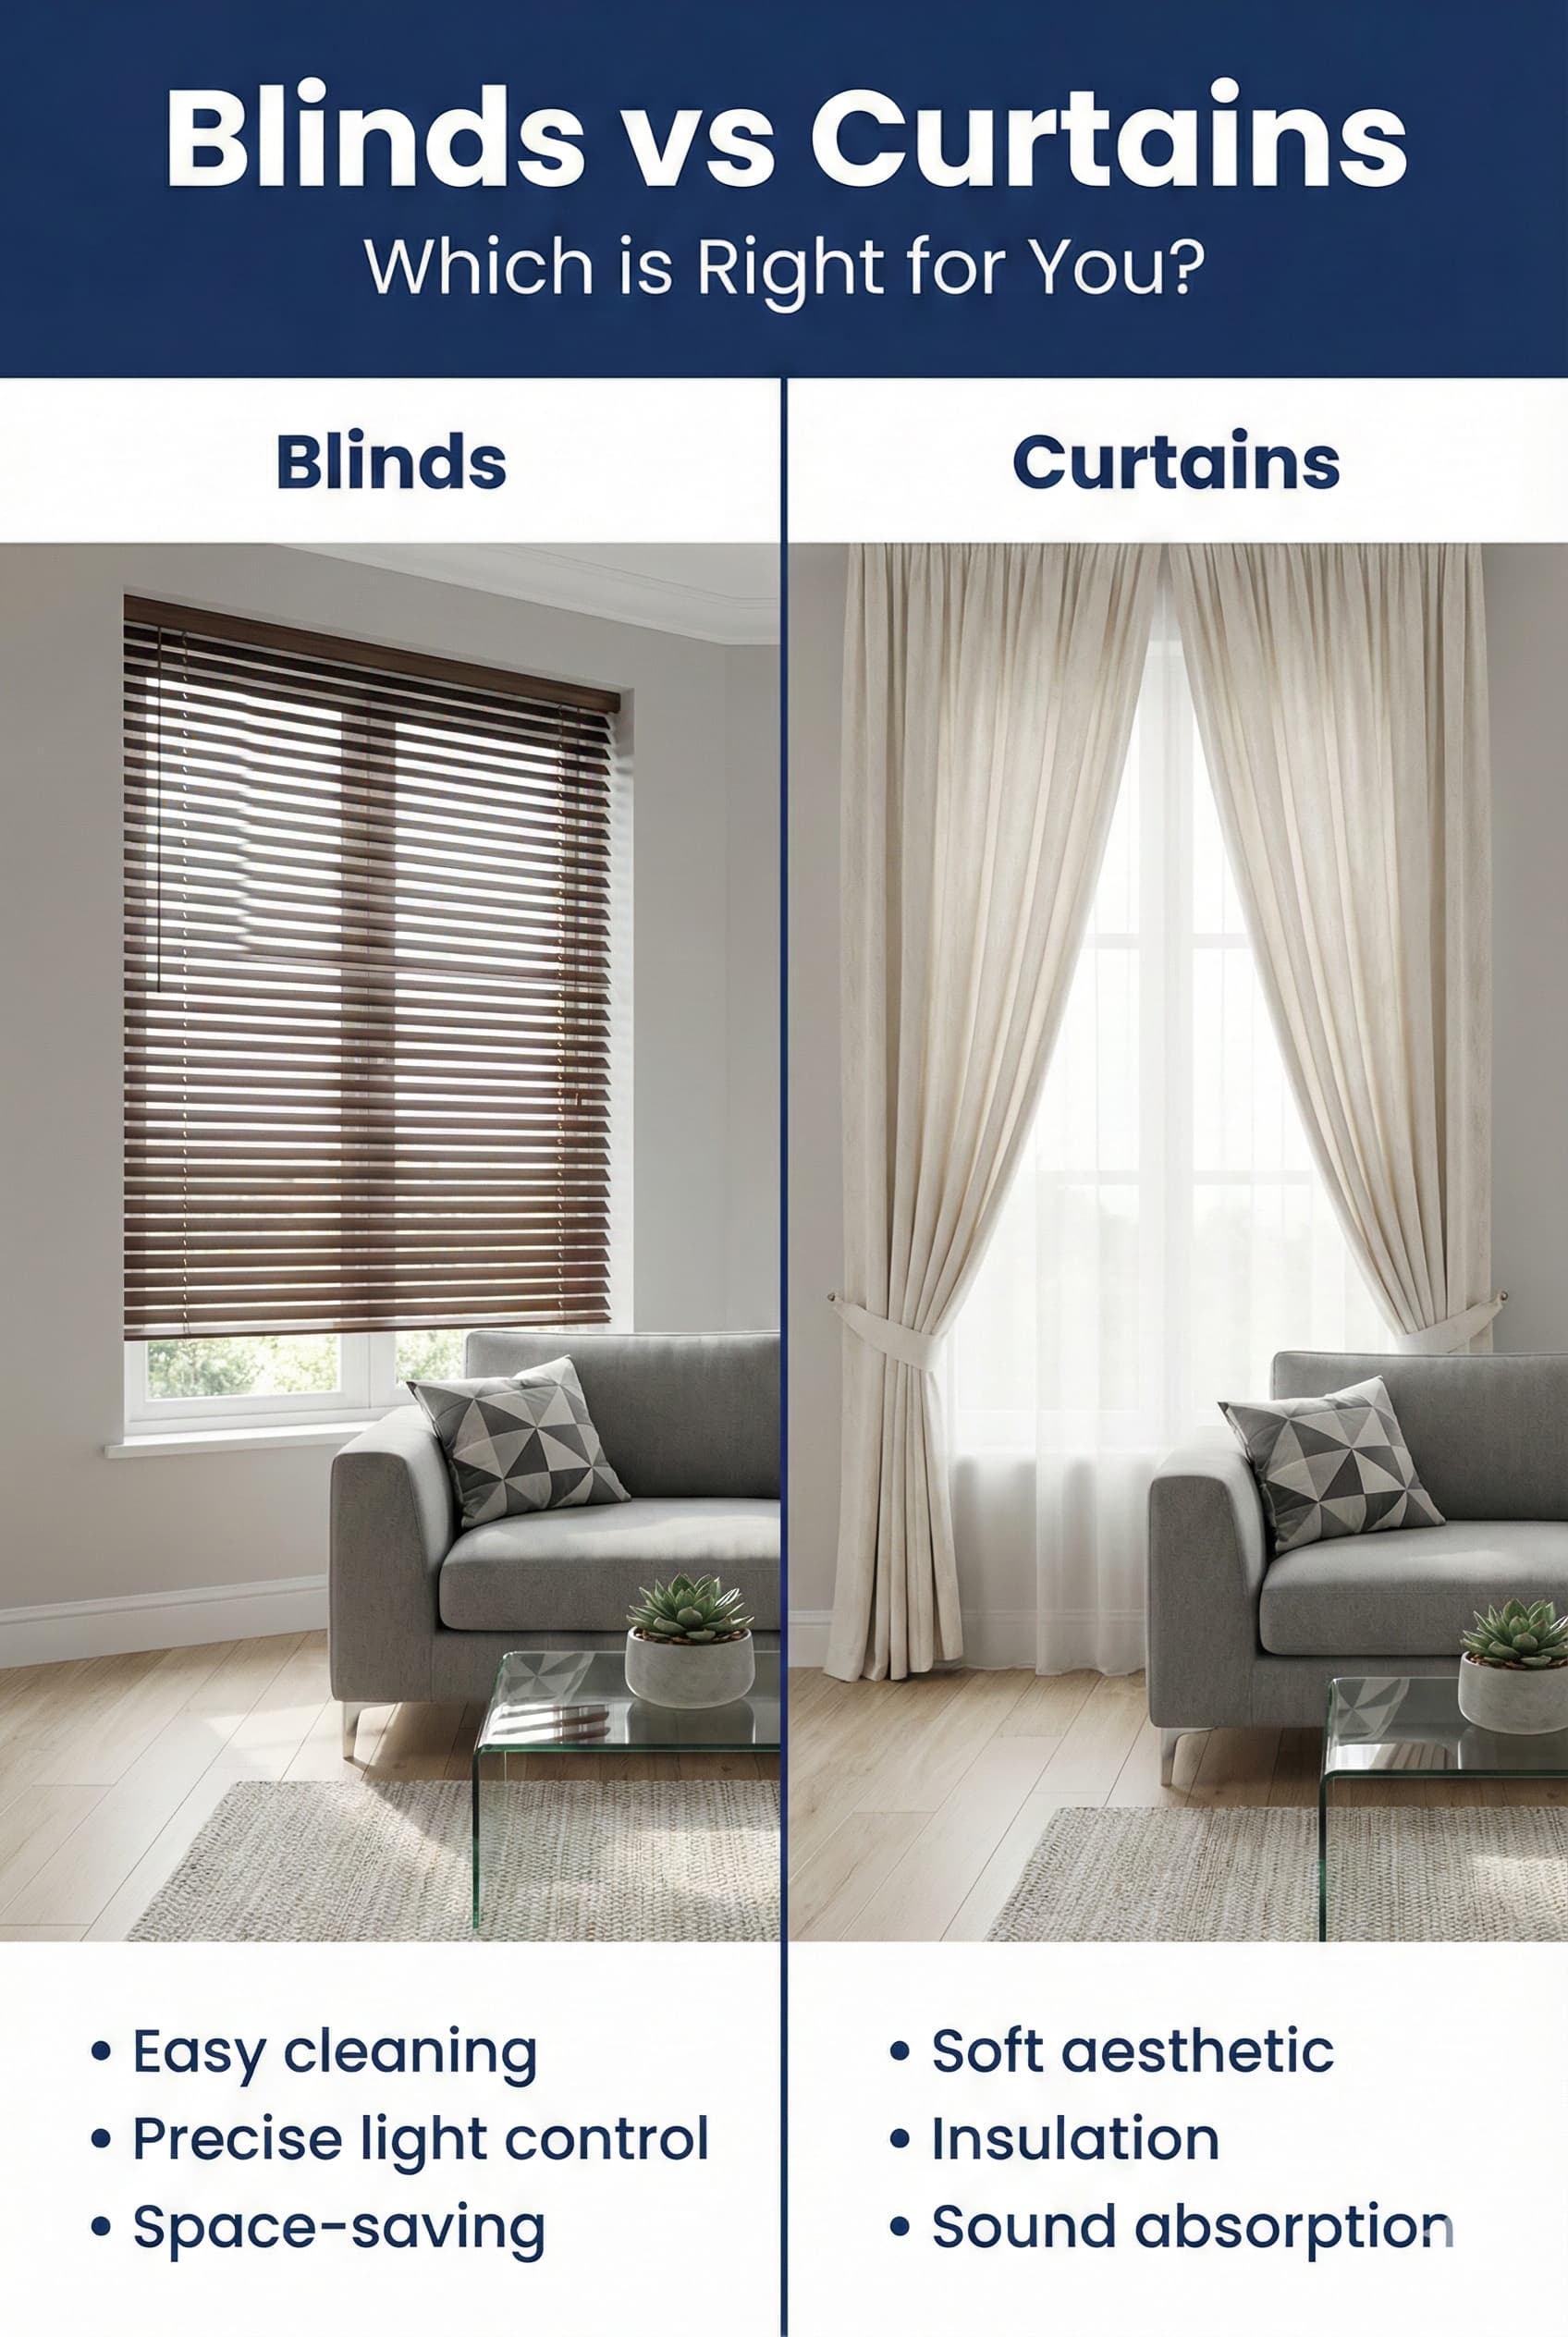
Window blinds feature horizontal or vertical slats adjusting to control light admission and privacy. Horizontal blinds including Venetian blinds, mini blinds, and wood blinds suit most living room windows providing adjustable light control through slat tilting. Vertical blinds suit wide windows or sliding glass doors though appear dated in contemporary residential applications. Modern blind materials include aluminum, faux wood, real wood, and composite materials offering varied aesthetics and price points.
Cellular shades (honeycomb shades) feature cellular construction trapping air providing insulation value while filtering or blocking light. Single-cell construction offers basic functionality while double-cell construction increases insulation value. Light-filtering cellular shades allow view and natural light while room-darkening versions block 95-100 percent light. Cellular shades cost $60-300 per window providing energy efficiency and sound dampening benefits beyond light control.
Roman shades fold into horizontal pleats when raised creating tailored fabric window treatments. These shades combine soft fabric aesthetics with functional light control. Flat Roman shades display minimal fold depth while hobbled Roman shades feature cascading folds even when raised. Roman shade construction varies from economical outside-mount options to premium inside-mount custom versions with hidden mounting hardware. Fabric selection dramatically impacts appearance from casual linen to formal silk.
⚠ PAIN POINT: My blinds or shades stop functioning smoothly – they stick, won’t raise, or slats won’t close
✓ SOLUTION: Vacuum blind slats and shade fabrics quarterly removing dust accumulation preventing smooth operation. Lubricate moving parts including pulleys and lift mechanisms using silicone spray (avoid oil attracting dust). Replace worn lift cords every 2-3 years before complete failure. Clean and lubricate vertical blind tracks removing debris. Adjust tension on spring-loaded roller shades tightening or loosening as needed. For persistent issues, replace rather than repair as replacement costs ($40-150 per window) often comparable to repair costs while providing fresh updated appearance.
Roller shades represent simplest shade construction wrapping fabric around roller tubes for raising and lowering. Contemporary cordless or motorized lift mechanisms eliminate hanging cords creating clean contemporary aesthetics while improving child safety. Roller shade fabrics range from sheer to blackout with varied textures and patterns. Solar shades specifically designed to block UV radiation and heat while maintaining outward views benefit living rooms with problematic sun exposure requiring glare and heat management.
Aluminum Mini Blinds | Adjustable slats | Minimal | Cord or cordless | $15-60 per window |
Faux Wood Blinds | Adjustable slats | Minimal-moderate | Cord or cordless | $40-150 per window |
Real Wood Blinds | Adjustable slats | Moderate | Cord or cordless | $80-300 per window |
Cellular Shades | Light-filtering to blackout | Excellent | Cord, cordless, motorized | $60-300 per window |
Roman Shades | Light-filtering to blackout | Minimal-moderate | Cord or cordless | $80-400 per window |
Roller Shades | Sheer to blackout | Minimal | Cord, cordless, motorized | $40-200 per window |
Solar Shades | 5-15% openness | Moderate | Cordless or motorized | $60-250 per window |
Motorized window treatments provide remote control and smart home integration allowing schedule programming and voice activation. Motorized options add $150-400 per window to treatment costs but provide substantial convenience particularly for hard-to-reach windows or users with mobility limitations. Battery-powered motors simplify installation avoiding electrical work while plug-in or hardwired systems eliminate battery replacement. Smart window treatments integrate with home automation systems enabling automated opening/closing based on time, temperature, or sunlight levels.
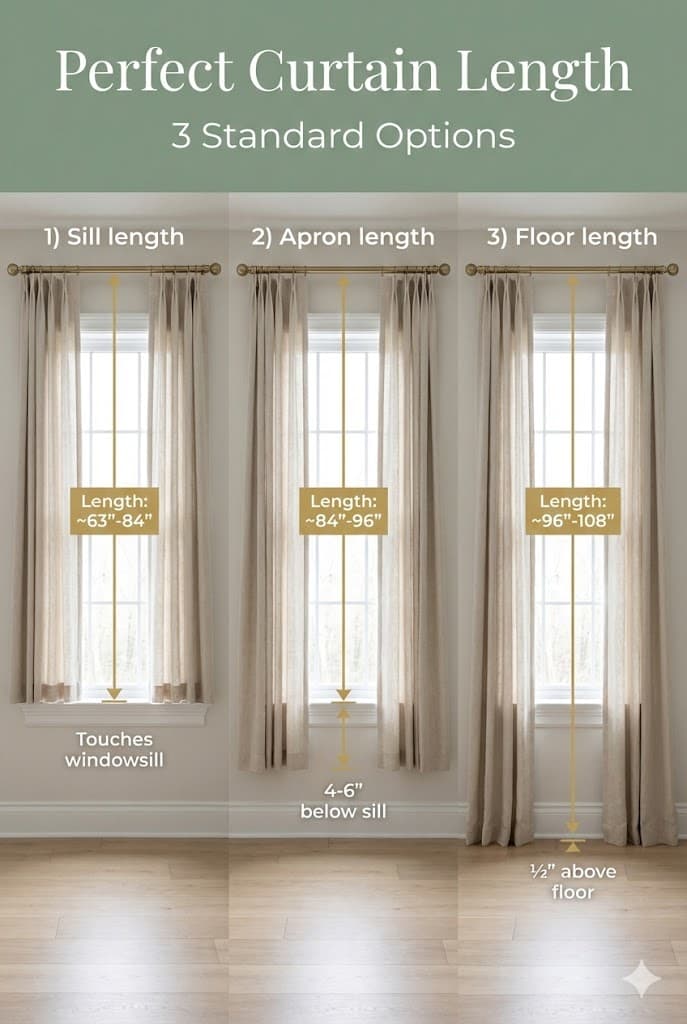
Window treatment hardware including rods, brackets, mounting hardware, and decorative elements requires proper specification and installation ensuring secure mounting and smooth operation. Hardware selection should coordinate with treatment type, window dimensions, and mounting surface characteristics. Improper hardware specification or installation causes sagging rods, fallen treatments, or operational difficulties frustrating daily use.
Curtain rod mounting height significantly impacts living room appearance and perceived ceiling height. Mounting rods near ceiling (within 4-6 inches) rather than directly above window frames elongates walls creating more dramatic proportions. Standard mounting positions rods 4-6 inches above window frame though contemporary approaches favor ceiling mounting when ceiling heights allow. Rod placement should allow adequate clearance above window opening preventing curtain fabric from obstructing upper window sections when curtains hang closed.
Rod projection (distance from wall) must fit window depth including any window treatments mounted inside frame plus adequate clearance preventing curtain fabric from touching windows. Standard projection measures 3-4 inches though may increase to 6-8 inches for layered treatments or deep windows. Double curtain rods provide two hanging positions for layered treatments combining sheers with heavier curtains. Curtain rod selection should provide adequate projection preventing fabric crushing against windows or blinds.
⚠ PAIN POINT: My curtain rods sag in the middle or pull out of walls under fabric weight
✓ SOLUTION: Install center support brackets for rods exceeding 48 inches preventing sagging under fabric weight. Mount rod brackets into wall studs rather than drywall alone – use stud finder identifying solid mounting locations. Use appropriate wall anchors (toggle bolts, drywall anchors rated for 20+ pounds) if stud mounting impossible. Select rods with adequate diameter and wall thickness supporting fabric weight without bending – heavy draperies require 1-1/4 to 2 inch diameter rods. Consider ceiling-mounted track systems distributing weight more effectively than wall-mounted rods for very heavy or wide treatments.
Blind and shade mounting options include inside mount (within window frame) or outside mount (on wall above and beside window). Inside mounting creates clean integrated appearance but requires adequate frame depth (2-3 inches minimum) and square true frames. Outside mounting fits any window while allowing treatments to cover entire window plus frame concealing gaps. Mounting decisions impact treatment dimensions – inside mount treatments measure exact window width while outside mount treatments extend 2-4 inches beyond frame on all sides.
Standard Curtain Rod | Single curtain layer | Up to 20 pounds | Easy (30-45 minutes) | $15-80 per window |
Heavy-Duty Rod | Heavy draperies | Up to 40 pounds | Moderate (45-60 minutes) | $40-150 per window |
Double Rod | Layered curtains | Up to 30 pounds | Moderate (60-90 minutes) | $30-120 per window |
Ceiling Track | Ceiling-mounted curtains | Up to 50 pounds | Moderate-difficult (90-120 minutes) | $60-200 per window |
Traverse Rod | Cord-operated curtains | Up to 35 pounds | Moderate (60-75 minutes) | $50-180 per window |
Motorized Track | Automated curtains | Up to 40 pounds | Difficult (120-180 minutes) | $200-600 per window |
Installation tools required for window treatment mounting include electric drill, drill bits, level, measuring tape, stud finder, screwdriver, and ladder or step stool. Accurate measurement and level installation ensure treatments hang properly and operate smoothly. Professional installation costs $50-150 per window providing secure mounting and warranty protection but many homeowners successfully self-install saving installation expenses. Window treatment installation mistakes including improper measurements, inadequate mounting, or incorrect hardware selection cause ongoing frustration justifying careful planning and execution.
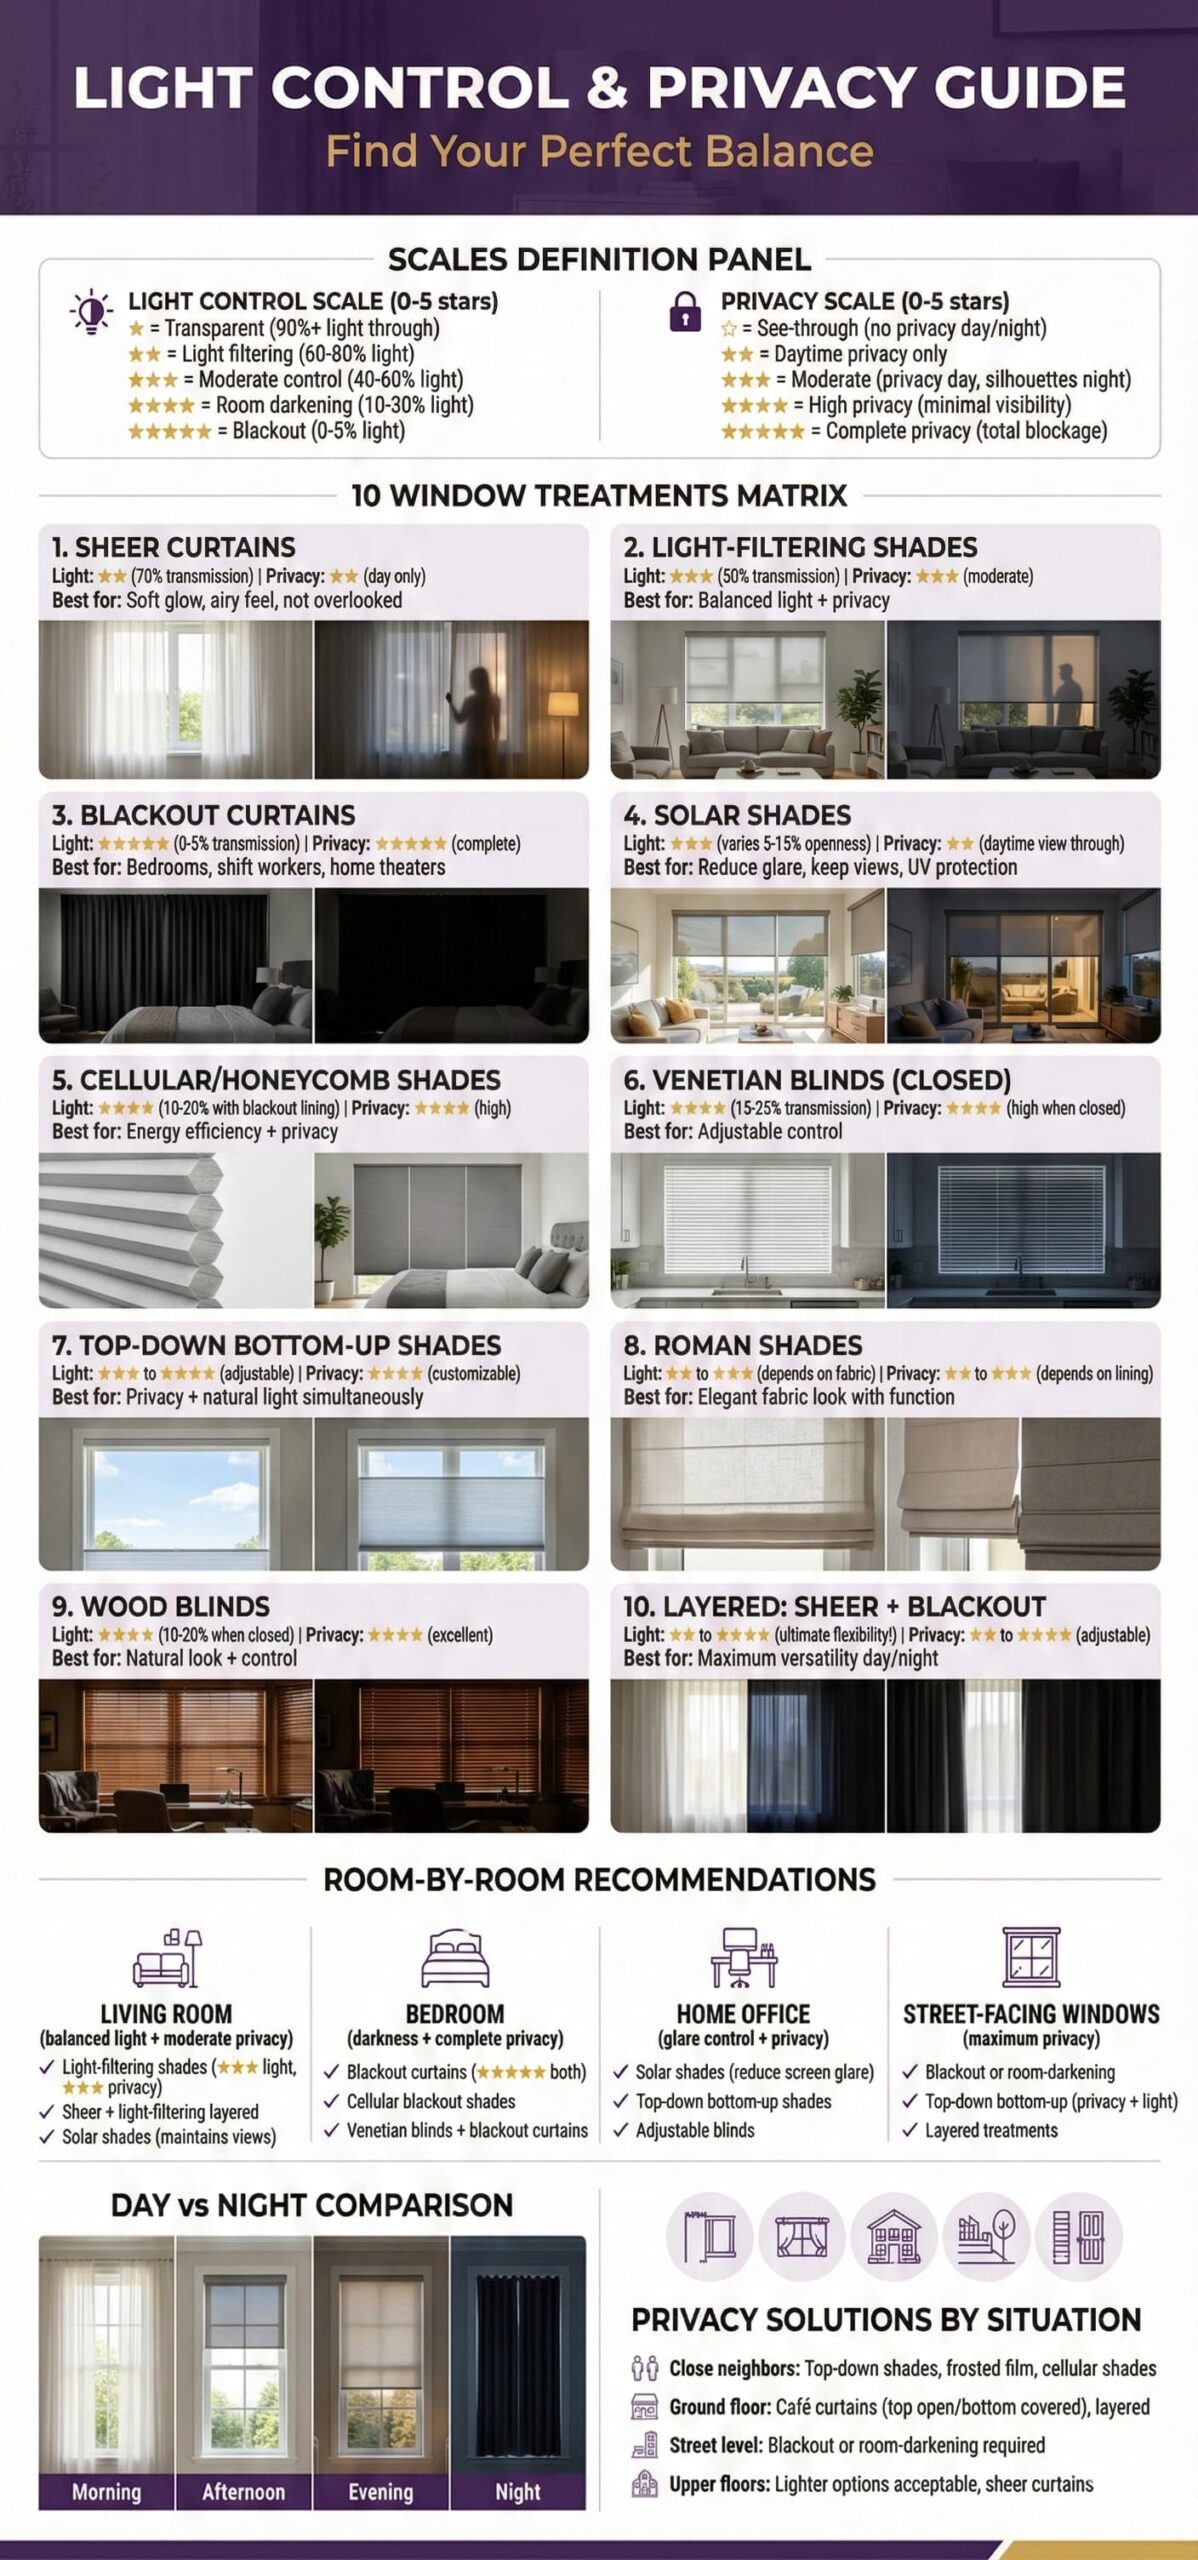
Light control in living rooms balances natural illumination benefits with glare management and heat gain reduction. Excessive uncontrolled sunlight creates uncomfortable glare on television screens, fades furniture and fabrics through UV exposure, and increases cooling costs during warm weather. Window treatments managing light levels maintain comfortable environments while preserving natural light benefits including mood enhancement, circadian rhythm regulation, and energy cost reduction from daytime natural illumination.
Glare management requires particular attention in living rooms with televisions or computer screens positioned near windows. Direct sunlight on screens creates washed-out images requiring increased screen brightness consuming more energy while causing viewer eye strain. Top-down shades lowering from window tops allow lower window views while blocking upper glare. Sheer curtains diffuse harsh direct sunlight creating softer ambient illumination without complete light blockage. Anti-glare treatments balance screen viewing quality with natural light admission.
UV protection preserves furniture, flooring, and artwork from sun-induced fading and deterioration. UV-blocking window films applied to glass block 99 percent UV radiation while maintaining transparency. Cellular shades, solar shades, and UV-protective fabrics reduce UV transmission protecting living room contents. South and west-facing windows require most aggressive UV protection due to direct sun exposure intensity and duration. UV damage occurs gradually over months and years making prevention superior to addressing damage after occurring.
⚠ PAIN POINT: My living room furniture and flooring are fading from sun exposure despite having window treatments
✓ SOLUTION: Install UV-blocking window film providing 99% UV protection while maintaining view and light transmission ($5-12 per square foot professionally installed or $1-3 per square foot DIY). Close window treatments during peak sun exposure hours (typically 10am-4pm). Rotate furniture and rugs periodically preventing uneven fading patterns. Use cellular shades or solar shades with UV-blocking properties rather than standard sheers offering minimal protection. Consider exterior solar screens or awnings blocking sunlight before entering windows providing superior heat gain and UV reduction compared to interior treatments.
Privacy patterns vary throughout day requiring flexible treatment control. Daytime privacy from street or neighbor views needs treatments allowing light while obscuring interior views. Nighttime privacy requires opaque treatments preventing interior illumination from revealing occupant activities. Sheer curtains provide adequate daytime privacy becoming transparent after dark when interior lights illuminate. Layered treatments combining sheers with heavier curtains or blinds address varied privacy requirements throughout day without choosing between light and privacy.
Seasonal considerations impact window treatment effectiveness and appropriateness. Summer months require heat gain reduction and glare management while winter months benefit from thermal insulation reducing heat loss through windows. Operable treatments allowing adjustment between seasons provide optimal year-round performance. Thermal cellular shades with honeycomb construction reduce heat transfer in both directions maintaining summer coolness and winter warmth. Living room comfort and energy efficiency improve significantly through proper seasonal window treatment management.
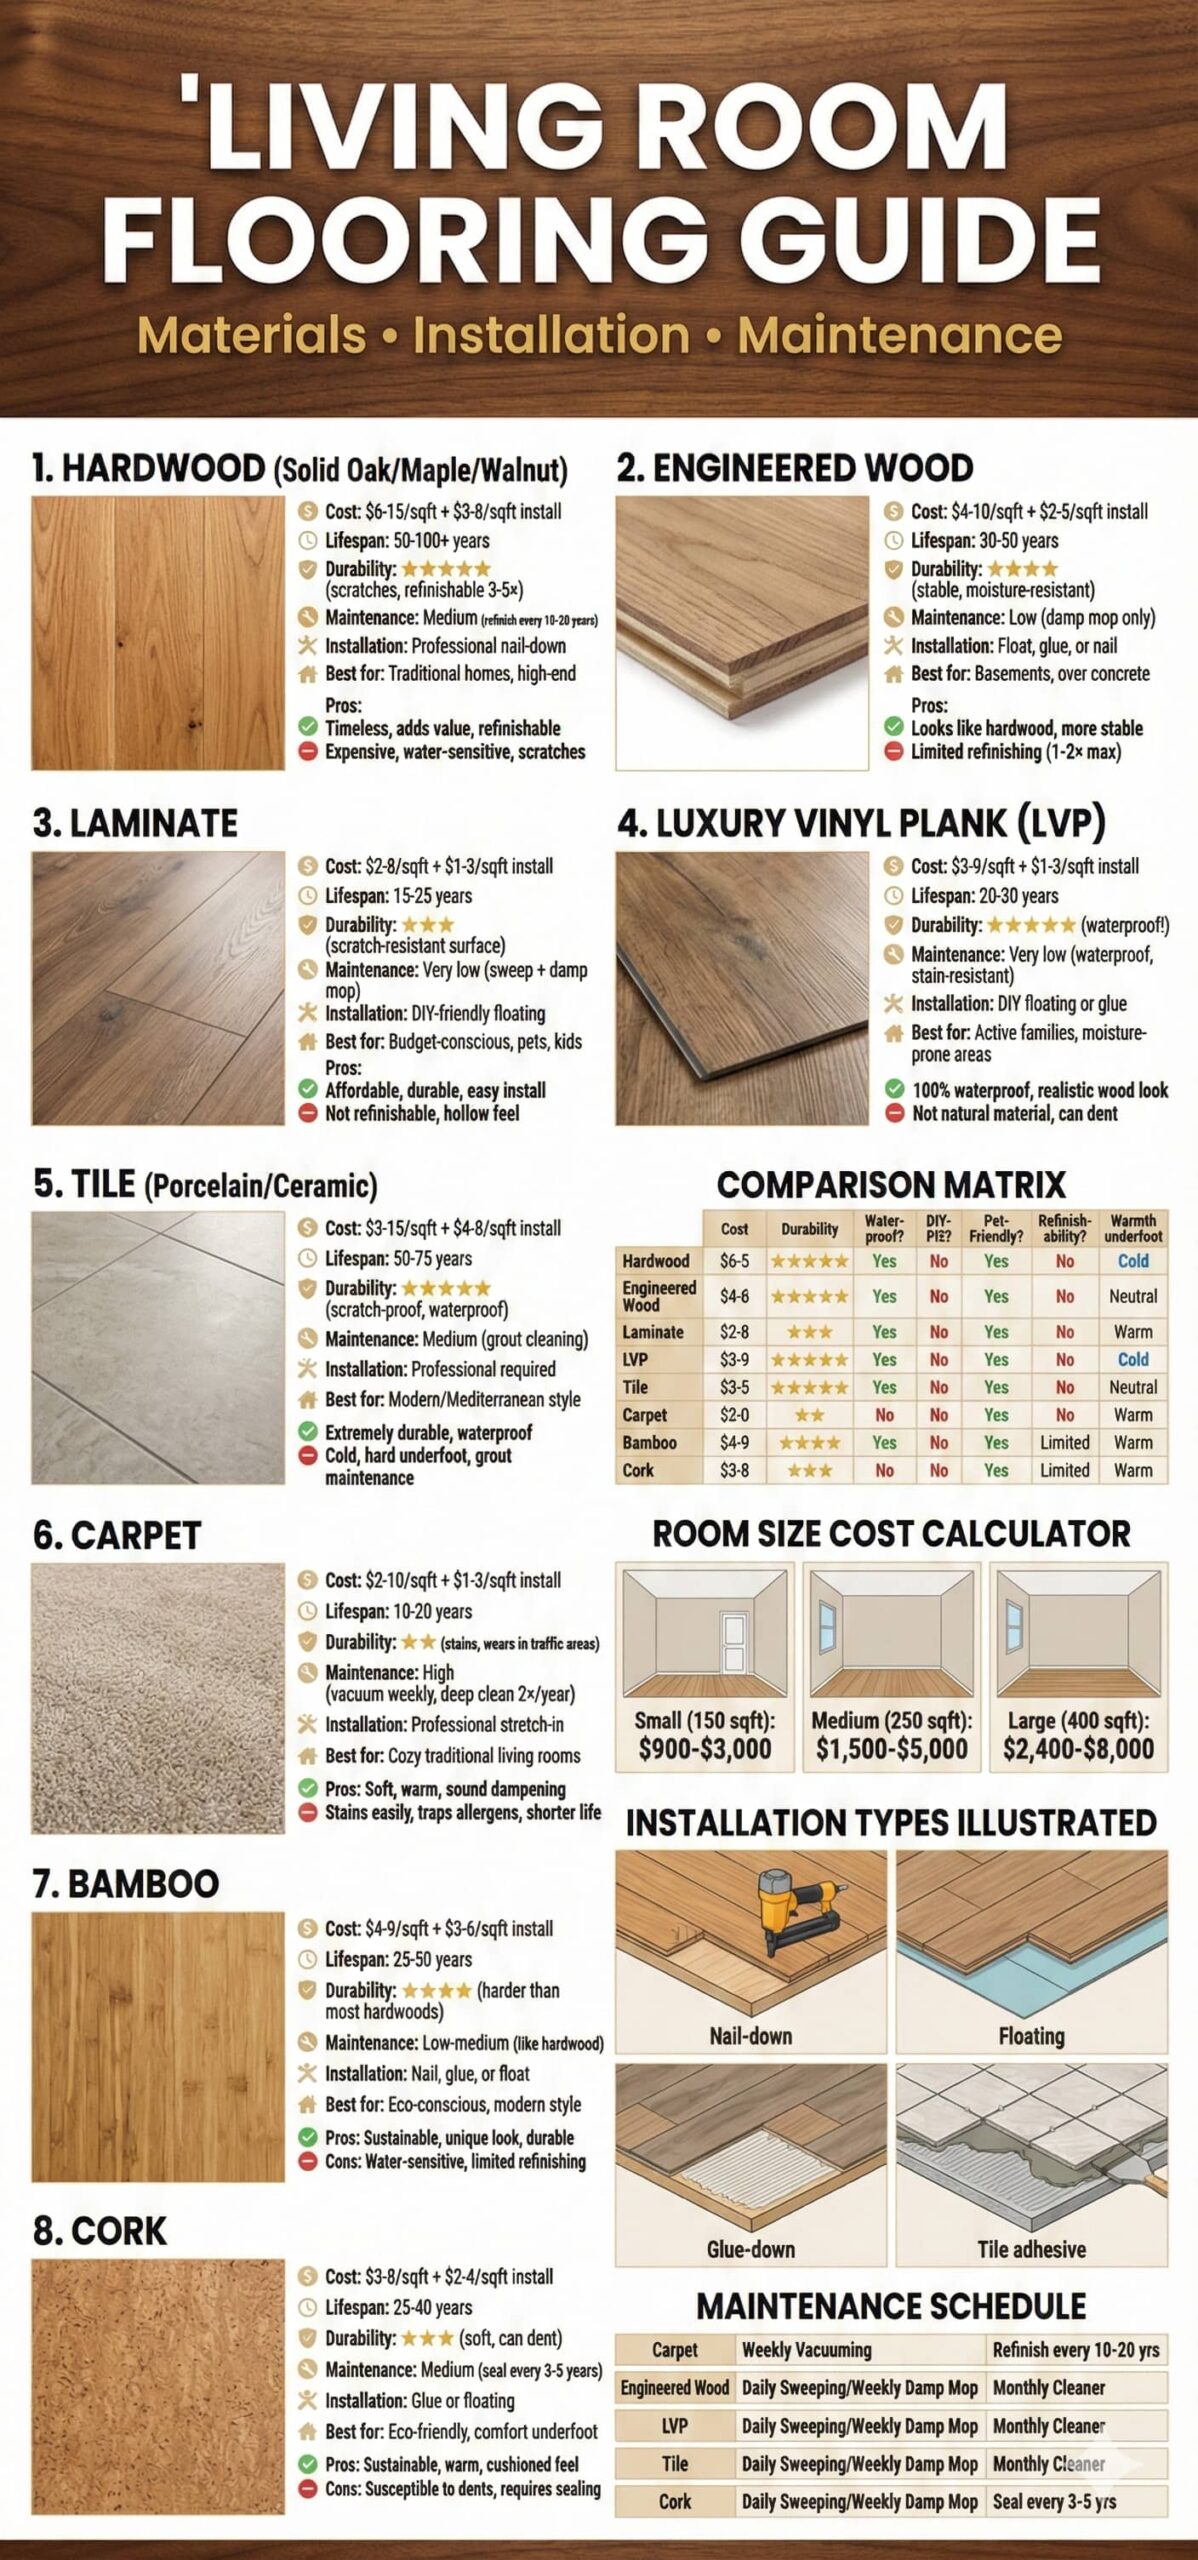
Professional flooring selection follows industry standards and material specifications. Living room flooring establishes foundational design element impacting aesthetics, comfort, durability, and maintenance requirements. Flooring selection should balance visual preferences with practical considerations including foot traffic levels, furniture weight, pet presence, and cleaning tolerance. Flooring materials range from traditional hardwood to contemporary luxury vinyl offering varied characteristics, costs, and performance attributes requiring informed evaluation before installation commitment.
Flooring costs vary dramatically from budget vinyl planks ($1-3 per square foot) to premium hardwood ($8-15+ per square foot) requiring careful budget allocation. Average living room measuring 300 square feet requires $300-4,500+ flooring investment depending on material selection. Installation costs add 30-100 percent to material costs depending on complexity – simple floating floors install DIY while hardwood requires professional installation. Flooring investment represents substantial financial commitment justifying careful selection ensuring long-term satisfaction.
Underfoot comfort impacts daily use satisfaction particularly in living rooms where occupants frequently walk barefoot or sit on floors. Hard surfaces including tile and hardwood feel cold and hard while carpet and cork provide cushioned warmth. Area rugs over hard flooring combine easy-clean benefits with localized comfort and sound dampening. Living room flooring should balance practical cleaning and durability advantages of hard surfaces with comfort preferences for softer warmer alternatives.
⚠ PAIN POINT: I installed beautiful expensive flooring that shows every scratch, stain, and imperfection making me regret the investment
✓ SOLUTION: Select flooring with appropriate durability for actual household use patterns – homes with dogs, children, or heavy traffic require commercial-grade durability ratings. Choose medium-toned wood or floors with distressed finishes concealing scratches better than glossy dark or very light floors showing every imperfection. Install area rugs in high-traffic paths protecting flooring from wear. Implement entry mat systems capturing dirt and moisture before tracking onto flooring. Maintain floors properly using appropriate cleaning products and techniques preventing damage from improper care. Accept that all flooring shows use over time – perfection expectations create ongoing frustration.
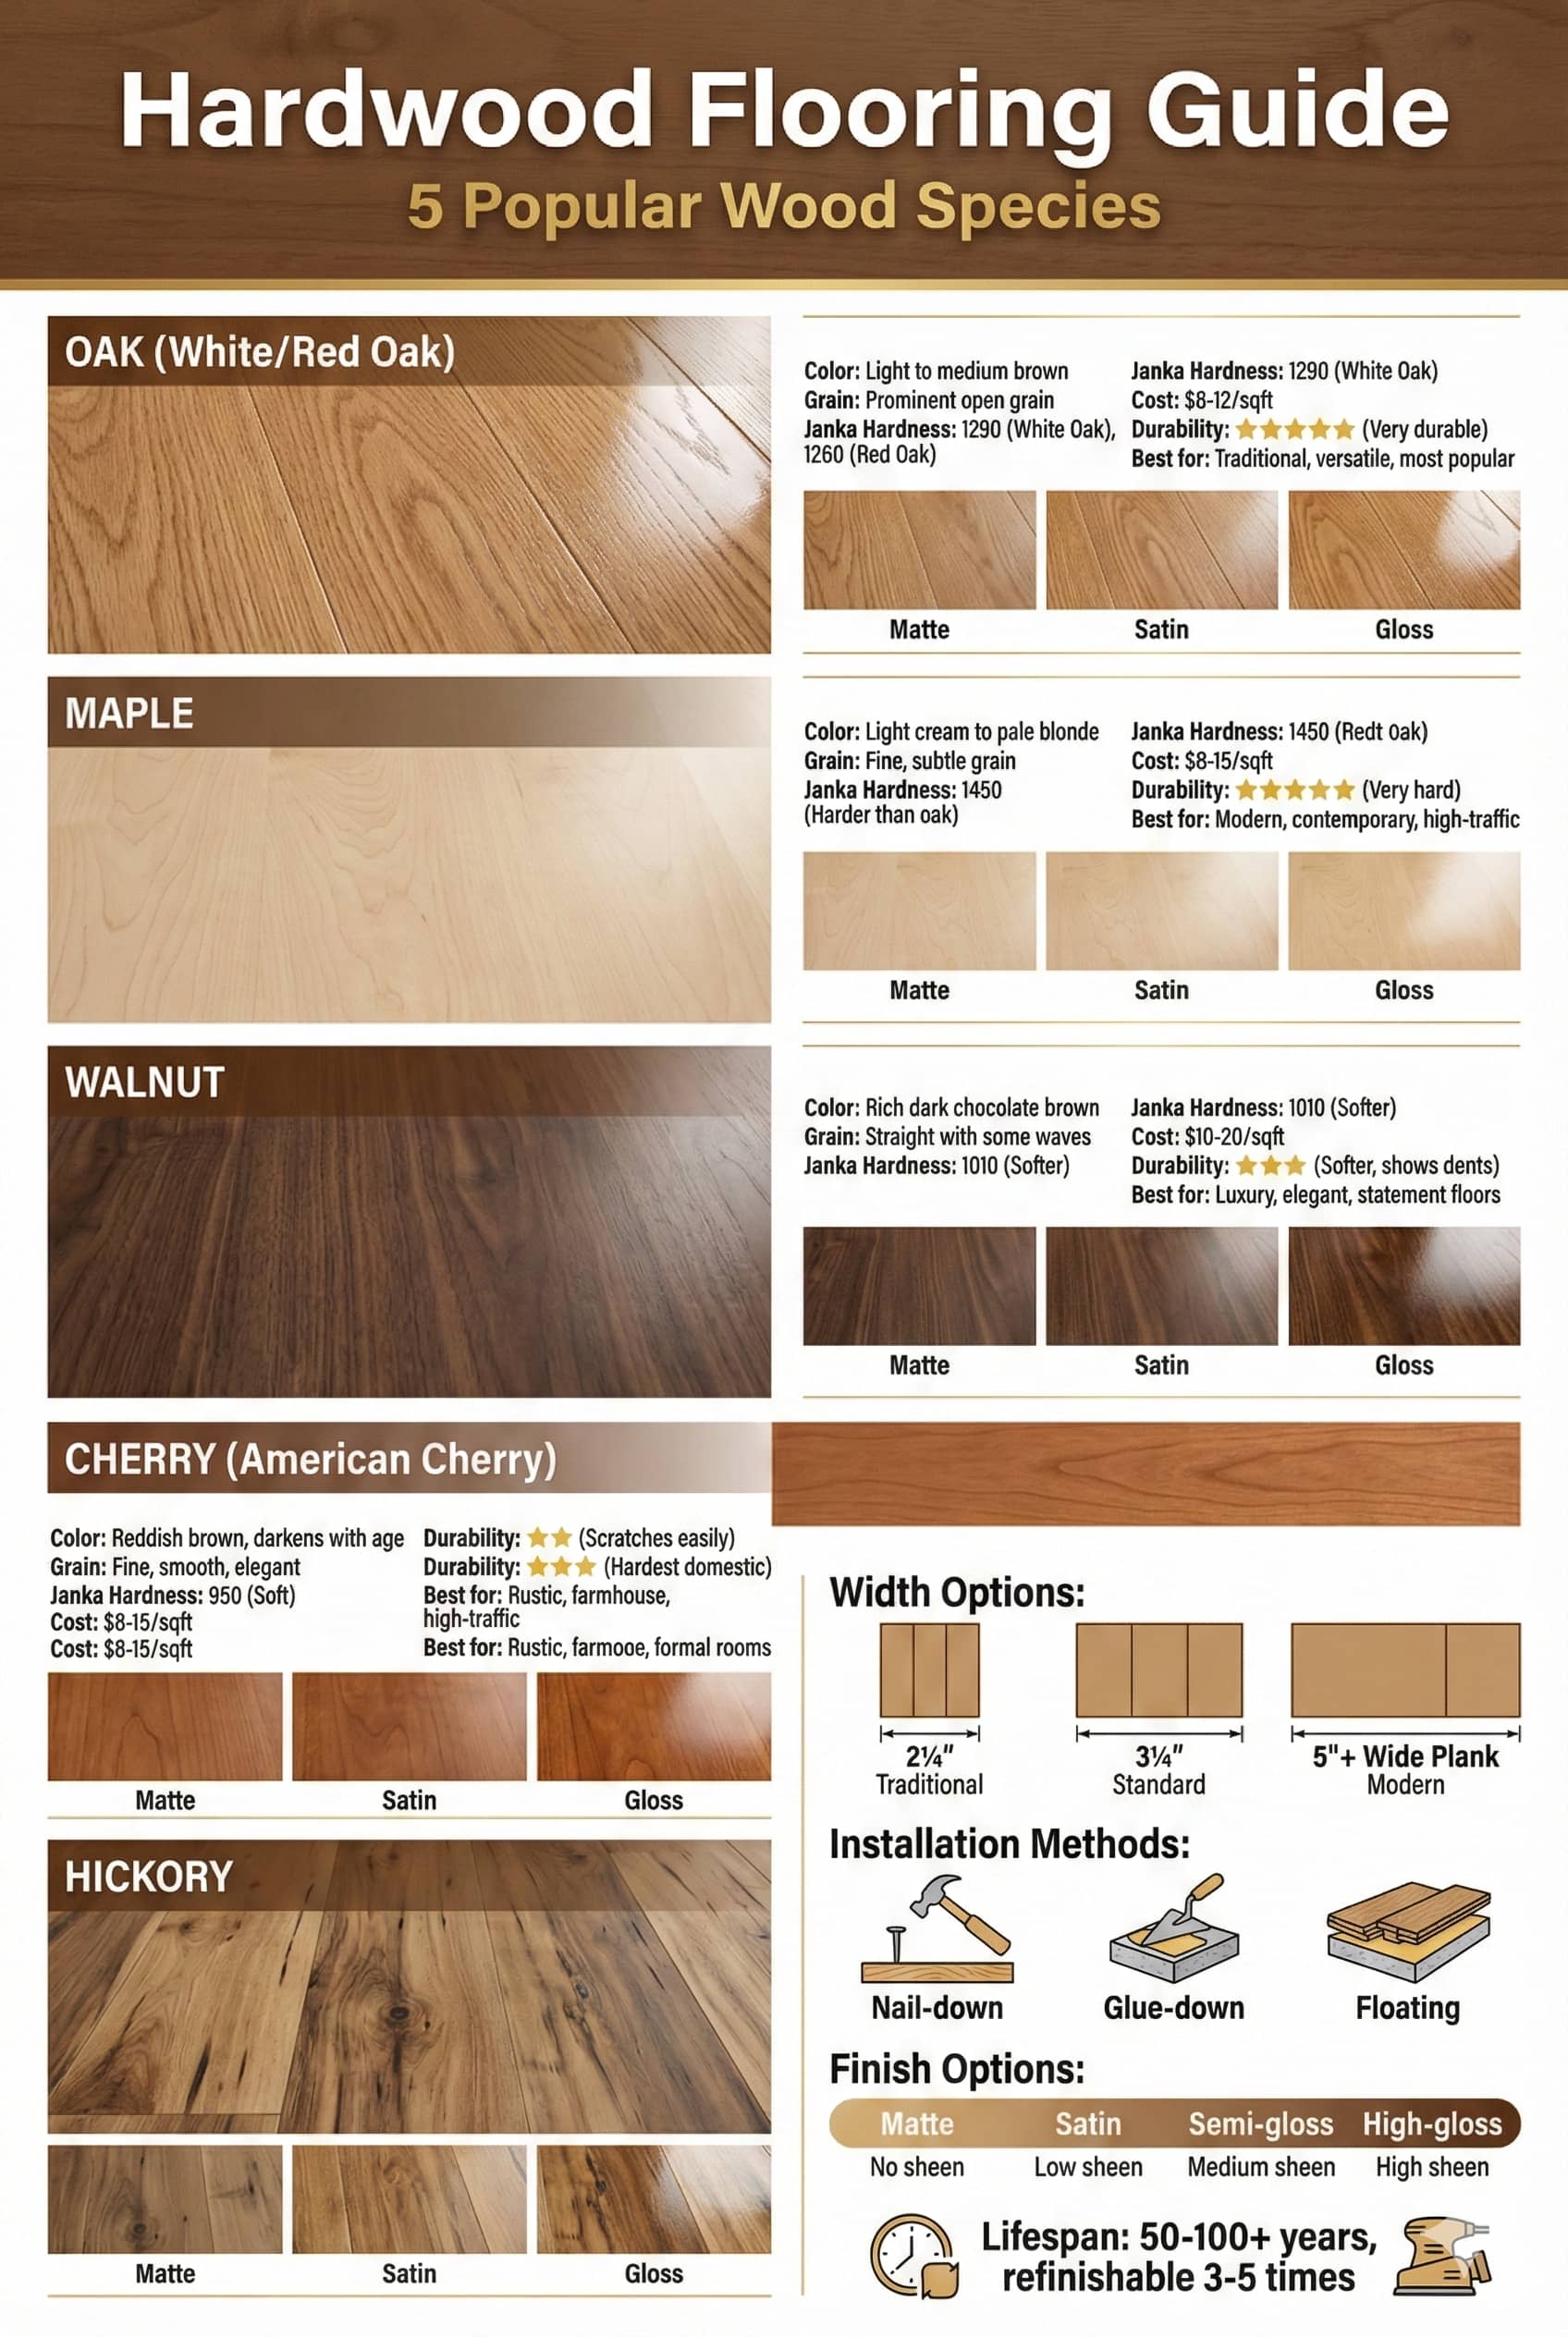
Hardwood flooring remains premium living room flooring choice offering timeless aesthetic appeal, excellent durability (lasting 50-100+ years with proper care), and property value enhancement. Solid hardwood manufactured from single wood pieces measures 3/4 inch thick allowing multiple refinishing opportunities restoring appearance as needed. Species including oak, maple, hickory, walnut, and cherry offer varied grain patterns, hardness levels, and color characteristics accommodating aesthetic preferences.
Wood hardness measured on Janka scale indicates scratch and dent resistance – higher numbers indicate harder more durable woods. Red oak measures 1290 Janka (industry standard), Brazilian cherry reaches 2350 (very hard), while pine measures only 690 (soft, not recommended for high-traffic areas). Living room foot traffic levels require minimum 1000 Janka hardness for adequate durability though higher hardness provides superior long-term performance resisting wear and damage.
Hardwood finish types impact appearance, durability, and maintenance requirements. Polyurethane finishes (water-based or oil-based) create durable protective surfaces resisting staining and moisture. Oil-finished woods display natural appearance but require more frequent maintenance. Prefinished hardwood arrives with factory-applied finishes ensuring consistent quality while site-finished floors allow custom color matching and seamless appearance. Hardwood maintenance requires regular sweeping/vacuuming, periodic damp mopping with appropriate cleaners, and occasional refinishing (every 7-10 years) restoring appearance.
⚠ PAIN POINT: My hardwood floors are scratched, dull, and water-damaged despite expensive installation
✓ SOLUTION: Use felt pads under all furniture legs preventing scratches during movement. Place mats at exterior doors capturing dirt and moisture before tracking onto floors. Never wet mop hardwood – use damp (not dripping) microfiber mops with hardwood-specific cleaners. Refinish floors every 7-10 years or when finish shows wear rather than waiting for wood damage requiring complete replacement. Maintain consistent humidity levels (30-50%) preventing wood expansion/contraction causing gaps or cupping. Address water spills immediately preventing moisture penetration damaging wood. Accept that hardwood ages gracefully – some patina and character acceptable rather than demanding perfection.
Hardwood plank widths range from traditional 2-1/4 inches to contemporary wide planks measuring 5-7 inches. Narrow planks create traditional formal appearances while wide planks provide contemporary dramatic presentations. Wider planks expand and contract more with humidity variations potentially creating larger seasonal gaps. Living room scale impacts appropriate plank width – small rooms suit narrow to medium widths (2-4 inches) while large rooms fit wide planks (5-7 inches) without overwhelming space.
Red Oak | 1290 | Light to medium brown | $5-10 | Traditional to contemporary |
White Oak | 1360 | Light gray-brown | $6-12 | Contemporary, transitional |
Maple | 1450 | Light cream to tan | $6-12 | Contemporary, high-traffic |
Hickory | 1820 | Tan with dark streaks | $7-14 | Rustic, farmhouse, high-traffic |
Brazilian Cherry | 2350 | Deep reddish-brown | $8-16 | Formal traditional |
Walnut | 1010 | Dark chocolate brown | $8-15 | Contemporary luxury |
Bamboo (strand-woven) | 3000+ | Honey to espresso | $4-8 | Sustainable, contemporary |
Hardwood acclimation requires storing flooring in installation room for 3-7 days before installation allowing wood moisture content to equilibrate with ambient conditions preventing post-installation expansion or contraction issues. Professional installation costs $3-8 per square foot depending on installation complexity and geographic location. Hardwood installation requires skilled execution ensuring proper subfloor preparation, appropriate expansion gaps, and correct nail spacing supporting decades of performance.
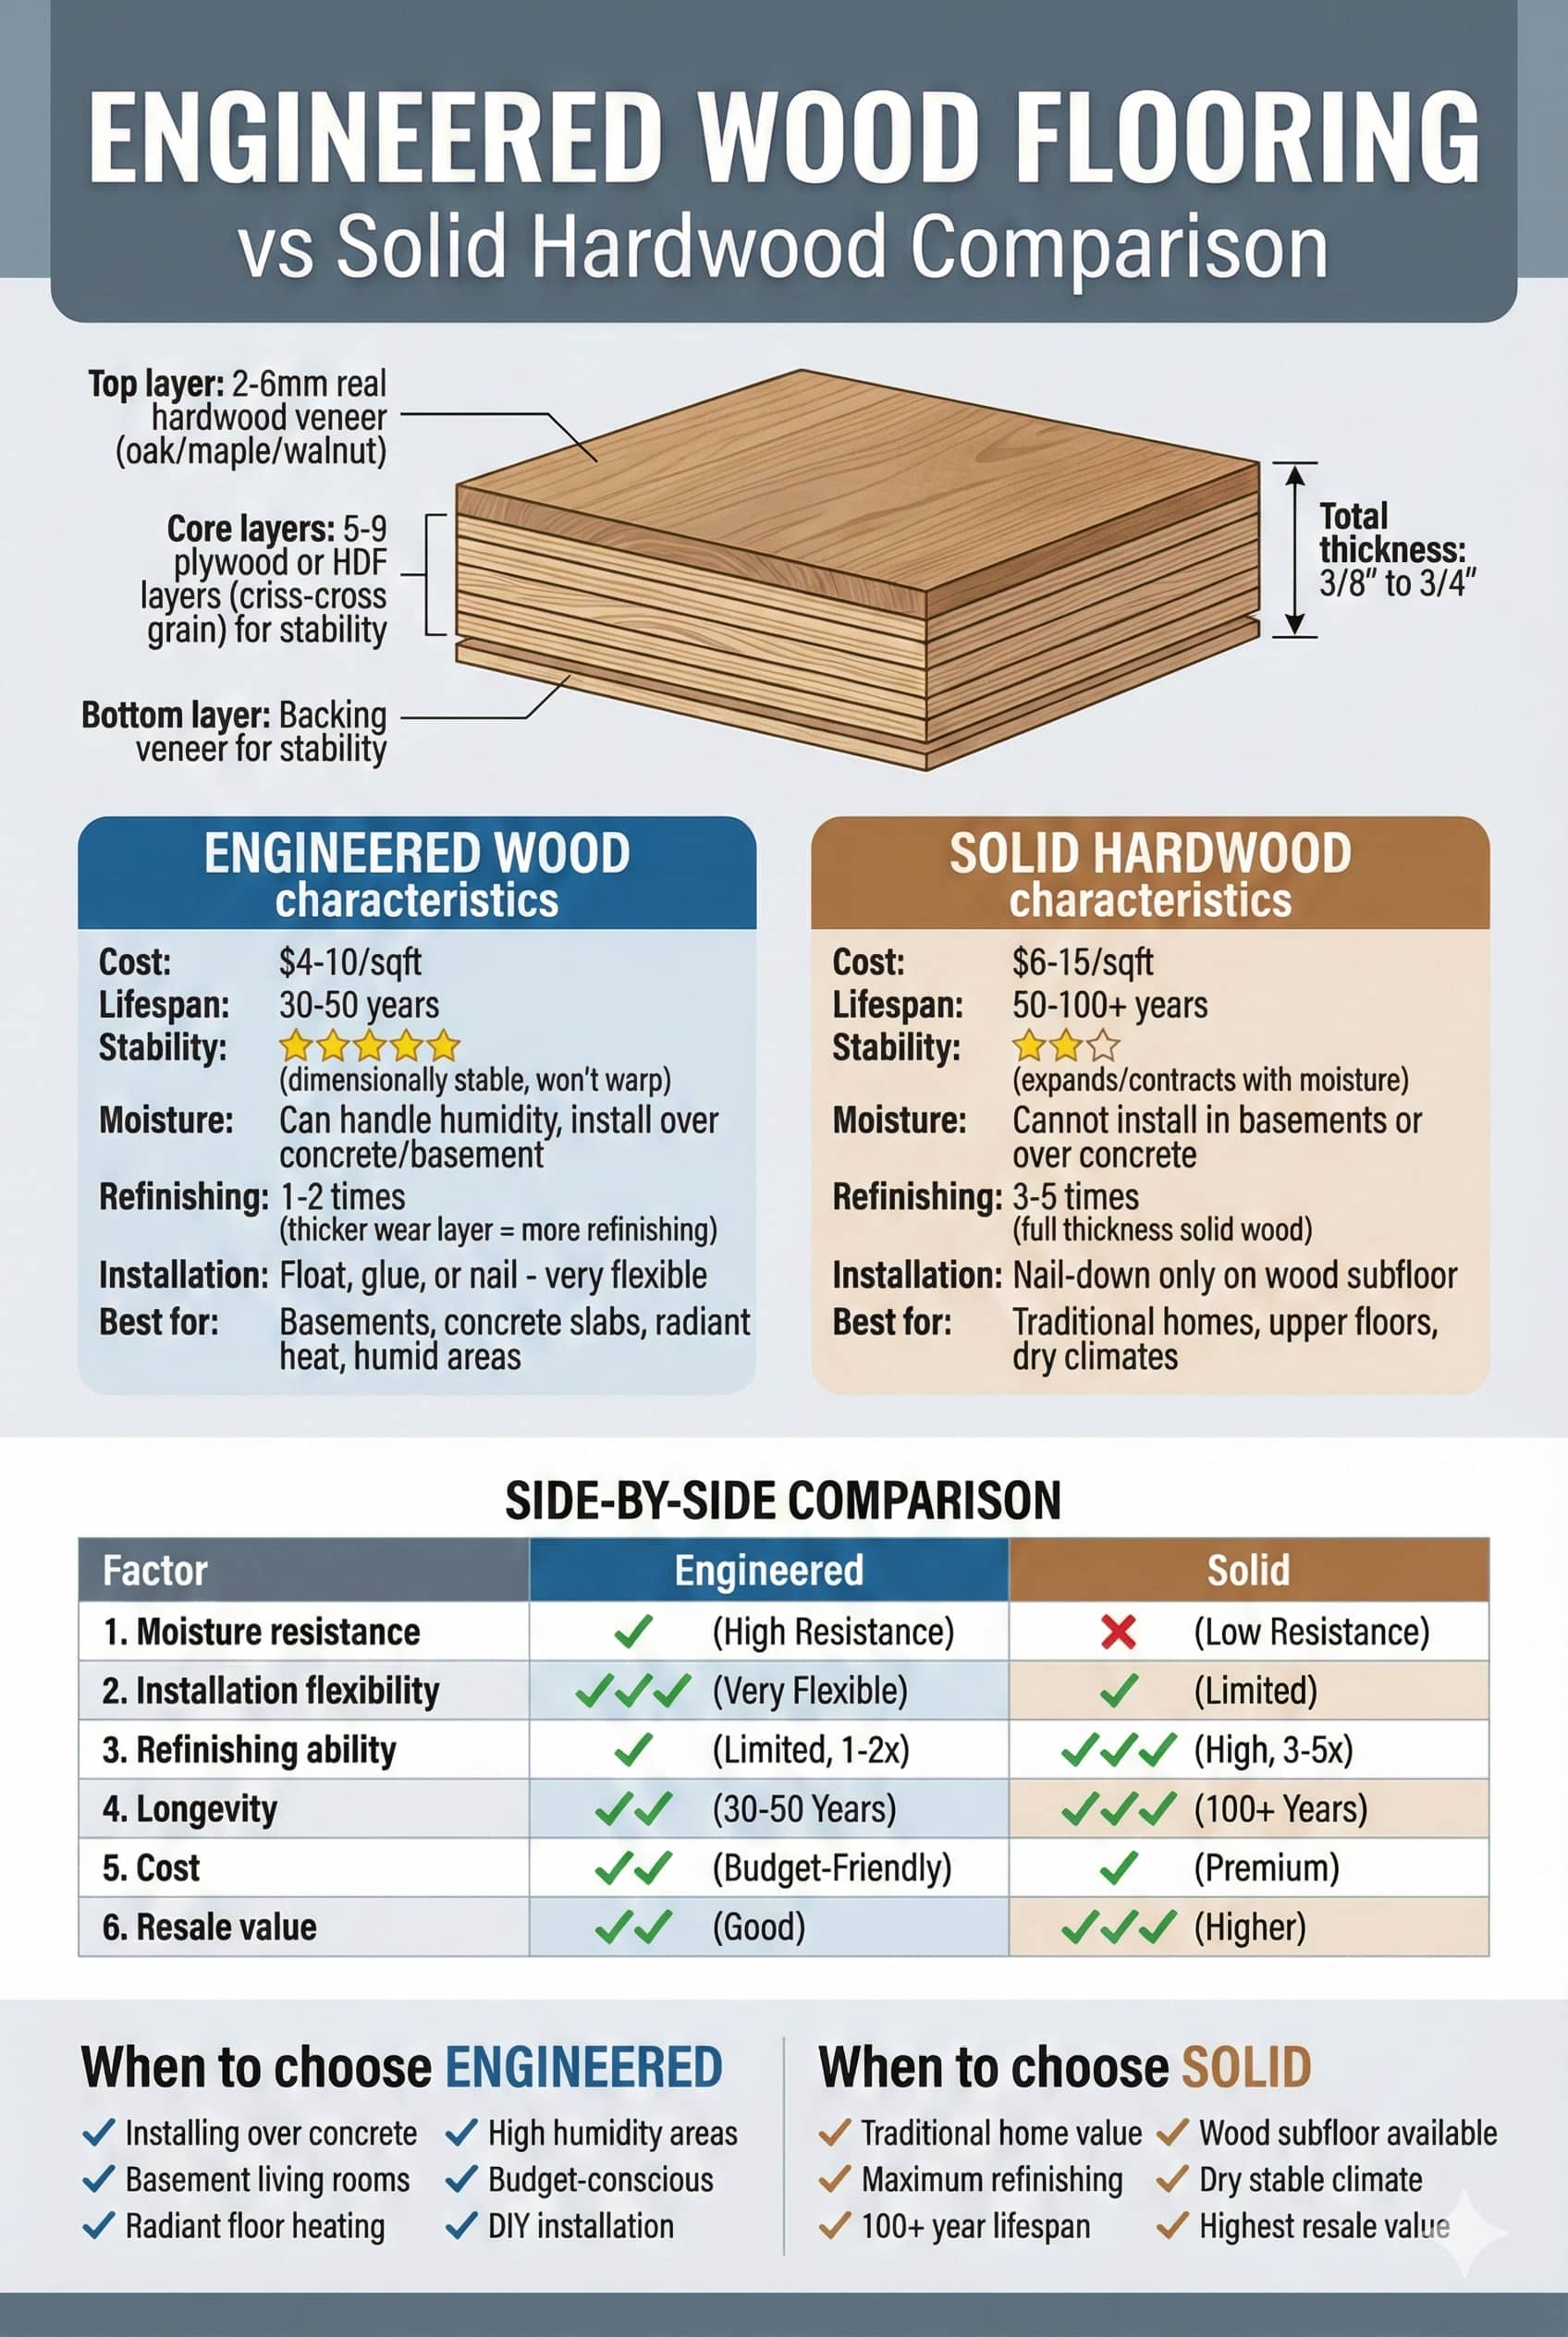
Engineered wood flooring provides hardwood aesthetic with enhanced dimensional stability and installation versatility. These products feature thin real wood veneer surfaces (2-6mm) bonded to plywood or high-density fiberboard cores creating stable flooring suitable for basement installations or over radiant heating where solid hardwood fails. Engineered flooring costs $3-10 per square foot offering hardwood appearance at reduced expense with improved moisture resistance.
Construction quality varies dramatically across engineered wood products – premium products feature thick wear layers (4-6mm) allowing refinishing while budget products with thin veneers (2-3mm) cannot refinish and must replace when worn. Core material quality impacts stability and durability – higher-density cores resist compression better than low-density alternatives. Engineered wood quality correlates strongly with price – budget options ($3-5/sq ft) sacrifice longevity while premium versions ($8-12/sq ft) approach solid hardwood performance.
Installation methods for engineered wood include floating installations (planks click together without adhesive), glue-down applications, or nail-down methods matching solid hardwood techniques. Floating installations suit DIY projects and allow easy future replacement while glue-down provides permanent stable installation preventing movement. Living room installations typically employ floating or glue-down methods depending on subfloor conditions and homeowner preferences.
⚠ PAIN POINT: My engineered wood flooring looks cheap and artificial compared to real hardwood
✓ SOLUTION: Select engineered products with thick wear layers (4mm+) displaying real wood variation and grain rather than photographic reproductions. Choose wire-brushed or hand-scraped textures providing authentic wood tactile feel and appearance. Avoid perfectly uniform colors or overly glossy finishes appearing artificial. Invest in quality products ($7-12 per square foot) with superior veneer quality and natural variation. Install properly ensuring planks fit tightly without visible seams or gaps. Consider site-finished engineered wood allowing custom staining creating seamless premium appearance matching solid hardwood aesthetics.
Moisture resistance advantages of engineered wood allow installation in basements, over concrete slabs, or over radiant heating systems where solid hardwood performs poorly. Plywood or HDF cores resist moisture-induced expansion better than solid wood maintaining dimensional stability. But engineered wood still requires avoiding standing water and maintaining appropriate humidity levels. Basement living rooms or spaces over concrete benefit substantially from engineered wood stability advantages over solid hardwood.
Wear Layer Thickness | 2-3mm (cannot refinish) | 3-4mm (limited refinishing) | 4-6mm (multiple refinishing) |
Core Material | Low-density HDF | Medium-density plywood | High-density plywood |
Number of Layers | 3-5 layers | 5-7 layers | 7-11 layers |
Cost per Square Foot | $3-5 | $5-8 | $8-12 |
Expected Lifespan | 15-25 years | 25-40 years | 40-70 years |
Installation Method | Floating only | Floating or glue-down | Any method |
Moisture Resistance | Moderate | Good | Excellent |
Refinishing limitations restrict engineered wood to 0-3 refinishing opportunities depending on wear layer thickness compared to 5-10+ refinishings possible with solid hardwood. Once wear layer sands through to core, flooring requires complete replacement. Engineered wood suitability depends on long-term expectations – homeowners planning 15-30 year occupancy before replacement find engineered wood adequate while those wanting multi-generational flooring should select solid hardwood or premium thick-veneer engineered products.
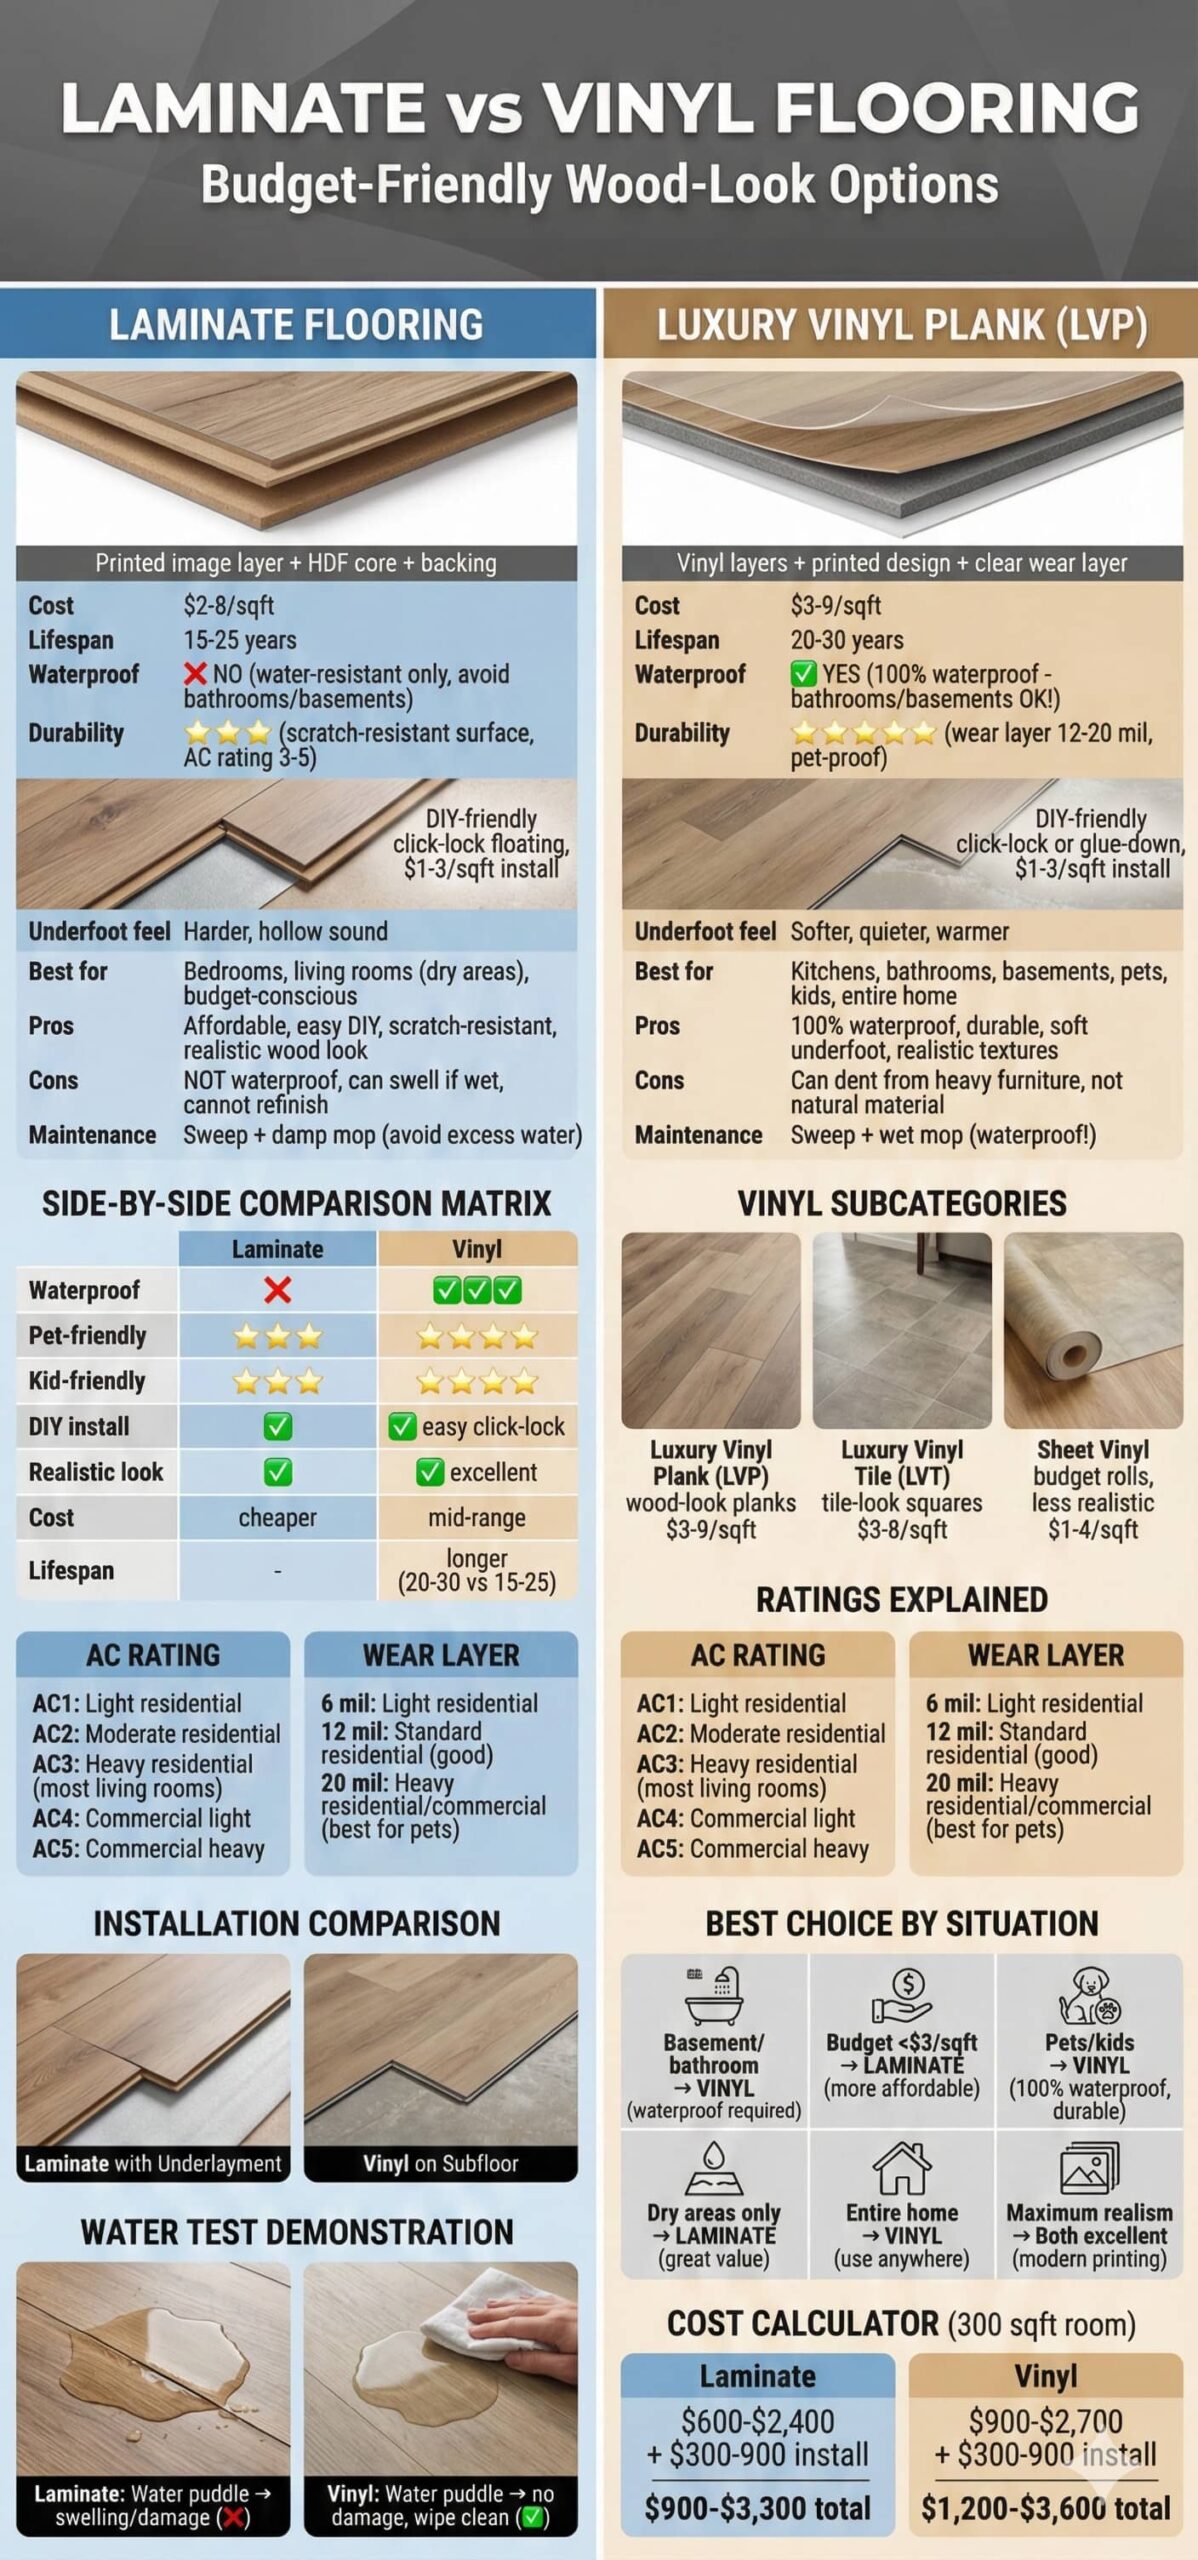
Laminate flooring provides affordable wood-look alternative featuring photographic images of wood grain beneath protective wear layers. These synthetic floors cost $1-5 per square foot offering budget-friendly solutions for living rooms requiring attractive appearance without hardwood investment. Laminate planks install as floating floors clicking together without adhesives allowing DIY installation and easy future replacement.
Laminate durability depends on AC (Abrasion Criteria) rating indicating wear resistance. AC3 rating suits residential moderate traffic including living rooms, AC4 handles heavy residential or light commercial traffic, while AC5 survives commercial heavy traffic. Higher AC ratings cost more but provide superior scratch resistance and longer lifespan. Living room installations require minimum AC3 rating though AC4 provides extra durability margin particularly for households with pets or children.
Luxury vinyl plank (LVP) and luxury vinyl tile (LVT) provide contemporary flooring alternatives combining affordability, durability, water resistance, and design versatility. These products feature photographic images or printed textures beneath protective wear layers creating realistic wood or stone appearances. LVP flooring costs $2-7 per square foot offering easy maintenance, warm underfoot feel, and complete water resistance suitable for any residential application including basements.
⚠ PAIN POINT: My laminate or vinyl flooring looks fake and cheap despite manufacturer claims of authentic wood appearance
✓ SOLUTION: Select premium products ($4-7 per square foot) featuring realistic embossed textures matching printed wood grain rather than smooth flat surfaces with printed images. Choose products with varied plank lengths and multiple color variations rather than repeating identical planks. Install properly ensuring tight seams without gaps or height variations. Add quality transitions at doorways and edges preventing hollow appearance. Consider rigid core LVP providing superior stability and premium feel over flexible vinyl. Accept laminate/vinyl limitations – these products mimic wood appearance but cannot replicate authentic wood characteristics completely.
Vinyl advantages include complete water resistance (unlike laminate damaged by moisture), warmer underfoot feel, and quieter walking sound compared to laminate’s hollow clacking. Modern rigid core vinyl constructs provide dimensional stability preventing indentations from furniture while maintaining water resistance throughout product thickness. LVP flooring represents excellent value combining attractive appearance, easy maintenance, durability, and affordability in single package suitable for most residential living room applications.
Budget Laminate | $1-2 | Poor (swells when wet) | AC1-AC2 | Floating click-lock |
Standard Laminate | $2-4 | Poor | AC3-AC4 | Floating click-lock |
Premium Laminate | $4-6 | Moderate (water-resistant) | AC4-AC5 | Floating click-lock |
Standard LVP | $2-4 | Excellent (100% waterproof) | Residential grade | Floating click-lock |
Rigid Core LVP | $3-5 | Excellent | Residential-commercial | Floating click-lock |
Premium LVP | $5-8 | Excellent | Heavy commercial | Floating or glue-down |
Luxury LVT | $4-7 | Excellent | Commercial grade | Glue-down |
Maintenance simplicity makes laminate and vinyl attractive for busy households – regular sweeping/vacuuming plus damp mopping maintains appearance without specialized products or refinishing. These surfaces resist staining better than hardwood and tolerate water exposure during cleaning (vinyl completely, laminate moderately). Living room flooring subjected to food spills, beverage spills, and pet accidents benefits from vinyl’s complete moisture resistance and easy cleanup requirements.
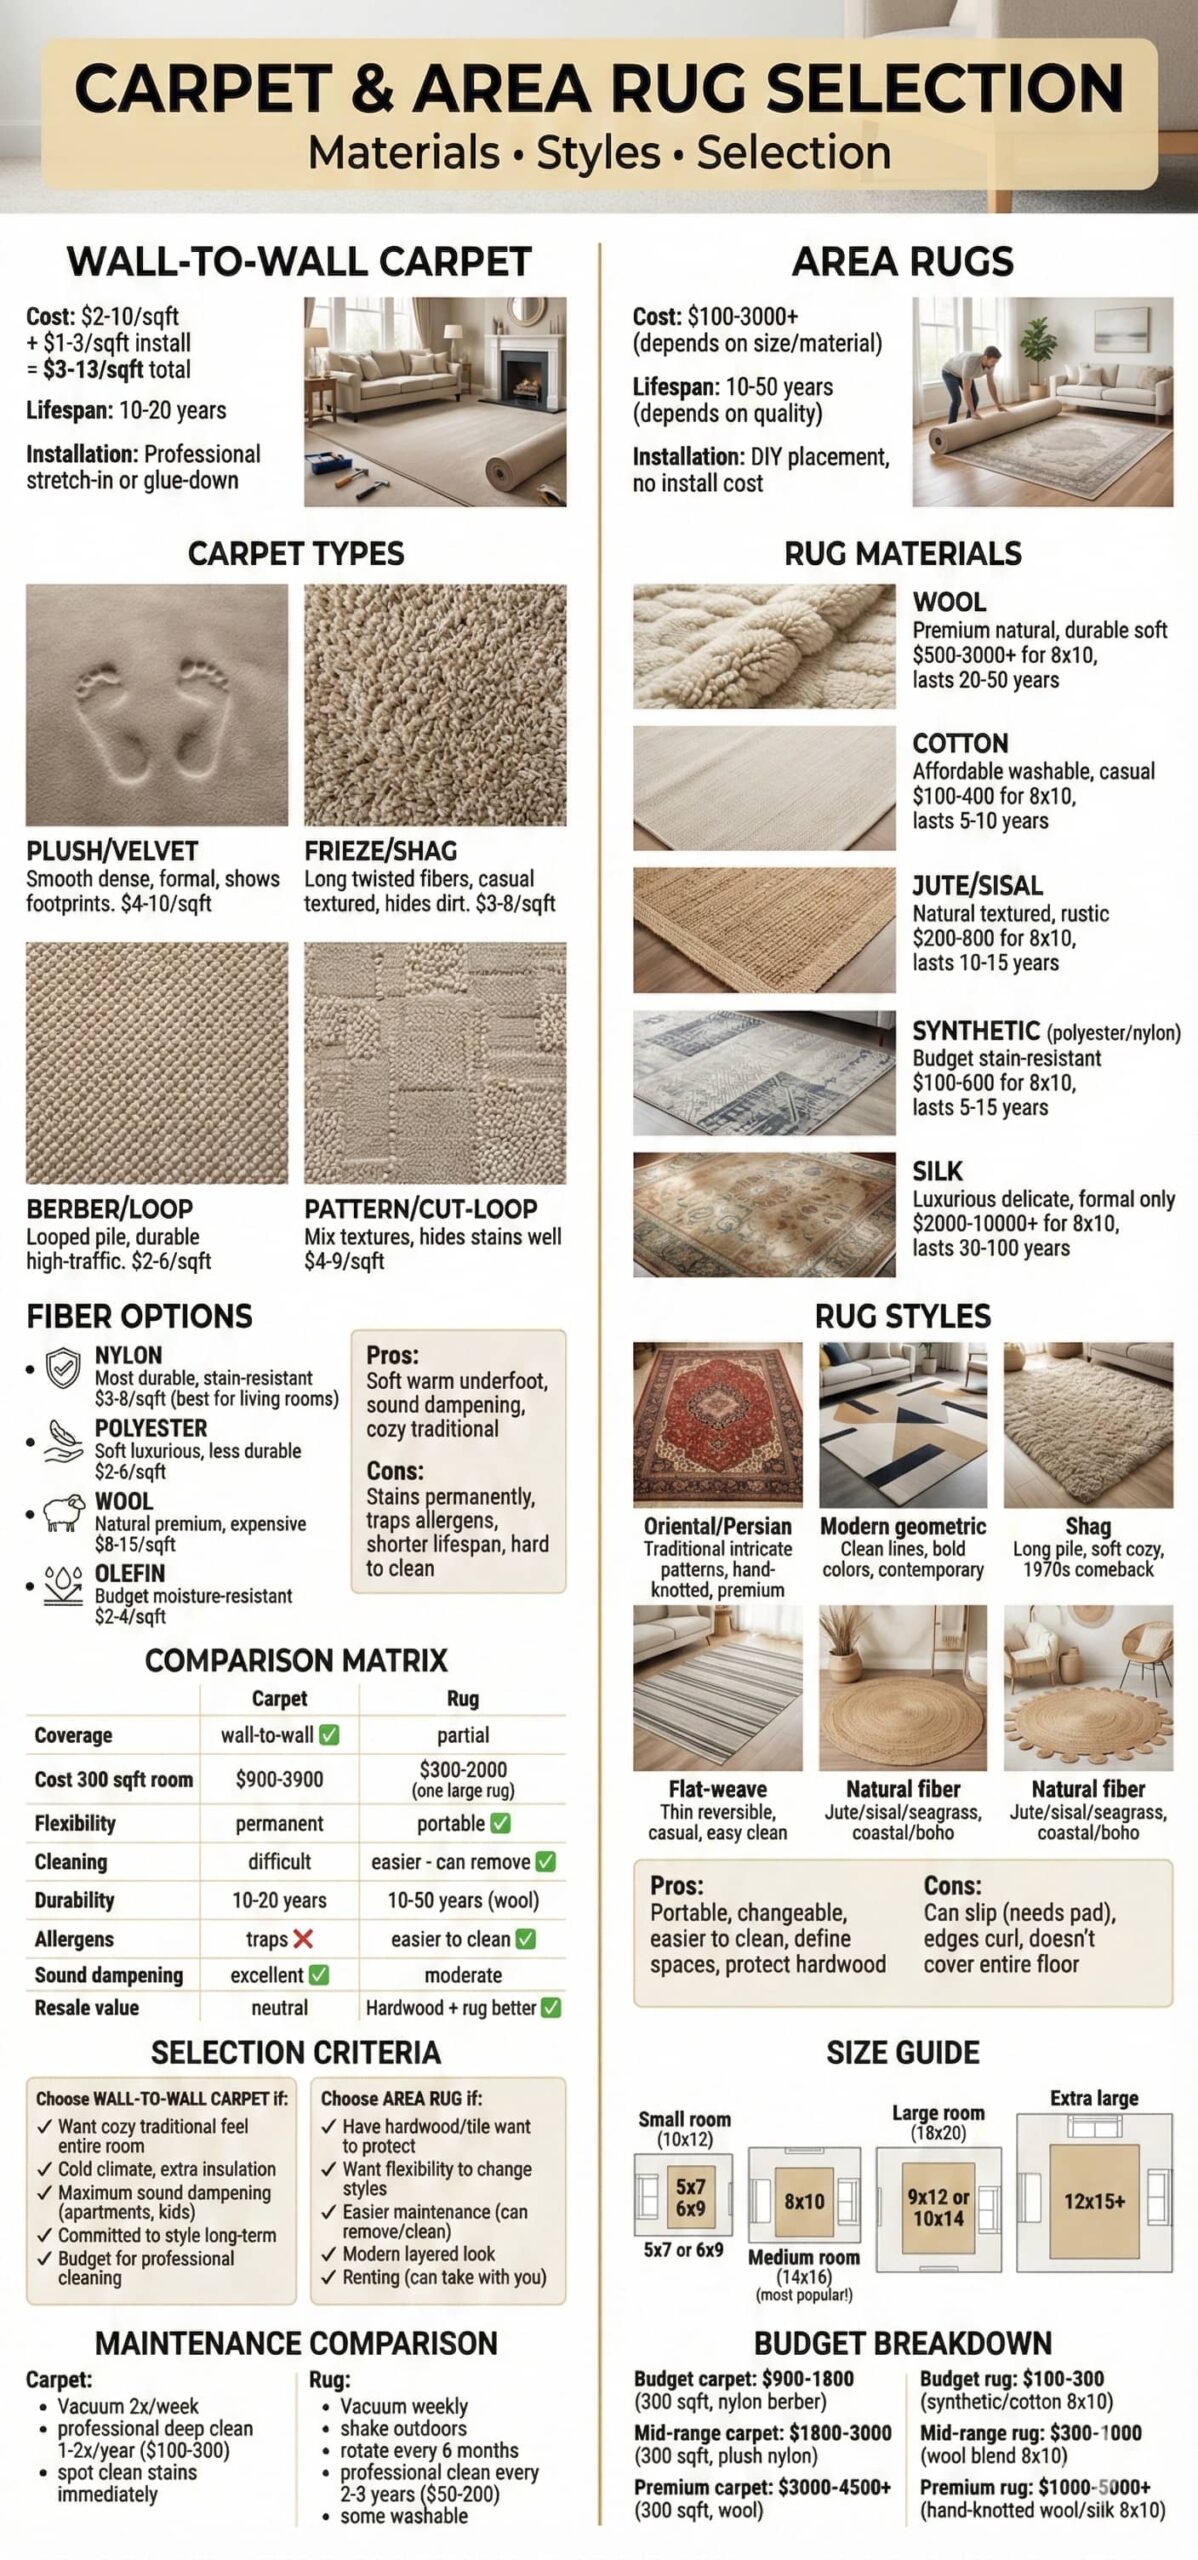
Carpet flooring provides soft warm comfortable living room surfaces ideal for barefoot walking, floor sitting, and toddler play areas. Wall-to-wall carpet costs $2-8 per square foot installed offering affordability, sound dampening, fall cushioning, and warmth. But carpet requires regular vacuuming, professional cleaning every 12-18 months, shows staining readily, and traps allergens concerning for allergy sufferers. Modern living room trends favor hard flooring with area rugs rather than full carpet allowing flexibility and easier maintenance.
Carpet fiber types include nylon (most durable, stain resistant, expensive), polyester (soft, affordable, stains easily), olefin/polypropylene (budget, indoor-outdoor rated, less soft), and wool (natural, luxurious, expensive, requires professional cleaning). Living room carpet subjected to moderate traffic performs best in nylon or nylon blends providing durability and cleanability. Budget polyester carpets show wear patterns within 5-7 years while quality nylon lasts 10-15+ years.
Area rugs over hard flooring provide localized softness, warmth, sound dampening, and decorative impact without wall-to-wall commitment. Rugs allow easy replacement updating aesthetics without flooring reinstallation. Living room rugs anchor furniture groupings, define functional zones, add color and pattern, and protect flooring from furniture wear. Rug sizing should fit furniture with front furniture legs on rug or all furniture legs on rug rather than rugs floating in space with no furniture contact.
⚠ PAIN POINT: My area rug slides around constantly requiring repositioning multiple times daily
✓ SOLUTION: Install rug pad beneath rugs providing grip preventing sliding while adding cushioning and protecting flooring. Quality rug pads cost $0.50-2 per square foot providing grip on both sides. Select felt-rubber hybrid pads for hard flooring or natural rubber pads for carpet. Cut pads 2 inches smaller than rugs on all sides keeping pads invisible beneath rug edges. Replace rug pads every 3-5 years as grip effectiveness deteriorates. Use double-sided carpet tape at rug corners on particularly problematic rugs. Avoid cheap thin pads lacking effective grip – proper rug pads justify investment through improved functionality.
Rug placement rules for living rooms recommend sizing accommodating furniture appropriately. Common living room rug size is 8×10 feet though 9×12 feet suits larger spaces and 6×9 feet works in compact areas. Sofa and chair front legs should rest on rug defining conversation area cohesively. Alternative placement positions all furniture legs on rug creating comprehensive furniture island. Avoid floating rugs with no furniture contact appearing disconnected from furniture arrangement.
5×8 feet | Small rooms (150-200 sq ft) | Front legs only | $80-400 |
6×9 feet | Small-medium rooms (200-250 sq ft) | Front legs only | $150-600 |
8×10 feet | Medium rooms (250-350 sq ft) | Front legs or all legs | $250-1,200 |
9×12 feet | Large rooms (350-450 sq ft) | All furniture legs | $350-2,000 |
10×14 feet | Extra large rooms (450+ sq ft) | All furniture legs | $500-3,000 |
Rug materials include wool (natural, durable, expensive), cotton (affordable, machine-washable, less durable), synthetic (stain-resistant, affordable, varied quality), jute/sisal (natural texture, casual, rough underfoot), and silk (luxurious, delicate, expensive). Living room rugs in moderate traffic areas perform well in wool or quality synthetics. Natural fiber rugs suit low-traffic areas or layering over other flooring. Machine-washable cotton rugs benefit households with pets or young children requiring frequent cleaning.
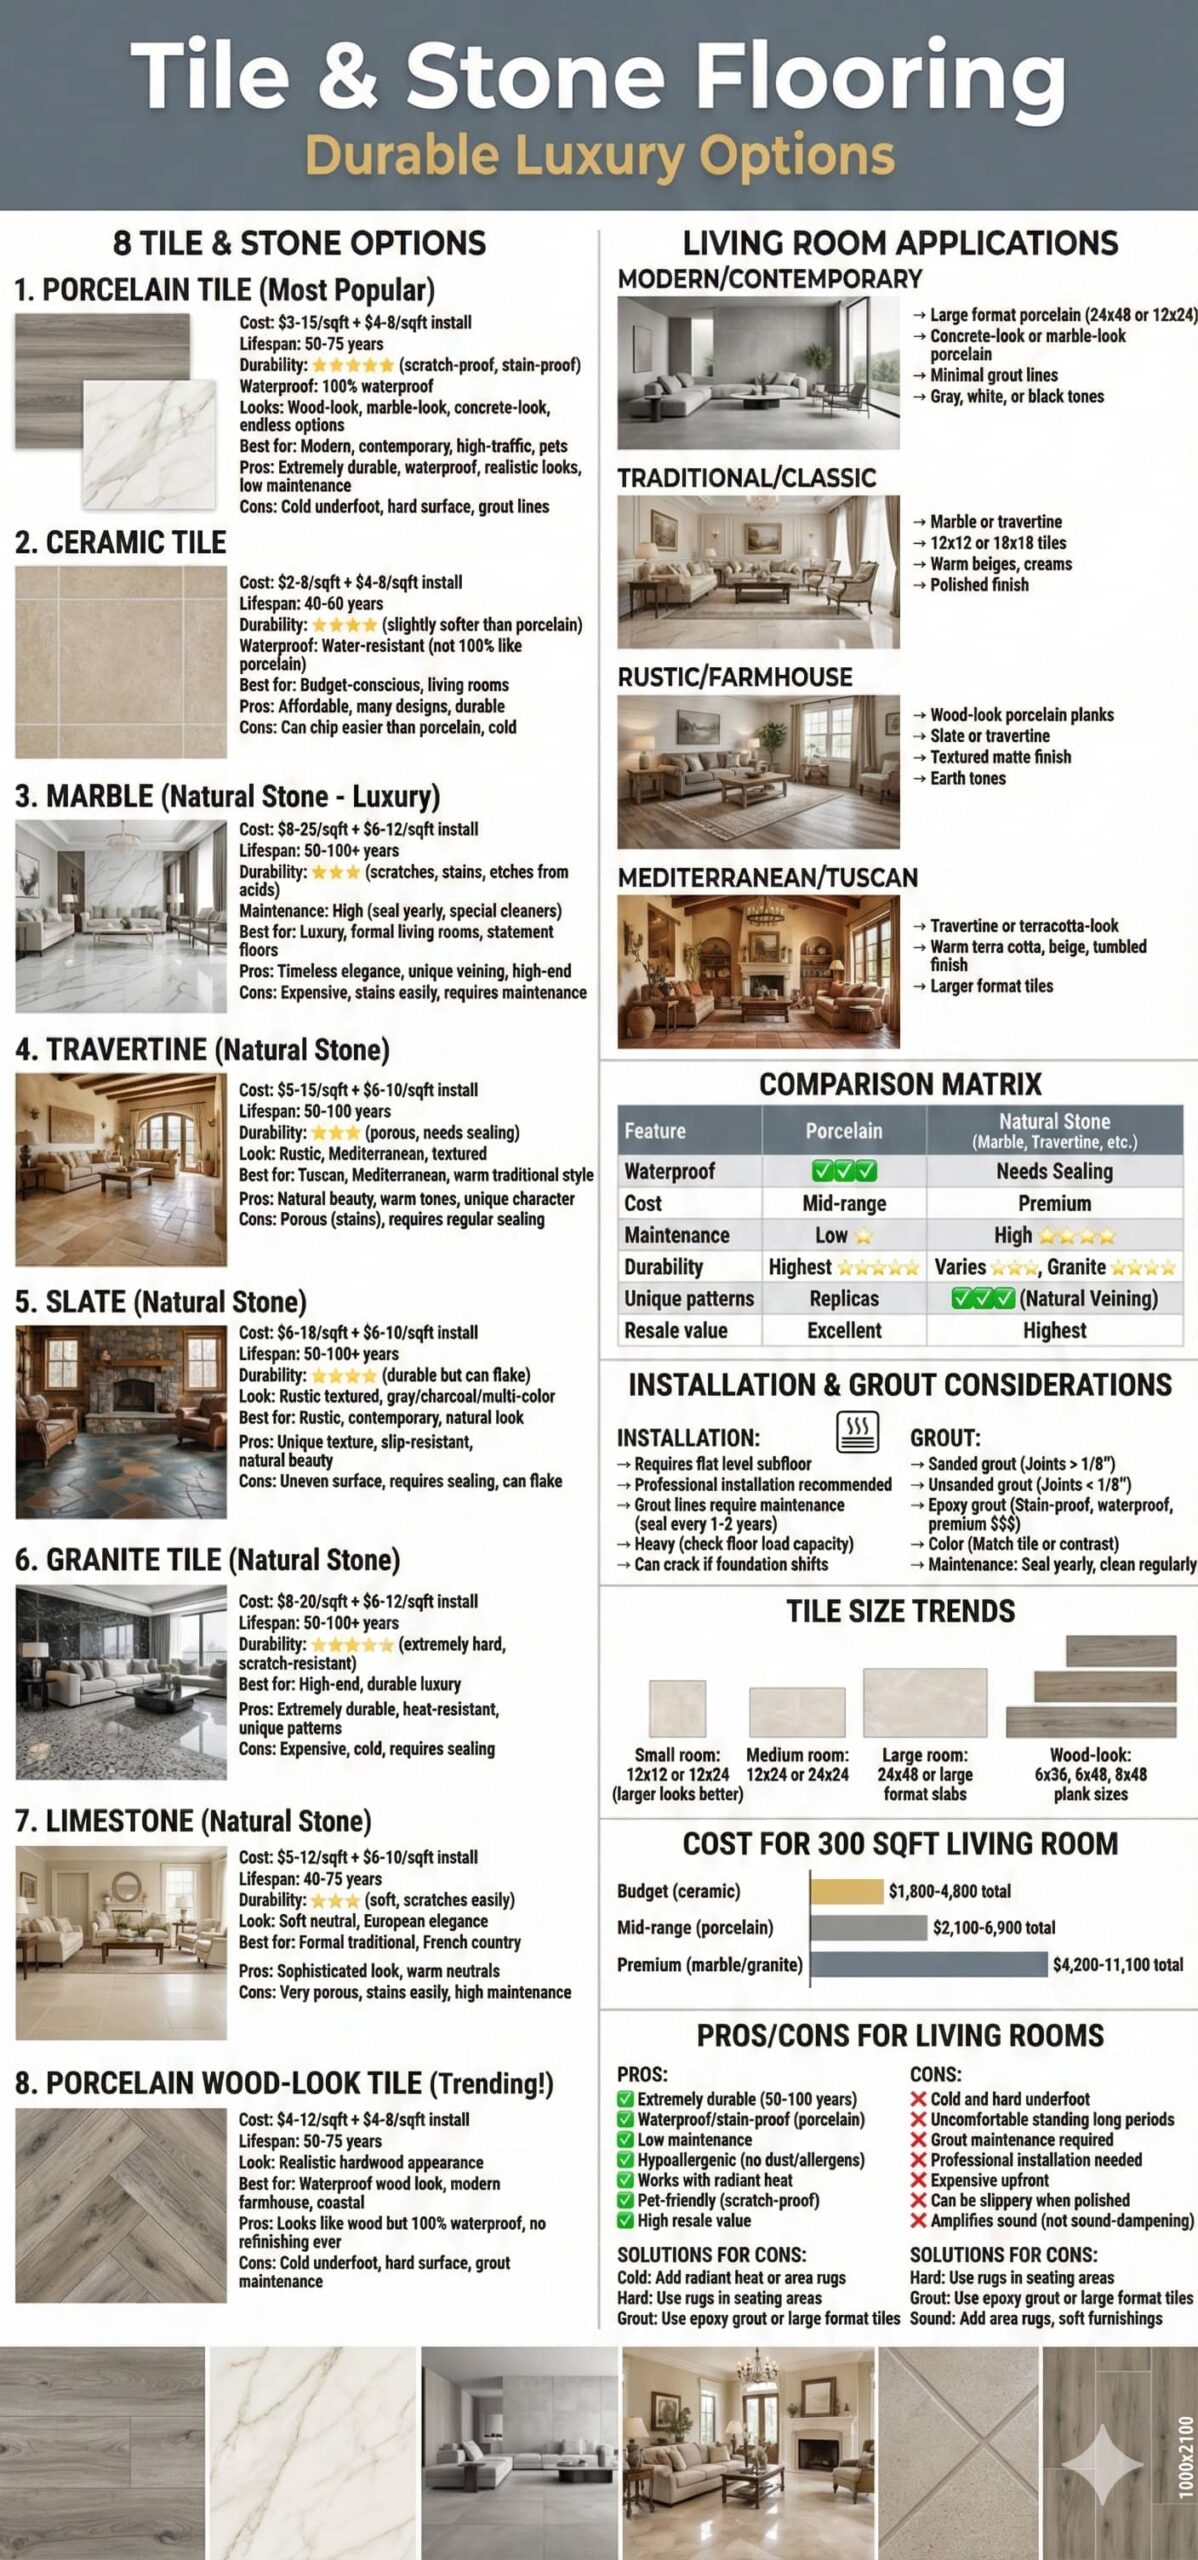
Tile flooring including ceramic, porcelain, and natural stone provides durable water-resistant surfaces suitable for living rooms in warm climates or homes with radiant floor heating. These hard cold surfaces excel in durability and maintenance simplicity but feel uncomfortable for barefoot walking and provide no cushioning for falls. Tile living rooms typically employ area rugs adding warmth and comfort over hard tile surfaces.
Porcelain tile offers superior durability and water resistance compared to ceramic tile through higher firing temperatures creating denser harder products. Porcelain costs $3-15 per square foot varying by size, quality, and design. Large format tiles (12×24 inches or larger) create contemporary minimal appearance with fewer grout lines while small tiles provide traditional detailed aesthetic. Tile installation requires professional skills ensuring proper subfloor preparation, appropriate thinset application, and correct tile layout preventing lippage or grout failure.
Natural stone including marble, granite, slate, travertine, and limestone creates luxurious organic living room flooring with unique natural variations. Stone costs $8-30+ per square foot requiring sealing for stain protection and professional installation ensuring proper support. Soft stones including marble and limestone scratch and stain readily requiring careful maintenance while harder granite and slate resist damage better. Stone flooring weight needs verifying structural support adequacy before installation.
⚠ PAIN POINT: My tile floor always feels cold and uncomfortable making my living room unwelcoming
✓ SOLUTION: Install radiant floor heating beneath tile providing warmth during cold months (adds $8-15 per square foot to installation costs). Use large area rugs (8×10 or 9×12 feet) covering 50-70 percent tile area providing soft warm walking surfaces. Consider tile only in warm climates where cold floor temperature less problematic. Select warm-toned tiles (beiges, tans, warm grays) rather than cool grays or whites reducing psychological cold perception. Install cork underfoot in conversation areas providing warm soft standing surface over cold tile. Accept tile’s limitations – this flooring type prioritizes durability and cleanability over comfort.
Grout color selection impacts tile appearance and maintenance requirements. Light grout shows soil requiring frequent cleaning while dark grout conceals dirt but may appear harsh with light tile. Matching grout color to tile creates seamless appearance minimizing grout visibility. Contrasting grout emphasizes tile pattern and grid lines. Epoxy grout provides superior stain resistance and reduced maintenance compared to standard cement grout though costs more and requires skilled installation.
Ceramic Tile | $1-8 | Good | Low | Warm climate living rooms |
Porcelain Tile | $3-15 | Excellent | Low | High-traffic areas, contemporary |
Marble (polished) | $10-30 | Moderate (scratches easily) | High (requires sealing) | Formal traditional luxury |
Granite | $8-25 | Excellent | Moderate (seal annually) | Durable stone appearance |
Slate | $6-15 | Excellent | Moderate | Rustic, textured appearance |
Travertine | $8-20 | Moderate | High (porous, stains easily) | Mediterranean, traditional |
Limestone | $8-20 | Moderate | High | Natural organic aesthetic |
Tile pattern layouts including straight lay, diagonal, herringbone, or chevron impact visual appearance and installation complexity. Straight lay (tiles aligned with walls) provides simplest most economical installation. Diagonal orientation creates visual interest with 10-15 percent material waste. Herringbone and chevron patterns create dramatic designer appearances but increase installation costs 30-50 percent due to cutting requirements and complexity. Living room tile pattern selection should balance aesthetic preferences with budget realities.

Living room wall decor transforms blank surfaces into personal expressions through artwork, accent wall treatments, gallery displays, and architectural enhancements. Wall treatments provide opportunities for color, pattern, texture, and personal storytelling creating character and visual interest. Empty walls create sterile institutional atmospheres while thoughtfully decorated walls establish inviting personalized environments reflecting occupant interests and aesthetics.
Art selection should coordinate with overall living room design style, color palette, and scale requirements. Large-scale artwork (36×48 inches or larger) creates focal points on primary walls while smaller pieces group into gallery arrangements. Art budget ranges from affordable prints and posters ($20-200) to original paintings and photography ($500-10,000+) accommodating varied financial capacities. Living room artwork provides most accessible personalization opportunity requiring minimal commitment compared to permanent architectural modifications.
Accent wall treatments including paint color, wallpaper, wood paneling, or architectural texture create focal walls drawing attention and adding dimensional interest. Single accent walls prevent overwhelming spaces while providing color or pattern impact. Accent walls typically feature behind sofas, on fireplace walls, or as architectural focal points complementing rather than competing with artwork and furniture. Treatment selection should coordinate with overall design style maintaining cohesive aesthetics.
⚠ PAIN POINT: I hang artwork but my walls still look empty and boring rather than curated and interesting
✓ SOLUTION: Scale artwork appropriately – artwork above sofas should measure 2/3 sofa width minimum (56-60 inches for 84-inch sofa). Hang artwork at correct height (57-60 inches center from floor) rather than too high appearing disconnected from furniture. Create gallery wall groupings (5-9 pieces) rather than single small pieces appearing inadequate. Layer wall decor through varied heights, textures, and depths (artwork, mirrors, 3D objects, shelving). Include adequate spacing between pieces (2-4 inches within groupings) preventing cluttered appearance. Commit to filling walls rather than minimal sparse approach appearing unfinished.
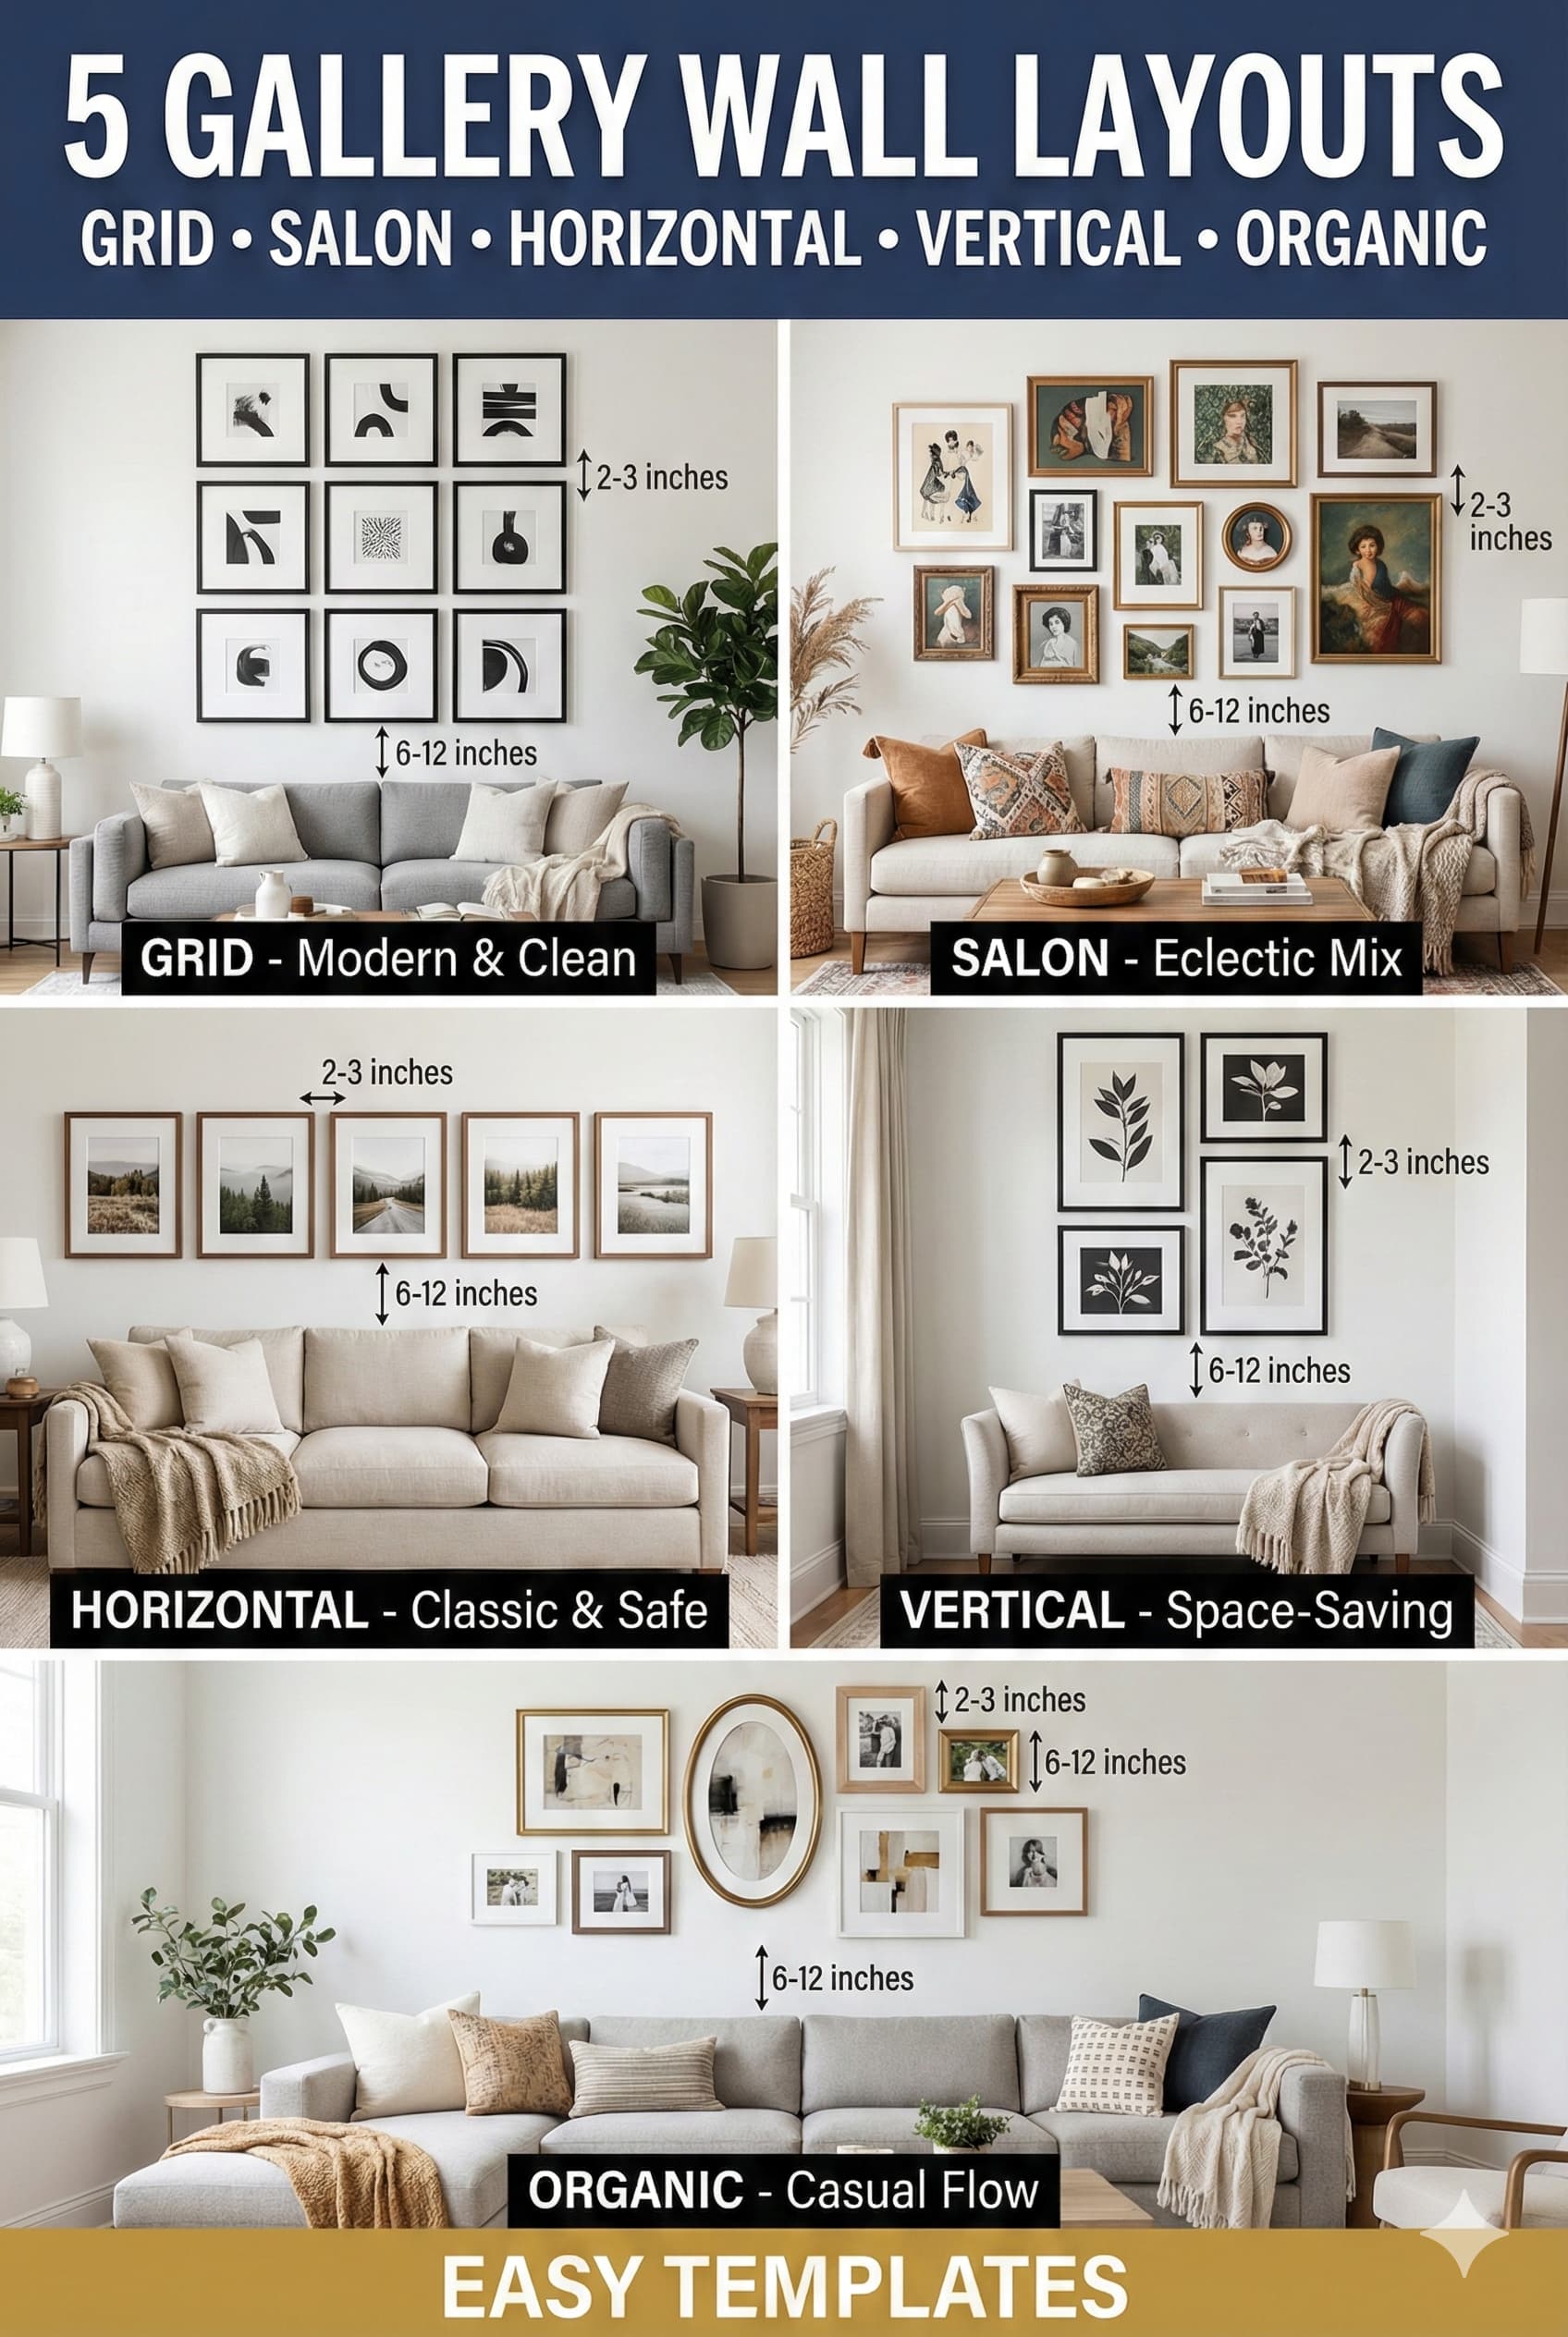
Gallery walls combine multiple artwork pieces, photographs, mirrors, or objects into unified wall displays creating visual impact exceeding individual piece impact. These curated arrangements suit living rooms where substantial wall space fits comprehensive displays. Gallery wall planning requires careful layout development ensuring balanced compositions with appropriate spacing and visual weight distribution avoiding random haphazard appearances.
Layout planning should occur on floor before wall installation allowing arrangement experimentation without wall damage. Trace all frames on craft paper creating templates then tape to wall testing compositions. Measure and mark hanging positions on templates transferring to walls for accurate nail placement. Digital planning applications allow virtual wall arrangement testing though hands-on physical layout provides most accurate assessment. Gallery wall installations without planning frequently result in unbalanced asymmetrical compositions requiring rehinging or resigned acceptance of imperfect layouts.
Frame coordination impacts gallery wall cohesion – matching frames create unified formal appearance while mixed frames provide eclectic casual aesthetic. Contemporary approaches favor consistent frame styles (all black, all natural wood, all white) with varied sizes. Traditional approaches may mix frame styles though maintaining color palette consistency. Living room gallery walls with mixed frame colors typically limit to 2-3 coordinating finishes preventing chaotic appearance.
⚠ PAIN POINT: My gallery wall looks messy and haphazard rather than intentionally curated like in design magazines
✓ SOLUTION: Maintain consistent spacing between all pieces (2-4 inches) creating organized grid-like structure even in asymmetrical arrangements. Select frames in 2-3 coordinating finishes maximum avoiding random frame collection appearance. Create paper templates marking exact frame positions before hanging preventing trial-and-error wall damage. Start with largest piece positioning first then arrange remaining pieces around it. Establish straight top line, bottom line, or center line creating alignment reference preventing random floating appearance. Keep entire gallery within rectangular boundary rather than scattered placements across entire wall.
Spacing guidelines recommend 2-3 inches between individual frames within gallery groupings and 4-6 inches from furniture or architectural elements (door frames, windows). Tighter spacing creates unified single artwork appearance while wider spacing emphasizes individual pieces. Gallery wall arrangements should remain within imaginary rectangular boundary rather than scattered randomly across entire wall surface creating intentional curated appearance.
Formal Grid | Matching frames and mats | Uniform 2 inches | Symmetrical grid | Traditional living rooms |
Salon Style | Mixed frames, sizes | Varied 2-4 inches | Asymmetrical organic | Eclectic, bohemian |
Modern Linear | Matching simple frames | Uniform 3 inches | Single row or column | Contemporary spaces |
Balanced Asymmetry | Coordinating frames | Consistent 2-3 inches | Planned asymmetry | Transitional spaces |
Statement + Supporting | One large + smaller pieces | Wider 4-6 inches | Focal point emphasis | Any style |
Subject matter in gallery walls may coordinate thematically (family photos, travel photography, botanical prints) or embrace eclectic mixing. Thematic coordination creates cohesive storytelling while mixed subjects provide visual variety. Living room galleries frequently combine family photographs with artwork creating personal meaningful displays. Abstract artwork, landscapes, portraits, and photographs mix successfully with thoughtful composition planning preventing visual chaos.
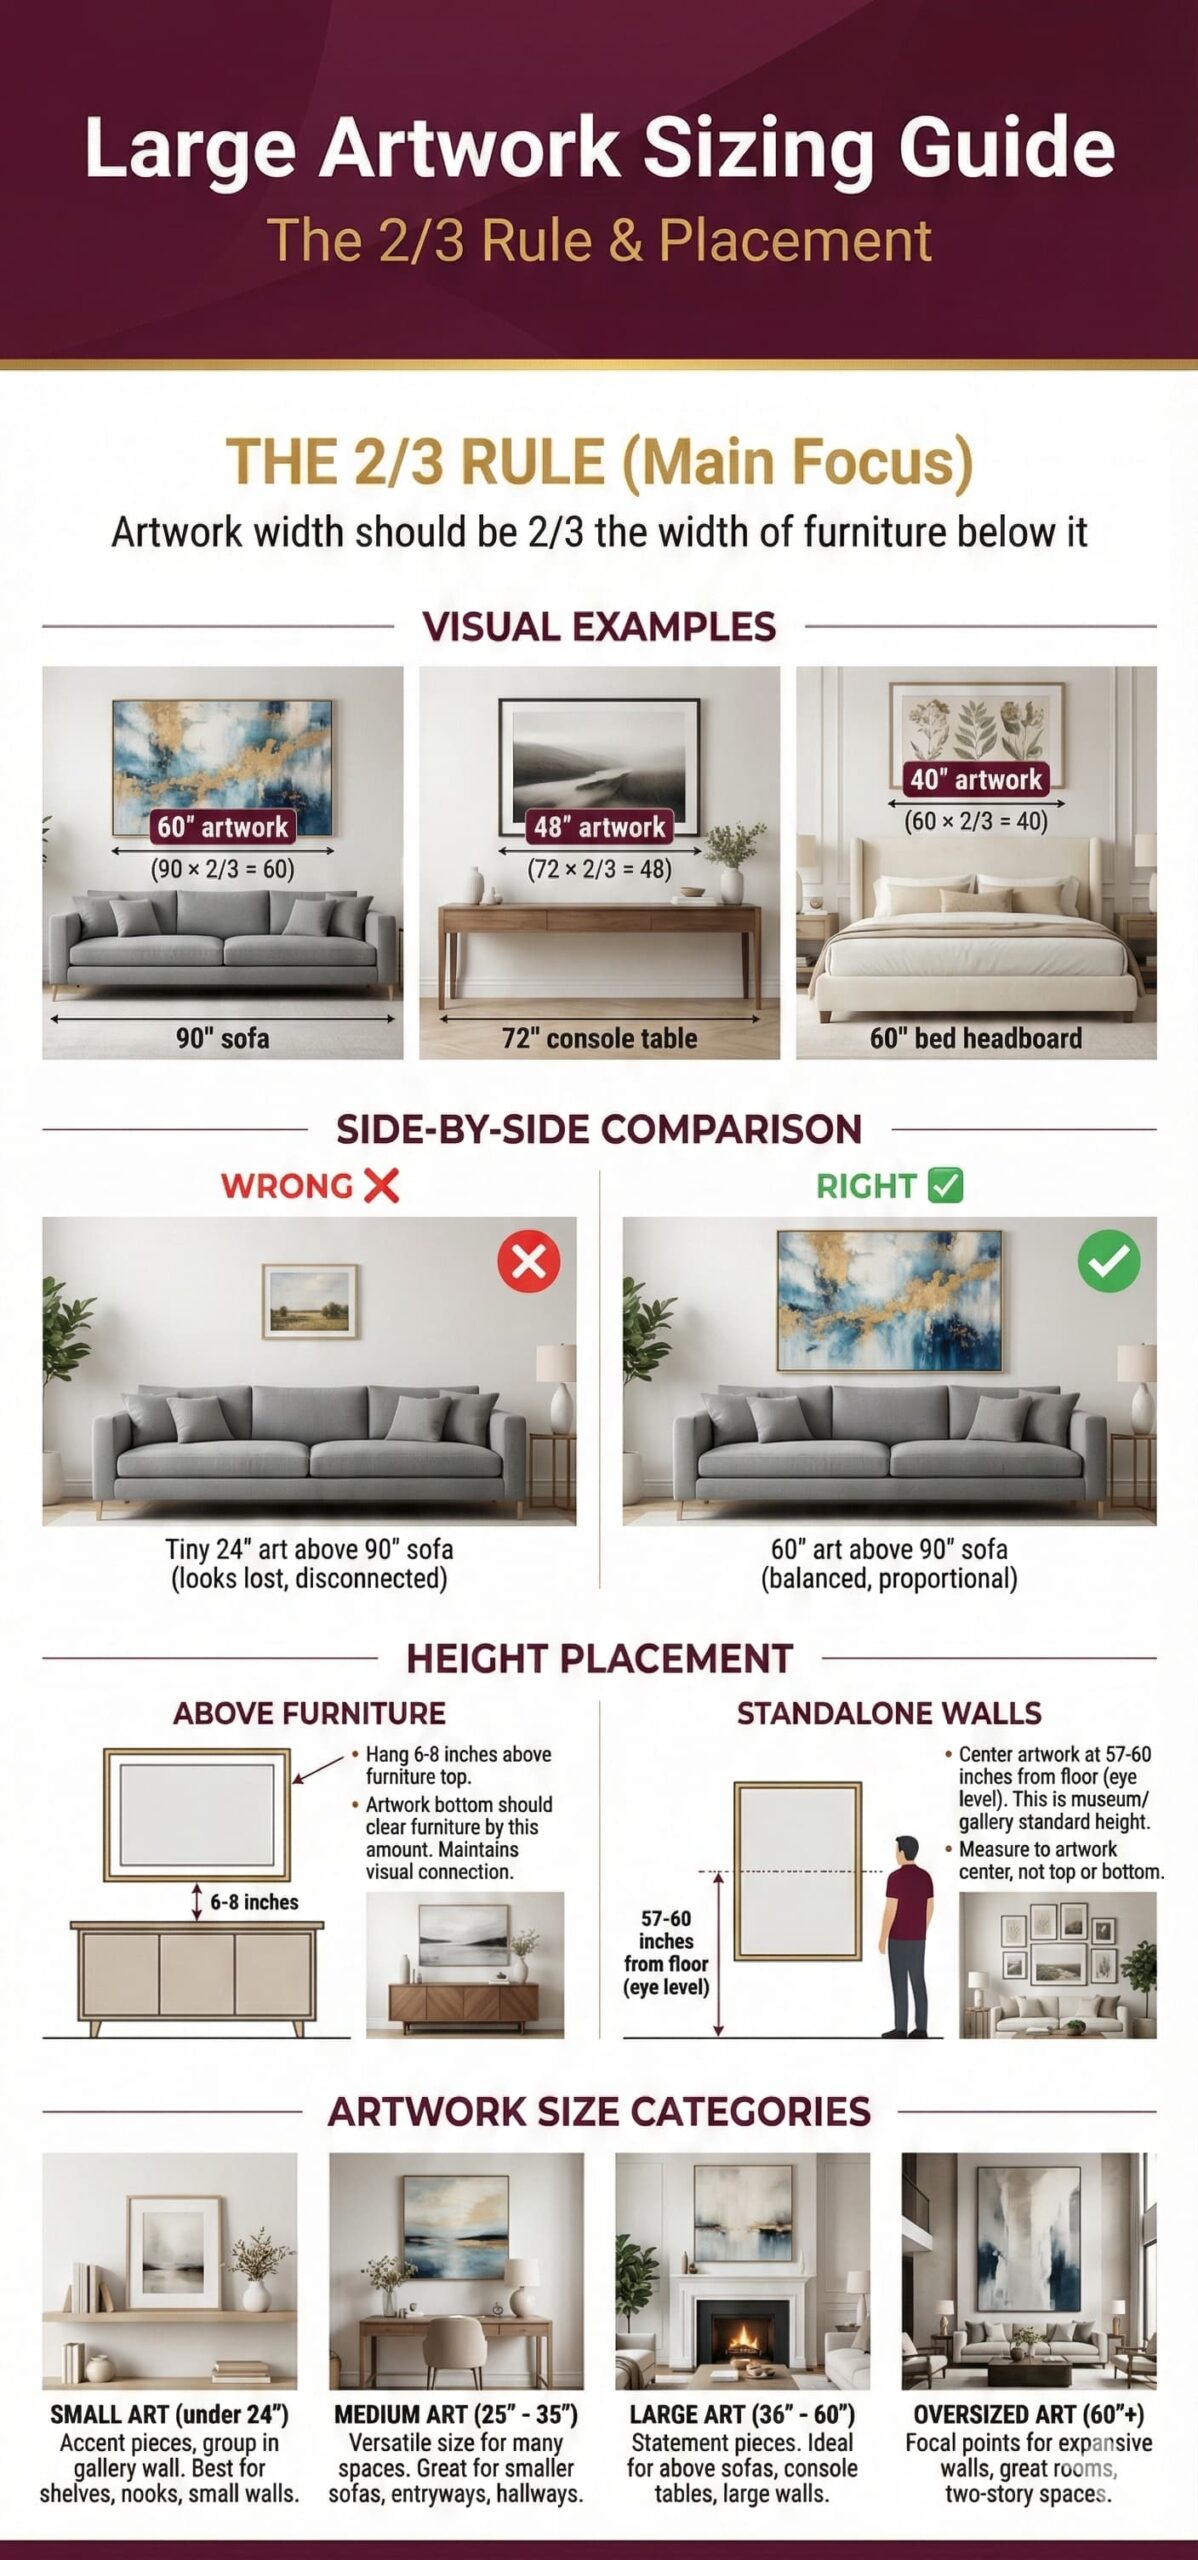
Large artwork measuring 36×48 inches or larger provides substantial visual impact creating focal points on primary living room walls. Single large pieces offer simplified installation and bold statements compared to multi-piece gallery complexity. Oversized artwork suits contemporary aesthetics and spaces with substantial wall area accommodating dramatic scale. Artwork dimensions should relate proportionally to furniture and wall dimensions avoiding undersized or oversized installations.
Placement height for artwork above furniture follows center-at-57-60-inches-from-floor guideline for standalone walls or 6-10-inches-above-furniture for pieces hung over sofas or consoles. This positioning creates visual connection between artwork and furniture rather than floating disconnected high on walls. Living room artwork above sofas should measure minimum 2/3 sofa width (preferably 3/4) creating balanced proportions. Narrow vertical art appears inadequate over long horizontal sofas.
Horizontal versus vertical orientation selection depends on wall and furniture proportions. Horizontal artwork suits spaces above sofas, consoles, or horizontal furniture reinforcing lateral movement. Vertical artwork works above tall narrow furniture, in narrow wall sections between windows, or creating vertical emphasis in spaces with low ceilings. Square artwork provides neutral option working in varied contexts though large squares require substantial wall space.
⚠ PAIN POINT: I bought beautiful large artwork but it looks wrong on my wall – either too small, too large, or poorly positioned
✓ SOLUTION: Verify artwork width equals 2/3 to 3/4 sofa or furniture width before purchasing – use painter’s tape on wall marking proposed artwork dimensions evaluating scale appropriateness. Hang artwork 6-10 inches above furniture tops rather than high on walls appearing disconnected. For standalone walls, position artwork center 57-60 inches from floor (standard eye level). Photograph wall with temporary paper template at proposed size/position evaluating scale and position before commitment. Return or exchange artwork that doesn’t work rather than accepting poor fit damaging overall room aesthetics.
Lighting artwork enhances visual impact and perceived value through dedicated picture lights, track lighting, or strategically positioned accent lights. Picture lights mounted above artwork direct focused illumination onto surfaces emphasizing colors and details. Track lighting with adjustable heads allows flexible artwork highlighting. Artwork illumination requires positioning lights to avoid glare on glass-covered artwork while providing adequate intensity (2-3x ambient light levels) ensuring artwork attracts visual attention.
Medium (24×36) | 40-54 inch furniture | 6-8 inches above furniture | $100-1,000 | Small walls, tight spaces |
Large (36×48) | 54-70 inch furniture | 8-10 inches above furniture | $200-3,000 | Standard walls, over sofas |
Oversized (48×72) | 70-84 inch furniture | 8-12 inches above furniture | $500-10,000+ | Large walls, statement pieces |
Extra Large (60×84+) | 84+ inch furniture | 8-12 inches above furniture | $1,000-25,000+ | Great rooms, luxury spaces |
Framing quality significantly impacts artwork presentation and perceived value. Custom framing costs $100-500+ per piece but provides museum-quality presentation protecting artwork while enhancing visual impact. Ready-made frames offer economical alternatives ($20-150) though may not perfectly fit artwork or provide desired aesthetic quality. Living room artwork investment justifies quality framing enhancing presentation and protecting valuable pieces from environmental damage.
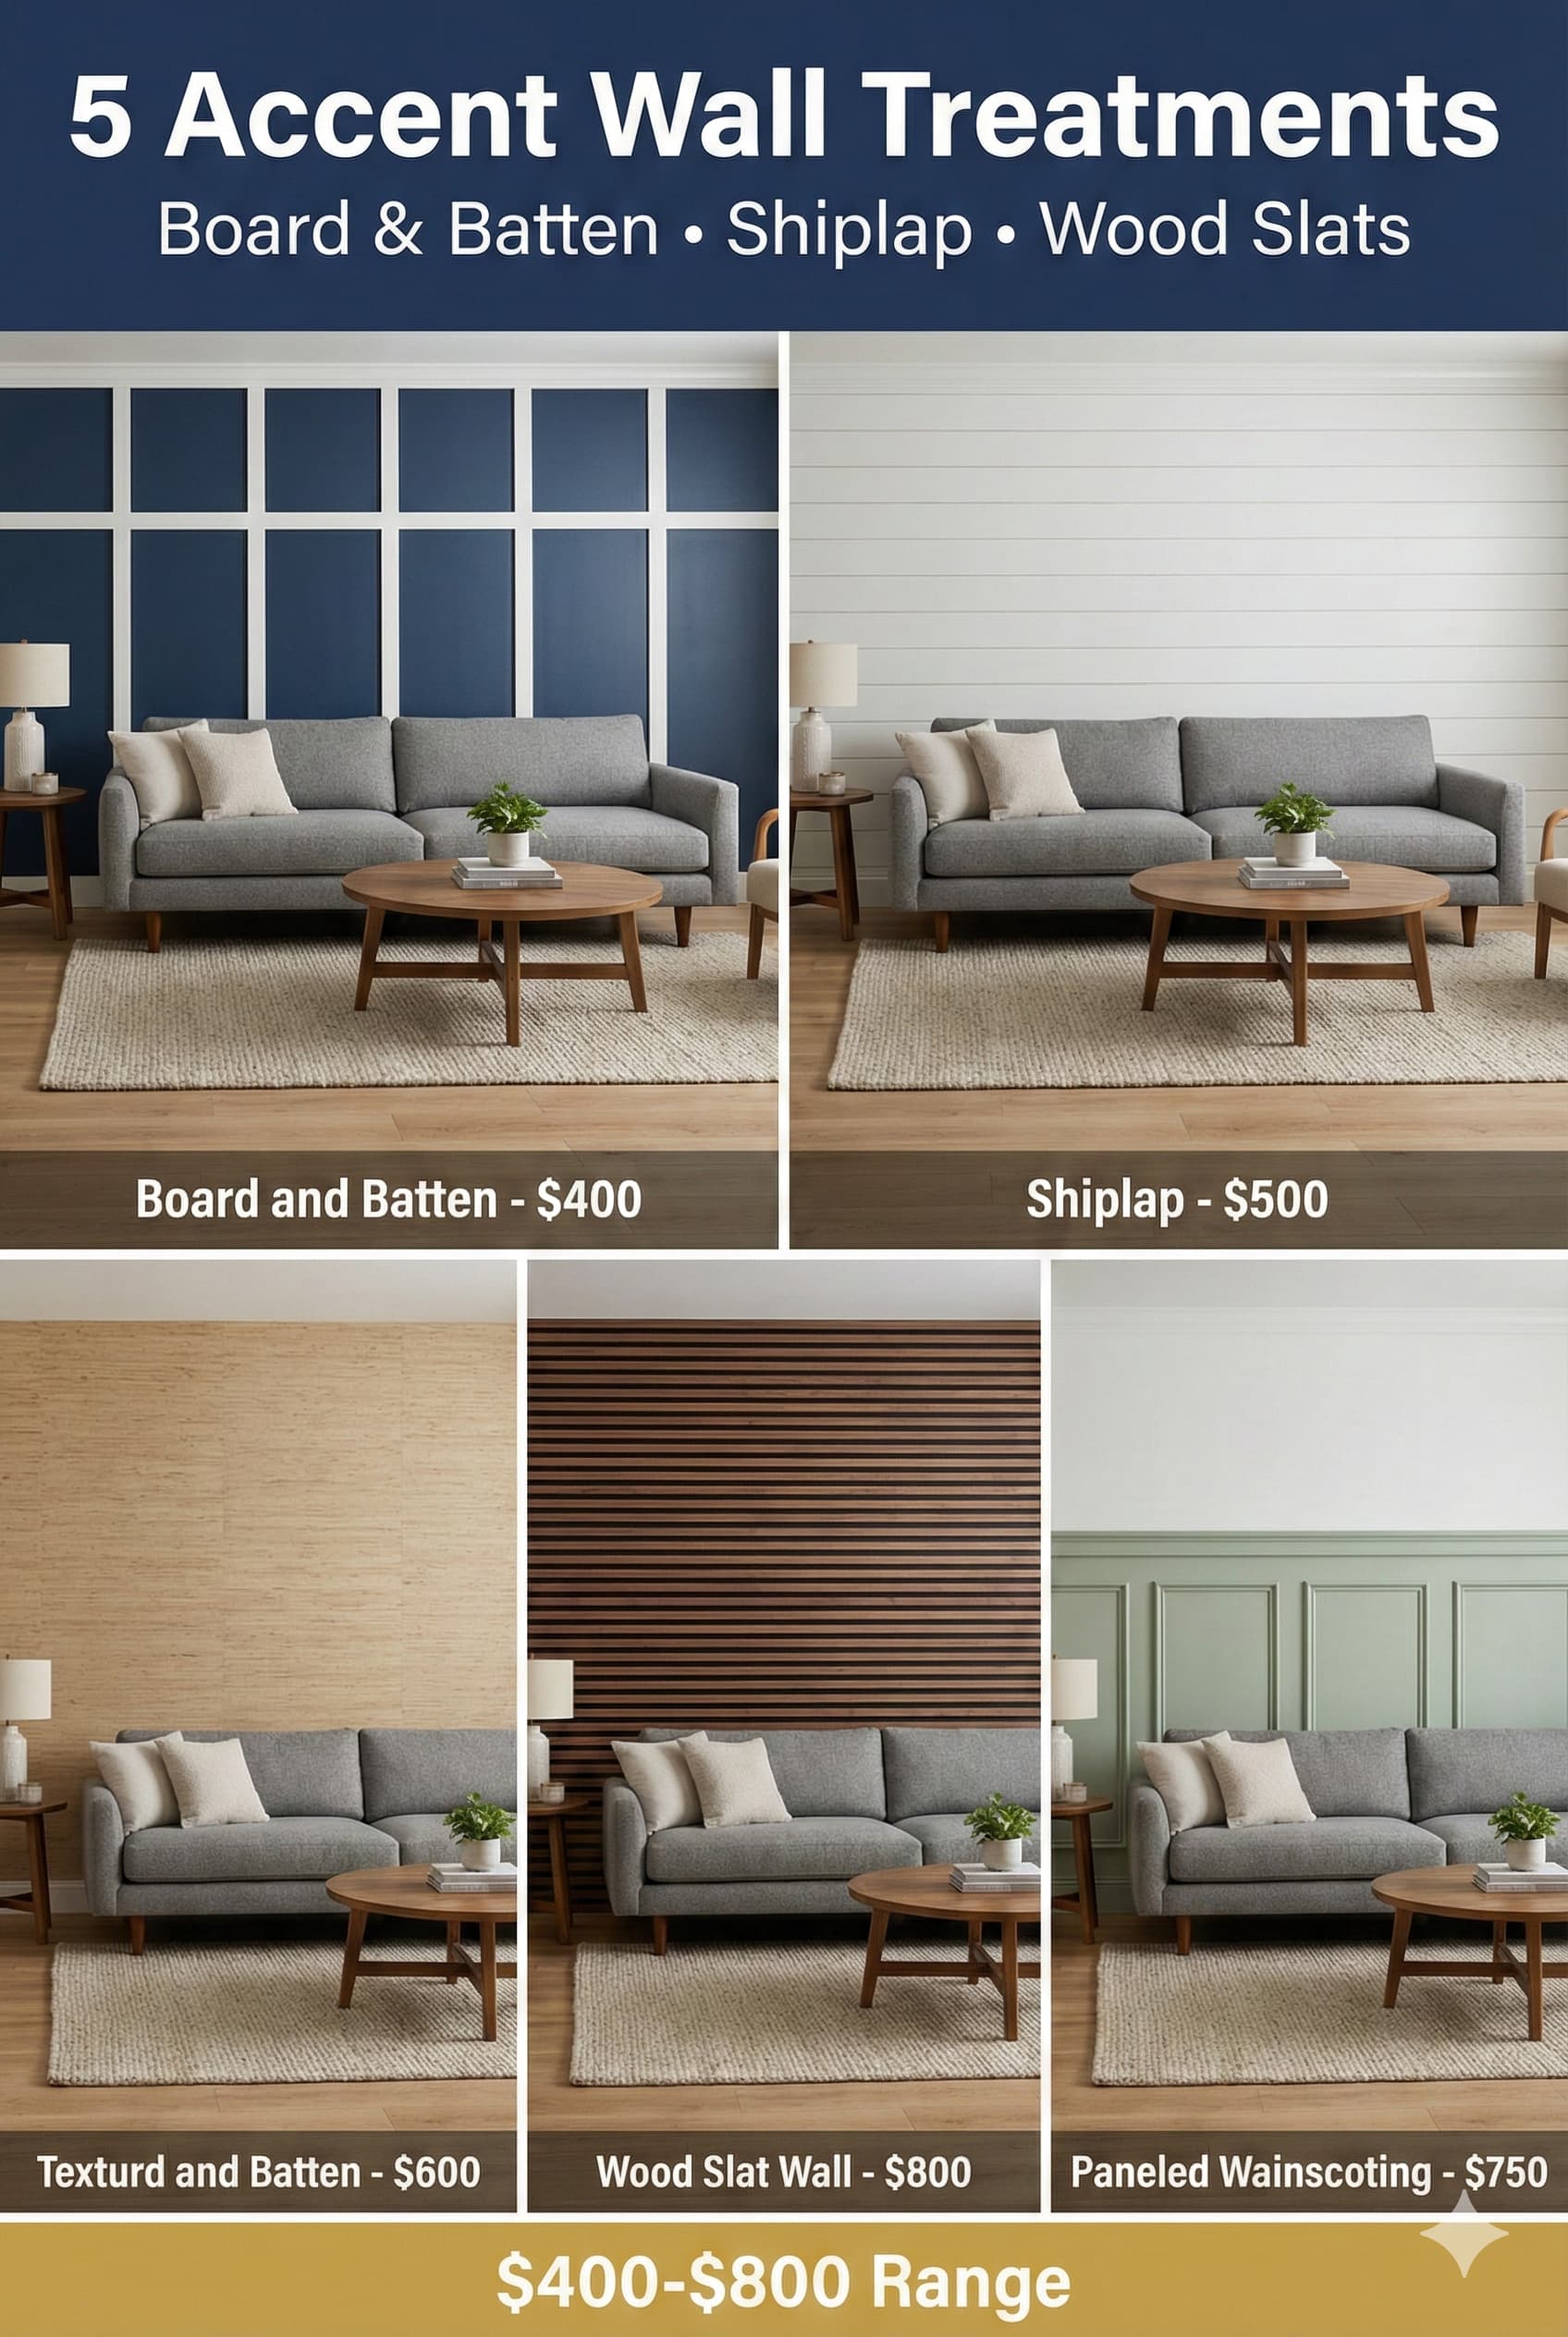
Accent walls create focal points through color, pattern, texture, or material differentiation from surrounding walls. Single accent wall treatments prevent overwhelming spaces while providing visual interest and architectural definition. Common living room accent wall locations include behind sofas, fireplace walls, or walls facing main entry creating immediate visual impact upon room entry.
Paint color accents provide most economical accent wall approach requiring only paint investment ($30-60 per gallon covering 350-400 square feet). Accent wall colors typically employ bolder saturated versions of room color palette or complementary contrasting colors creating dynamic visual interest. Dark accent walls in light rooms create dramatic contrast while maintaining overall room brightness. Light accent walls in dark rooms may appear washed out lacking desired impact.
Wallpaper accents introduce pattern, texture, and visual complexity unavailable through paint alone. Contemporary wallpaper ($30-150 per roll covering 30-60 square feet) offers removable peel-and-stick options simplifying installation and allowing future modification without damage. Traditional wallpaper requires professional installation and removal difficulties. Wallpaper patterns range from subtle tone-on-tone textures to bold geometric or floral designs accommodating varied boldness tolerances.
⚠ PAIN POINT: I painted an accent wall but it looks wrong – either too bold, doesn’t coordinate, or makes room feel smaller
✓ SOLUTION: Test paint colors on large sample boards (24×24 inches minimum) observing under room lighting conditions for several days before committing to entire wall. Select colors already present in room through artwork, rugs, or pillows rather than introducing completely new colors lacking coordination. Use lighter values of bold colors rather than highly saturated versions if concerned about overwhelming space. Paint only one wall as accent – multiple accent walls compete creating visual confusion. Accept that accent walls may require repainting if dissatisfied – consider this experiment with relatively low financial consequence ($50-100) compared to permanent installations.
Wood plank walls including shiplap, board-and-batten, or reclaimed wood create textural architectural interest suitable for farmhouse, rustic, or transitional living rooms. Shiplap installation costs $2-7 per square foot for materials plus installation labor. These treatments add dimensional depth and organic warmth to spaces though require carpentry skills and permanent installation commitment. Wood accent walls coordinate naturally with wood furniture and natural material color palettes.
Paint Color | $50-150 total | Easy (repaint) | Moderate | Universal |
Peel-and-Stick Wallpaper | $100-400 | Easy (peel off) | High | Contemporary to traditional |
Traditional Wallpaper | $200-600 with installation | Difficult (scraping) | High | Traditional to transitional |
Shiplap/Wood Planks | $400-1,200 | Moderate-difficult | High | Farmhouse, rustic |
Board-and-Batten | $300-800 | Moderate | Moderate-high | Traditional, transitional |
Textured Paint | $100-300 | Moderate (skim coat) | Moderate | Mediterranean, traditional |
Tile/Stone Veneer | $600-2,000 | Difficult (demolition) | High | Contemporary, rustic |
Geometric accent walls using painter’s tape create custom painted patterns including stripes, chevrons, or color blocking. These DIY approaches personalize spaces affordably though require careful taping and patient execution preventing paint bleed. Pattern accent walls work best in contemporary or transitional living rooms where geometric designs coordinate with overall aesthetics. Traditional spaces typically employ solid accent colors rather than patterns.
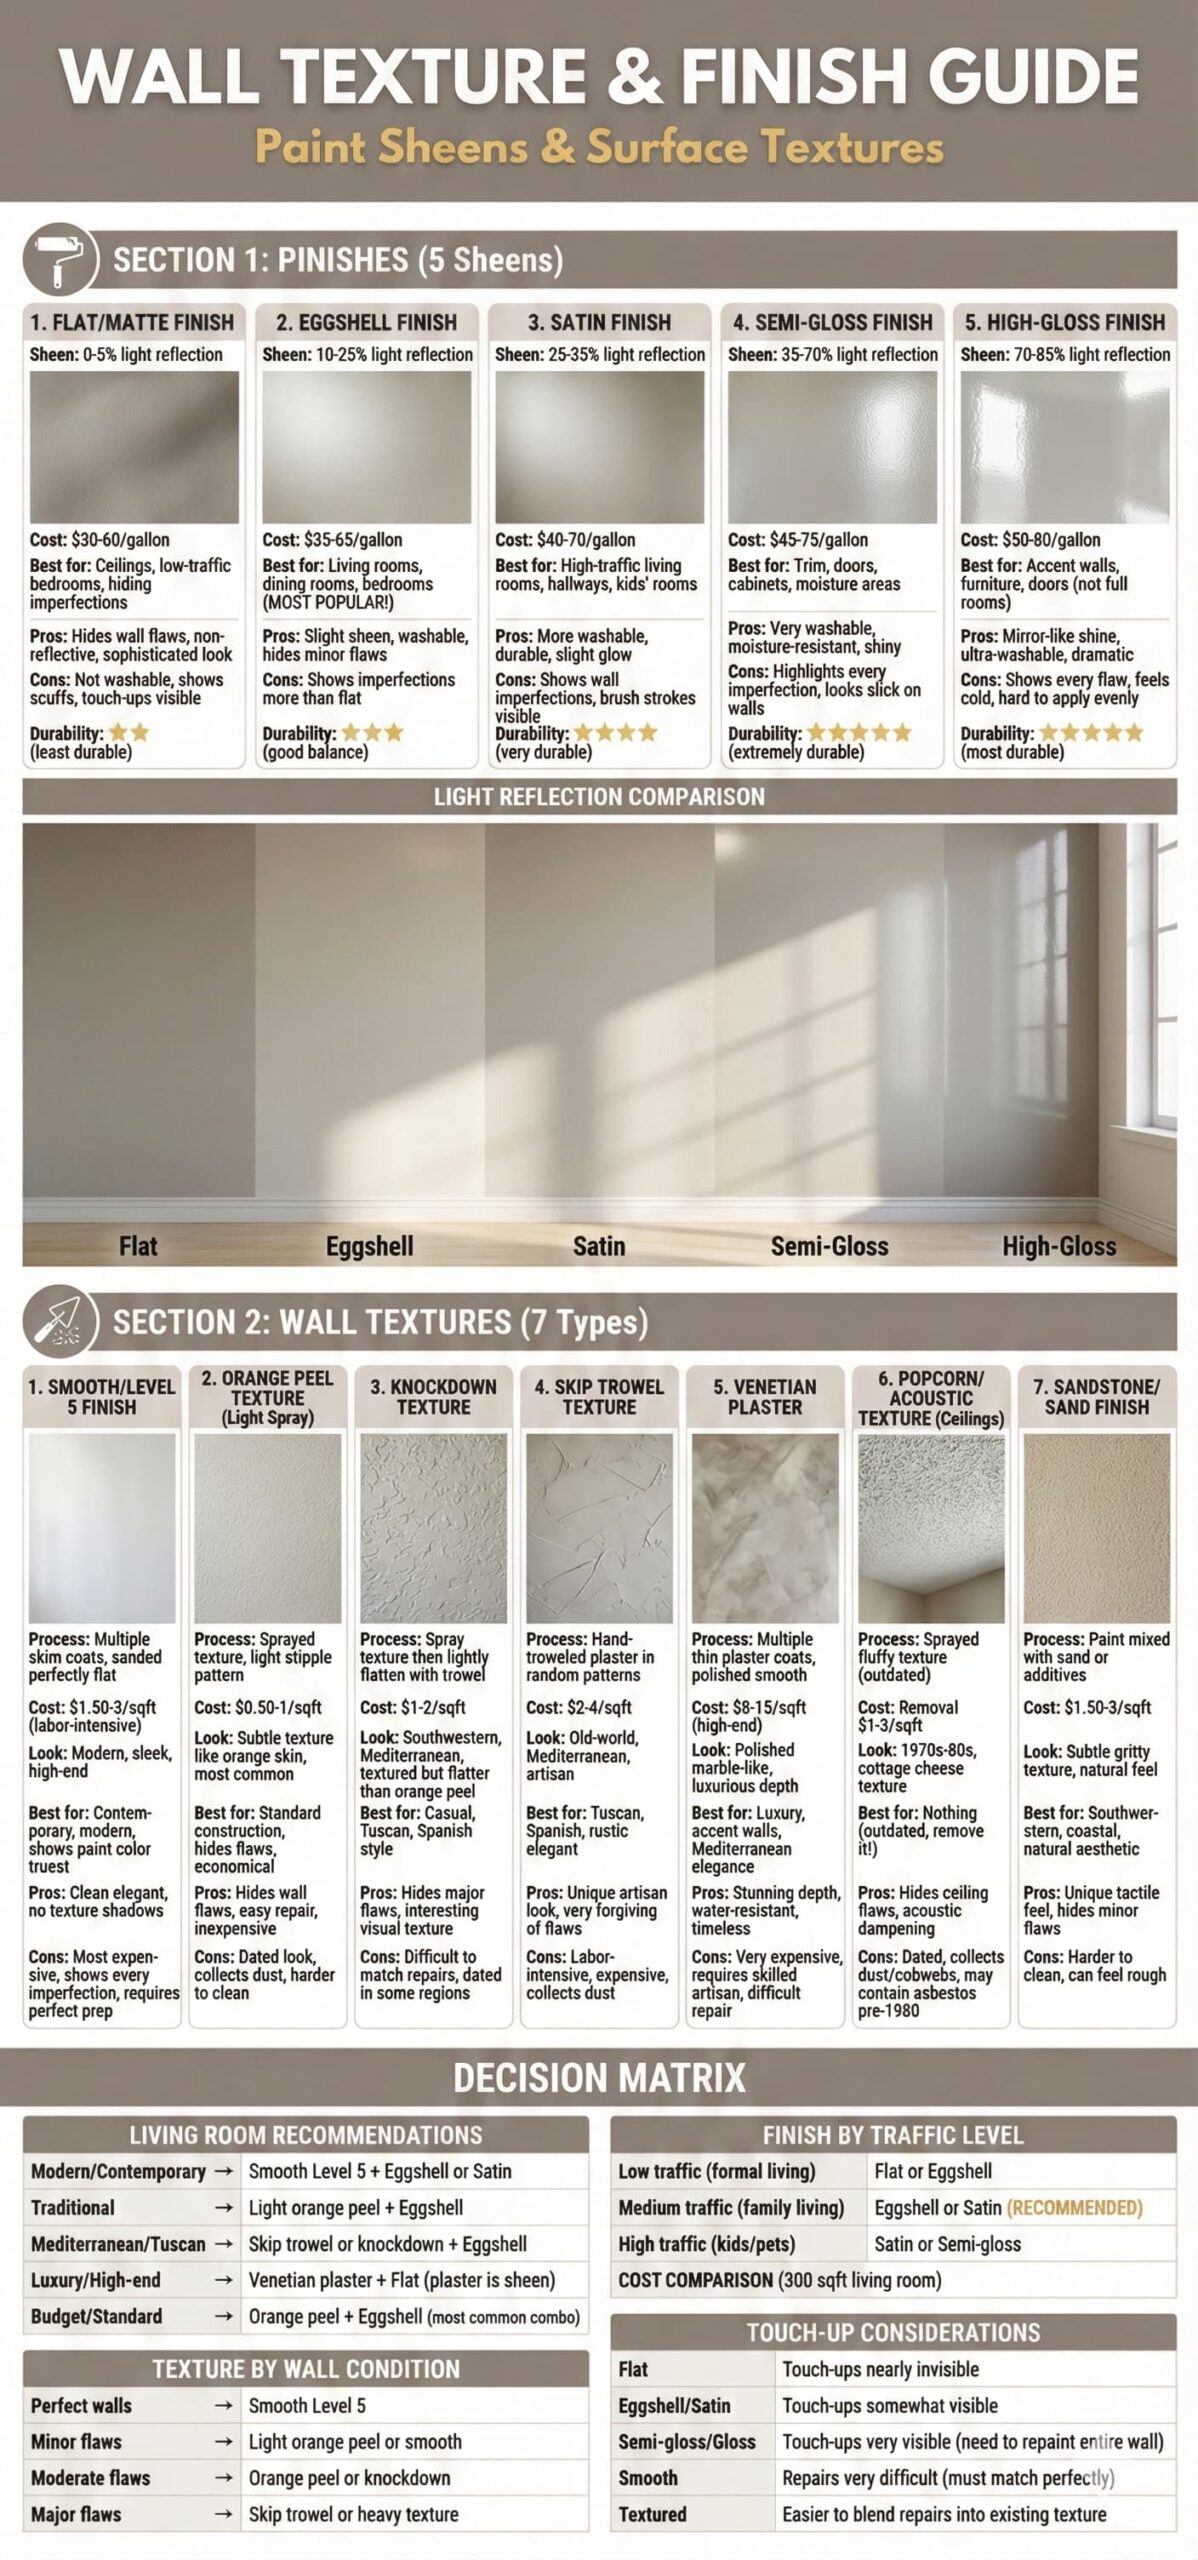
Wall texture and paint finishes impact light reflection, visual interest, and practical performance characteristics. Smooth walls display contemporary minimal aesthetic while textured walls add dimensional interest and conceal surface imperfections. Paint sheen selection ranges from flat/matte (no reflection) to high-gloss (maximum reflection) affecting appearance and cleanability.
Flat paint finishes provide non-reflective matte appearance ideal for hiding wall imperfections and creating sophisticated understated look. But flat paint shows scuffs and cannot withstand wet cleaning limiting application in high-traffic living rooms or homes with children. Matte finishes suit formal low-traffic spaces prioritizing aesthetic perfection over practical durability.
Eggshell and satin finishes provide slight sheen (10-25 percent light reflection) offering improved cleanability while maintaining relatively non-reflective appearance. These mid-range sheens represent most popular residential choices balancing aesthetic appeal with practical performance. Living room walls benefit from eggshell or satin finishes allowing damp cleaning without excessive shine. Higher traffic areas warrant satin while lower traffic areas fit eggshell.
⚠ PAIN POINT: My wall paint looks perfect initially but shows every scuff, handprint, and mark making walls constantly look dirty
✓ SOLUTION: Use satin or semi-gloss finish in living rooms rather than flat/matte allowing wet cleaning without paint damage. Select mid-tone colors (medium grays, taupes, greiges) concealing marks better than stark white or very dark colors showing every imperfection. Install chair rails or picture frame molding at 36-42 inches height protecting walls from furniture scuffs. Place furniture slightly away from walls (3-6 inches) preventing constant contact. Clean walls quarterly using appropriate cleaning methods preventing buildup. Accept that walls show use over time – touch-up paint availability allows spot repairs without complete repainting.
Semi-gloss and high-gloss finishes provide maximum durability and cleanability through higher resin content creating washable surfaces. But these reflective finishes emphasize every wall imperfection requiring perfect surface preparation. Glossy finishes suit trim, doors, and cabinets rather than large wall surfaces in residential living rooms where sheen draws excessive attention to imperfections. Commercial spaces employ glossy walls for cleanability accepting industrial aesthetic.
Flat/Matte | 0-5% | Poor (absorbs marks) | Excellent | Formal low-traffic rooms |
Eggshell | 10-25% | Moderate | Good | Standard living rooms |
Satin | 25-35% | Good | Moderate | High-traffic living rooms |
Semi-Gloss | 35-70% | Excellent | Poor | Trim, doors, kitchens |
High-Gloss | 70-90% | Excellent | Very poor | Cabinets, furniture |
Textured wall finishes including orange peel, knockdown, skip trowel, or Venetian plaster add dimensional interest concealing wall imperfections while creating tactile surfaces. Texture application requires professional skills though achieves unique customized appearances unavailable through flat painted walls. Textured walls suit Mediterranean, traditional, or rustic living rooms while contemporary spaces typically favor smooth walls. Texture removal requires skim coating or drywall replacement creating expensive remediation.
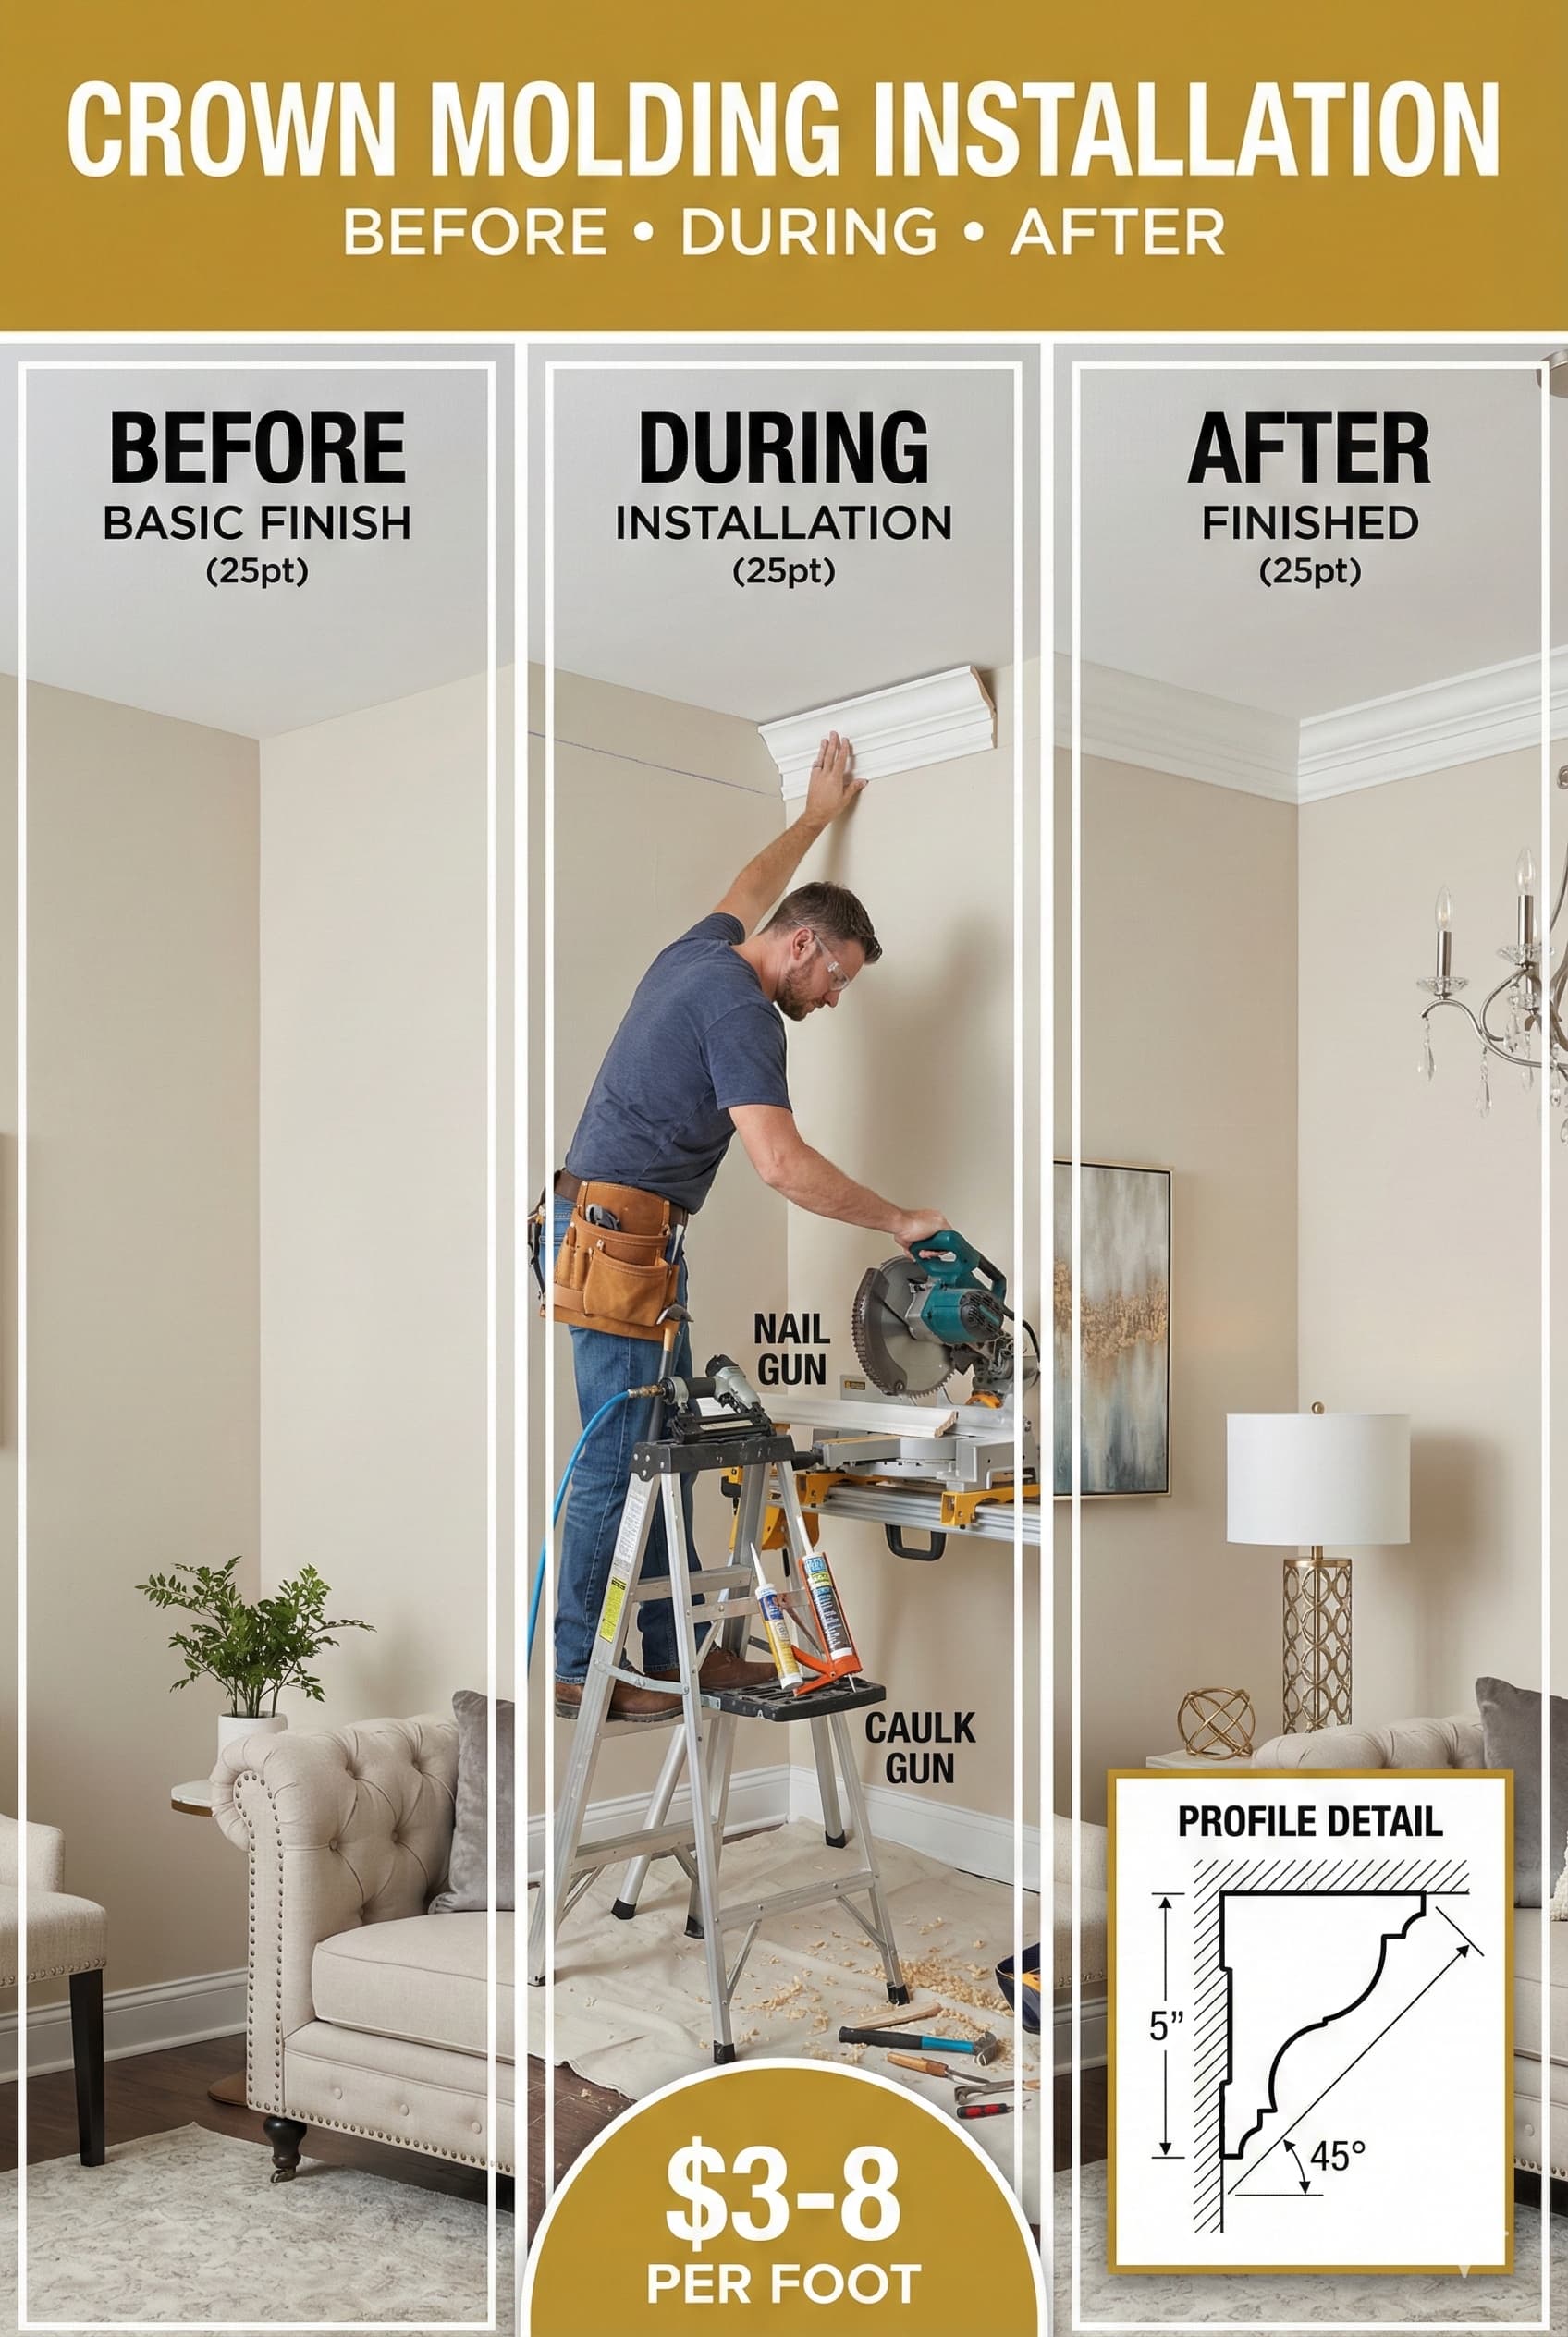
Decorative molding including crown molding, baseboards, chair rails, and picture frame molding adds architectural detail elevating plain walls into refined finished spaces. Molding installation ranges from simple baseboards ($1-3 per linear foot) to elaborate crown molding ($3-8+ per linear foot) depending on profile complexity and material quality. These architectural enhancements particularly suit traditional and transitional living rooms creating period-appropriate detailing.
Crown molding installed at ceiling-wall junction creates finished transition softening harsh angles while adding vertical emphasis. Crown profiles range from simple 2-3 inch coves to elaborate 6-8 inch built-up profiles with multiple components. Living room ceiling heights determine appropriate crown size – standard 8-foot ceilings suit 3-4 inch crown while 9-10 foot ceilings fit 4-6 inch profiles. Oversized crown on low ceilings appears disproportionate while undersized crown on high ceilings lacks visual impact.
Baseboard trim protects walls from floor cleaning equipment, conceals wall-floor junction gaps, and provides finished appearance. Standard residential baseboards measure 3-5 inches tall though contemporary designs employ taller 6-8 inch profiles creating substantial architectural presence. Baseboard style should coordinate with overall trim package and design aesthetic – simple profiles suit contemporary spaces while detailed profiles enhance traditional rooms.
⚠ PAIN POINT: I want decorative molding but installation quotes exceed my budget at $3,000-8,000 for my living room
✓ SOLUTION: Install molding in phases starting with most visible areas (crown molding on primary walls) deferring less visible locations (behind furniture, secondary walls). Use primed MDF or composite molding ($1-3 per foot) rather than premium hardwood ($4-8+ per foot) achieving similar painted appearance at fraction of cost. Learn DIY installation watching online tutorials saving 50-70 percent costs though requiring tool investment ($200-400) and time commitment. Accept simplified molding profiles rather than elaborate built-ups reducing material and labor costs. Consider picture frame molding or chair rails rather than crown molding if budget extremely limited.
Picture frame molding creates decorative wall panels adding architectural interest without crown molding expense. These grid-like molding applications frame wall sections in rectangular panels suitable for painting contrasting colors or applying wallpaper creating dramatic accent walls. Picture molding installation costs $2-5 per linear foot creating substantial visual impact relatively economically compared to comprehensive crown molding throughout spaces.
Baseboard (simple) | 3-5 inches tall | $0.50-2 | $1-3 | Moderate |
Baseboard (detailed) | 5-8 inches tall | $2-5 | $2-4 | Moderate-high |
Crown Molding (simple) | 3-4 inches | $1-3 | $2-5 | High |
Crown Molding (elaborate) | 5-8 inches | $3-8 | $4-10 | Very high |
Chair Rail | 2-3 inches | $1-3 | $1.50-4 | Moderate |
Picture Frame Molding | 2-3 inches | $1-3 | $2-5 | High |
Wainscoting Panels | 36-42 inches tall | $3-8 per sq ft | $4-10 per sq ft | Very high |
Wainscoting installs on lower wall sections (typically 36-42 inches tall) creating architectural paneling suitable for traditional living rooms. Beadboard, raised panel, and flat panel wainscoting styles offer varied aesthetics from cottage casual to formal traditional. Wainscoting installation costs $7-18 per square foot installed creating substantial visual impact and wall protection though representing significant investment for comprehensive installations.
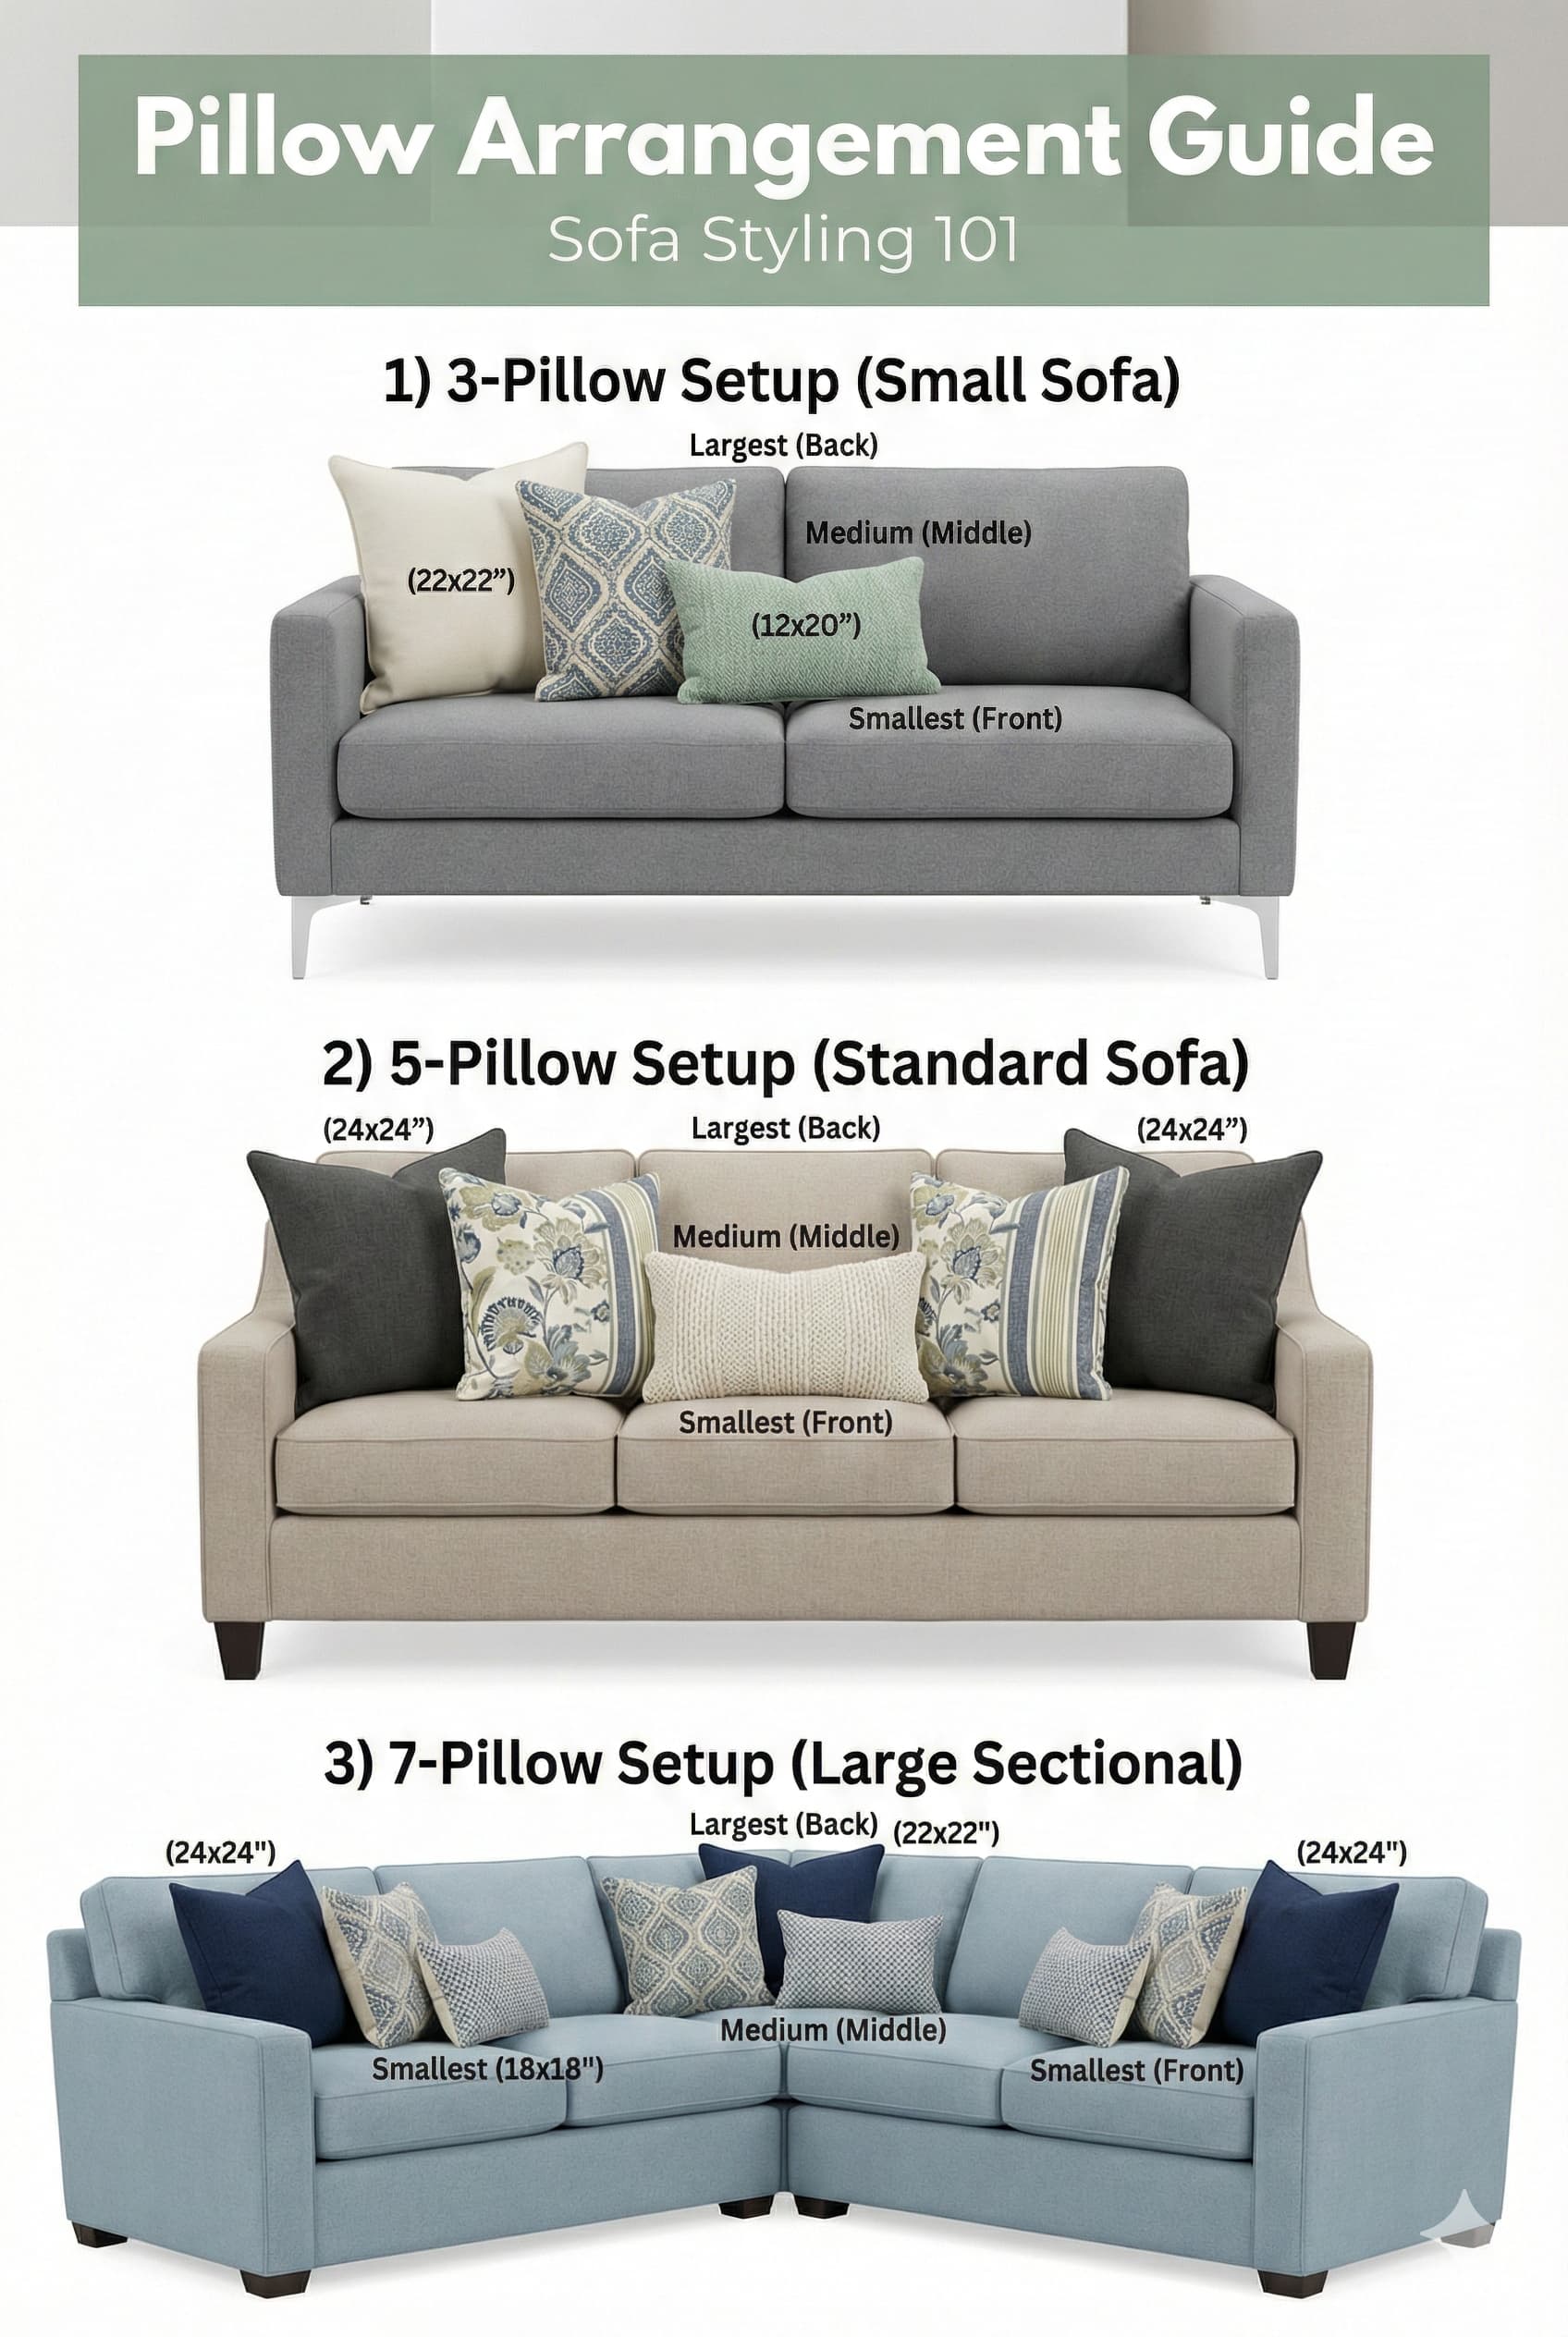
Throw pillows provide accessible color, pattern, and texture introductions allowing seasonal refreshing and style evolution without major investments. Pillow quantities vary by furniture size – sofas fit 5-9 pillows, loveseats hold 3-5 pillows, chairs suit 1-2 pillows depending on scale. Pillow arrangements should balance symmetry and asymmetry creating curated rather than perfectly matched or completely random appearances.
Pillow sizes progress from largest at sofa ends to smallest at center creating dimensional layering. Standard progression uses 22-inch pillows at ends, 20-inch pillows in middle positions, and 18-inch or lumbar pillows at center. Varying sizes creates visual interest and comfortable functional arrangement. Living room pillows all matching size appear flat and uninspired lacking dimensional sophistication.
Pillow patterns should mix scales and styles maintaining shared color elements ensuring coordination. Combine large-scale pattern (large floral, oversized geometric) with medium-scale pattern (stripe, medium geometric) and small-scale pattern or solid creating balanced varied display. Limit patterns to 3-4 maximum per sofa preventing chaotic overload. Pattern mixing intimidates many homeowners though following scale-variation and color-coordination principles ensures successful results.
⚠ PAIN POINT: My pillow patterns clash looking mismatched and chaotic rather than intentionally curated
✓ SOLUTION: Establish color palette first (3-4 colors maximum) then select all patterns incorporating those colors. Include one large-scale pattern, one medium-scale pattern, one small-scale or solid preventing same-scale pattern competition. Limit pattern types to 2-3 styles (examples: geometric + floral, stripe + abstract, botanical + texture). Order fabric samples before purchasing viewing together under living room lighting confirming coordination. Use online pillow combination tools visualizing arrangements before purchasing. Start with fewer pillows (3-5) in coordinated patterns adding more as confidence builds.
Pillow construction includes down-filled (soft, moldable, expensive, requires fluffing), polyester-filled (affordable, holds shape, may flatten over time), and foam-core with down-wrap (maintains shape while providing softness). Pillow inserts should measure 2 inches larger than covers (22-inch insert in 20-inch cover) creating full plump appearance preventing deflated flat pillows. Budget pillows with undersized inserts appear sad and inadequate despite attractive covers.
Loveseat (60-72 inches) | 3-5 pillows | 20″, 18″, 20″ OR 22″, 20″, 20″, 22″ | Symmetrical |
Standard Sofa (84-90 inches) | 5-7 pillows | 22″, 20″, 18″, 20″, 22″ | Symmetrical with center variation |
Oversized Sofa (92-96 inches) | 7-9 pillows | 22″, 20″, 20″, 18″ lumbar, 20″, 20″, 22″ | Layered symmetrical |
Sectional | 6-10 pillows | 22″ corners, 20″ middle, 18″ or lumbar center | Distributed along seating |
Lumbar pillows (12×20 or 14×26 inches) provide lower back support and dimensional variety in pillow arrangements. These horizontal accent pillows layer in front of larger square pillows creating depth. Lumbar pillow patterns often employ bolder graphics or patterns given smaller size preventing pattern dominance across entire arrangement. Lumbar pillows suit contemporary aesthetics particularly well given architectural forms.

Area rug selection and placement significantly impacts living room aesthetics and spatial perception. Properly sized rugs anchor furniture groupings, define functional zones, add color and pattern, protect flooring, and provide sound dampening and warmth. Undersized rugs appear inadequate floating in space while oversized rugs overwhelm rooms preventing proper furniture placement.
Rug sizing rules for living rooms recommend all furniture legs on rug (comprehensive furniture island) or front furniture legs only on rug (defining conversation zone). Avoid floating rugs with no furniture contact appearing disconnected from furniture arrangement. Common living room rug sizes include 8×10 feet (suits medium rooms 250-350 square feet), 9×12 feet (large rooms 350-450 square feet), or 10×14 feet (extra large rooms 450+ square feet).
Rug placement should maintain 12-24 inches bare flooring between rug edges and walls rather than wall-to-wall carpet appearance. This negative space frames rug creating intentional area rug installation rather than inadequate wall-to-wall attempt. Living room rugs floating centered in rooms without wall space appear appropriate in open concept layouts where rugs define spatial zones.
⚠ PAIN POINT: I bought an 8×10 rug for my living room but it looks too small floating awkwardly in space
✓ SOLUTION: Size up to 9×12 or 10×14 rug accommodating all furniture legs on rug rather than front legs only. Alternatively, reposition furniture closer together allowing existing 8×10 rug to fit all front legs. Layer smaller rug over larger neutral jute or sisal rug creating expanded rug footprint without replacing existing investment. Accept 8×10 size limitations positioning furniture strategically maximizing rug coverage. Consider return/exchange if within return window – correct rug size dramatically impacts room aesthetics justifying replacement investment.
Rug padding beneath area rugs prevents sliding, adds cushioning, protects flooring from rug backing, and extends rug life through reduced wear. Quality rug pads cost $0.50-2 per square foot providing essential functionality justifying investment. Felt-rubber combination pads suit hard flooring while natural rubber pads work over carpet. Cut pads 2 inches smaller than rugs on all sides keeping pads invisible beneath rug edges.
Small (150-200 sq ft) | 5×8 or 6×9 feet | Front legs only | 18-24 inches |
Medium (250-350 sq ft) | 8×10 feet | Front legs or all legs | 18-24 inches |
Large (350-450 sq ft) | 9×12 feet | All furniture legs | 18-24 inches |
Extra Large (450+ sq ft) | 10×14 or 12×15 feet | All furniture legs | 24-36 inches |
Rug materials including wool (natural, durable, expensive), synthetic (affordable, stain-resistant, varied quality), natural fibers (jute, sisal, seagrass providing texture), and cotton (affordable, machine-washable, less durable) offer varied characteristics. Living room rugs in moderate traffic areas perform well in wool or quality synthetics. Natural fiber rugs suit low-traffic areas or layering beneath other rugs. Machine-washable cotton rugs benefit households with pets or young children requiring frequent cleaning.
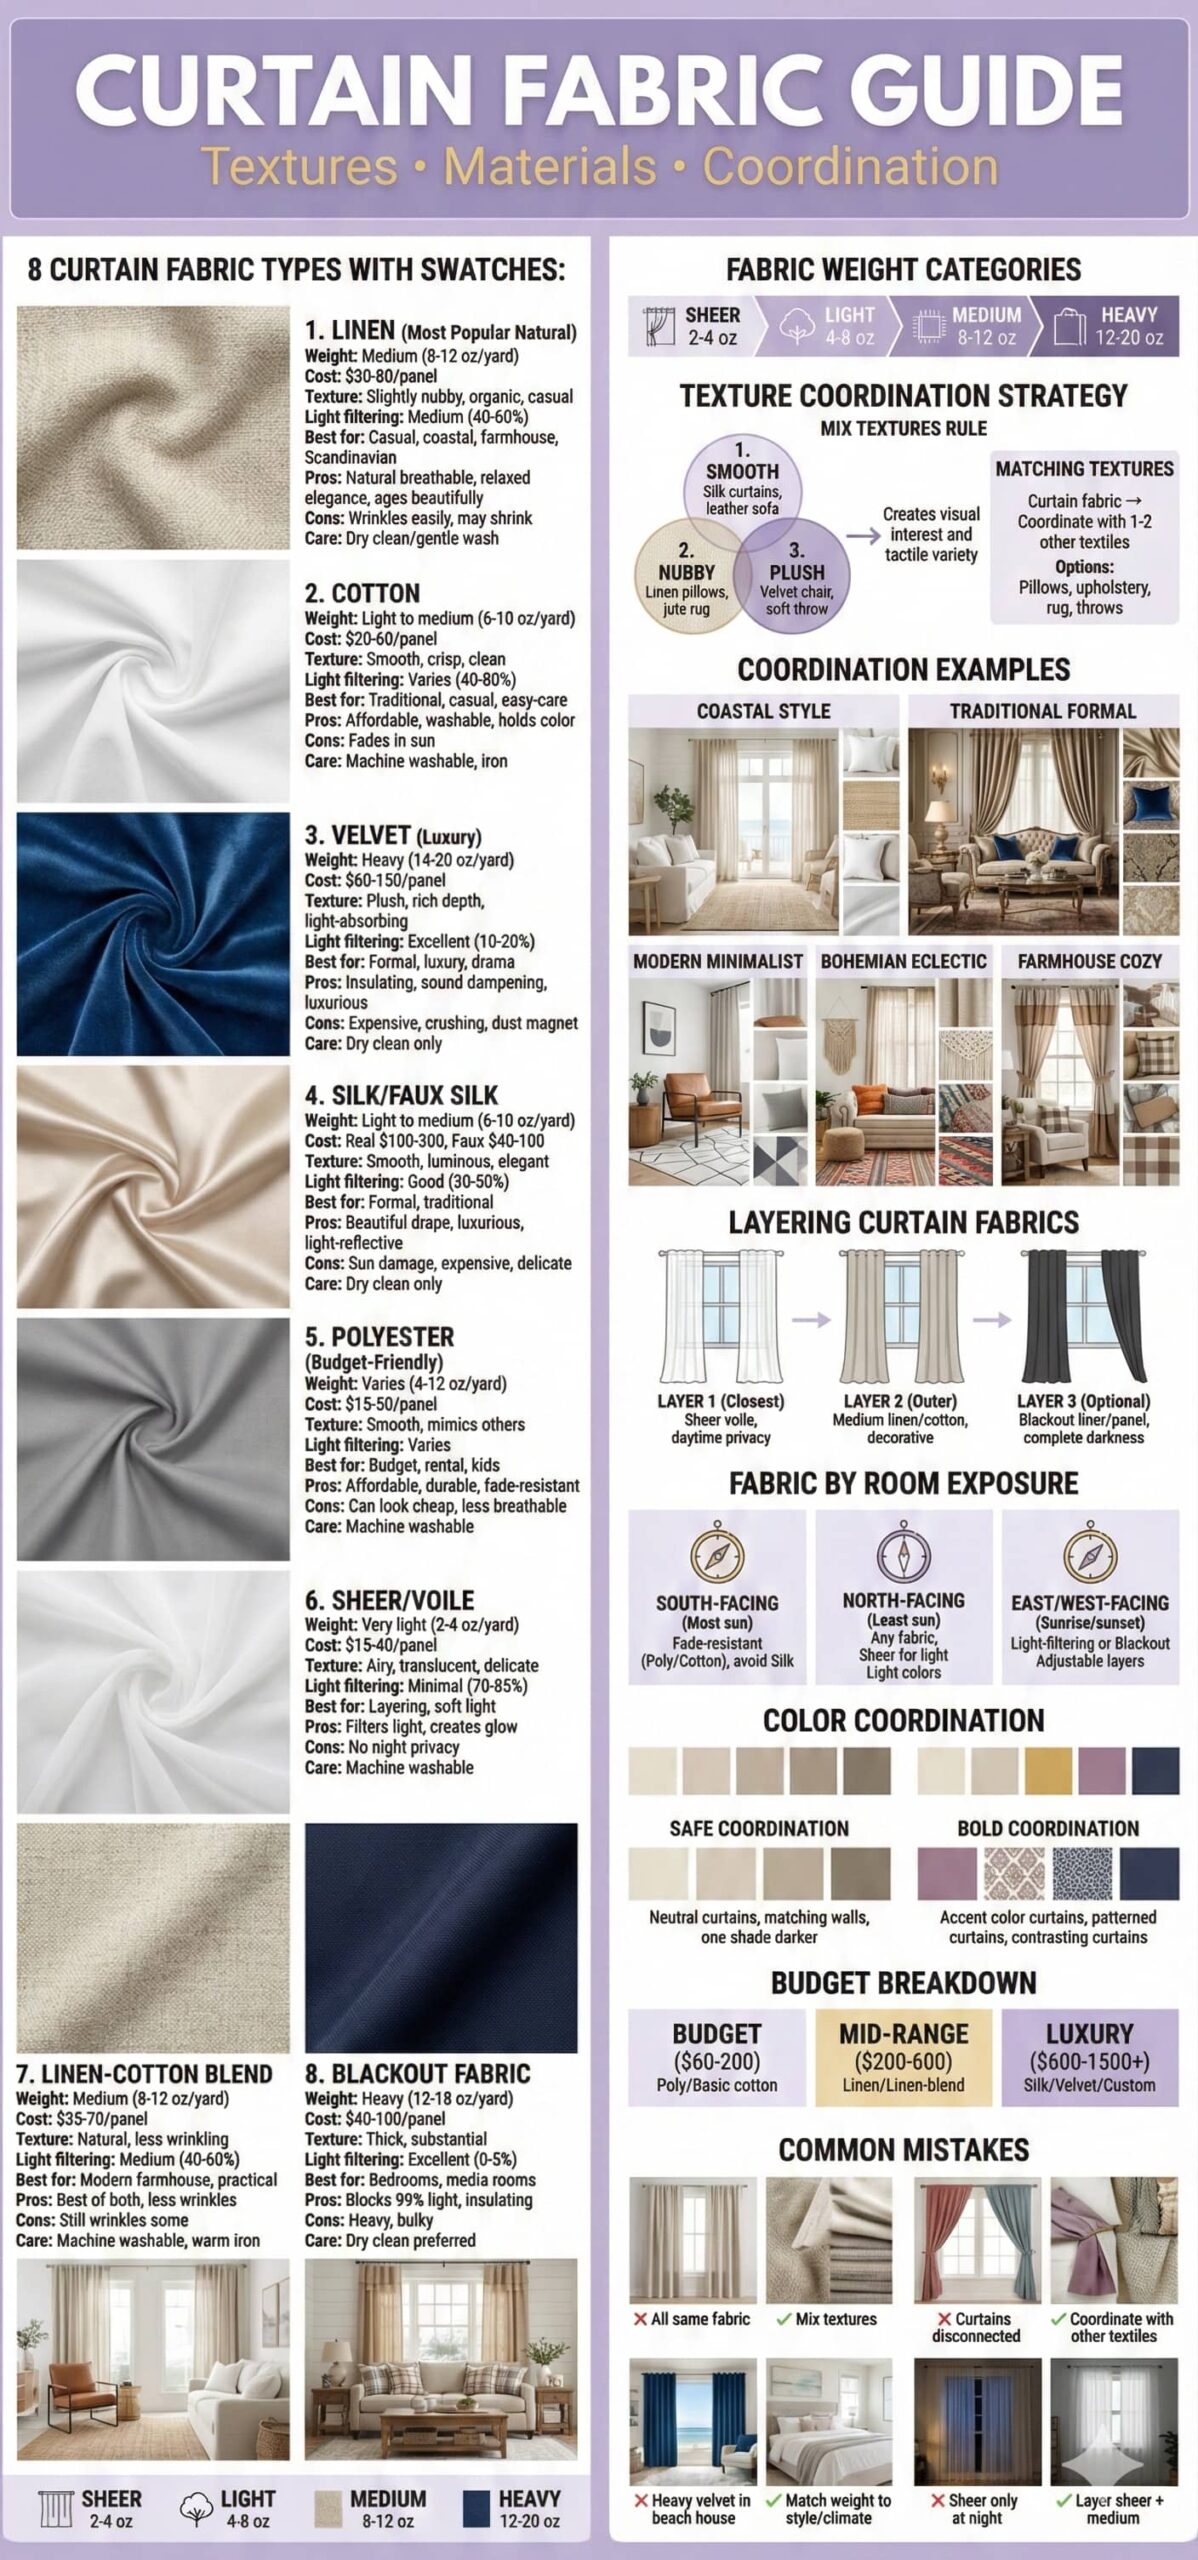
Curtain fabric selection impacts light filtering, privacy provision, maintenance requirements, and aesthetic contribution. Fabric weight ranges from sheer lightweight voiles to heavy lined draperies affecting both functional performance and visual appearance. Living room curtains typically employ medium to heavy weight fabrics providing adequate privacy and light control while creating substantial visual presence.
Linen curtains provide natural texture and casual elegance suitable for transitional and contemporary living rooms. Linen naturally wrinkles creating relaxed organic aesthetic though some find wrinkled appearance unkempt. Linen-cotton blends reduce wrinkling while maintaining natural character. Linen fabric typically requires dry cleaning though some lighter linens allow gentle machine washing maintaining appearance longer term.
Velvet curtains create luxurious traditional statement through rich texture and excellent light-blocking properties. Heavy velvet drapes provide sound dampening and energy efficiency benefits beyond aesthetic contributions. Velvet requires professional dry cleaning maintaining appearance and avoiding crushing. Velvet curtains suit formal traditional or glamorous living rooms where luxury textile display creates desired atmospheric effect.
⚠ PAIN POINT: My curtain fabric looks cheap or wrinkled rather than polished and professional
✓ SOLUTION: Select quality fabric with adequate weight (6-8 oz per square yard minimum) creating attractive folds rather than limp flat appearance. Order lined curtains providing body, light blocking, and protection from sun damage. Steam or iron curtains after installation and seasonally maintaining crisp appearance. Select linen-cotton blends rather than 100% linen if wrinkled appearance concerns you. Invest in custom curtains using quality fabrics rather than budget ready-made panels if budget allows ($200-600 per window custom vs $40-150 ready-made). Accept that natural fabrics including linen and silk develop character through slight wrinkling distinguishing them from stiff synthetic alternatives.
Cotton curtains provide versatile affordable option with easy care machine-washable maintenance. Cotton accepts dye readily offering unlimited color options while providing moderate weight and opacity. Cotton-polyester blends reduce wrinkling and shrinkage while maintaining cotton aesthetic. Cotton curtain panels suit casual and transitional living rooms where easy maintenance and affordability take priority over luxury textiles.
Sheer Voile | Lightweight, 10-20% opacity | Machine wash | $20-60 | Contemporary, layered treatments |
Cotton | Medium, 50-70% opacity | Machine wash | $40-120 | Casual, transitional |
Linen | Medium-heavy, 60-80% opacity | Dry clean or gentle wash | $60-200 | Transitional, contemporary |
Linen-Cotton Blend | Medium, 60-75% opacity | Machine wash | $50-150 | Transitional, contemporary |
Velvet | Heavy, 80-95% opacity | Dry clean only | $80-300 | Traditional, glamorous |
Polyester (lined) | Medium-heavy, 70-90% opacity | Machine wash | $40-150 | Any style |
Texture mixing across living room textiles creates dimensional interest preventing flat monotonous appearances. Combine smooth curtains with textured throw pillows, nubby wool rugs with sleek leather furniture, or velvet pillows with linen curtains creating tactile variety. Textile layers in varied textures add sophisticated complexity elevating overall design quality beyond single-texture approaches appearing simplistic or bland.
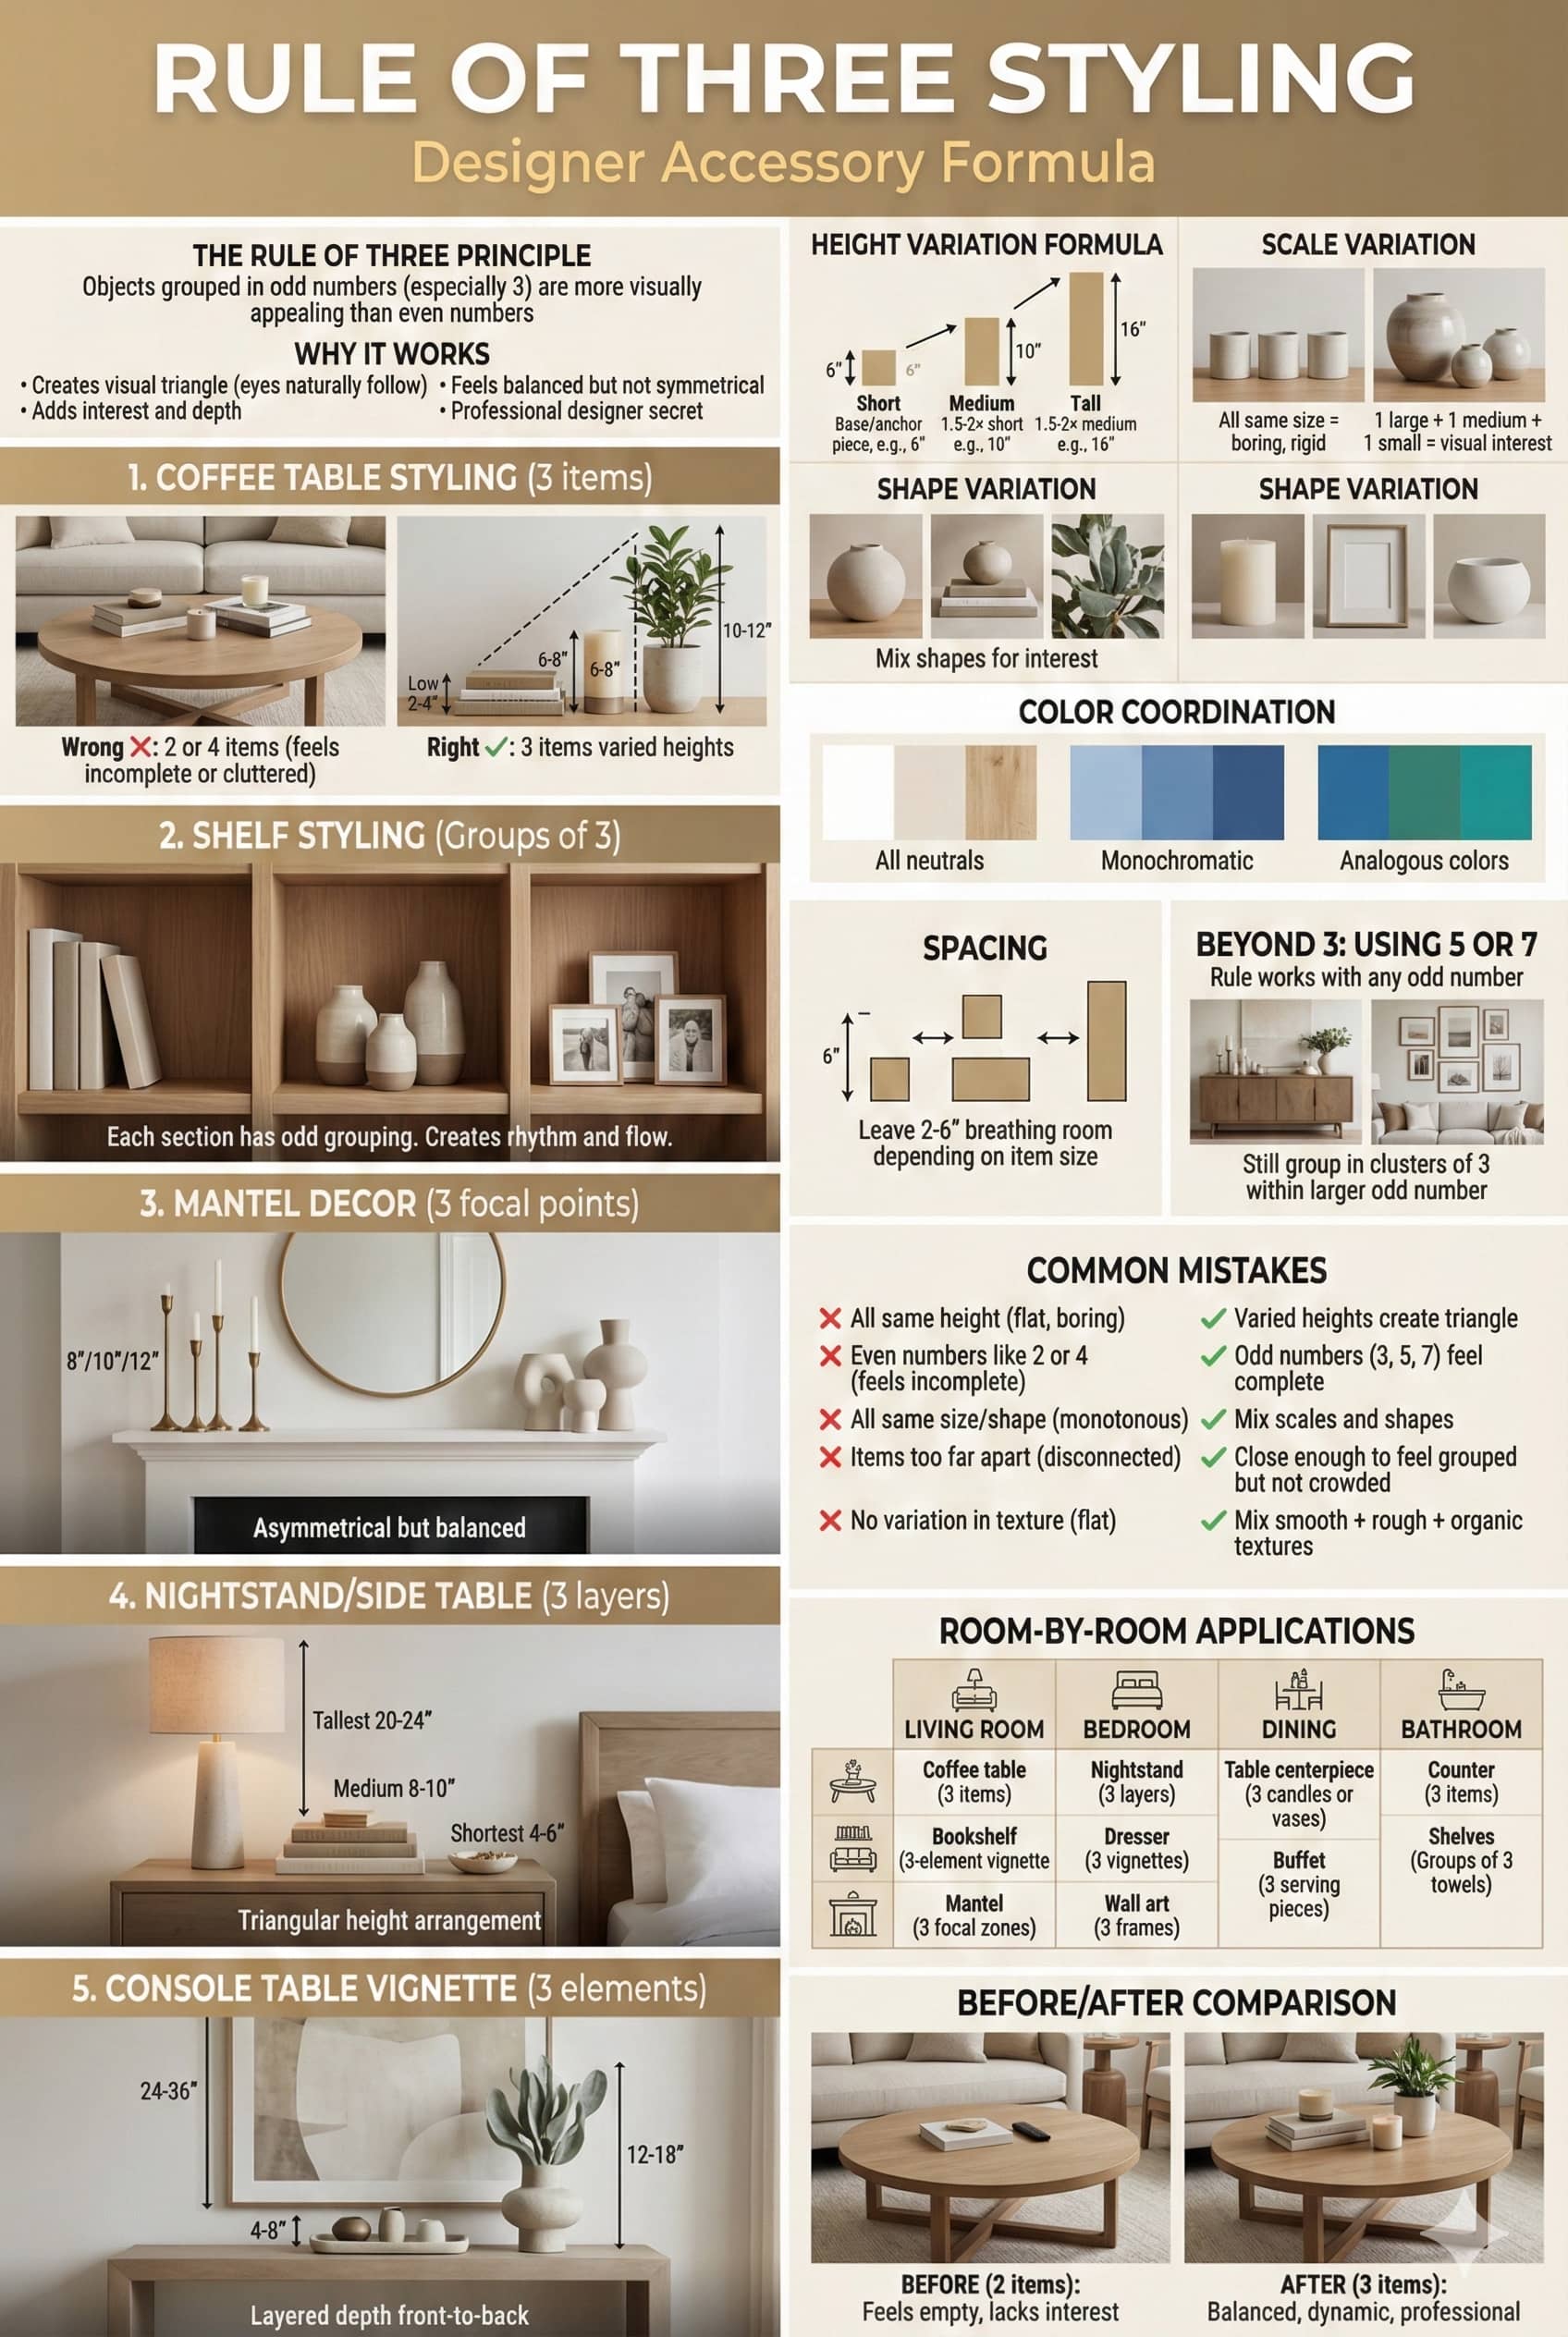
Living room accessories including vases, bowls, books, candles, plants, and decorative objects personalize spaces creating character and visual interest. Styling accessories provides opportunity for seasonal refreshing and personal expression without major investments. But excessive accessories create cluttered chaotic appearances while insufficient accessories leave rooms appearing stark and incomplete. Balance requires thoughtful curation and disciplined editing.
Coffee table styling creates focal point displays combining function and aesthetics. Successful arrangements typically include books (2-4 stacked as base), organic element (plant, flowers, or natural object), and decorative object (sculpture, bowl, or tray). Odd-numbered groupings (3 or 5 items) create more dynamic arrangements than even numbers. Coffee table displays should consume 1/3 to 1/2 table surface leaving remainder clear for functional use (beverages, remotes, laptops).
Bookshelf styling balances book storage with decorative display creating curated edited appearance rather than library stacks. Implement vertical AND horizontal book stacking creating dimensional variation. Intersperse decorative objects breaking up book rows every 2-3 feet preventing wall-of-books appearance. Include negative space leaving 30-40 percent shelves empty rather than filling completely. Bookshelf arrangements require periodic editing removing accumulated items no longer meaningful or attractive.
⚠ PAIN POINT: My living room accessories look cluttered and random rather than curated and intentional
✓ SOLUTION: Limit accessories to meaningful beautiful pieces – remove everything lacking story or aesthetic value. Group items in odd numbers (3, 5, 7) rather than even groupings. Vary accessory heights within groupings creating dimensional interest. Leave substantial negative space (40-50% of surfaces) empty rather than covering every inch. Edit seasonally removing 1/3 accessories rotating storage rather than permanent display. Create intentional vignettes with shared color, material, or theme rather than random unrelated objects. Remove items until arrangement feels edited and intentional – err toward too few rather than too many accessories.
Plant styling includes living organic elements softening hard architecture and furniture while providing documented air quality and psychological benefits. Living room plants including fiddle leaf figs, snake plants, pothos, or rubber trees require appropriate light conditions and consistent care. Large floor plants (4-6 feet tall) create architectural statements while smaller table plants add organic softness. Maintenance-averse households substitute high-quality faux plants achieving similar aesthetic without care responsibilities.
Coffee Table | 3-5 items | Stack books, add organic element | Overcrowding, blocking function |
Bookshelf | 50-60% books, 20-30% objects, 20-30% empty | Vary vertical/horizontal, add objects | Filling completely, no negative space |
Console Table | 3-7 items | Vary heights, create vignettes | Symmetrical rigid arrangements |
Side Table | 1-3 items | Lamp + 1-2 small objects | Overcrowding small surface |
Mantel | 5-9 items | Asymmetrical balance, layer depths | Perfect symmetry, too minimal |
Walls | 3-7 items per wall | Varied sizes, unified theme | Random small items, no scale |
Seasonal styling refreshes living room aesthetics through changing throw pillow covers, adding seasonal florals or botanicals, rotating displayed accessories, or introducing seasonal color accents. Fall may feature warm rust and orange tones with pumpkins and dried arrangements. Winter includes evergreens and metallics. Spring embraces fresh florals and pastels. Summer features light breezy coastal elements. Seasonal updates maintain fresh current aesthetic without complete room redesign.
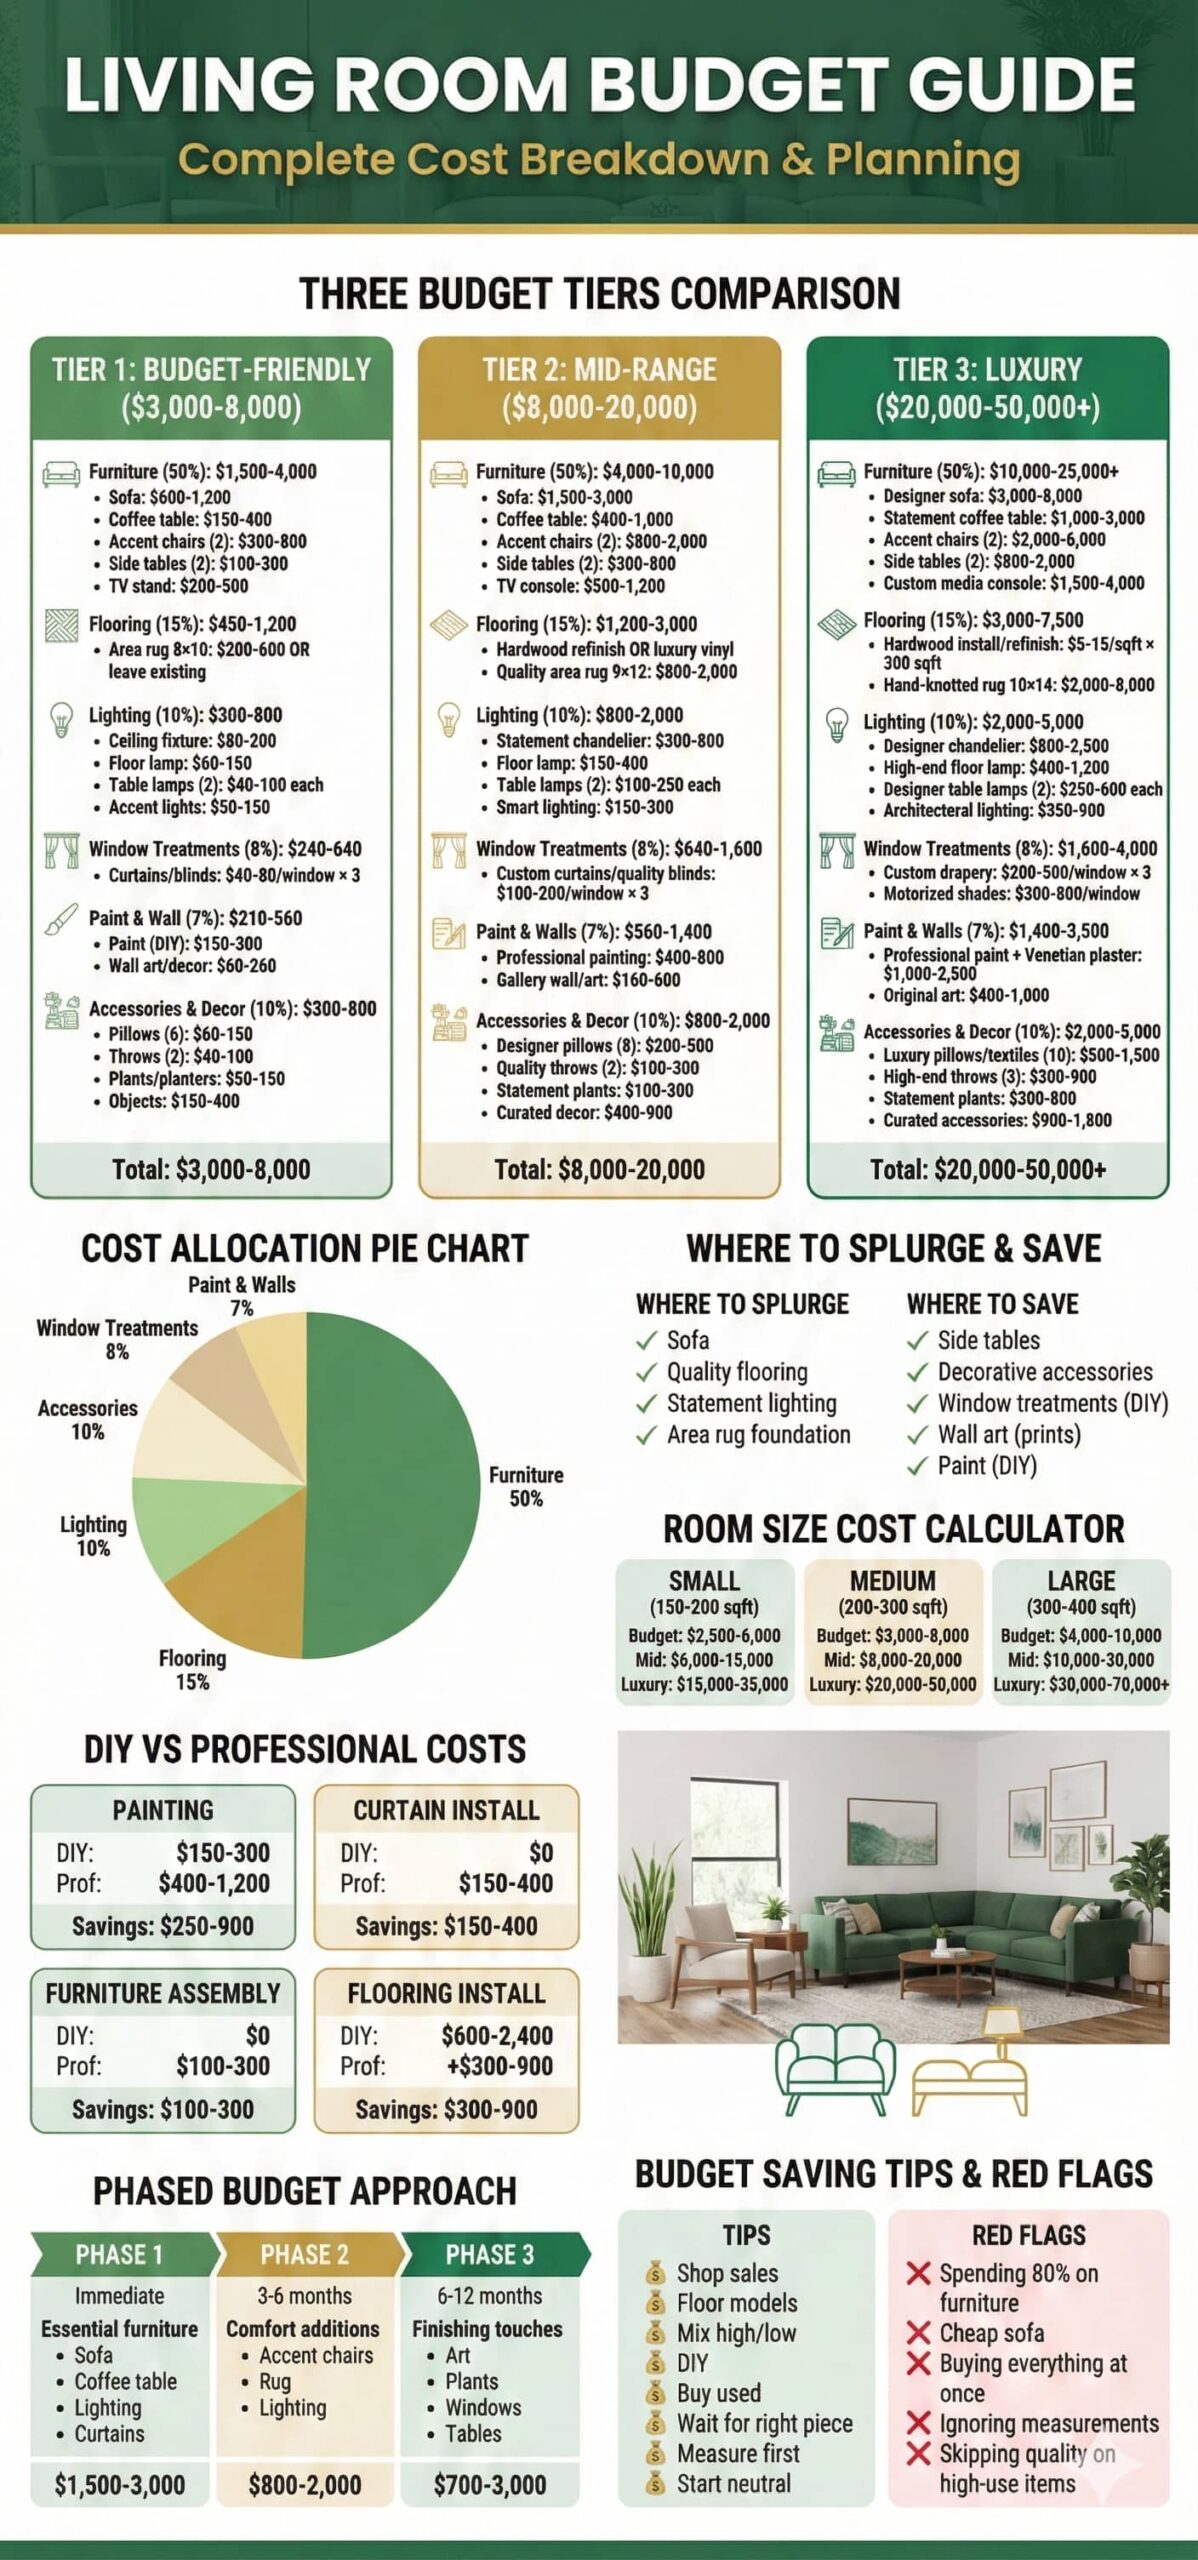
Living room design budgets vary dramatically from minimal refreshing ($500-2,000) to comprehensive renovations ($15,000-50,000+) depending on scope, quality expectations, and existing conditions. Budget planning requires realistic cost assessment, priority identification, and phased put in placeation strategies preventing financial stress while creating satisfying results. Understanding typical cost ranges for furnishings, finishes, and services enables informed decision-making and effective budget allocation.
Furniture investment typically consumes 40-50 percent total living room budget with sofas representing largest single expense ($800-5,000+). Additional seating, tables, storage furniture, and accessories consume remaining furniture budget. Quality furniture lasting 10-25+ years justifies higher initial investment compared to budget alternatives requiring replacement every 3-7 years. Total furniture costs for complete living room furnishing ranges $3,000-20,000+ depending on quality and quantity selections.
Finish investment including flooring, window treatments, lighting, and paint comprises 30-40 percent total budget. Flooring represents largest finish expense ($2-15+ per square foot installed) followed by window treatments ($100-600+ per window), lighting fixtures ($50-500+ each), and paint ($200-800 for average room). Finish selections significantly impact long-term satisfaction justifying careful consideration and appropriate budget allocation rather than excessive cost-cutting compromising results.
⚠ PAIN POINT: I started my living room project with $5,000 budget but actual costs exceeded $12,000 creating financial stress and project abandonment
✓ SOLUTION: Research actual costs before establishing budget – use online pricing guides, visit retailers noting prices, request contractor quotes for services needed. Add 20-30% contingency to estimated costs accounting for unexpected expenses and scope expansion. Create detailed line-item budget tracking all expenses rather than vague total estimate. Prioritize must-have investments (sofa, flooring if needed, paint) deferring nice-to-have items (accent chairs, expensive artwork, designer lighting) until funds available. Implement in phases spreading costs over 6-12 months rather than purchasing everything simultaneously. Accept that quality results require appropriate investment – unrealistic budget expectations guarantee dissatisfaction.
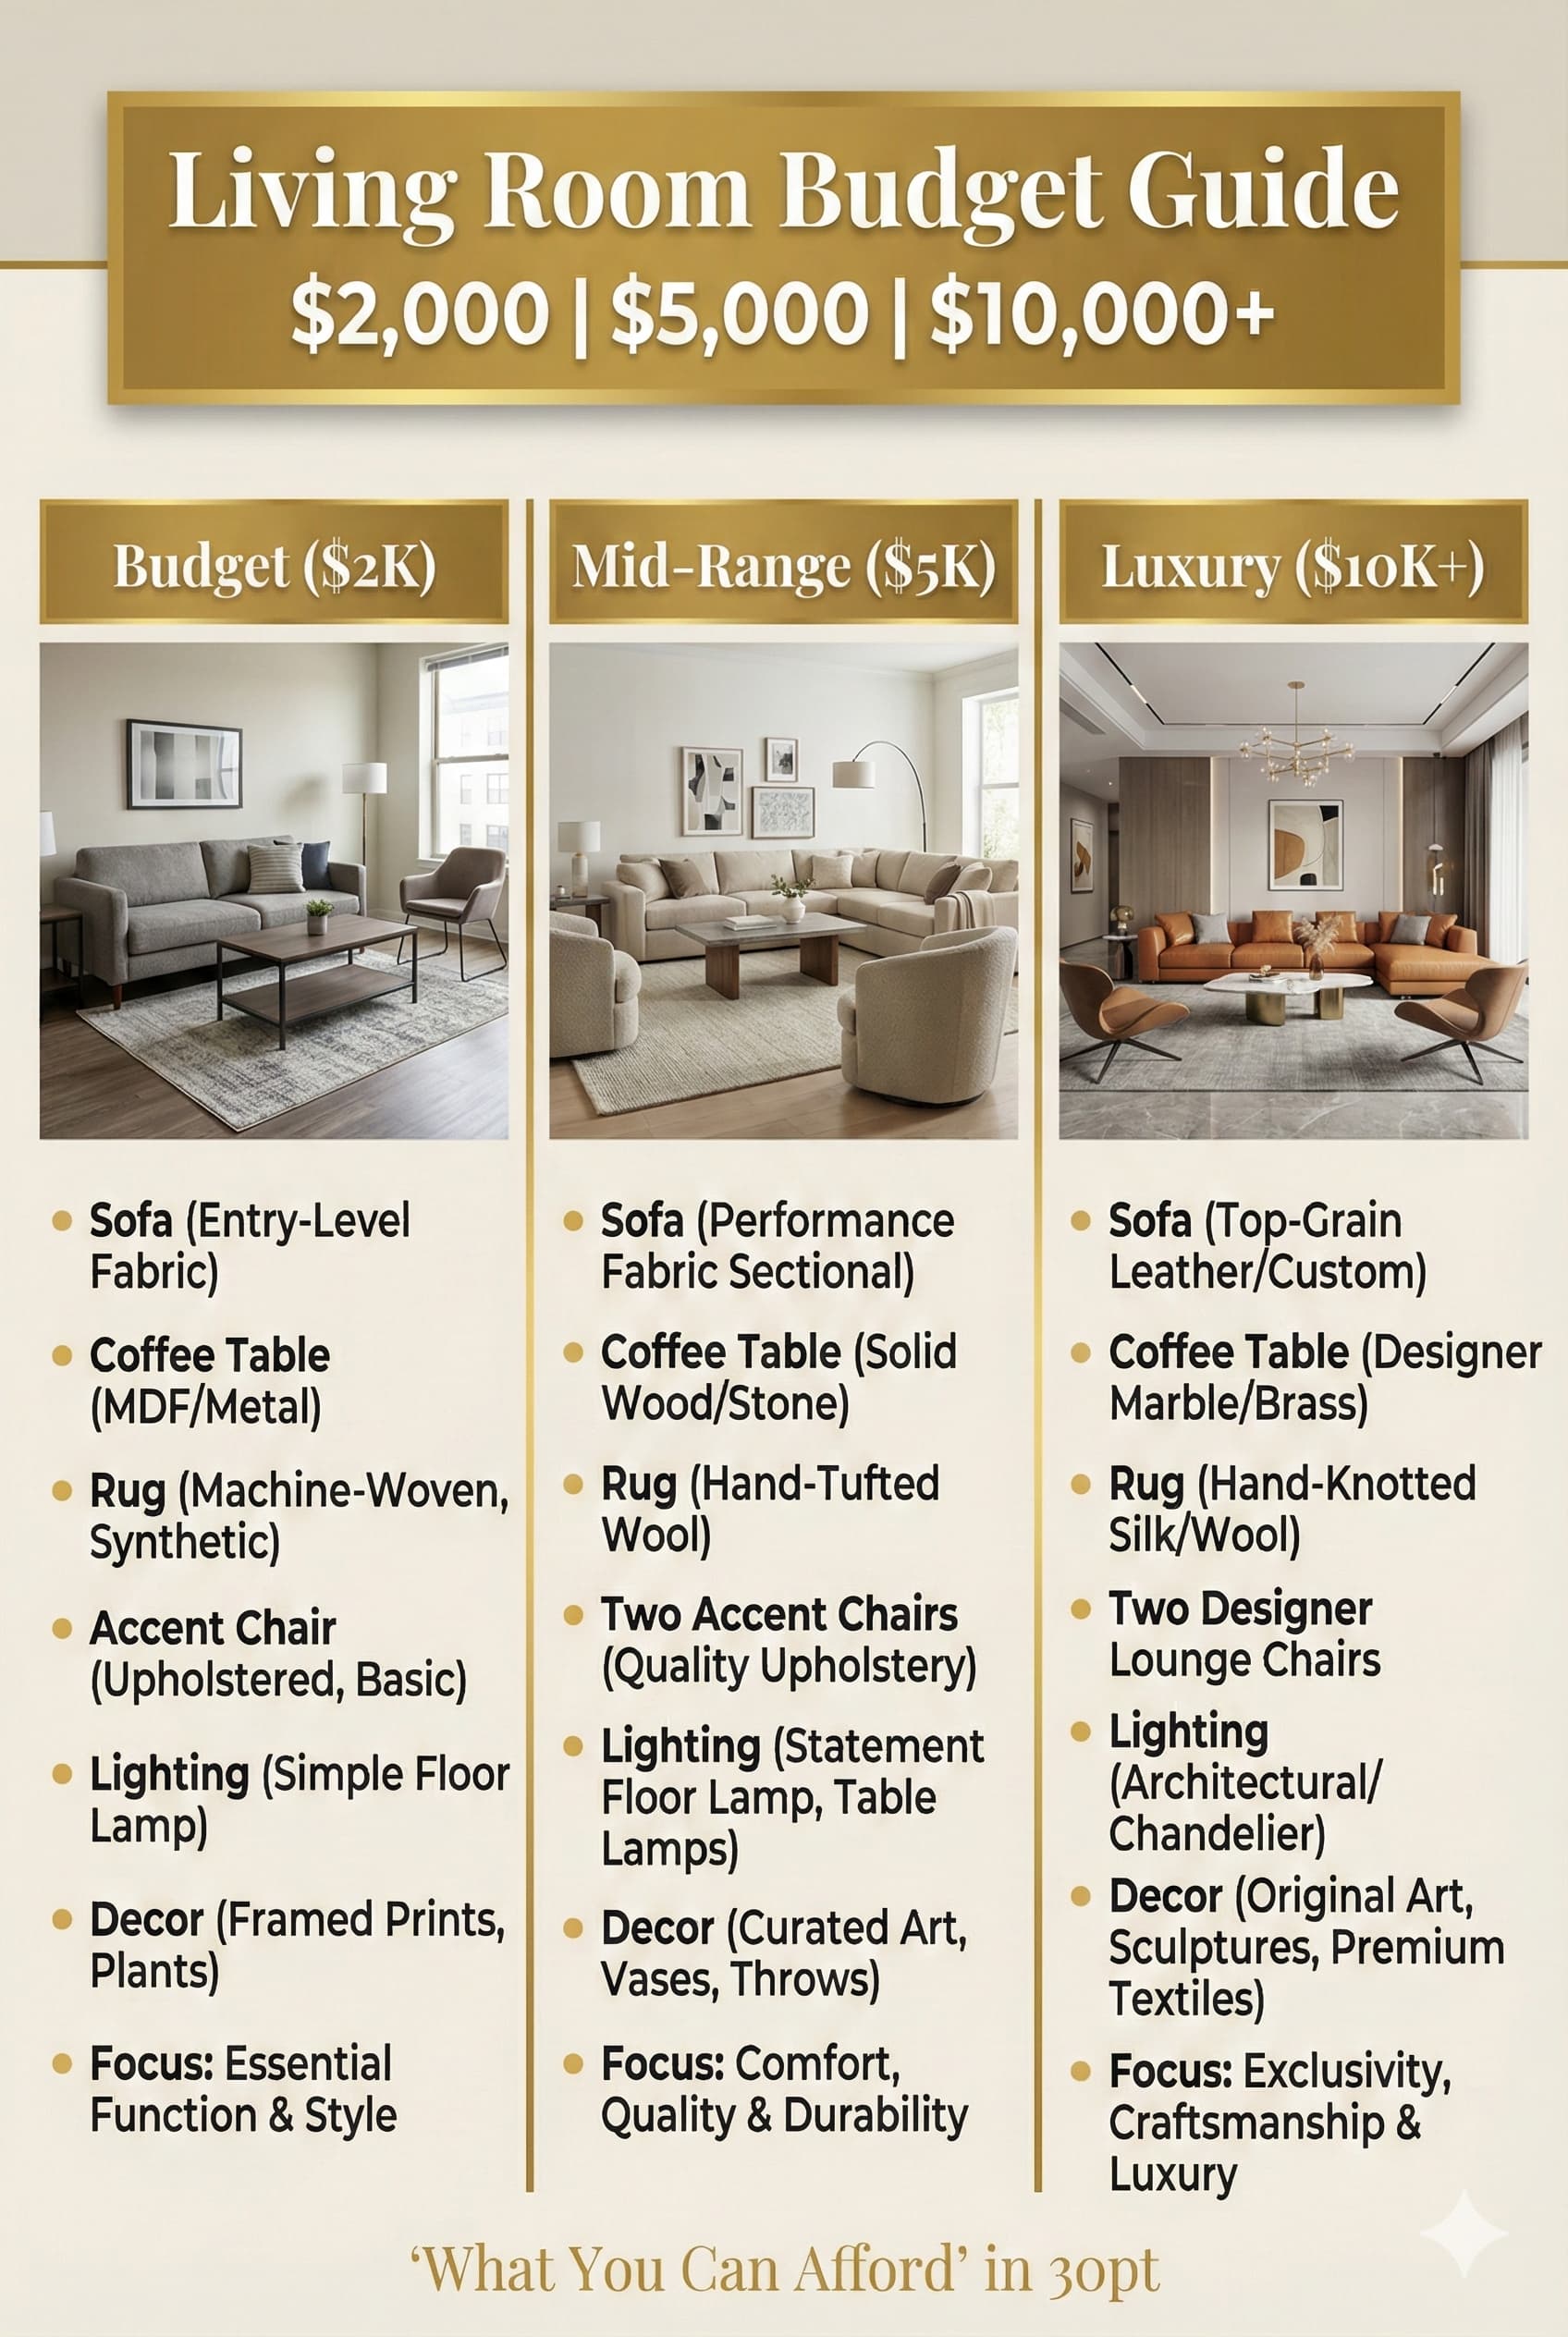
Budget living room design focusing on essential investments and strategic compromises creates attractive functional spaces without excessive spending. This approach prioritizes key pieces (sofa, coffee table, lighting) while economizing on supplementary items (accent furniture, accessories, artwork). Budget strategies include mixing price points (investing in sofa, saving on accent chairs), DIY projects (painting, simple installations), and patient acquisition (buying pieces over time rather than immediately).
Furniture budget allocation for affordable living room design dedicates $1,200-2,500 to seating (sofa or sectional), $200-500 to tables (coffee table, end tables), $150-400 to lighting (lamps, overhead fixture), $100-300 to storage (console, bookcase), and $250-800 to accessories and finishing touches. These allocations require careful shopping, sales monitoring, and willingness to accept mass-produced furniture rather than custom or designer pieces.
Budget furniture sources include mass-market retailers (IKEA, Target, Wayfair, Amazon), discount furniture stores (Bob’s Discount, Ashley Furniture Outlet), secondhand sources (Facebook Marketplace, Craigslist, estate sales), and end-of-season sales at traditional furniture stores. Budget sofa options ($500-1,200) sacrifice premium construction and fabric quality but provide functional seating lasting 5-10 years with reasonable care. Supplementary seating may involve reupholstering existing pieces ($300-800) rather than purchasing new.
⚠ PAIN POINT: I bought budget furniture to save money but it fell apart within 2-3 years requiring replacement costing more long-term
✓ SOLUTION: Research furniture construction quality rather than focusing solely on aesthetics – check frame materials (kiln-dried hardwood best), joint methods (mortise-and-tenon or screwed/glued superior to stapled), and cushion density (1.8-2.0 density foam minimum). Read reviews extensively identifying budget furniture with surprising quality-price ratios. Accept some quality sacrifices in budget furniture but avoid absolute bottom-tier options guaranteeing rapid failure. Consider investing in quality sofa ($1,500-2,500) while economizing on accent furniture, tables, and accessories having less impact on comfort and longevity. Plan replacement horizon realistically – budget furniture requires refresh every 5-8 years rather than decades.
DIY projects substantially reduce living room design costs while personalizing spaces. Painting walls ($50-150 in supplies), installing floating shelves ($30-80 per shelf), refinishing existing furniture ($50-150 per piece), and creating artwork ($20-100) provides substantial cost savings compared to professional services or purchased alternatives. Budget DIY approach requires time investment and basic skills but creates customized spaces within limited budgets.
Sofa | $500-1,200 | Sales, floor models, mass market | Ultra-cheap particle board frames |
Accent Chairs | $150-400 each | Secondhand, DIY reupholster | Cheapest foam cushions |
Coffee Table | $100-300 | Secondhand, DIY refinish | Particleboard construction |
End Tables | $50-150 each | Mass market, simple designs | Wobbly construction |
Lighting | $50-200 total | Simple designs, smart bulbs | Cheapest fixtures, no dimming |
Area Rug | $150-500 | Synthetic, online retailers, sales | Ultra-thin low-quality construction |
Window Treatments | $100-300 total | Ready-made panels, simple rods | Sheer cheap fabrics, inadequate fullness |
Paint/Finish | $100-300 | DIY painting, fewer accent walls | Lowest-grade paint, skipping primer |
Accessories | $100-500 | Secondhand, DIY, plants | Excessive accessories, cheap tchotchkes |
TOTAL | $2,000-5,000 | Strategic compromises | Everything cheapest available |
Budget timeline spreads purchases over 3-6 months allowing sale monitoring, patient searching for quality-price combinations, and income-based purchasing preventing debt accumulation. Phase 1 addresses essentials (sofa, paint, lighting), Phase 2 adds supplementary furniture (chairs, tables), and Phase 3 completes styling (accessories, artwork, finishing touches). Phased put in placeation creates livable spaces immediately while allowing quality upgrades over time.
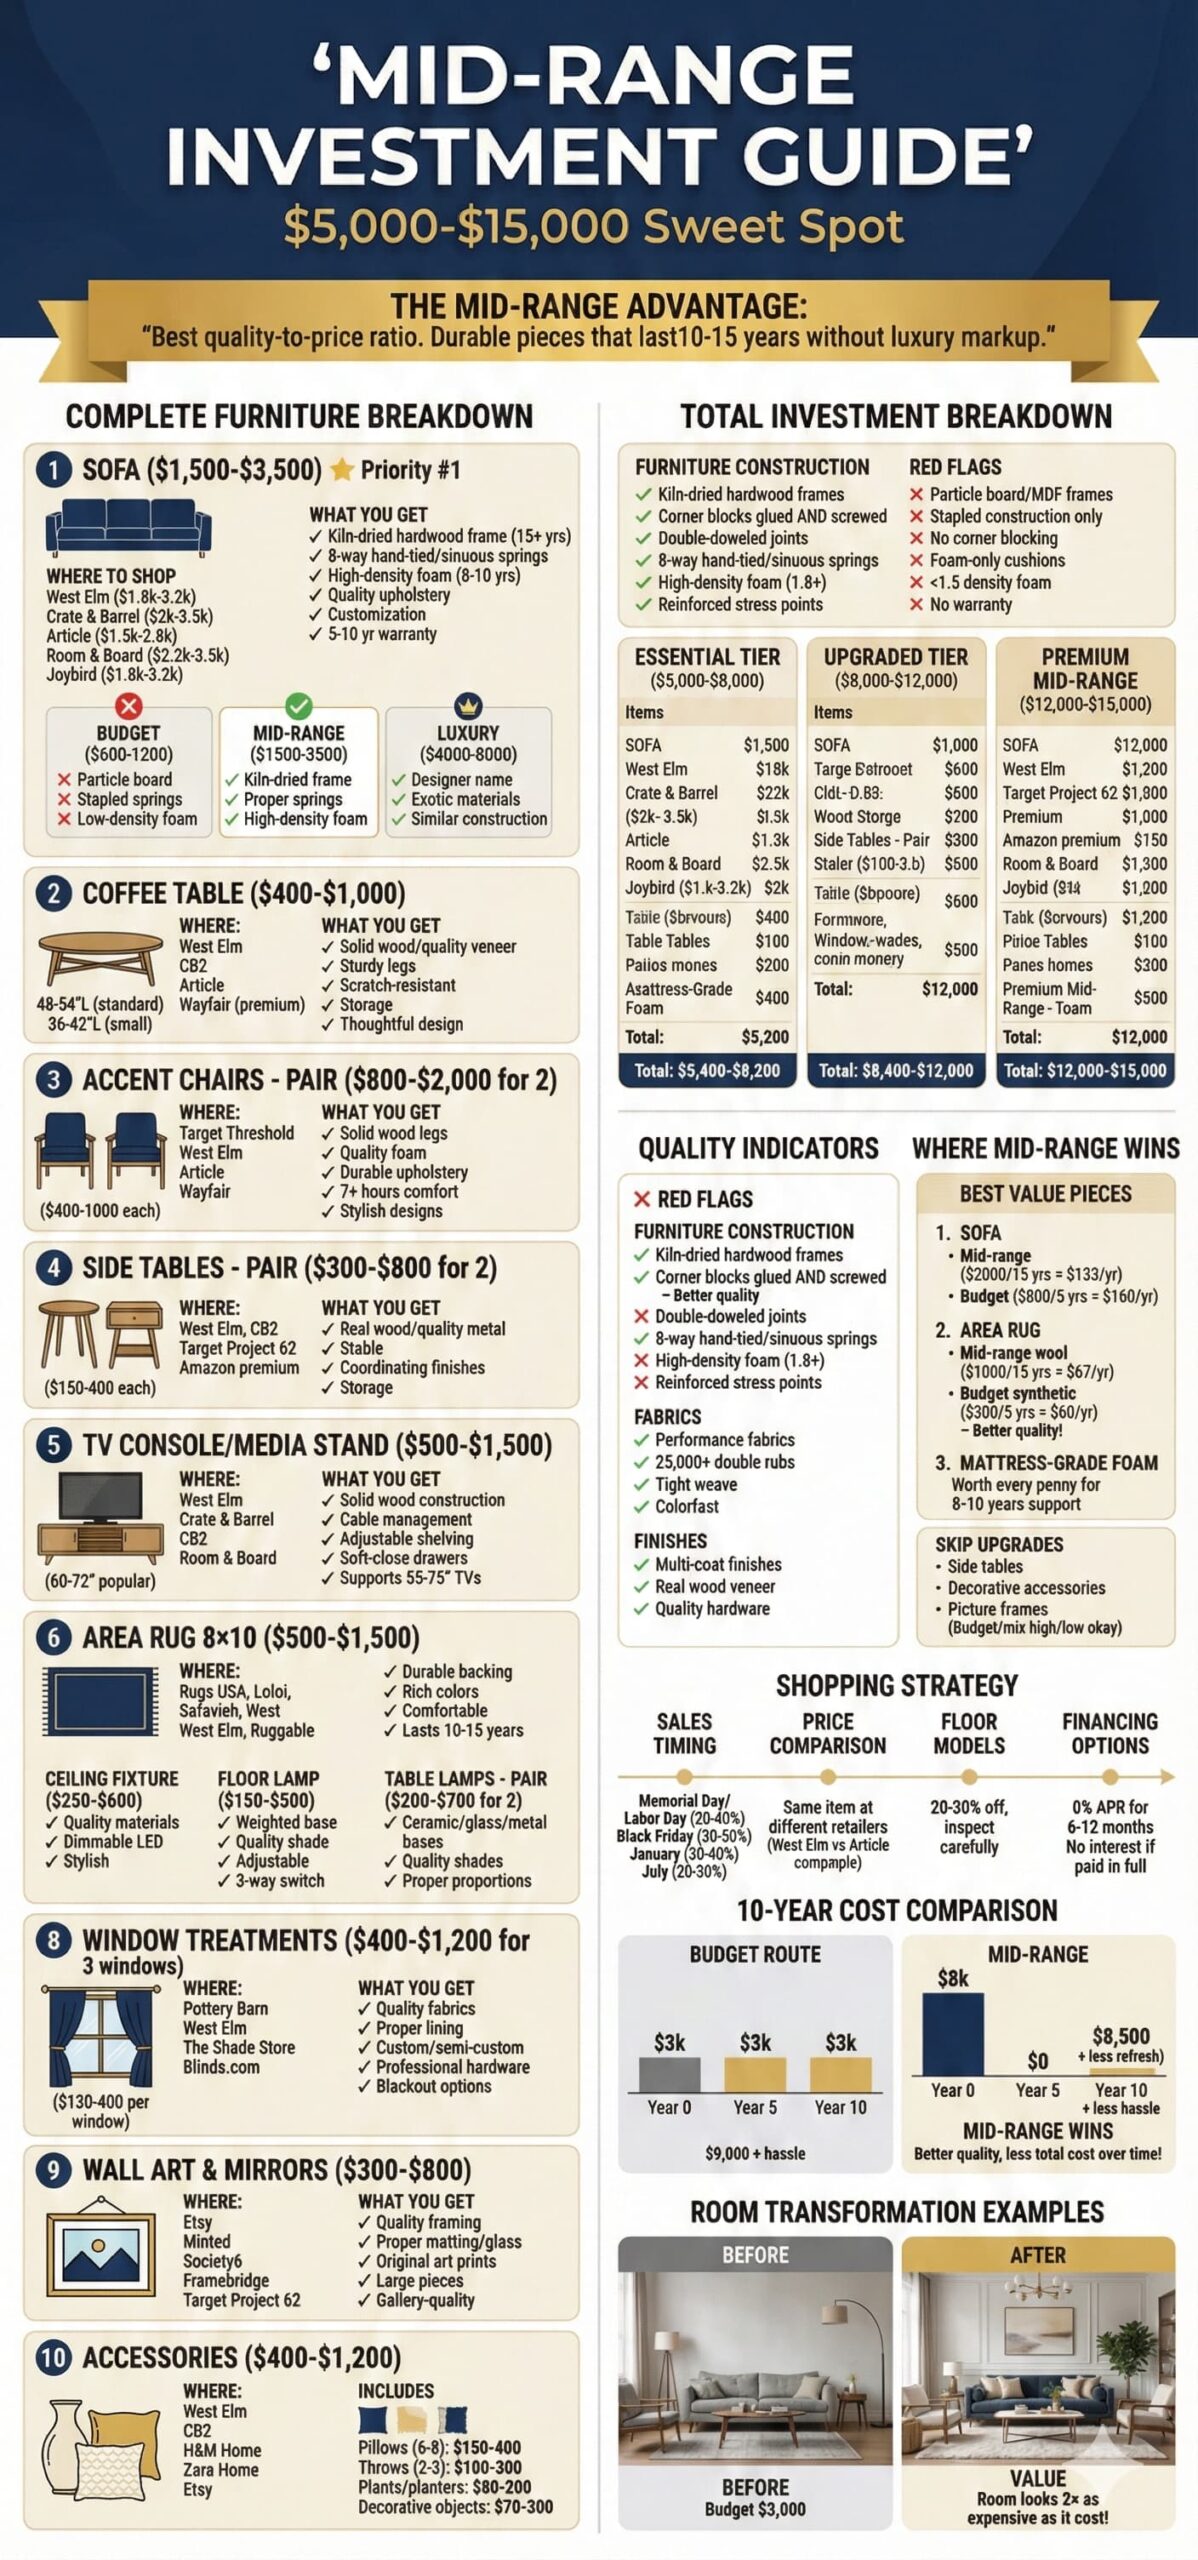
Mid-range living room budgets allow quality furniture investments, comprehensive furnishing, and professional services creating polished attractive spaces without luxury price tags. This budget range fits good construction quality, durable fabrics, and thoughtful design choices resulting in living rooms lasting 10-20 years before requiring major updates. Mid-range investment represents sweet spot balancing cost management with quality outcomes satisfying most homeowner expectations.
Furniture budget allocation for mid-range living room dedicates $2,000-4,500 to primary seating (quality sofa or sectional), $800-2,000 to supplementary seating (2 accent chairs or loveseat), $400-1,000 to tables (coffee table, 2 end tables), $300-800 to storage furniture (console, bookcase), $500-1,500 to lighting (floor lamp, table lamps, overhead fixture), and $800-2,000 to finishing touches (artwork, accessories, rugs, window treatments). These allocations support quality mid-market furniture providing good value-quality relationships.
Professional services including interior designer consultation ($100-300 hourly or $1,000-3,000 project-based), custom window treatments ($200-600 per window), and professional painting ($2-6 per square foot) enhance results through expertise and execution quality. Mid-range budgets afford selective professional assistance on challenging aspects while maintaining DIY approaches on straightforward tasks balancing costs with quality outcomes.
⚠ PAIN POINT: I have mid-range budget but struggle deciding where to invest for maximum impact versus where to economize
✓ SOLUTION: Invest in items used daily and difficult to replace: sofa ($2,000-3,500), quality area rug ($500-1,500), comfortable seating ($600-1,200 per chair). Economize on items easily updated or supplemental: accent tables ($150-400), some lighting ($80-200), accessories ($20-100 each), supplementary textiles ($30-80 per pillow). Allocate budget by impact formula: 40% major furniture, 25% finishes (flooring if needed, window treatments), 20% supplementary furniture and lighting, 15% styling and accessories. This distribution ensures essentials receive appropriate investment while managing total spending.
Quality indicators in mid-range furniture include hardwood or engineered wood frames (avoiding particle board), screwed and glued joints (avoiding stapled construction), medium to high-density foam cushions (1.8+ density), durable upholstery fabrics (30,000+ double rubs), and reinforced high-stress areas. These construction details support 10-20 year lifespans with reasonable care justifying mid-range investment over budget alternatives requiring replacement within 5-7 years.
Sofa | $1,500-3,500 | Hardwood frame, quality fabric | 10-20 years |
Accent Chairs | $400-1,200 each | Good construction, comfortable | 10-15 years |
Coffee Table | $300-800 | Solid wood or quality veneer | 15-25 years |
End Tables | $150-400 each | Real wood, good finish | 15-25 years |
Area Rug (8×10) | $400-1,500 | Wool or quality synthetic | 10-20 years |
Window Treatments | $200-600 per window | Custom or quality ready-made | 10-15 years |
Lighting | $150-500 per fixture | Quality materials, good design | 15-25 years |
Artwork | $200-2,000 total | Original or quality prints, framed | Permanent |
TOTAL | $5,000-15,000 | Quality lasting 10-20+ years | Good long-term value |
Mid-range timeline put in places over 2-4 months allowing furniture delivery lead times (4-12 weeks typical), professional service scheduling, and thoughtful decision-making preventing rushed purchases. This measured pace enables living with initial purchases before adding supplementary pieces ensuring cohesive results rather than impulsive accumulation creating disconnected aesthetics.
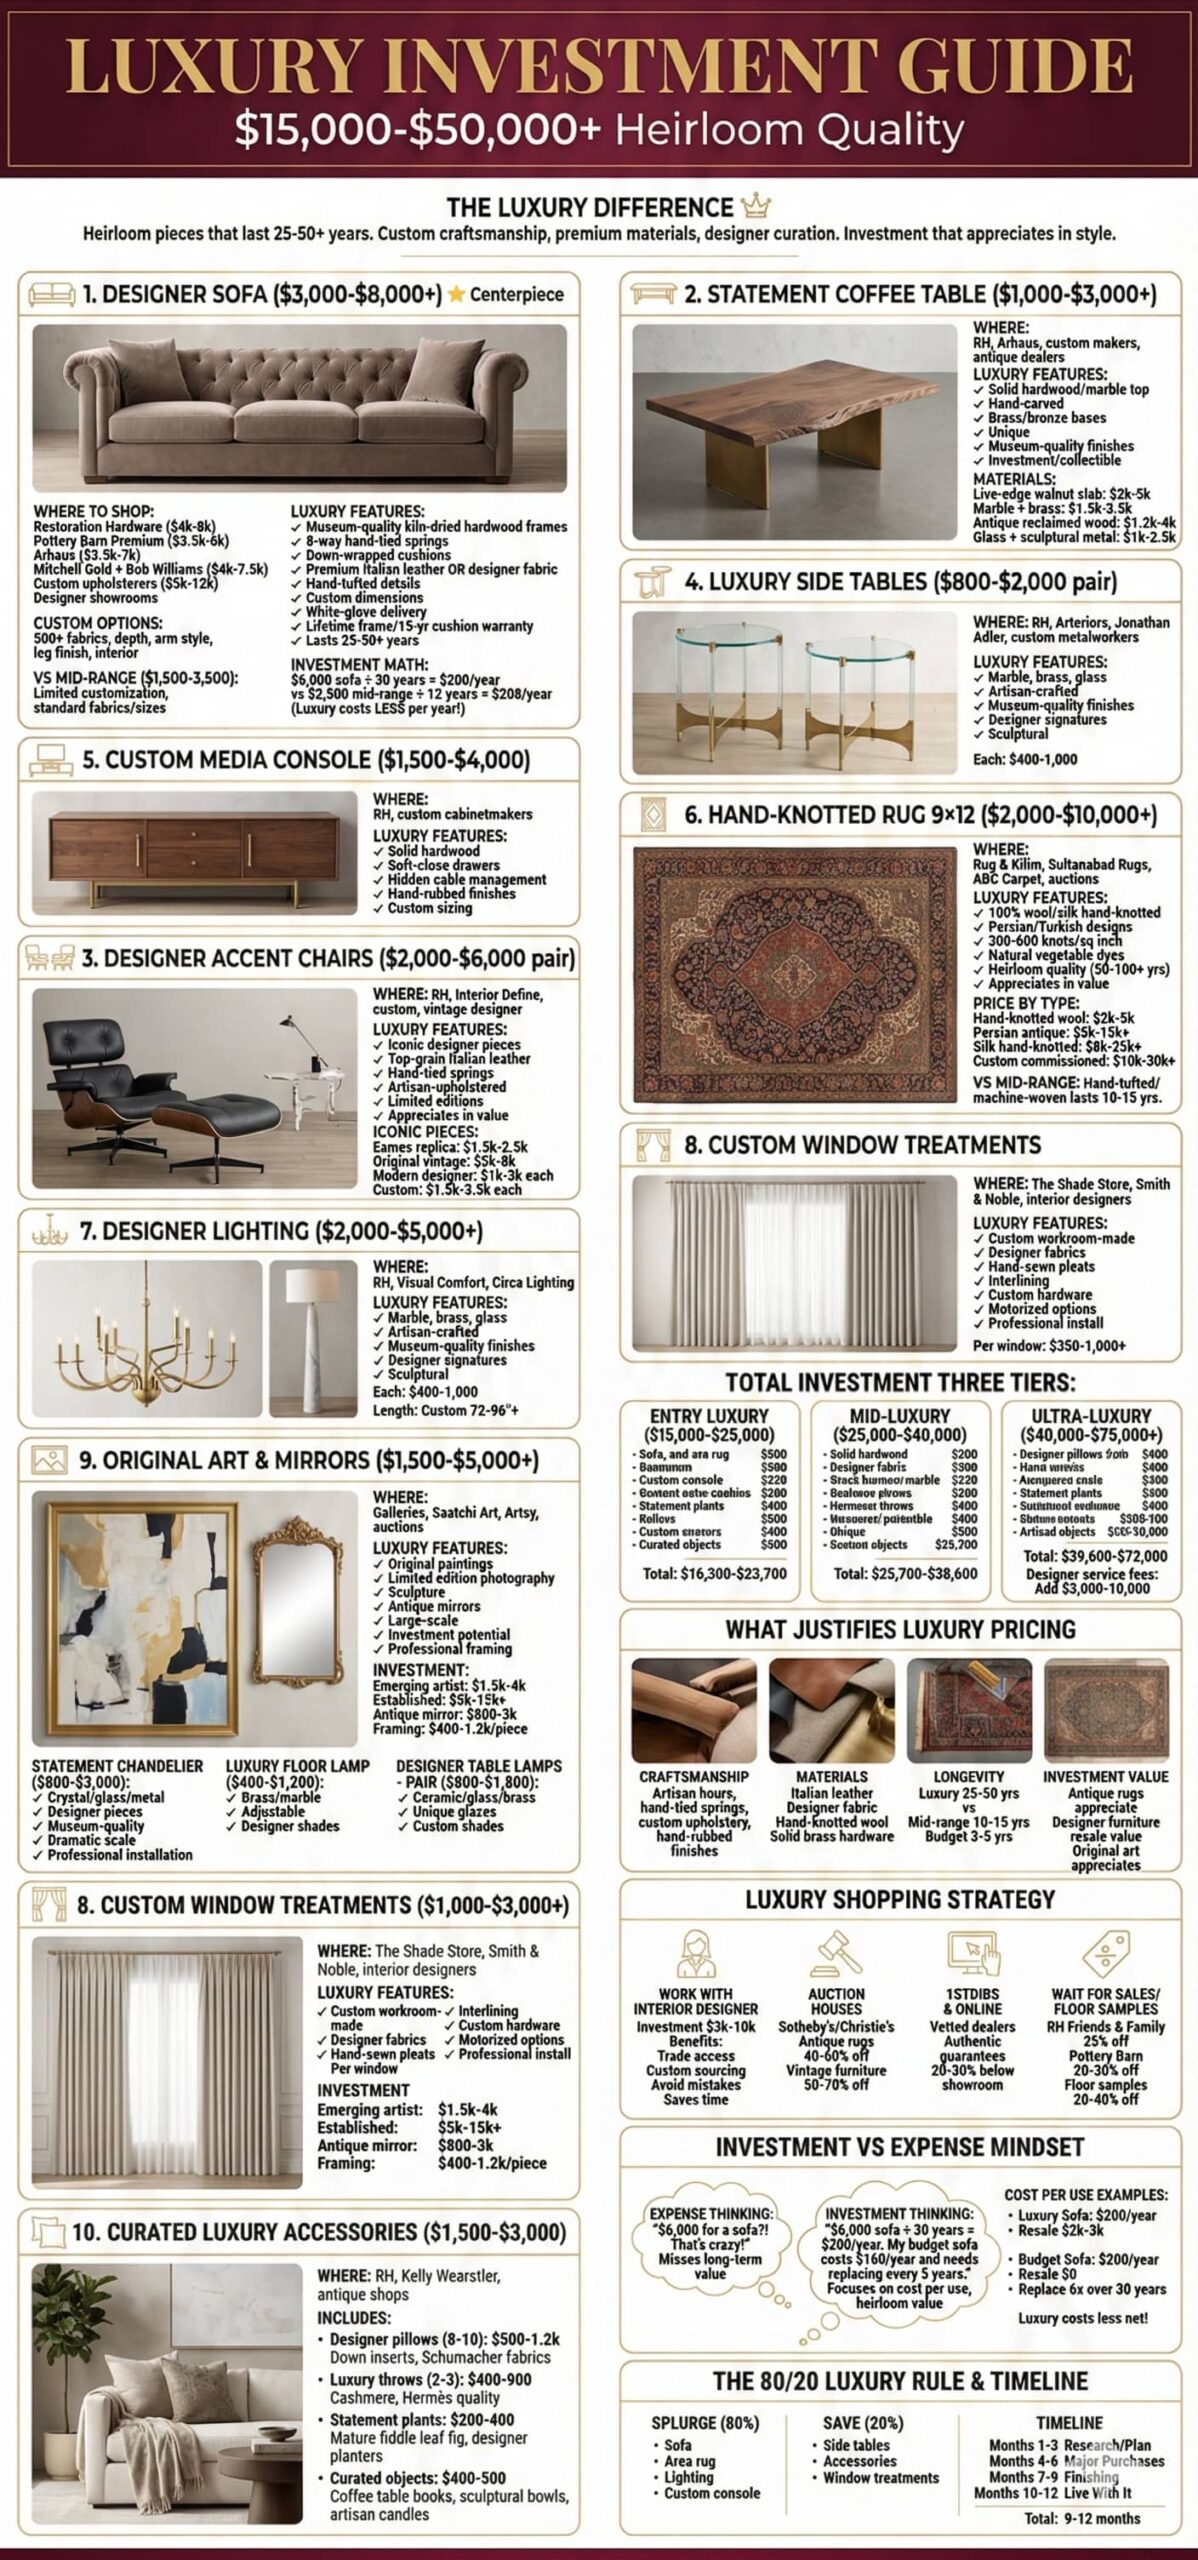
Luxury living room investments pursue premium aesthetics, custom fabrication, designer services, and highest quality materials creating showpiece spaces showcasing refined taste and substantial financial resources. This budget range fits custom upholstered furniture, designer lighting, original artwork, premium flooring, built-in installations, and comprehensive professional design services. Luxury investment prioritizes distinctive character, exceptional quality, and personalized customization over value optimization.
Custom furniture fabricated to exact specifications provides perfect dimensional fit, personalized upholstery selection, and superior construction quality. Custom sofas cost $3,500-12,000+ depending on size, frame quality, cushion construction, and fabric selection. Luxury seating features eight-way hand-tied spring construction, premium high-resilience foam or down cushions, top-grain leather or designer fabric upholstery, and meticulous tailoring creating heirloom-quality pieces lasting 30-50+ years with proper care.
Professional design services including full-service interior designers ($150-500+ hourly or 15-35% of project budget) provide comprehensive space planning, custom furniture specification, finish selection, artwork curation, and installation coordination. Luxury design investment in professional expertise ensures cohesive sophisticated results exceeding homeowner capabilities particularly for architecturally significant spaces or discriminating aesthetic expectations.
⚠ PAIN POINT: I spent $40,000 on my living room but it looks generic and similar to furniture store showrooms rather than distinctive and personalized
✓ SOLUTION: Invest in custom fabricated furniture rather than premium mass-produced pieces – custom sofas, chairs, draperies, and built-ins create distinctive character unavailable in retail furniture. Commission original artwork rather than purchasing mass-produced prints – emerging artists provide affordable custom pieces ($500-3,000) creating personal connection and uniqueness. Incorporate architectural enhancements (built-in bookcases, custom millwork, specialty finishes) permanently distinguishing space from generic furnished rooms. Work with design professionals bringing refined aesthetic sensibility and access to trade-only resources unavailable to consumers. Luxury investment should pursue distinction and personalization rather than simply expensive versions of common furniture.
Architectural upgrades including built-in cabinetry ($5,000-20,000+), specialty finishes (Venetian plaster $8-15 per square foot, decorative painting $4-12 per square foot), custom millwork ($3,000-10,000+), and premium flooring (hardwood $12-25+ per square foot, natural stone $15-40+ per square foot) create permanent distinctive character elevating spaces beyond furnishing alone. Luxury living rooms often invest substantially in architectural bones supporting quality furniture and finishes.
Custom Sofa | $4,000-12,000 | Eight-way hand-tied springs, down cushions, designer fabric | 30-50 year heirloom |
Designer Chairs | $1,500-5,000 each | Custom frame, premium upholstery | Museum-quality design |
Custom Coffee Table | $1,500-6,000 | Solid hardwood, artistic design | One-of-a-kind piece |
Original Artwork | $2,000-20,000+ | Commissioned or gallery pieces | Investment-grade art |
Custom Draperies | $500-2,000 per window | Hand-sewn, designer fabric, custom hardware | Perfect fit, luxury fabric |
Designer Lighting | $800-5,000+ per fixture | Artistic design, premium materials | Statement pieces |
Area Rug (9×12) | $2,000-15,000 | Hand-knotted wool or silk | Heirloom quality |
Built-In Cabinetry | $8,000-25,000 | Custom dimensions, premium materials | Architectural permanence |
TOTAL | $15,000-50,000+ | Distinctive, custom, highest quality | Generational investment |
Luxury timeline extends 3-12+ months accommodating custom furniture fabrication (12-20 weeks), architectural construction (varies by scope), artwork commissioning, and comprehensive design development. This extended process allows deliberate decision-making, sample review, and iterative refinement ensuring exceptional results justifying substantial investment.

Cost optimization strategies maximize living room design impact within budget constraints through strategic investment prioritization, smart shopping, DIY projects, and patient acquisition. Budget success requires distinguishing essential quality investments from acceptable compromises balancing financial prudence with outcome satisfaction. Understanding which elements justify premium investment versus where economizing has minimal impact enables effective budget allocation.
High-impact investments deserving budget priority include primary seating (used daily, difficult to replace, impacts comfort substantially), quality area rug (anchors space, affects daily experience, lasts 10-20+ years), and adequate lighting (impacts atmosphere and functionality continuously). These elements justify premium allocation within available budget providing maximum satisfaction return on investment.
Low-impact economies accepting budget compromises include accent tables (easily upgraded later, modest impact), some accessories (inexpensive to replace seasonally), and supplementary lighting (can add over time as budget allows). Strategic economizing on lower-impact elements allows essential investment concentration without compromising overall room quality.
⚠ PAIN POINT: I tried saving money everywhere but my living room looks cheap and I regret not investing more strategically
✓ SOLUTION: Identify your daily-use items (likely sofa, coffee table, primary lighting) investing 50-60% budget there. Accept good-enough quality on occasional-use items (accent chairs used weekly, decorative accessories displayed not used). Buy in phases rather than purchasing everything at minimum quality – better to have excellent sofa with modest accent chairs than mediocre everything. Shop end-of-season sales saving 30-50% on quality furniture rather than buying cheap furniture at full price. Consider “investment per use” metric – $2,000 sofa used 5 hours daily for 15 years costs $0.09 per hour use while $400 sofa used same amount for 5 years costs $0.22 per hour use before replacement costs.
Shopping strategies maximizing value include end-of-season sales (Memorial Day, July 4th, Labor Day, Black Friday offering 20-50% discounts), floor model purchases (20-40% off display furniture with minor imperfections), warehouse sales (30-60% off discontinued or overstocked items), and patient negotiation (many furniture stores negotiate especially on high-ticket items). Strategic shopping timing and tactics significantly impact budget effectiveness acquiring quality pieces at reduced prices.
DIY versus professional decision-making weighs skill requirements, time investment, tool costs, and failure risks against professional service expense. DIY appropriate projects include painting (skill:low, savings:high), simple furniture assembly (skill:low, savings:moderate), and basic installations (shelf mounting, curtain rods, skill:low-moderate, savings:moderate). Professional recommended projects include electrical work (safety issues), complex installations (built-ins, complicated window treatments), and specialized finishes (requiring technique mastery). Smart DIY/professional balance improves budget while ensuring quality results.
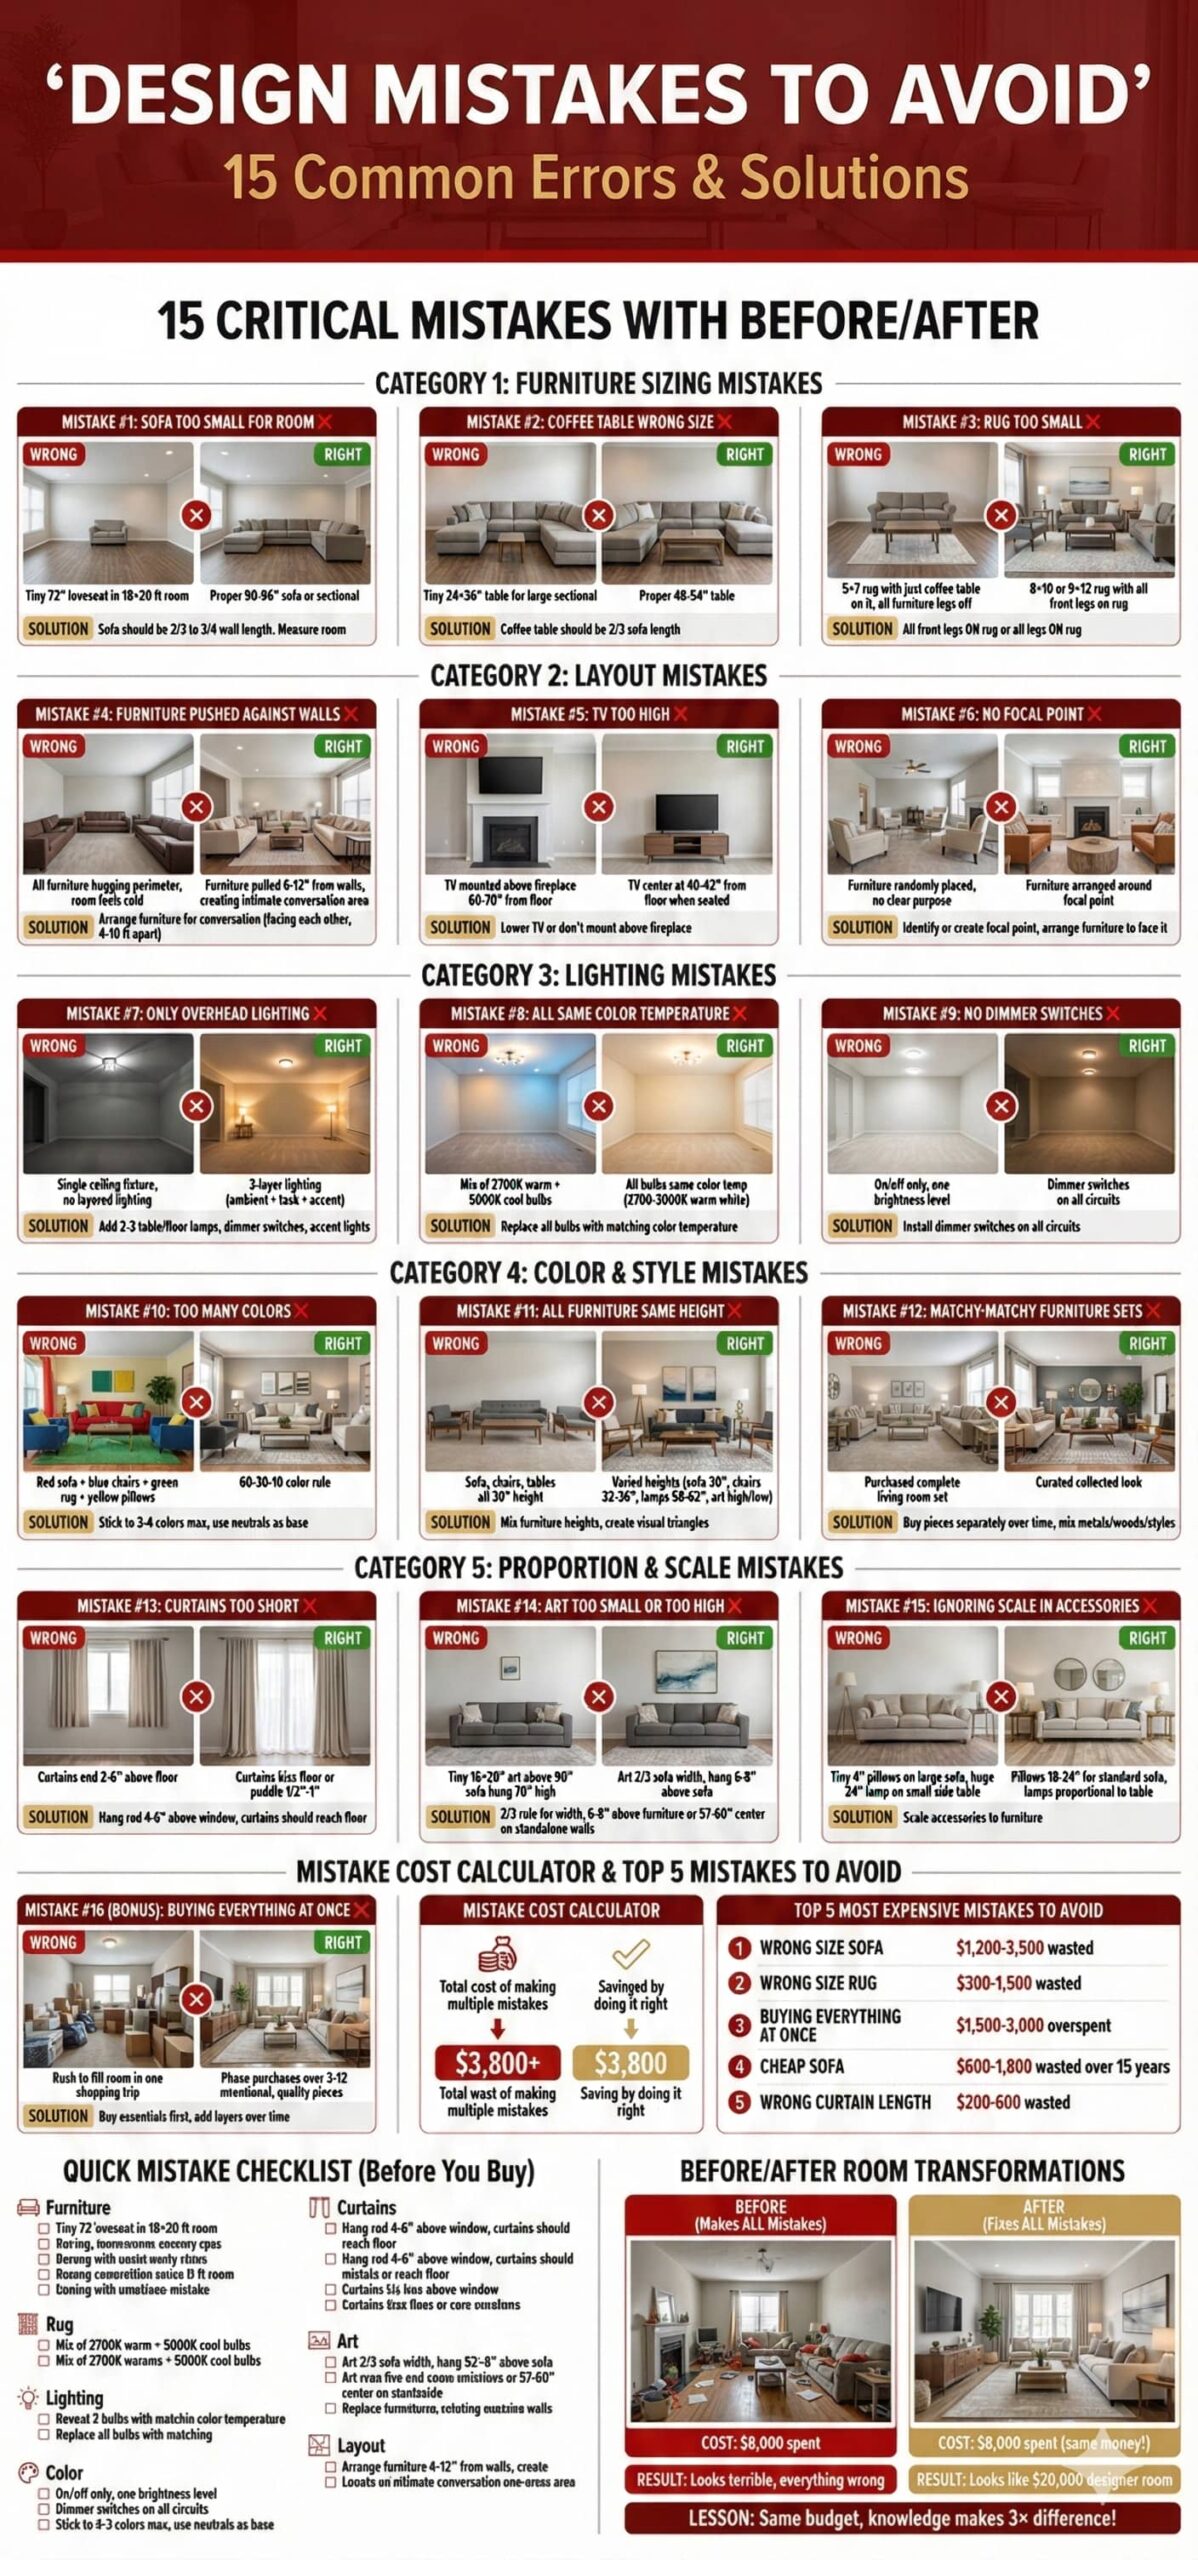
Living room design mistakes undermine aesthetic success, functional performance, and financial investment creating disappointing results despite good intentions and substantial expenditure. Common errors including improper sizing, inadequate lighting, poor layout planning, and styling missteps occur repeatedly across homeowner projects. Learning from documented mistakes prevents costly time-consuming corrections while ensuring successful outcomes from initial put in placeation.
Measurement mistakes including furniture oversizing or undersizing, inadequate clearance allocation, and improper spatial planning create functional difficulties and visual imbalance. These fundamental errors appear obvious in retrospect yet occur frequently among homeowners lacking systematic planning approaches. Proper measurement and scaled floor planning prevents the majority of these mistakes with minimal additional effort during planning phases.
Purchasing mistakes including impulsive acquisition without careful measurement, trend-driven selections lacking long-term appeal, and insufficient quality research create regret and financial loss. Furniture returns often incur 15-25% restocking fees plus shipping costs making impulse purchases expensive mistakes. Deliberate thoughtful purchasing following systematic evaluation prevents most acquisition errors while ensuring satisfaction with selected pieces.
⚠ PAIN POINT: I made expensive mistakes in my living room that I now regret and can’t easily fix without substantial additional investment
✓ SOLUTION: Accept that some mistakes teach valuable lessons informing future decisions – beating yourself up provides no benefit. Identify solutions making best of situation: oversized furniture might work with different layout, wrong paint color covered with artwork or accepts as character, poor lighting supplemented with additional fixtures. Implement fixes as budget allows prioritizing highest-impact corrections first. Remember most people notice far fewer “mistakes” than you perceive – perfectionism creates unnecessary dissatisfaction. Move forward learning from experience rather than dwelling on regrets. Consider consultation with designer identifying creative solutions to mistakes that aren’t apparent to untrained eye.

Furniture sizing mistakes represent most common living room design error with sofas, rugs, and artwork frequently purchased in inappropriate dimensions creating awkward spatial relationships. Oversized furniture overwhelms small spaces eliminating circulation room and creating cramped uncomfortable environments. Undersized furniture appears inadequate in large spaces failing to provide visual weight or functional capacity matching spatial scale.
Sofa size errors typically involve purchasing standard 84-90 inch sofas for small rooms better suited to 72-78 inch apartment sofas or loveseats. This mistake eliminates comfortable clearances, blocks traffic paths, and makes rooms feel cramped. Conversely, small sofas in large rooms appear lost and inadequate. Proper sofa sizing requires measuring room dimensions, creating floor plan, and verifying adequate clearances before purchasing. Many retailers allow returns but charge restocking fees making proper initial sizing financially preferable.
Rug size mistakes purchasing undersized rugs creates floating rug appearance disconnected from furniture arrangements. The most common error involves 5×8 rugs in medium living rooms better suited to 8×10 or 9×12 sizes. This mistake costs hundreds replacing inadequate rugs with properly sized alternatives. Rug sizing rules (all furniture legs on rug or front legs only) prevent this common mistake ensuring appropriate rug-furniture relationships from initial purchase.
⚠ PAIN POINT: I bought furniture that looked great in the store but feels completely wrong in my actual living room – too big, too small, or just wrong proportions
✓ SOLUTION: ALWAYS create scaled floor plan (graph paper or digital app) before purchasing furniture. Research exact furniture dimensions from manufacturer websites – showroom pieces may differ from versions you order. Mark furniture footprints on living room floor using painter’s tape visualizing size before purchase. Photograph room with tape markers evaluating scale through photos revealing size issues not apparent in person. Measure doorways, hallways, and stairs verifying delivery path accommodation. Shop with room dimensions, photos, and floor plan in hand. Order samples (fabric swatches, finish samples) testing in actual room under your lighting before committing. These simple steps prevent 90% of furniture sizing regrets.
Coffee table mistakes frequently involve improper sizing (too small or too large relative to seating), incorrect height (too tall or too short relative to cushions), or poor placement (too close causing shin banging or too far preventing comfortable reach). Standard coffee table should measure 2/3 sofa length, approximate cushion height (within 2 inches), and position 14-18 inches from sofa front edge. These specifications prevent functional issues and visual awkwardness.
Furniture placement mistakes blocking traffic paths, obstructing views, preventing door operation, or creating awkward asymmetrical layouts undermine functionality despite appropriate individual furniture sizing. Proper placement maintains minimum clearances (36 inches main paths, 24 inches secondary paths, 18 inches furniture clearances) ensuring comfortable navigation and use. Floor plan development identifies placement issues before moving heavy furniture preventing trial-and-error repositioning.

Color mistakes including poor paint selection, clashing color combinations, or excessive color intensity create uncomfortable spaces requiring expensive remediation through repainting or replacement. Color decisions intimidate many homeowners yet represent most easily corrected mistakes given relatively low repainting costs ($200-800 for average room) compared to furniture or flooring errors requiring thousands in corrections.
Insufficient color testing represents root cause of most color mistakes with homeowners selecting paint from small chips under store lighting differing dramatically from actual room lighting and context. Proper color testing requires purchasing sample pints ($4-8 each), painting large sample boards (24×36 inches minimum), and observing samples in room under varied lighting conditions (daylight, evening artificial light, cloudy days) for minimum 2-3 days before committing to entire room. This small investment prevents expensive regrets.
Too-bold color selections apply saturated intense colors creating overwhelming spaces uncomfortable for extended periods. Bold jewel tones, deep darks, or vibrant brights appearing exciting initially often cause regret within months as daily exposure creates fatigue. Bold color restraint limiting intense colors to accent walls or accessories provides impact without overwhelming spaces. Most homeowners prefer living with neutral foundations long-term allowing accent color modifications through changeable elements.
⚠ PAIN POINT: I painted my living room an exciting color but now hate it – it’s too dark, too bright, clashes with furniture, or just wrong
✓ SOLUTION: Accept repainting sometimes necessary – paint costs $200-800 for average living room providing relatively inexpensive correction compared to furniture mistakes. Sample new colors extensively before repainting learning from previous error. If repaint budget unavailable immediately, use abundant artwork, large area rug, and bold pillows distracting from wall color while saving for eventual correction. Consider painting just one accent wall new color leaving remaining walls as-is reducing correction costs. Don’t suffer with wrong color for years due to reluctance admitting mistake – quality of daily life in frequently-used room justifies correction investment.
Undertone mismatches create color clashing where selected colors contain conflicting undertones (warm yellow-based with cool blue-based) appearing discordant and unprofessional. Undertone identification requires careful observation in varied lighting examining whether colors shift toward warm (yellow, orange, red) or cool (blue, green, purple) undertones. Undertone consistency across paint, furniture, and finishes creates cohesive harmonious color schemes while mixing undertones creates subtle dissonance even when colors appear superficially compatible.
Excessive white creates sterile institutional atmosphere lacking warmth and character. While white walls provide versatile background, all-white rooms including white furniture, white accessories, and white textiles appear cold and uncomfortable in residential contexts. White balance requires warm white paint tones (not stark pure white), layered textures, natural materials, and strategic color accent introduction creating approachable livable white-based schemes avoiding antiseptic appearance.
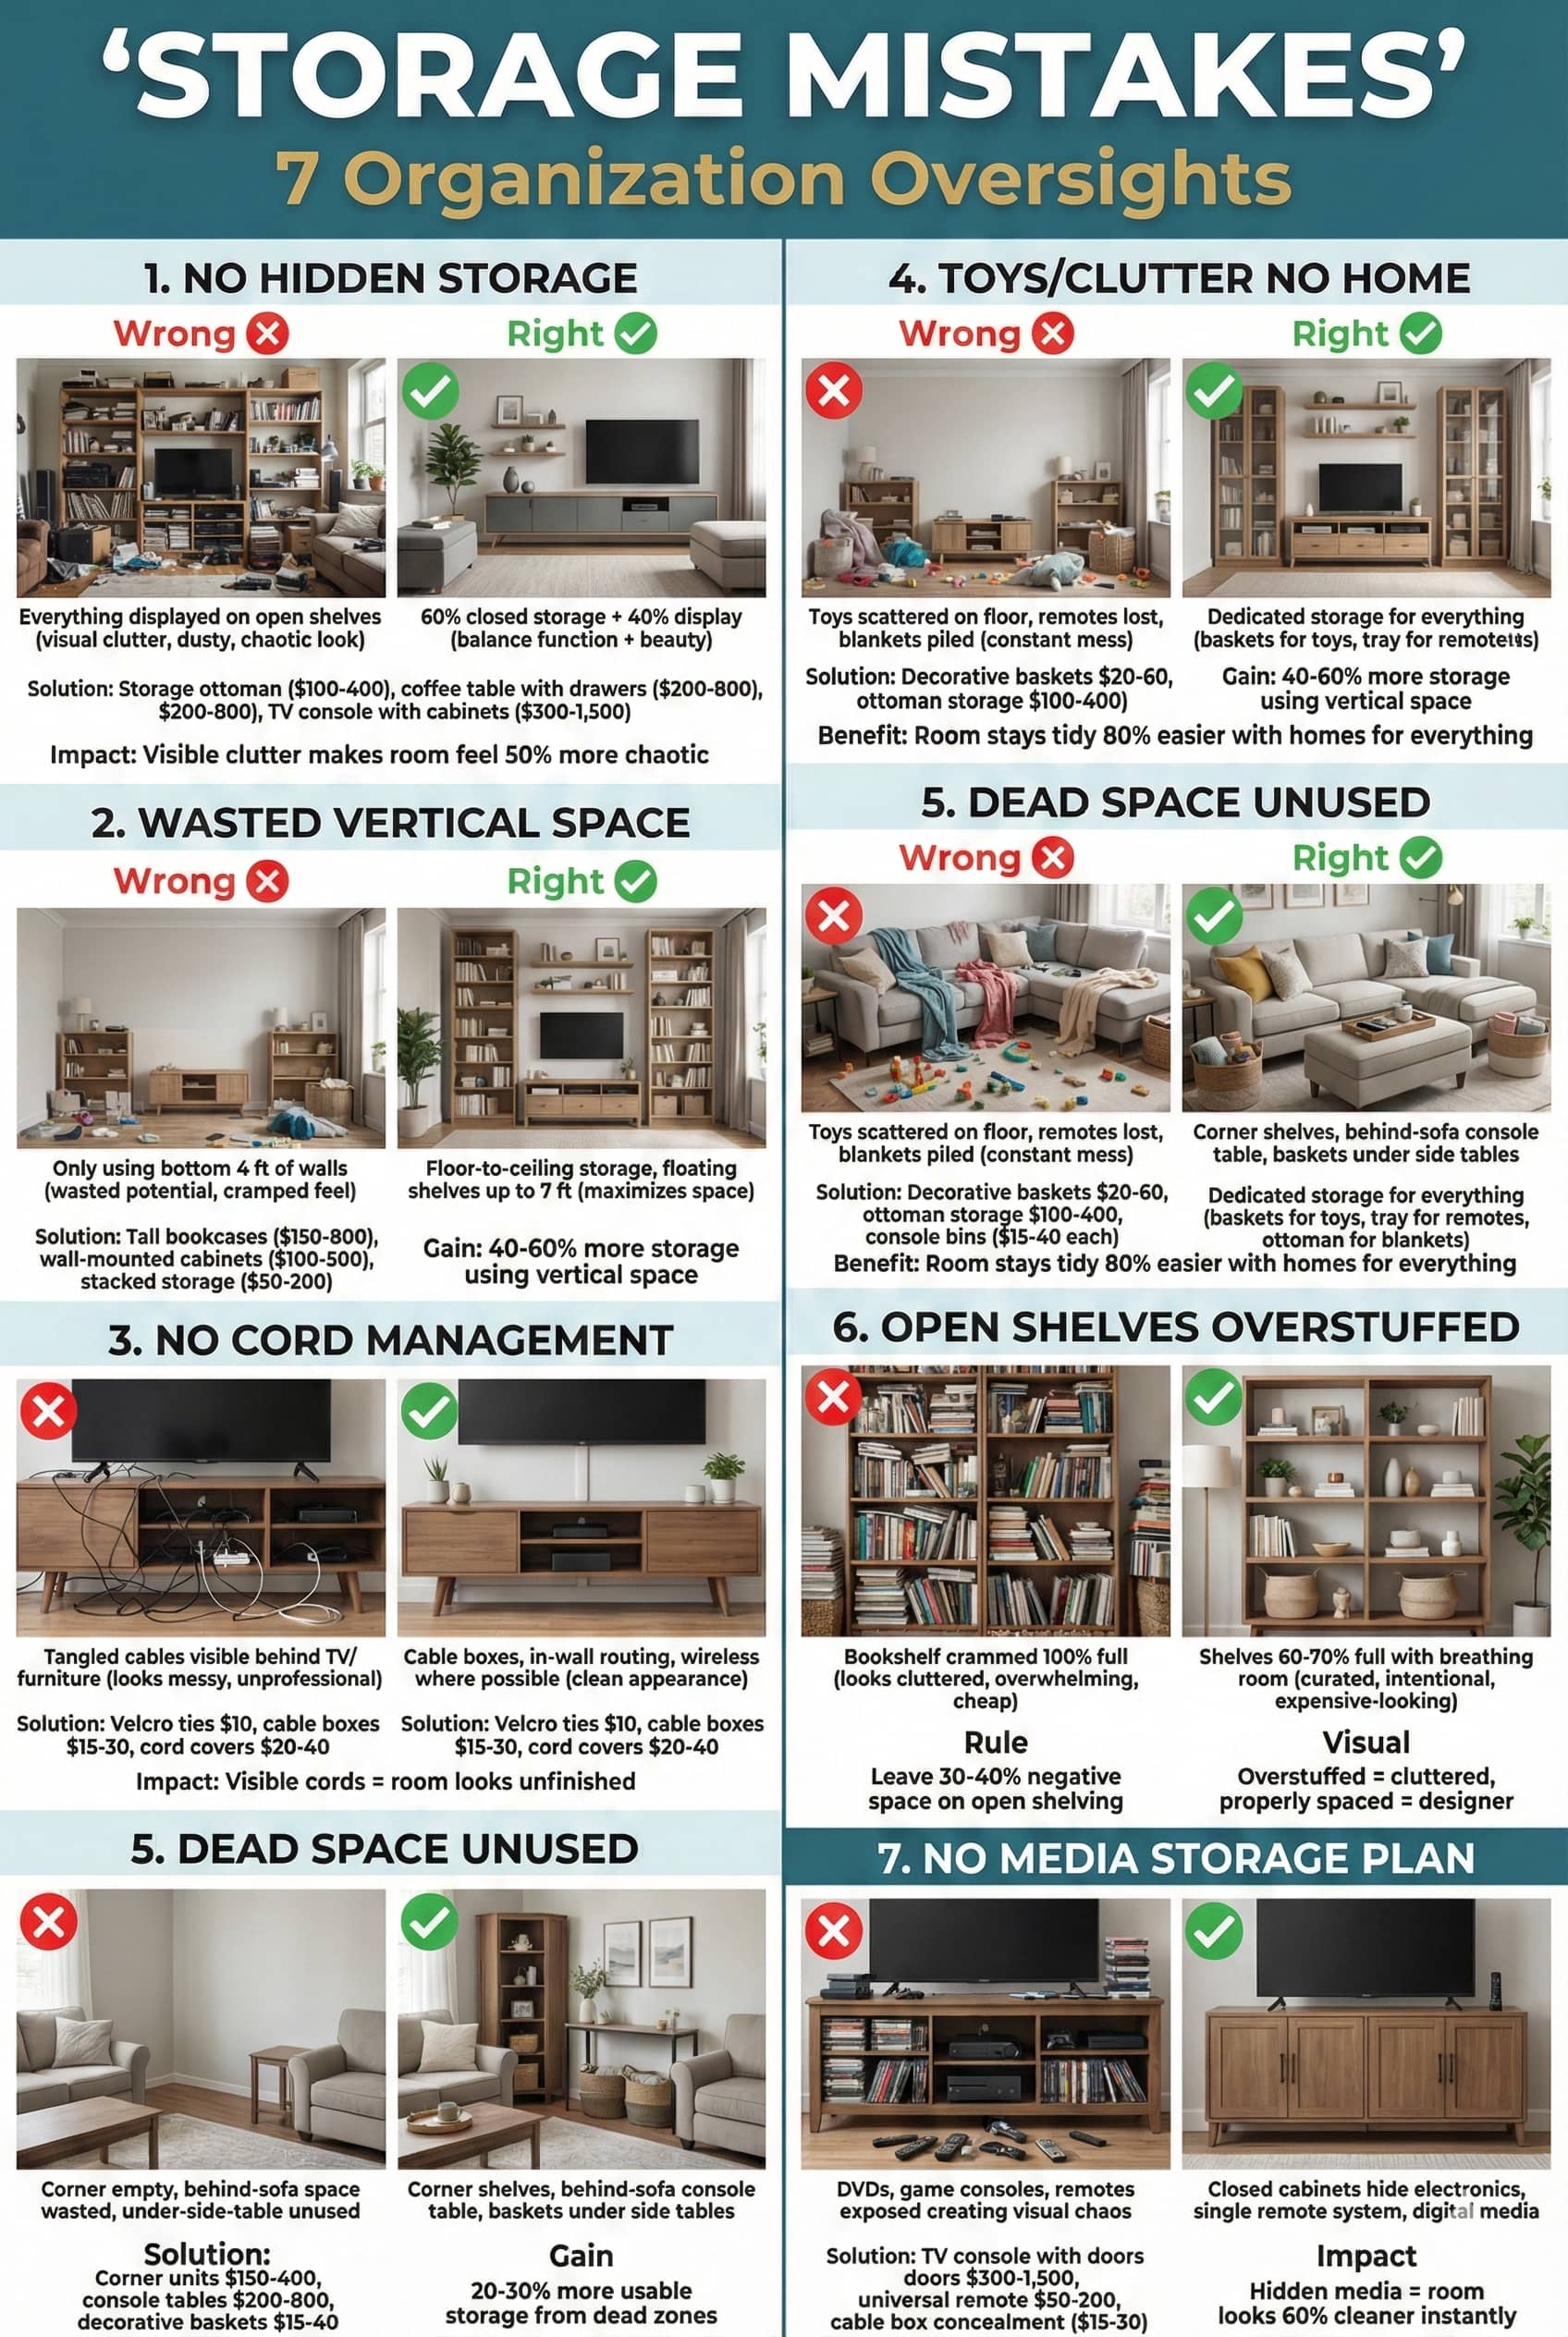
torage mistakes including insufficient capacity, poor organizational systems, or inadequate planning create cluttered chaotic living rooms undermining aesthetic investments and frustrating daily use. Storage planning receives insufficient attention during design phases with homeowners focusing on furniture and finishes then discovering nowhere to store accumulated belongings, media, games, blankets, and miscellaneous items requiring organization.
Insufficient closed storage forces visible item storage creating cluttered appearances despite organizational efforts. Open shelving alone cannot fit everything requiring storage – most living rooms benefit from 60-70% closed concealed storage with 30-40% open display preventing cluttered overwhelming appearances. Storage solutions including media consoles with cabinets, storage ottomans, skirted furniture concealing under-storage, and built-in cabinetry address concealment needs maintaining streamlined aesthetics.
Poor cable management creates tangled visible wiring detracting from otherwise attractive spaces. Modern living rooms accumulate numerous cables (television, cable box, gaming consoles, streaming devices, speakers, chargers) requiring organized management preventing chaotic appearances. Cable solutions including cable raceways, under-furniture routing, in-wall installation, and consolidated connection points within media console interiors maintain organized professional appearances worth modest effort and expense.
⚠ PAIN POINT: My living room has storage but things still pile up creating constant clutter and messy appearance despite organizational efforts
✓ SOLUTION: Implement “one in, one out” rule – before acquiring new items, remove equal quantity preventing accumulation creep. Conduct quarterly purges removing items not used in past 6 months. Create specific homes for all items training household members to return things after use rather than leaving randomly. Label storage containers and cabinet shelves identifying contents preventing searching and randomness. Limit collections and decorative objects to designated spaces – when space fills, remove items before adding new ones. Accept that organization requires discipline beyond just storage capacity – abundance exceeding capacity creates clutter regardless of storage quantity.
Remote control chaos with 3-7 remotes accumulating on coffee tables creates frustrating searching and cluttered appearances. Remote solutions including decorative storage bowls, remote caddies, drawer organization, or universal remote consolidation (reducing multiple remotes to single controller) address this common irritation. Small organizational investments dramatically improve daily experience in modern media-equipped living rooms.
Cord visibility from floor lamps, table lamps, and chargers trails visibly across floors and up walls creating unsightly appearances. Cord management including furniture placement concealing cords behind pieces, cable clips organizing cords along furniture backs or baseboards, and strategic outlet placement minimize visible wiring. Planning furniture placement considering outlet locations prevents many cord visibility issues from initial arrangement.